plist
来源:互联网 发布:match sql语句 编辑:程序博客网 时间:2024/04/30 01:11
在做iOS开发时,经常用到到plist文件, 那plist文件是什么呢? 它全名是:Property List,属性列表文件,它是一种用来存储串行化后的对象的文件。属性列表文件的扩展名为.plist ,因此通常被称为 plist文件。文件是xml格式的。
Plist文件通常用于储存用户设置,也可以用于存储捆绑的信息
我们创建一个项目来学习plist文件的读写。
1、创建项目Plistdemo
项目创建之后可以找到项目对应的plist文件,打开如下图所示:
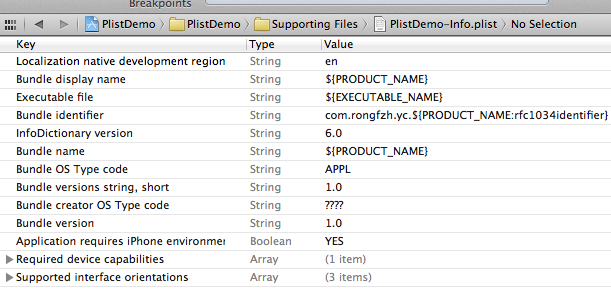
在编辑器中显示类似与表格的形式,可以在plist上右键,用源码方式打开,就能看到plist文件的xml格式了。
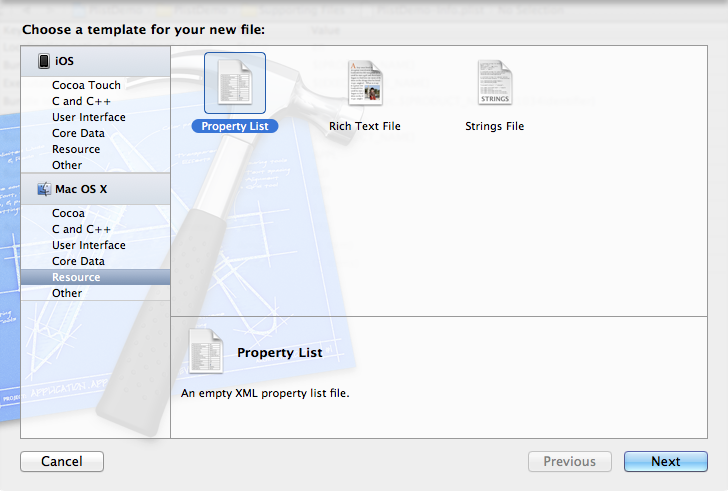
2、创建plist文件。
按command +N快捷键创建,或者File —> New —> New File,选择Mac OS X下的Property List
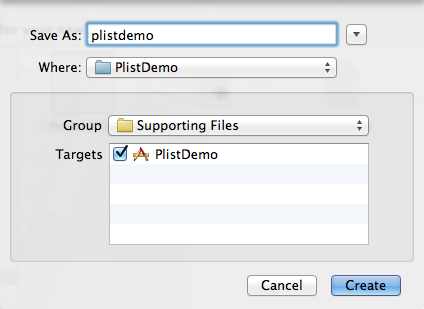
创建plist文件名为plistdemo。
打开plistdemo文件,在空白出右键,右键选择Add row 添加数据,添加成功一条数据后,在这条数据上右键看到 value Type选择Dictionary。点加号添加这个Dictionary下的数据
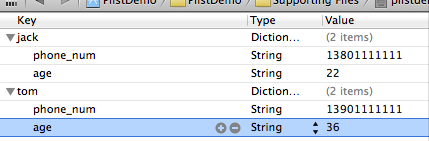
添加完key之后在后面添加Value的值,添加手机号和年龄
创建完成之后用source code查看到plist文件是这样的:
- <?xml version="1.0" encoding="UTF-8"?>
- <!DOCTYPE plist PUBLIC "-//Apple//DTD PLIST 1.0//EN" "http://www.apple.com/DTDs/PropertyList-1.0.dtd">
- <plist version="1.0">
- <dict>
- <key>jack</key>
- <dict>
- <key>phone_num</key>
- <string>13801111111</string>
- <key>age</key>
- <string>22</string>
- </dict>
- <key>tom</key>
- <dict>
- <key>phone_num</key>
- <string>13901111111</string>
- <key>age</key>
- <string>36</string>
- </dict>
- </dict>
- </plist>
3、读取plist文件的数据
- - (void)viewDidLoad
- {
- [super viewDidLoad];
- //读取plist
- NSString *plistPath = [[NSBundle mainBundle] pathForResource:@"plistdemo" ofType:@"plist"];
- NSMutableDictionary *data = [[NSMutableDictionary alloc] initWithContentsOfFile:plistPath];
- NSLog(@"%@", data);//直接打印数据。
- }
- PlistDemo[6822:f803] {
- jack = {
- age = 22;
- "phone_num" = 13801111111;
- };
- tom = {
- age = 36;
- "phone_num" = 13901111111;
- };
- }
这样就把数据读取出来了。
4、创建和写入plist文件
在开发过程中,有时候需要把程序的一些配置保存下来,或者游戏数据等等。 这时候需要写入Plist数据。
写入的plist文件会生成在对应程序的沙盒目录里。
接着上面读取plist数据的代码,加入了写入数据的代码,
- <strong>- (void)viewDidLoad
- {
- [super viewDidLoad];
- //读取plist
- NSString *plistPath = [[NSBundle mainBundle] pathForResource:@"plistdemo" ofType:@"plist"];
- NSMutableDictionary *data = [[NSMutableDictionary alloc] initWithContentsOfFile:plistPath];
- NSLog(@"%@", data);
- //添加一项内容
- [data setObject:@"add some content" forKey:@"c_key"];
- //获取应用程序沙盒的Documents目录
- NSArray *paths=NSSearchPathForDirectoriesInDomains(NSDocumentDirectory,NSUserDomainMask,YES);
- NSString *plistPath1 = [paths objectAtIndex:0];
- //得到完整的文件名
- NSString *filename=[plistPath1 stringByAppendingPathComponent:@"test.plist"];
- //输入写入
- [data writeToFile:filename atomically:YES];
- //那怎么证明我的数据写入了呢?读出来看看
- NSMutableDictionary *data1 = [[NSMutableDictionary alloc] initWithContentsOfFile:filename];
- NSLog(@"%@", data1);
- // Do any additional setup after loading the view, typically from a nib.
- }
- </strong>
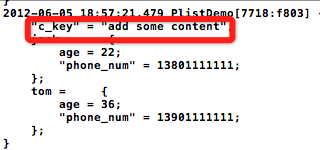
在获取到自己手工创建的plistdemo.plist数据后,在这些数据后面加了一项内容,证明输入写入了。
怎么证明添加的内容写入了呢?下面是打印结果:
转自http://blog.csdn.net/totogo2010/article/details/7634185
pist 最为持久化保存的一种方式!本身plist文件是xml ,对于小数量数据可以采用plis 的方法!这样更高效!废话不多说了!进入正题吧!如果是一个新手用plist的话一定会遇到各种问题!我当时就是这样走过来的!也是做个总结吧!
功能介绍:保存学生的基本信息:
一.
在故事板上拖拽几个控件吧如下图用来输入学生的信息
并在ViewController.h 里关联相应的控件!
@interface ViewController : UIViewController
@property (weak, nonatomic) IBOutlet UITextField *studentNumberTextField;
@property (weak, nonatomic) IBOutlet UITextField *studentNameTextField;
@property (weak, nonatomic) IBOutlet UITextField *studentnationTextField;
@property (weak, nonatomic)IBOutlet UITextField *studentAgeTextFIeld;

二.创建一个保存学生信息的类 SaveStudentMessagePlist 并继承 NSObject
SaveStudentMessagePlist.h 文件里创建一个初始化的函数
#import <Foundation/Foundation.h>
@interface SaveStudentMessagePlist : NSObject
-(id)initWithStudentName:(NSString *)name Studentage:(NSString *)age StudentNumber:(NSString * )numerb StudentNation:(NSString *)nation;
@end
//////////////////////////////////////////在.m文件里实现方法///////////////////////////////////////////////////////////////////
-(id)initWithStudentName:(NSString *)name Studentage:(NSString *)age StudentNumber:(NSString * )numerb StudentNation:(NSString *)nation
{
//我们把学生的信息保存在可变数组里
NSMutableArray *studentMessageArray = [[NSMutableArrayalloc]initWithObjects:name,age,numerb,nation,nil];
if (self = [superinit])
{
[self createStudentMessagePlist:studentMessageArraykey:numerb]; // 因为学生的学号是唯一的作为词典的key值
}
return self;
}
// 创建plist 写入操作
-(void)createStudentMessagePlist:(NSMutableArray *)studentMessageArray key:(NSString *)studentNumebr
{
//沙盒路径
NSArray *paths = NSSearchPathForDirectoriesInDomains(NSDocumentDirectory,NSUserDomainMask, YES);
NSString *documentsDirectory = [paths objectAtIndex:0];
// plist 路径
NSString * = [documentsDirectory stringByAppendingPathComponent:@"student.plist"];
NSFileManager *fileManager = [[NSFileManageralloc]init];
// 下面这几步很重要 通过文件管理器 来判读plist 文件是否存在! 如果不存在 我们就通过 [fileManager createFileAtPath:plistPath contents:nil attributes:nil创建一个plist 并检测是否成功失败!存在后写入词典
如何存在plist 我们就 在 studentMessageDic 可变词典里保存在来色数据这样可以避免数据被覆盖问题
if(![fileManager fileExistsAtPath:plistPath])
{
if(![fileManager createFileAtPath:plistPathcontents:nil attributes:nil])
{
NSLog(@"create file error");
}
else
{
NSDictionary* studentMessageDic = [NSDictionary dictionaryWithObjectsAndKeys:studentMessageArray,studentNumebr ,nil];
[studentMessageDic writeToFile:plistPathatomically:YES];
}
}
else
{
NSMutableDictionary *studentMessageDic = [[NSMutableDictionary alloc]initWithContentsOfFile: plistPath];
[studentMessageDic setObject: studentMessageArray forKey:studentNumebr ];
[studentMessageDic writeToFile:plistPathatomically:YES];
}
}
现在让我们调用方法吧! 打印路径plistPath 我们在沙盒里就会找到你的文件了如下图
-(void)prepareForSegue:(UIStoryboardSegue *)segue sender:(id)sender
{
if (![studentNumberTextField.textisEqualToString:@""])
{
SaveStudentMessagePlist *save = [[SaveStudentMessagePlistalloc]initWithStudentName:studentNameTextField.textStudentage:studentAgeTextFIeld.textStudentNumber:studentNumberTextField.textStudentNation:studentnationTextField.text];
}
}
三 对plist 经行读操作
我创建了一个只定义的tableview 来显示学生的信息
-(void)readStudentMessageFromPlist
{
//创建文件管理器
NSFileManager *fileManager = [NSFileManagerdefaultManager];
NSArray *path = NSSearchPathForDirectoriesInDomains(NSDocumentDirectory,NSUserDomainMask, YES);
NSString *documentation = [path objectAtIndex:0];
//更改到待操作的目录下
[fileManager changeCurrentDirectoryPath:[documentationstringByExpandingTildeInPath]];
NSString *studentPlistPath = [documentationstringByAppendingPathComponent:@"student.plist"];
_studentMessageDic = [[NSMutableDictionaryalloc]initWithContentsOfFile:studentPlistPath];
NSLog(@"%d", [_studentMessageDicallKeys].count);
}
然后在tableview上显示
#pragma mark - Table view data source
- (NSInteger)numberOfSectionsInTableView:(UITableView *)tableView
{
// Return the number of sections.
return 1;
}
- (NSInteger)tableView:(UITableView *)tableView numberOfRowsInSection:(NSInteger)section
{
// Return the number of rows in the section.
return [[_studentMessageDicallKeys] count];
}
- (UITableViewCell *)tableView:(UITableView *)tableView cellForRowAtIndexPath:(NSIndexPath *)indexPath
{
NSString *keyValue = [[_studentMessageDic allKeys]objectAtIndex:indexPath.row];
NSArray *studenMessageArr = [_studentMessageDic objectForKey:keyValue];
static NSString *CellIdentifier =@"Cell";
StudentCell *cell = (StudentCell *)[tableView dequeueReusableCellWithIdentifier:@"StudentCell"];
if (cell == nil)
{
if (cell == nil)
{
cell = [[StudentCellalloc]initWithStyle: UITableViewCellStyleDefault reuseIdentifier:CellIdentifier];
}
}
cell.name.text = [studenMessageArrobjectAtIndex:0];
cell.age.text = [studenMessageArrobjectAtIndex:1];
cell.number.text = [studenMessageArrobjectAtIndex:2];
cell.national.text = [studenMessageArrobjectAtIndex:3];
return cell;
}

当我们输入多个学生信息的时候我们会发现!数据根本不是按顺序显示的!(⊙_⊙)? 我们在plist表里明明看的是顺序写入的,但是显示的时候确是随机的!这时候应该想到的是排序! 好吧我把key 经行排序!

其实我们把红色 key 的那段函数改成下面的就可以了
NSArray *keyArray = [[_studentMessageDic allKeys]sortedArrayUsingSelector:@selector(compare:)]; //经行排序
NSString *keyValue = [ keyArray objectAtIndex:indexPath.row];
眼见为实 如图
!
四 这时候如果一个学生转学了!我们就要删除他的信息
这时候我们需要把以前的代码小改变下
我们把排序放在读取plist函数(-(void)readStudentMessageFromPlist)里更好!并设置为全局变量
_keyArray = [[_studentMessageDicallKeys]sortedArrayUsingSelector:@selector(compare:)];
并把路径也改完全局的
在tableview的委托里进行删除
-(void)tableView:(UITableView *)tableView commitEditingStyle:(UITableViewCellEditingStyle)editingStyle forRowAtIndexPath:(NSIndexPath *)indexPath
{
[self.tableViewbeginUpdates];
if (editingStyle ==UITableViewCellEditingStyleDelete)
{
[_studentMessageDicremoveObjectForKey:[_keyArrayobjectAtIndex:indexPath.row]];
[_studentMessageDicwriteToFile:_studentPlistPathatomically:YES];
[self.tableViewdeleteRowsAtIndexPaths:[NSMutableArrayarrayWithObject:indexPath ] withRowAnimation:UITableViewRowAnimationAutomatic];
}
[self.tableViewendUpdates];
}
现在就只有小花了
看下效果吧 :
:
发现小花的信息出被替换了!这时候程序员又要做个判读了!

我在存入前遍历了下plist 如果存在就不进行写入操作 ,这样可以避免保存相同的数据!
// 创建plist
-(void)createStudentMessagePlist:(NSMutableArray *)studentMessageArray key:(NSString *)studentNumebr
{
BOOL isOrSava = YES;
NSArray *paths = NSSearchPathForDirectoriesInDomains(NSDocumentDirectory,NSUserDomainMask, YES);
NSString *documentsDirectory = [paths objectAtIndex:0];
NSString *plistPath = [documentsDirectory stringByAppendingPathComponent:@"student.plist"];
NSFileManager *fileManager = [[NSFileManageralloc]init];
NSMutableDictionary *studentMessageDic = [NSMutableDictionarydictionaryWithContentsOfFile:plistPath];
if ([studentMessageDic count] >= 1)
{
//遍历key
for (id objin [studentMessageDic allKeys])
{
NSString *objstring = obj;
if ([[studentMessageArray objectAtIndex:2] isEqualToString:objstring])
{
isOrSava = NO; // 如果存在设置为NO
NSLog(@"学号以存在");
break;
}
}
if (isOrSava == YES)
{
if(![fileManager fileExistsAtPath:plistPath])
{
if(![fileManager createFileAtPath:plistPath contents:nilattributes:nil])
{
NSLog(@"create file error");
}
else
{
NSDictionary* studentMessageDic = [NSDictionarydictionaryWithObjectsAndKeys:studentMessageArray,studentNumebr ,nil];
[studentMessageDic writeToFile:plistPathatomically:YES];
}
}
else
{
NSMutableDictionary *studentMessageDic= [[NSMutableDictionaryalloc]initWithContentsOfFile:plistPath];
[studentMessageDic setObject:studentMessageArray forKey:studentNumebr ];
[studentMessageDic writeToFile:plistPathatomically:YES];
}
}
}else
{
if(![fileManager fileExistsAtPath:plistPath])
{
if(![fileManager createFileAtPath:plistPath contents:nilattributes:nil])
{
NSLog(@"create file error");
}
else
{
NSDictionary* studentMessageDic = [NSDictionarydictionaryWithObjectsAndKeys:studentMessageArray,studentNumebr ,nil];
[studentMessageDic writeToFile:plistPathatomically:YES];
}
}
else
{
NSMutableDictionary *studentMessageDic= [[NSMutableDictionaryalloc]initWithContentsOfFile:plistPath];
[studentMessageDic setObject:studentMessageArray forKey:studentNumebr ];
[studentMessageDic writeToFile:plistPathatomically:YES];
}
}
}
六 又过了几天 老师找到程序员说!我要可以修改学生的年龄!可是当时的需求没有要求呀!找知道可以修改不如用数据库 ,coredata ,可是这是一个很懒的程序员!我想直接对plist 经行修改吧!
点击cell 显示当前学生的年龄 改成你想改的年龄 然后返回首页 改成15 了 很懒的程序员只是加了几行代码
用到 atIndexedSubscript 插入函数 把这个学习的年龄修改后在重新写入了plist
- (IBAction)SaveMessage:(id)sender
{
[_insterstudenMessagesetObject:_ageTextField.text atIndexedSubscript:1];
NSMutableDictionary *studenDic = [[NSMutableDictionaryalloc]init];
[studenDic setValue:_insterstudenMessageforKey:[_insterstudenMessageobjectAtIndex:2]];
[studenDic writeToFile:_pathatomically:YES];
}


http://blog.csdn.net/lengshengren/article/details/15500687
- .plist
- plist
- plist
- plist
- plist
- Plist
- plist操作
- 读取plist。
- .plist配置文件
- 使用plist
- info.plist
- plist文件
- plist读写
- plist Bundle
- plist文件
- ios.plist
- plist文件
- Plist文件
- Oracle11g ORA-609 TNS 12537 TNS 12560
- vector 中删除指定元素(个数为1-n个)
- 集合框架__JDK1.5新特性__【增强for循环】【可变参数】【静态导入】
- 黑马程序员---java学习笔记之多线程2
- c语言if-else的效率比较
- plist
- 贝叶斯统计
- UITableView表视图控件
- linux MISC 驱动模型分析
- 4 各种文件
- 关于国债的一些计算: 转换因子的计算
- 图像处理---内存法
- 理工大学ACM平台题答案关于C语言 1014 A+B for Input-Output Practice (V)
- 设置Linux shell超时自动退出