SharePoint 2010中的单点登录
来源:互联网 发布:人工智能专业研究生 编辑:程序博客网 时间:2024/05/29 05:04
与2007相同的是在SP 2010中要实现单点登录依然需要我们写代码来实现,不过在这之前还需要对场中的SSS服务进行初始配置。
对SSS进行初始配置
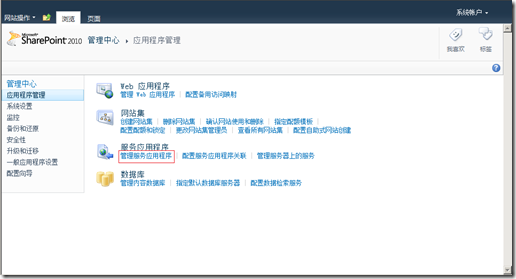
首先进入SharePoint 2010管理中心,在应用程序管理页面选择管理服务应用程序。
在服务应用程序页面,选择Secure Store Service,然后点击上方Ribbon区中的管理。

在初次进入SSS管理页面时,系统将提示我们“在创建新的安全存储目标应用程序之前,必须首先在功能区中为此 Secure Store Service 应用程序生成新密钥。”
该密钥将对我们存储在SSS数据库中的凭据信息进行加密和解密。

点击Ribbon区内的生成新密钥,在弹出窗口中为该密钥设置通行短语。

密钥生成后,SSS的初始配置便算是告一段落了。
创建目标应用程序
如果大家在SharePoint 2007中曾经使用过SSO的话应该对这部分的内容比较熟悉,关于创建目标应用程序的操作与2007相比并无很大区别。
首先还是进入我们的SSS实例的管理页面,在Ribbon区里的管理目标应用程序组中单击新建按钮进入创建新的安全存储目标应用程序页面。
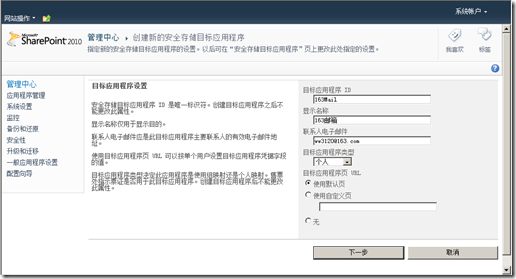
我们需要设置目标应用程序的ID、显示名称、联系人电子邮件、目标应用程序类型这四个主要属性,其中比较重要的属性是目标应用程序ID和目标应用程序类型。ID是SSS用于识别此目标应用程序的唯一标识,目标应用程序类型主要分为个人和组两大类,如果选择个人则可以启用一个目标应用程序页,该页面将用于用户自行添加该目标应用程序的个人凭据。
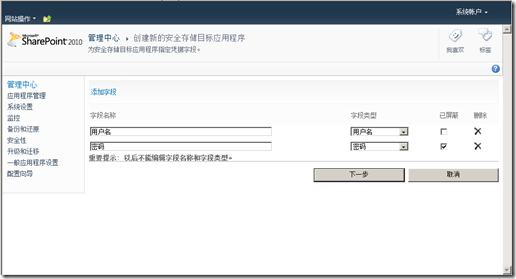
因为在本例中要做的是用户与其个人邮箱间的映射,所以这里选择个人就好了,然后点击下一步。下面要做的就是设置将凭据提交到外部数据源时所要用到的字段了,默认情况下是用户名和密码两个字段。其中的已屏蔽选项表示当用户在输入该字段的值时将以屏蔽字符代替用户的输入字符,例如 *号。在本例中保持默认值就可以了。
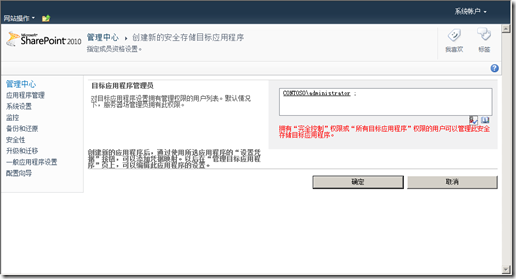
最后还需要为此目标应用程序设置一个管理员。
OK,到了这里所有的配置工作就结束了,由于在SharePoint 2010中微软仍然没有提供一个可以out-of-box的WebPart,所以像07中一样,要实现单点登录的话还需要我们自己来开发一个WebPart。
创建单点登录WebPart
由于在SharePoint 2010中微软用SSS取代了以前的SSO,所以在2007中实现单点登录时所用的代码现在已经不能用了,需要用SP 2010中新的对象模型来完成这一功能。
使用VS2010创建一个空白SharePoint项目,然后添加一个可视Web部件。
接着在此项目中添加Microsoft.BussinessData和Microsoft.Office.SecureStoreService的引用。这里呢可能会出现一个问题,因为在\Microsoft Shared\Web Server Extensions\14\ISAPI这个目录下只有Microsoft.Office.SecureStoreService.Server.Security这个dll,需要我们自己到GAC中将Microsoft.Office.SecureStoreService这个dll拷贝出来才行。Microsoft.BussinessData可以在\Microsoft Shared\Web Server Extensions\14\ISAPI目录下找到。通过下面这段代码可获得当前用户存储在SSS中的目标应用程序凭据。
以下是代码片段:1 protected void Button1_Click(object sender, EventArgs e)
2 {
3 string m_userName = string.Empty;
4 string m_password = string.Empty;
5 string m_html = string.Empty;
6 string m_appId = "163Mail";
7 SecureStoreProvider m_provider = new SecureStoreProvider();
8 SPSite m_site = SPContext.Current.Site;
9 SPServiceContext m_serviceContext = SPServiceContext.GetContext(m_site);
10 m_provider.Context = m_serviceContext;
11 try
12 {
13 SecureStoreCredentialCollection m_sscc = m_provider.GetCredentials(m_appId);
14 foreach (SecureStoreCredential ssc in m_sscc)
15 {
16 switch (ssc.CredentialType)
17 {
18 case SecureStoreCredentialType.Generic:
19 break;
20 case SecureStoreCredentialType.Key:
21 break;
22 case SecureStoreCredentialType.Password:
23 m_password = ToClrString(ssc.Credential);
24 break;
25 case SecureStoreCredentialType.Pin:
26 break;
27 case SecureStoreCredentialType.UserName:
28 m_userName = ToClrString(ssc.Credential);
29 break;
30 case SecureStoreCredentialType.WindowsPassword:
31 break;
32 case SecureStoreCredentialType.WindowsUserName:
33 break;
34 default:
35 break;
36 }
37 }
38 m_html += "<script>";
39 m_html += string.Format("window.location.href='http://reg.163.com/login.jsp?url=&type=1&product=&savelogin=&outfoxer=&domains=&syscheckcode=4ecd8fe3803494cff0df5414f321fd5f9afa4c78&username={0}%40163.com&password={1}&Submit='", m_userName, m_password);
40 m_html += "</script>";
41 Response.Write(m_html);
42 }
43 catch (Exception ex)
44 {
45 Response.Write("<script>window.location.href= '/_layouts/SecureStoreSetCredentials.aspx?TargetAppId=" + m_appId + "';</script>");
46 }
47 }
完成后将WebPart部署到网站中,OK,结束~~~

下面是本示例的完整代码,比较简单也没写注释,大伙凑乎着看吧。
以下是代码片段:1 using System;
2 using System.Security;
3 using System.Web.UI;
4 using System.Web.UI.WebControls;
5 using System.Web.UI.WebControls.WebParts;
6 using Microsoft.SharePoint;
7 using Microsoft.Office.SecureStoreService.Server;
8 using Microsoft.BusinessData.Infrastructure.SecureStore;
9 namespace SP2010SingleSignOnWebPart.SingleSignOnWebPart
10 {
11 public partial class SingleSignOnWebPartUserControl : UserControl
12 {
13 protected void Button1_Click(object sender, EventArgs e)
14 {
15 string m_userName = string.Empty;
16 string m_password = string.Empty;
17 string m_html = string.Empty;
18 string m_appId = "163Mail";
19 SecureStoreProvider m_provider = new SecureStoreProvider();
20 SPSite m_site = SPContext.Current.Site;
21 SPServiceContext m_serviceContext = SPServiceContext.GetContext(m_site);
22 m_provider.Context = m_serviceContext;
23 try
24 {
25 SecureStoreCredentialCollection m_sscc = m_provider.GetCredentials(m_appId);
26 foreach (SecureStoreCredential ssc in m_sscc)
27 {
28 switch (ssc.CredentialType)
29 {
30 case SecureStoreCredentialType.Generic:
31 break;
32 case SecureStoreCredentialType.Key:
33 break;
34 case SecureStoreCredentialType.Password:
35 m_password = ToClrString(ssc.Credential);
36 break;
37 case SecureStoreCredentialType.Pin:
38 break;
39 case SecureStoreCredentialType.UserName:
40 m_userName = ToClrString(ssc.Credential);
41 break;
42 case SecureStoreCredentialType.WindowsPassword:
43 break;
44 case SecureStoreCredentialType.WindowsUserName:
45 break;
46 default:
47 break;
48 }
49 }
50 m_html += "<script>";
51 m_html += string.Format("window.location.href='http://reg.163.com/login.jsp?url=&type=1&product=&savelogin=&outfoxer=&domains=&syscheckcode=4ecd8fe3803494cff0df5414f321fd5f9afa4c78&username={0}%40163.com&password={1}&Submit='", m_userName, m_password);
52 m_html += "</script>";
53 Response.Write(m_html);
54 }
55 catch (Exception ex)
56 {
57 Response.Write("<script>window.location.href= '/_layouts/SecureStoreSetCredentials.aspx?TargetAppId=" + m_appId + "';</script>");
58 }
59 }
60 internal string ToClrString(SecureString p_string)
61 {
62 var m_ptr = System.Runtime.InteropServices.Marshal.SecureStringToBSTR(p_string);
63 try
64 {
65 return System.Runtime.InteropServices.Marshal.PtrToStringBSTR(m_ptr);
66 }
67 finally
68 {
69 System.Runtime.InteropServices.Marshal.FreeBSTR(m_ptr);
70 }
71 }
72 }
73 }
Secure Store Service 是SharePoint Server提供的运行在应用程序服务器上的授权服务。Secure Store Service将用户凭据存储于一个凭据的数据库,录入用户信息时,会使用密钥加密。用户凭据通常包含用户名和密码,也可以根据需要包含其他属性。通过获取Secure Store Service存储的凭据,可以用于访问其他外部应用。根据微软官方的描述,在SharePoint应用Secure Store Service的解决方案包括:
- Excel Services 可使用安全存储提供对已发布工作簿中的外部数据源的访问。这可以用作将用户凭据传递给数据源(此过程通常需要配置 Kerberos 委托)的替代方式。如果您需要为数据身份验证配置无人参与服务帐户,则 Excel Services 需要安全存储。
Visio Services 可使用安全存储提供对已发布的数据连接图表中的外部数据源的访问。这可以用作将用户凭据传递给数据源(此过程通常需要配置 Kerberos 委托)的替代方式。如果您需要为数据身份验证配置无人参与服务帐户,则 Visio Services 需要安全存储。
PerformancePoint Services 可使用安全存储提供对外部数据源的访问。如果您需要为数据身份验证配置无人参与服务帐户,则 PerformancePoint Services 需要安全存储。
PowerPivot 需要安全存储以便对 PowerPivot 工作簿进行计划刷新。
Microsoft Business Connectivity Services 可使用安全存储将用户凭据映射到外部系统中的一组凭据。您可将每个用户的凭据映射到外部系统中的唯一帐户,也可以将一组经过身份验证的用户映射到单个组帐户。Business Connectivity Services 还可以使用安全存储来存储用于访问 SharePoint Online 中的本地数据源的凭据。
SharePoint 运行时可使用安全存储来存储与 Azure 服务进行通信所必需的凭据(如果任何用户应用程序需要 SharePoint 运行时来设置和使用 Azure 服务)。
本文是除以上解决方案中的另外一种应用。
在使用Secure Store Service前,我们做一些设置。
一、首先,打开SharePoint管理中心,进入应用程序管理,点击“管理服务应用程序”
在服务应用程序列表中,找到Secure Store Service服务。该服务会在运行配置向导过程中默认配置,也可以点击新建手动配置(手动配置方法请看官方文档)。

二、点击进入Secure Store Service服务
1、首次配置,要生成新密钥

2、生成新密钥后,就可以新建目标应用程序,点击新建

3、进入新建页面后,填写相关内容
显示名称:目标应用程序显示名称
联系人email:填写管理员email,用来用户联系管理员;
目标应用程序类型:根据需要选择类型,比如“个人”用来存储个人凭据,“组”用来存储组凭据(一个用户组用一个凭据)
目标应用程序页 URL:一般选择默认页,系统会有一个默认页面(http:/<samplesite>/_layouts/SecureStoreSetCredentials.aspx?TargetAppId=<TargetApplicationID>)用来录入用户凭据。
4、点击下一步,进入配置字段页面,按照需要添加凭据需要包含的字段(注:以后不能编辑字段名称和字段类型)
在这里,我除默认的用户名和密码外,另外添加一列EmailAddress用来存储用户邮箱,类型选择一般(Genetic)。

5、继续点击下一步
添加目标应用程序管理员,点击完成,完成创建目标应用程序
至此我们已经完成了Secure Store Service的准备工作,接下来就是实际应用的实践。
一、用户凭据录入
你可以使用系统默认的页面(http:/<samplesite>/_layouts/SecureStoreSetCredentials.aspx?TargetAppId=<TargetApplicationID>)用于用户凭据录入,也可以使用自定义的页面创建、更新用户凭据。下面的代码用来更新(创建)当前用户的特定目标应用程序凭据:

public static void SetCredentials(string appId, string[] userInfo) { List<SecureStoreCredential> creds = new List<SecureStoreCredential>(); SecureStoreCredential name = new SecureStoreCredential(toSecureString(userInfo[0]), SecureStoreCredentialType.WindowsUserName); SecureStoreCredential pwd = new SecureStoreCredential(toSecureString(userInfo[1]), SecureStoreCredentialType.WindowsPassword); SecureStoreCredential EmailAddress = new SecureStoreCredential(toSecureString(userInfo[2]), SecureStoreCredentialType.Generic); creds.Add(name); creds.Add(pwd); creds.Add(EmailAddress); SecureStoreCredentialCollection credes = new SecureStoreCredentialCollection(creds.ToArray()); SecureStoreServiceProxy proxySs = new SecureStoreServiceProxy(); SPSite site = null; SPWeb web = null; SPSecurity.RunWithElevatedPrivileges(delegate() { site = SPContext.Current.Site; web = SPContext.Current.Web; }); site.AllowUnsafeUpdates = true; web.AllowUnsafeUpdates = true; SPServiceContext context = SPServiceContext.GetContext(site); ISecureStore store = proxySs.GetSecureStore(context); store.SetCredentials(appId, credes); web.AllowUnsafeUpdates = false; site.AllowUnsafeUpdates = false; }
参数介绍:
appid:目标应用程序ID,也就是上面步骤新建的“FirstID”;
userInfo:从页面中获取的用户信息列表;
方法介绍:
1、创建字段实例(注:实例名称与实际目标应用程序字段名称没有关联,只要顺序对就可以了,当然类型要一致)
SecureStoreCredential name = new SecureStoreCredential(toSecureString(userInfo[0]), SecureStoreCredentialType.WindowsUserName);
上面这句语句是创建一个凭据字段,对应FirstID中的“Windows用户名”,此类型包含一个2个参数的构造函数(字段值,字段类型);
2、创建Secure Store Service代理,获取当前SharePoint Secure Store Service上下文环境
3、为site,web提升权限
SPSecurity.RunWithElevatedPrivileges(delegate()
{
site = SPContext.Current.Site;
web = SPContext.Current.Web;
});
4、使用ISecureStore的SetCredentials方法更新(创建)用户凭据。
5、最后,会注意到有一个toSecureString方法,这个方法是对字符串进行安全编码,代码是:

 View Code
 public static System.Security.SecureString toSecureString(string s) { System.Security.SecureString secureString = new System.Security.SecureString(); foreach (Char character in s) { secureString.AppendChar(character); } return secureString; }
利用上面的代码,就可以为用户配置目标应用程序的凭据。
二、根据当前用户获取该用户凭据信息
使用上面的方法将用户凭据录入后,下一步就是利用Secure Store Service获取用户凭据。
在使用EMSManagedAPI操作Exchange邮箱所在的博客中,有一个步骤是需要用户的账号和密码。另外,上面在创建目标应用程序的过程中,多加了一列EmailAddress,这样我们就可以用EWS Managed API中AutodiscoverUrl方法,而不需要知道具体的邮件服务器服务地址,代码就可以改为:
View Code 原代码: service.Credentials = new WebCredentials(creds); service.Url = new Uri("https://服务器地址/ews/exchange.asmx"); service.PreAuthenticate = true;
View Code 修改后: service.Credentials = new WebCredentials(creds); service.AutodiscoverUrl(EmailAddress); service.PreAuthenticate = true;
上面是对之前应用的一点优化,如果有兴趣,可以去看之前的博客。接下来是如何取得用户凭证的实例。
Secure Store Service不需要指定用户,会直接根据当前上下文获得当前登陆用户,下面是获取用户信息列表的方法:
public List<string> GetUserCredentialCollection(string appId, SPServiceContext CurrentContext)//appid is the SSS' ID { List<string> credentialList = new List<string>(); SecureStoreProvider prov = new SecureStoreProvider(); SPServiceContext context = CurrentContext; prov.Context = context; //当前上下文信息,以便从上下文中找到当前登陆用户 try { SecureStoreCredentialCollection cc = prov.GetCredentials(appId); for (int i = 0; i < cc.Count; i++) { ISecureStoreCredential c = cc[i]; IntPtr ptr = System.Runtime.InteropServices.Marshal.SecureStringToBSTR(c.Credential); string sDecrypString = System.Runtime.InteropServices.Marshal.PtrToStringUni(ptr); credentialList.Add(sDecrypString); } } catch { } return credentialList; }
其实最重要的是for循环中的方法,根据目标应用程序ID,获取用户凭据集合,遍历用户凭据字段并存放到List中,之后就可以根据个人需求来利用这些信息。
到这里Secure Store Service的应用基本就结束了,总体来说Secure Store Service有利有弊,对于安全性要求很高的用户来说,可能并不是一个最佳的选择。但Secure Store Service得灵活性较好,可以存储用户的多个应用程序凭据,对于多个系统集成有很好的兼容性。有兴趣的朋友,可以一起讨论,这篇博客就先写到这里了。
- SharePoint 2010中的单点登录
- SharePoint 2010中的单点登录
- sharepoint的单点登录
- 基于SharePoint的单点登录的实现
- 基于SharePoint的单点登录的实现
- 从其它系统登录到SharePoint 2010系统的单点登录
- SpringMVC中的单点登录实现
- 为SharePoint 2010中的FBA创建自定义登录页面
- 理解ASP.NET 2.0中的单点登录
- 理解ASP.NET 2.0中的单点登录
- 理解ASP.NET 2.0中的单点登录
- 理解ASP.NET 2.0中的单点登录
- 企业级应用中的单点登录应用
- ASP.NET 4.0中的单点登录
- 信息集成中的单点登录技术
- 解析用户权限管理系统中的单点登录
- 浅析用户权限管理系统中的单点登录
- 浅析用户权限管理系统中的单点登录
- unity3d学习笔记(十四)--NGUI用Sprite动画和屏幕自适应制作游戏
- 有了它彻底摆脱切换窗口以后的白屏或花屏,想不正常都难
- Principal Component Analysis
- 预处理器(4)
- ActiveMQ基本介绍
- SharePoint 2010中的单点登录
- jsp获取项目路径(二)
- 学会思考1
- ubuntu 12.04 Server 上安装 MongoDB及运行
- vs 数据库连接字符串,连接本机数据库没任何问题,连其他的局域网数据库总是弹出调试窗口
- 工作中经典sql总结
- meld git的diff工具 + git项目管理
- asp.net用户角色管理
- js Array判断一个值是否存在