Android布局详解之二:LinearLayout
来源:互联网 发布:手机游戏java通用版 编辑:程序博客网 时间:2024/05/18 00:39
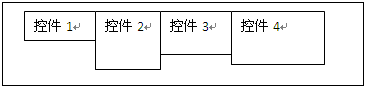
横向排列的示意图如下:layoutpic008
笔直排列的示意图如下:layoutpic009
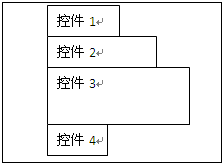
因为是并排放置的,所以不会有相互覆盖的情况出现。
我们把上一章的例子,稍加改动,仅仅把FrameLayout改成LinearLayout:
<?xml version="1.0" encoding="utf-8"?>
<LinearLayout xmlns:android="http://schemas.android.com/apk/res/android"
android:orientation="vertical"
android:layout_width="fill_parent"
android:layout_height="fill_parent"
>
<TextView
android:id="@+id/tv1"
android:layout_width="fill_parent"
android:layout_height="wrap_content"
android:textSize="50dip"
android:textColor="#ffffff"
android:text="第一层"/>
<TextView
android:id="@+id/tv2"
android:layout_width="fill_parent"
android:layout_height="wrap_content"
android:textSize="40dip"
android:textColor="#ffff00"
android:layout_toRightOf="@id/tv1"
android:text="第二层"/>
<TextView
android:id="@+id/tv3"
android:layout_width="wrap_content"
android:layout_height="wrap_content"
android:textSize="30dip"
android:textColor="#ff00ff"
android:gravity="right"
android:text="第三层"/>
<TextView
android:id="@+id/tv4"
android:layout_width="fill_parent"
android:layout_height="wrap_content"
android:textSize="20dip"
android:textColor="#00ffff"
android:layout_centerVertical="true"
android:text="第四层"/>
</LinearLayout>
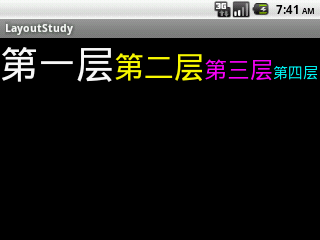
效果如下:layoutpic003
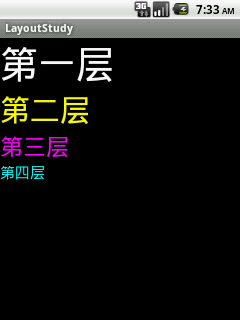
改动1
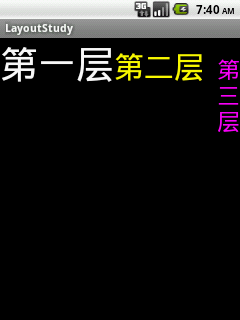
我们换成水平排列来看看。只改一行:
android:orientation="horizontal"
效果如下:
layoutpic004

晕了有木有?是不是发现不对劲啊?搞不定了,先出去抽支烟再说。
哦,忘了我不抽烟的,呵呵。其实很简单,我们控件的属性:android:layout_width="fill_parent"这就是说,第一个文本框的宽度就已经充满整个屏幕了,第二个文本框放在第一个文本框的右边,自然就看不到啦。
知道了原因,就改改。把四个文本框的宽度属性都改成:
android:layout_width="wrap_content"
再看看效果:layoutpic005
嗯。因为文字太宽了,第三个文本框为了显示完全,成了多行显示的文本了。第四个文本框直接就消失在屏幕之外了。我们按下“Ctrl + F11”,把虚拟机横过来,就可以看到下图:
layoutpic006
改动2
保持横屏不动。我们尝试把第二个文本框改成:
<TextView
android:id="@+id/tv2"
android:layout_width="wrap_content"
android:layout_height="wrap_content"
android:textSize="40dip"
android:textColor="#ffff00"
android:layout_below="@id/tv1"
android:text="第二层"/>
我们看看能不能让第二个文本框在第一个文本框的下面。显示结果表示:没变化。
改动3
我们尝试把第三个文本框改动下,加上边距:
<TextView
android:id="@+id/tv3"
android:layout_width="wrap_content"
android:layout_height="wrap_content"
android:textSize="30dip"
android:textColor="#ff00ff"
android:gravity="right"
android:layout_margin="20dip"
android:text="第三层"/>
看看有效果没?有的啊:
layoutpic007
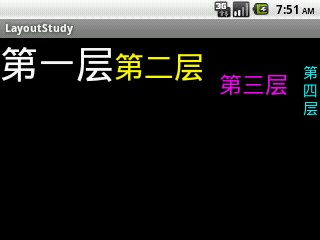
第三个文本框与其他控件以及父控件边缘,都保持了一定距离.(20dip不一定是20个像素哦,后面的文章我会仔细描述这个关系。)
总结
线性布局,同样没法直接控制控件的具体位置,以及相对的位置关系。每个控件都依次摆放。不过控件间的间距可以调整,控件也不会相互覆盖。线性布局可以嵌套使用,可以在一个纵向布局中加入一个横向布局。用这种嵌套方式,可以完成一些稍微复杂的页面。不过,当嵌套的情况使用的多了,并且嵌套的层次也多了,就会给维护带来非常大的麻烦。这个时候,就需要用更复杂的布局了。
- Android布局详解之二:LinearLayout
- Android布局详解之二:LinearLayout
- Android布局详解之二:LinearLayout
- Android布局详解之二:LinearLayout
- Android布局之LinearLayout详解
- Android布局之LinearLayout详解
- 《详解Android四大布局》之LinearLayout布局
- Android布局控件之LinearLayout详解
- Android布局控件之LinearLayout详解
- Android布局控件之LinearLayout详解
- Android布局控件之LinearLayout详解
- Android布局控件之LinearLayout详解
- Android布局控件之LinearLayout详解
- Android布局控件之LinearLayout详解
- Android布局控件之LinearLayout详解
- Android布局控件之LinearLayout详解
- Android - 布局详解之LinearLayout与RelativeLayout
- Android布局控件之LinearLayout详解
- select count 多条统计
- 次梯度与次微分
- mysql的基本操作
- ckeditor Remove tags on bottom bar
- Android Bluetooth蓝牙开发\蓝牙协议\蓝牙通信例子_Android支持蓝牙4.0版本_BLE开发
- Android布局详解之二:LinearLayout
- tomcat6.0 安装版和解压版的内存设置
- 最有用的 Key Mapping --- CapsLk -> Eac, Alt -> Ctrl
- win7使用VMware 下部署 hadoop集群(3台)过程及错误
- 18周过后~(学期总结)
- JAVA的class文件格式例解
- Big Endian 和 Little Endian
- C++/C 使用中的语法错误
- jsp中的javabean标签