xp下安装redmine 2.4.3
来源:互联网 发布:手机淘宝怎么发货卖家 编辑:程序博客网 时间:2024/05/16 08:55
第一步,软件下载
1. 下载railsinstaller
下载地址:http://files.rubyforge.vm.bytemark.co.uk/railsinstaller/railsinstaller-2.2.1.exe
railsinstaller大大简化了rails的安装。除了windows下面的外,还有iMac下面的安装包。
对应的官网:http://railsinstaller.org/en
该版本包括下面内容:
Ruby 1.9.3
Rails 3.2
Bundler
Git
Sqlite
TinyTDS
SQL Server Support
DevKit
2. 下载ImageMagick,这个是图型生成工具,redmine用于生成pdf等内容,也可以不安装。安装说明在这里http://www.redmine.org/projects/redmine/wiki/HowTo_install_rmagick_gem_on_Windows
这次下载安装的版本是ImageMagick-6.8.8-6-Q8-x86-dll.exe,
下载地址是:http://www.imagemagick.org/download/binaries/ImageMagick-6.8.8-6-Q8-x86-dll.exe
gem文件下载:http://download.csdn.net/detail/wind520/6931051
3、redmine的文件,这里下载的是最新版本redmine2.4.3 ,
发布版本下载列表地址是:http://www.redmine.org/projects/redmine/wiki/Download
我用的版本的下载地址是:http://download.csdn.net/detail/wind520/6921315
第二步:安装
1:安装railsinstaller,如果不需要选择目录,就一路安装下去就可以了
2:安装ImageMagick,但是在安装选项的时候,要注意改一下选择,如下图
In the Select Additional Tasks page of the wizard, make sure that both Add application directory to your system path and Install development headers and libraries for C and C++ options are checked:
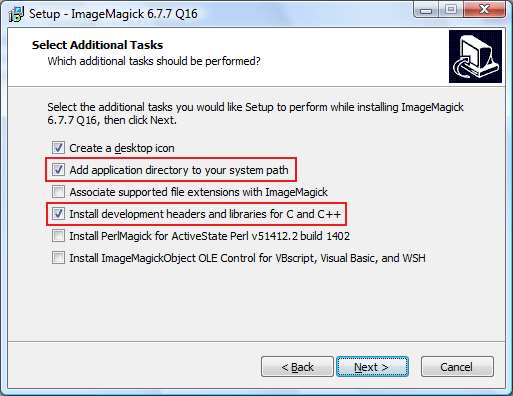
就是第二项和第四项勾上
3:解压redmine
放在E:\work\redmine-2.4.3
第三步:mysql准备
没有安装mysql,先安装mysql5.6
1:把libmysql.dll复制到E:\work\RailsInstaller\Ruby1.9.3\bin(RailsInstaller的安装目录里面)
2:创建数据库
CREATE DATABASE redmine CHARACTER SET utf8;3:修改redmine连接数据库文件
redmine目录下的config/database.yml.example 改为config/database.yml
第6行开始
production: adapter: mysql2 database: redmine host: localhost username: root password: my_password第四步:安装依赖文件
1:安装rmagick
gem install E:\work\rmagick-2.13.1-x86-mingw32.gem2:安装Bundler
gem install bundler
3: 安装其他
在redmine目录下执行
bundle install --without development testE:\work\redmine-2.4.3>bundle install --without development test rmagickUsing rake (10.1.1)Using i18n (0.6.9)Using multi_json (1.8.4)Using activesupport (3.2.16)Using builder (3.0.0)Using activemodel (3.2.16)Using erubis (2.7.0)Using journey (1.0.4)Using rack (1.4.5)Using rack-cache (1.2)Using rack-test (0.6.2)Using hike (1.2.3)Using tilt (1.4.1)Using sprockets (2.2.2)Using actionpack (3.2.16)Using mime-types (1.25.1)Using polyglot (0.3.3)Using treetop (1.4.15)Using mail (2.5.4)Using actionmailer (3.2.16)Using arel (3.0.3)Using tzinfo (0.3.38)Using activerecord (3.2.16)Using activeresource (3.2.16)Using coderay (1.1.0)Using rack-ssl (1.3.3)Using json (1.8.1)Using rdoc (3.12.2)Using thor (0.18.1)Using railties (3.2.16)Using jquery-rails (2.0.3)Using mysql2 (0.3.15)Using net-ldap (0.3.1)Using ruby-openid (2.3.0)Using rack-openid (1.4.2)Using bundler (1.5.3)Using rails (3.2.16)Your bundle is complete!Gems in the groups development, test and rmagick were not installed.Use `bundle show [gemname]` to see where a bundled gem is installed.
已经安装的会显示出来,没安装的会自动下载安装
第五步:数据库相关
1:生成 Session 存储密钥
rake generate_secret_token
2:创建表
set RAILS_ENV=productionrake db:migrate3:导入初始化数据
set RAILS_ENV=productionset REDMINE_LANG=zhrake redmine:load_default_data
第六步:测试
ruby script/rails server webrick -e production
E:\work\redmine-2.4.3>ruby script/rails server webrick -e production=> Booting WEBrick=> Rails 3.2.16 application starting in production on http://0.0.0.0:3000=> Call with -d to detach=> Ctrl-C to shutdown server[2014-02-15 22:42:20] INFO WEBrick 1.3.1[2014-02-15 22:42:21] INFO ruby 1.9.3 (2013-02-22) [i386-mingw32][2014-02-15 22:42:21] INFO WEBrick::HTTPServer#start: pid=4200 port=3000
成功!!
--------------------------------------------
安装后的环境:
Environment:
Redmine version 2.4.3.stable
Ruby version 1.9.3-p392 (2013-02-22) [i386-mingw32]
Rails version 3.2.16
Environment production
Database adapter Mysql2
SCM:
Subversion 1.7.5
Git 1.8.1

参考http://www.redmine.org/projects/redmine/wiki/RedmineInstall
http://www.cppblog.com/zdhsoft/archive/2013/10/17/redmine.html
- xp下安装redmine 2.4.3
- Windows 下Redmine-1.1.3的安装
- windows 下安装 redmine
- Ubuntu下安装Redmine
- centos5下 redmine安装
- windows 下 安装 redmine
- Windows下安装Redmine
- Windows下安装Redmine
- Windows下安装Redmine
- Windows下安装Redmine
- Windows下安装Redmine
- Windows下安装Redmine
- Linux下安装Redmine
- CentOS下安装Redmine
- Windows下安装Redmine
- Ubuntu下安装Redmine
- Linux下安装redmine
- Centos 下安装redmine
- Linux 档案属性与目录配置
- 注意事项
- Linux 档案属性与目录配置2
- libata 开发手册
- java heap space解决办法
- xp下安装redmine 2.4.3
- boost::assign(标准容器填充库)
- 23种设计模式
- Ruby Warrior —— 用游戏学习Ruby (附全部关卡代码)
- PHP实现Web Service的四种方法
- 内外网同时访问设置
- Linux 账号与身份管理1
- mysql table的增删查改。
- DB2创建数据库