Linux下如何颁发证书:学习使用openssl搭建一个CA
来源:互联网 发布:寻找大数据外包项目 编辑:程序博客网 时间:2024/04/27 13:12
这两天学习了openssl在LInux中的使用,openssl是一款开源的加密工具,在Linux环境下,我们能够利用它来搭建一个CA来实现证书的发放,可以用于企业内部使用的加密工具。在介绍openssl之前,首先描述一下关于“身份认证+数据加密”的实现方法原理。
如何实现“身份验证+数据加密”,请看下面的一张流程图(自己画得,比较简陋)
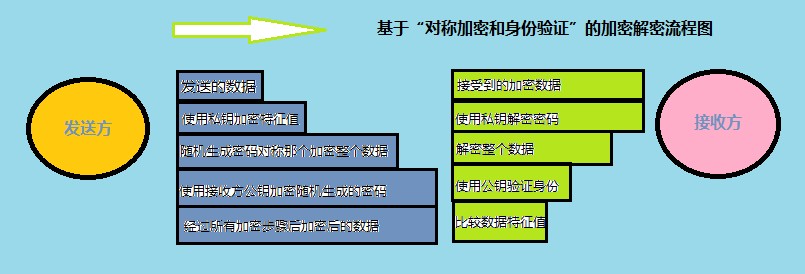
整个加密过程:
发送方: 计算数据特征值----> 使用私钥加密特征值 ---> 随机生成密码对称加密整个数据 ---> 使用接受方公钥加密密码
接收方: 使用私钥解密密码 ----> 解密整个数据 ----> 使用公钥验证身份 ----> 比较数据特征值
但是存在一个问题,谁来管理公钥,任何在互联网上传播的数据都不安全,更不用说传递公钥,它如果被篡改,那就无法验证身份,所以不可能由用户自己颁发公钥。
这个时候需要有一个具有公信力的中间机构来做这份工作,那就是CA,由此引发了两个概念:
CA : 证书颁发机构
PKI : 公钥基础设施,公钥基础构架
证书: 里面存放了用户的各种信息,最核心的部分就是公钥
但是还有一个问题,谁来给CA颁发公钥,解决方法是,CA自己给自己颁发公钥。。。
下面是用openssl这个强大的工具,在linux下构建一个CA,来实现证书管理,我们用一个web服务器端作为需要证书的客户端
1.首先我们来给CA生成一个私钥
切换到/etc/pki/CA/目录,使用openssl命令给自己生成一个私钥
- [root@server56 openssl]# cd /etc/pki/CA/
- [root@server56 CA]# ls
- private
- [root@server56 CA]# (umak 66;openssl genrsa 2046 > private/cakey.pem)
- -bash: umak: command not found
- Generating RSA private key, 2046 bit long modulus
- .............................+++
- ..+++
- e is 65537 (0x10001)
2. CA需要一个自签证书,所以我们给它使用openssl命令生成一个自签证书
- [root@server56 CA]# openssl req -new -x509 -key private/cakey.pem -out cacert.pem
- You are about to be asked to enter information that will be incorporated
- into your certificate request.
- What you are about to enter is what is called a Distinguished Name or a DN.
- There are quite a few fields but you can leave some blank
- For some fields there will be a default value,
- If you enter '.', the field will be left blank.
- -----
- Country Name (2 letter code) [GB]:CN # 输入你的各项信息,国家 , 省或州,地区,公司,单位,域名,邮箱地址
- State or Province Name (full name) [Berkshire]:Henan
- Locality Name (eg, city) [Newbury]:Zhengzhou
- Organization Name (eg, company) [My Company Ltd]:LINUX
- Organizational Unit Name (eg, section) []:Tech
- Common Name (eg, your name or your server's hostname) []:www.rhce.com #需要注意的是,这个域名是FQDN(完全限定域名)
- Email Address []:ca@rhce.com
- [root@server56 CA]# ls
- cacert.pem private
3.编辑CA配置文件,它位于etc/pki/tls/openssl.cnf,它的作用是指定你的CA所在目录,更改默认属性值
- [root@server56 CA]# vim /etc/pki/tls/openssl.cnf
- [ CA_default ]
- dir = ../../CA # Where everything is kept **************CA路径 ,修改为绝对路径
- certs = $dir/certs # Where the issued certs are kept ×××××××发给其他的人的证书 ,该目录需要手动创建
- crl_dir = $dir/crl # Where the issued crl are kept ××××××证书吊销列表 不属于必须创建的目录
- database = $dir/index.txt # database index file. *****************存放生成证书文件索引 需要手动创建的文件
- #unique_subject = no # Set to 'no' to allow creation of
- # several ctificates with same subject.
- new_certs_dir = $dir/newcerts # default place for new certs. ××××××××××x新生成的证书存放地 需要手动创建
- certificate = $dir/cacert.pem # The CA certificate
- serial = $dir/serial # The current serial number ××××××序列号,需要自己建每一个证书都有一个序列号需要自己建,并指定从几开始
- crlnumber = $dir/crlnumber # the current crl number
- # must be commented out to leave a V1 CRL
- crl = $dir/crl.pem # The current CRL
- private_key = $dir/private/cakey.pem# The private key
- RANDFILE = $dir/private/.rand # private random number file
- x509_extensions = usr_cert # The extentions to add to the cert
- # req_extensions = v3_req # The extensions to add to a certificate request
- #########修改证书CSR与自己的匹配
- [ req_distinguished_name ]
- countryName = Country Name (2 letter code)
- countryName_default = CN #我修改为CN和CA的自签证书对应
- countryName_min = 2
- countryName_max = 2
- stateOrProvinceName = State or Province Name (full name)
- stateOrProvinceName_default = Henan #同上
- localityName = Locality Name (eg, city)
- localityName_default = Zhengzhou #同上
- 0.organizationName = Organization Name (eg, company)
- 0.organizationName_default = Tech #同上
4.创建CA的相关目录和文件,指定序列号起始数字,在上一步已经说明,它们在CA所在目录创建
- [root@server56 ~]# cd /etc/pki/CA/
- [root@server56 CA]# mkdir certs crl newcerts
- [root@server56 CA]# ls
- cacert.pem certs crl newcerts private
- [root@server56 CA]# touch index.txt serial
- [root@server56 CA]# echo 01 > serial
5. 创建web服务器的私钥 ,因为是实验,所有并不需要安装web服务器,你可以创建一个ssl目录,我们假设它是一个web服务器
- [root@server56 CA]# cd /etc/httpd/
- [root@server56 httpd]# mkdir ssl
- [root@server56 httpd]# cd ssl/
- [root@server56 ssl]# (umask 66;openssl genrsa 2048 > web.key)
- Generating RSA private key, 2048 bit long modulus
6. 客户端(web服务器)请求获得证书,客户端如果想申请获得证书的话,需要创建一个申请证书,传递给CA
- [root@server56 ssl]# openssl req -new -key web.key -out web.csr
- You are about to be asked to enter information that will be incorporated
- into your certificate request.
- What you are about to enter is what is called a Distinguished Name or a DN.
- There are quite a few fields but you can leave some blank
- For some fields there will be a default value,
- If you enter '.', the field will be left blank.
- -----
- Country Name (2 letter code) [CN]:
- State or Province Name (full name) [Henan]:
- Locality Name (eg, city) [Zhengzhou]:
- Organization Name (eg, company) [RHCE]:
- Organizational Unit Name (eg, section) [Tech]:
- Common Name (eg, your name or your server's hostname) []:www.web.com
- Email Address []:www@web.com
- Please enter the following 'extra' attributes
- to be sent with your certificate request
- A challenge password []: # 请求证书需要在网络上传递,所以加密防止别人窥探,这里留空因为我们只是实验
- An optional company name []:
7. 在CA端给客户端颁发证书,使用openssl命令
- [root@server56 ssl]# openssl ca -in web.csr -out web.crt # 这个命令执行后,会显示请求证书里的信息
- Using configuration from /etc/pki/tls/openssl.cnf
- Check that the request matches the signature
- Signature ok
- Certificate Details:
- Serial Number: 1 (0x1)
- Validity
- Not Before: Aug 9 04:46:25 2011 GMT
- Not After : Aug 8 04:46:25 2012 GMT
- Subject:
- countryName = CN
- stateOrProvinceName = Henan
- organizationName = RHCE
- organizationalUnitName = Tech
- commonName = www.web.com
- emailAddress = www@web.com
- X509v3 extensions:
- X509v3 Basic Constraints:
- CA:FALSE
- Netscape Comment:
- OpenSSL Generated Certificate
- X509v3 Subject Key Identifier:
- B6:52:27:11:5B:BA:84:C8:56:4D:67:D7:B9:7A:CB:FE:45:CF:5A:02
- X509v3 Authority Key Identifier:
- keyid:5C:4A:A2:EB:DD:3F:BB:08:41:A2:02:3F:98:A4:59:8B:78:47:AF:4F
- Certificate is to be certified until Aug 8 04:46:25 2012 GMT (365 days)
- Sign the certificate? [y/n]:y # 是否认同这个请求的客户端,并授予证书
- 1 out of 1 certificate requests certified, commit? [y/n]y # 升级证书数据库
- Write out database with 1 new entries
- Data Base Updated
好了,看一下我们的证书把!就是那个.crt结尾的文件
- [root@server56 ssl]# ls
- server.key web.crt web.csr web.key
转自:http://blog.csdn.net/deansrk/article/details/6680299
- Linux下如何颁发证书:学习使用openssl搭建一个CA
- Linux下如何颁发证书:学习使用openssl搭建一个CA
- 使用OpenSSL创建CA颁发证书
- rhel6.3下使用openssl来生成CA证书并颁发证书实例解
- 使用OpenSSL自建CA及颁发证书、吊销证书
- Linxu环境下如何使用Openssl搭建CA中心签发证书
- 使用openssl来生成CA证书、申请证书、颁发证书以及撤销证书的过程
- 使用openssl来生成CA证书、证书申请、颁发证书以及撤销证书的过程
- openssl 自建ca,颁发客户端证书
- linux下使用openssl生成 csr crt CA证书
- linux下使用openssl生成 csr crt CA证书
- 搭建私有CA,并颁发证书
- 总结之:CentOS6.5下openssl加密解密及CA自签颁发证书详解
- 总结之:CentOS6.5下openssl加密解密及CA自签颁发证书详解
- CentOS6.5下openssl加密解密及CA自签颁发证书详解
- CentOS6.5下openssl加密解密及CA自签颁发证书详解
- 用Openssl建立私有CA并颁发证书
- 用Openssl建立私有CA并颁发证书
- 修改/etc/sudoers权限
- ThinkPad X61 高分屏安装Win8.1,Ubuntu
- MySQL内存表的特性与使用介绍
- 设备驱动模型第1节:平台-设备-驱动1
- Java应用级产品开发平台APDPlat
- Linux下如何颁发证书:学习使用openssl搭建一个CA
- C#——函数
- linux环境变量
- 赖伟锋《闹够了没有》
- 关于ajax返回对象的实用方法!
- PWM(脉宽调制)的基本原理 及其 应用实例
- Android网络编程之Http通信
- Myeclipse2013下修改Context Root的方法
- c#——字符串及字符串常用函数