Mac之Git/GitHub使用(1)——Set up Git
来源:互联网 发布:招聘网络兼职的广告语 编辑:程序博客网 时间:2024/05/22 02:16
2014-02-23 wcdj
摘要:通过作者的理解对Git和GitHub进行简单的介绍,并记录如何在Mac上通过git关联和使用GitHub的方法,从而可以将本地创建的project方便地上传到GitHub的repo上。本文主要讲述Git的基础概念和在Mac上的安装配置,下篇文章讲述如何在GitHub上创建一个repo。
0 Git和GitHub都是什么,有什么关系?
在GitHub的官网上[1],我们可以找到一些帮助信息。可以在主页上找到这样一句说明:
GitHub Bootcamp If you are still new to things, we’ve provided a few walkthroughs to get you started.
GitHub集训营,如果你对GitHub是一个新手,我们提供了一些入门资料来帮助你了解和使用GitHub。官网非常人性地告诉了我们如何一步步学习使用GitHub,如下图所示。

1 Set up Git (A quick guide to help you get started with Git) [2]
(1) 下载和安装Git
At the heart of GitHub is an open source version control system (VCS) called Git*. Created by the same team that created Linux, Git is responsible for everything GitHub related that happens locally on your computer.
*If you don't already know what Git is, take a crash course.
官网在这里提供了一篇很好的文章,介绍和说明了“Git 的基本概念”[3],笔者总结下自己的理解:
Git Basics
So, what is Git in a nutshell? This is an important section to absorb, because if you understand what Git is and the fundamentals of how it works, then using Git effectively will probably be much easier for you. As you learn Git, try to clear your mind of the things you may know about other VCSs, such as Subversion and Perforce; doing so will help you avoid subtle confusion when using the tool. Git stores and thinks about information much differently than these other systems, even though the user interface is fairly similar; understanding those differences will help prevent you from becoming confused while using it.
你要学习Git,请先忘记之前你知道的关于其他VCSs的用法(例如svn等),这样可以帮助你更好地理解和使用Git,因为Git的设计理念和其他的VCSs完全不同。下面使用图表非常形象地解释了二者的不同。
Snapshots, Not Differences (Git使用版本快照,而非版本差异)
The major difference between Git and any other VCS (Subversion and friends included) is the way Git thinks about its data. Conceptually, most other systems store information as a list of file-based changes. These systems (CVS, Subversion, Perforce, Bazaar, and so on) think of the information they keep as a set of files and the changes made to each file over time, as illustrated in Figure 1-4.
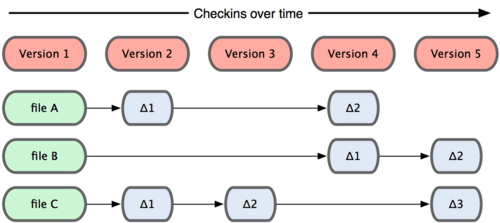
Figure 1-4. Other systems tend to store data as changes to a base version of each file.
Git doesn’t think of or store its data this way. Instead, Git thinks of its data more like a set of snapshots of a mini filesystem. Every time you commit, or save the state of your project in Git, it basically takes a picture of what all your files look like at that moment and stores a reference to that snapshot. To be efficient, if files have not changed, Git doesn’t store the file again—just a link to the previous identical file it has already stored. Git thinks about its data more like Figure 1-5.
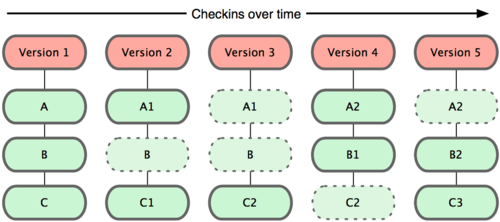
Figure 1-5. Git stores data as snapshots of the project over time.
This is an important distinction between Git and nearly all other VCSs. It makes Git reconsider almost every aspect of version control that most other systems copied from the previous generation. This makes Git more like a mini filesystem with some incredibly powerful tools built on top of it, rather than simply a VCS. We’ll explore some of the benefits you gain by thinking of your data this way when we cover Git branching in Chapter 3.
Git这样设计的好处可以看下文。
Nearly Every Operation Is Local(Git的所有操作都是本地的,不需要进行网络交互,因为Git在本地记录了所有的历史记录,故所有操作都是实时的)
Most operations in Git only need local files and resources to operate — generally no information is needed from another computer on your network. If you’re used to a CVCS where most operations have that network latency overhead, this aspect of Git will make you think that the gods of speed have blessed Git with unworldly powers. Because you have the entire history of the project right there on your local disk, most operations seem almost instantaneous.
For example, to browse the history of the project, Git doesn’t need to go out to the server to get the history and display it for you—it simply reads it directly from your local database. This means you see the project history almost instantly. If you want to see the changes introduced between the current version of a file and the file a month ago, Git can look up the file a month ago and do a local difference calculation, instead of having to either ask a remote server to do it or pull an older version of the file from the remote server to do it locally.
This also means that there is very little you can’t do if you’re offline or off VPN. If you get on an airplane or a train and want to do a little work, you can commit happily until you get to a network connection to upload. If you go home and can’t get your VPN client working properly, you can still work. In many other systems, doing so is either impossible or painful. In Perforce, for example, you can’t do much when you aren’t connected to the server; and in Subversion and CVS, you can edit files, but you can’t commit changes to your database (because your database is offline). This may not seem like a huge deal, but you may be surprised what a big difference it can make.
当你使用Git的时候,如果要浏览历史版本,是不需要进行网络交互的,因为历史版本的信息都保存在本地,因此,你可以在任何时间任何地点(即离线状态)进行你的工作,到可以使用网络的时候再对你之前的所有工作进行提交。而对比其他VCSs,在离线的状态下这些工作都是不可能完成的。
Git Has Integrity(Git对所有存储的文件通过SHA-1计算散列值来索引文件,以保证文件的完整性)
Everything in Git is check-summed before it is stored and is then referred to by that checksum. This means it’s impossible to change the contents of any file or directory without Git knowing about it. This functionality is built into Git at the lowest levels and is integral to its philosophy. You can’t lose information in transit or get file corruption without Git being able to detect it.
The mechanism that Git uses for this checksumming is called a SHA-1 hash. This is a 40-character string composed of hexadecimal characters (0–9 and a–f) and calculated based on the contents of a file or directory structure in Git. A SHA-1 hash looks something like this:
24b9da6552252987aa493b52f8696cd6d3b00373You will see these hash values all over the place in Git because it uses them so much. In fact, Git stores everything not by file name but in the Git database addressable by the hash value of its contents.
Git Generally Only Adds Data(在操作Git时只有添加文件的概念,而没有删除的概念)
When you do actions in Git, nearly all of them only add data to the Git database. It is very difficult to get the system to do anything that is not undoable or to make it erase data in any way. As in any VCS, you can lose or mess up changes you haven’t committed yet; but after you commit a snapshot into Git, it is very difficult to lose, especially if you regularly push your database to another repository.
This makes using Git a joy because we know we can experiment without the danger of severely screwing things up. For a more in-depth look at how Git stores its data and how you can recover data that seems lost, see Chapter 9.
The Three States(请记住Git中的三种状态:committed[3已提交到本地数据库], modified[1已修改但未提交], and staged[2对修改进行了标记以待提交])
Now, pay attention. This is the main thing to remember about Git if you want the rest of your learning process to go smoothly. Git has three main states that your files can reside in: committed, modified, and staged. Committed means that the data is safely stored in your local database. Modified means that you have changed the file but have not committed it to your database yet. Staged means that you have marked a modified file in its current version to go into your next commit snapshot.
This leads us to the three main sections of a Git project: the Git directory, the working directory, and the staging area.
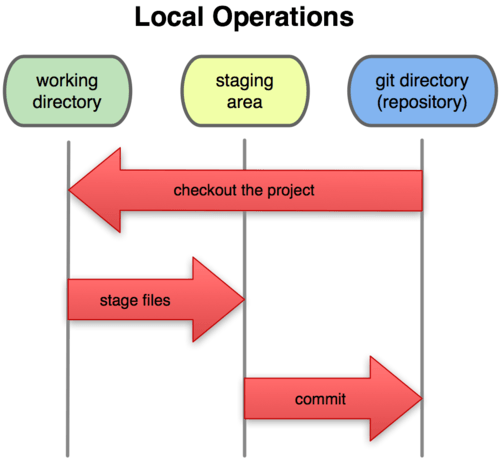
Figure 1-6. Working directory, staging area, and git directory.
The Git directory is where Git stores the metadata and object database for your project. This is the most important part of Git, and it is what is copied when you clone a repository from another computer.
The working directory is a single checkout of one version of the project. These files are pulled out of the compressed database in the Git directory and placed on disk for you to use or modify.
The staging area is a simple file, generally contained in your Git directory, that stores information about what will go into your next commit. It’s sometimes referred to as the index, but it’s becoming standard to refer to it as the staging area.
The basic Git workflow goes something like this:
- You modify files in your working directory.
- You stage the files, adding snapshots of them to your staging area.
- You do a commit, which takes the files as they are in the staging area and stores that snapshot permanently to your Git directory.
If a particular version of a file is in the git directory, it’s considered committed. If it’s modified but has been added to the staging area, it is staged. And if it was changed since it was checked out but has not been staged, it is modified. In Chapter 2, you’ll learn more about these states and how you can either take advantage of them or skip the staged part entirely.
--------------------------------------------------------- 对于Git的基本概念介绍完毕 ---------------------------------------------------------
若需要下载Git可以参考如下链接,由于Mac上已经默认安装了Git,因此这里就不需要了。
gerryyang@mba:wcdj$git --versiongit version 1.8.3.4 (Apple Git-47)
Download and install the latest version of Git [4].
Tip: Git won't add an icon to your dock, it's not that sort of application. (注意:Git是一个命令行工具,它没有华丽的GUI界面,所以你只能在Terminal里使用它而不会在Mac的dock上找到它)
(2) 安装后,对Git进行配置
Now that you have Git installed, it's time to configure your settings. To do this you need to open the Terminal.
Username
First you need to tell git your name, so that it can properly label the commits you make.
git config --global user.name "Your Name Here"# Sets the default name for git to use when you commit
Email
Git saves your email address into the commits you make. We use the email address to associate your commits with your GitHub account.
git config --global user.email "your_email@example.com"# Sets the default email for git to use when you commit
Your email address for Git should be the same one associated with your GitHub account. If it is not, see this guide for help adding additional emails to your GitHub account. If you want to keep your email address hidden,this guide may be useful to you.
注意上面的设置是对全局生效的,若想对某个repo使用不同的username或email可以通过下面方法进行设置:The steps listed above show you how to set your user info globally. This means that no matter which repository you work in on your computer, you'll be making commits as that user. If you find yourself needing to make commits with different user info for a specific repository (perhaps for work vs. personal projects), you will have to change the info in that repository itself.
cd my_other_repo# Changes the working directory to the repository you need to switch info forgit config user.name "Different Name"# Sets the user's name for this specific repositorygit config user.email "differentemail@email.com"# Sets the user's email for this specific repository
Now your commits will be "blamed" on (associated with) the new user name and email whenever working in the specified repository.
Password caching
The last option we need to set will tell git that you don't want to type your username and password every time you talk to a remote server.
这里配置类似帮助我们缓存用户名和密码,方便我们使用,详细介绍可以参考链接[2]。
git credential-osxkeychain# Test for the cred helper# Usage: git credential-osxkeychain <get|store|erase>
To tell git to use osxkeychain, simply set the global git config:
git config --global credential.helper osxkeychain# Set git to use the osxkeychain credential helper
The next time you clone an HTTPS URL that requires a password you will be prompted for your username and password, and to grant access to the OSX keychain. After you've done this, the username and password are stored in your keychain and you won't be required to type them in to git again.
Tip: The credential helper only works when you clone an HTTPS repository URL. If you use the SSH repository URL instead, SSH keys are used for authentication.This guide offers help generating and using an SSH key pair.
注意:官方这里对credential的使用场景进行了说明,如果你使用SSH的方式,需要对SSH的key进行验证,参考链接[5]详细说明了如何生成一个SSH的公钥,以及在GitHub上进行配置。
“
Generating SSH Keys
”
While we recommend HTTPS because it is generally easier to set up, you can also use SSH keys to establish a secure connection between your computer and GitHub. The steps below will walk you through generating an SSH key and then adding the public key to your GitHub account.
Step 1: Check for SSH keys
First, we need to check for existing ssh keys on your computer. Open up Terminal and run:
cd ~/.sshls# Lists the files in your .ssh directory
Check the directory listing to see if you have a file named either id_rsa.pub orid_dsa.pub. If you don't have either of those files go tostep 2. Otherwise, you already have an existing keypair, and you can skip tostep 3.
Step 2: Generate a new SSH key
To generate a new SSH key, enter the code below. We want the default settings so when asked to enter a file in which to save the key, just press enter.
ssh-keygen -t rsa -C "your_email@example.com"# Creates a new ssh key, using the provided email as a label# Generating public/private rsa key pair.# Enter file in which to save the key (/Users/you/.ssh/id_rsa): [Press enter]ssh-add id_rsa
Now you need to enter a passphrase.
# Enter passphrase (empty for no passphrase): [Type a passphrase]# Enter same passphrase again: [Type passphrase again]
Which should give you something like this:
# Your identification has been saved in /Users/you/.ssh/id_rsa.# Your public key has been saved in /Users/you/.ssh/id_rsa.pub.# The key fingerprint is:# 01:0f:f4:3b:ca:85:d6:17:a1:7d:f0:68:9d:f0:a2:db your_email@example.com
Step 3: Add your SSH key to GitHub
Run the following code to copy the key to your clipboard.
pbcopy < ~/.ssh/id_rsa.pub# Copies the contents of the id_rsa.pub file to your clipboard
Alternatively, using your favorite text editor, you can open the ~/.ssh/id_rsa.pub file and copy the contents of the file manually
Warning: it's important to copy the key exactly without adding newlines or whitespace. Thankfully thepbcopy command makes it easy to perform this setup perfectly.
 Go to yourAccount Settings
 Click"SSH Keys" in the left sidebar
 Click "Add SSH key"
 Paste your key into the "Key" field
 Click "Add key"
- Confirm the action by entering your GitHub password
Step 4: Test everything out
To make sure everything is working you'll now SSH to GitHub. When you do this, you will be asked to authenticate this action using your password, which for this purpose is the passphrase you created earlier. Don't change thegit@github.com part. That's supposed to be there.
ssh -T git@github.com# Attempts to ssh to github
You may see this warning:
# The authenticity of host 'github.com (207.97.227.239)' can't be established.# RSA key fingerprint is 16:27:ac:a5:76:28:2d:36:63:1b:56:4d:eb:df:a6:48.# Are you sure you want to continue connecting (yes/no)?
Don't worry, this is supposed to happen. Verify that the fingerprint matches the one here and type "yes".
# Hi username! You've successfully authenticated, but GitHub does not# provide shell access.
If that username is correct, you've successfully set up your SSH key. Don't worry about the shell access thing, you don't want that anyway.
If you see "access denied" please consider using HTTPS instead of SSH. If you need SSH start at these instructions for diagnosing the issue.
Celebrate (恭喜,你已经对Git基本入门了,下篇文章将讲述如何创建一个Repository)
Congratulations, you now have Git and GitHub all set up! What do you want to do next?
- Set Up Git
- Create A Repository
- Fork A Repository
- Be Social
2 参考
[1] https://github.com/
[2] https://help.github.com/articles/set-up-git
[3] http://git-scm.com/book/en/Getting-Started-Git-Basics
[4] http://git-scm.com/downloads
[5] https://help.github.com/articles/generating-ssh-keys
- Mac之Git/GitHub使用(1)——Set up Git
- Mac之Git/GitHub使用(1)——Set up Git
- github set up git
- Mac之Git/GitHub使用(4)——Be Social
- Mac之Git/GitHub使用(4)——Be Social
- git mac github 使用
- git——Mac下github的使用
- [git hub]Set Up Git
- Mac使用git/github小结
- Mac使用git/github小结
- mac使用git管理Github
- mac使用git管理Github
- Mac之Git/GitHub使用(2)——Create A Repo
- Mac之Git/GitHub使用(3)——Fork A Repo
- Mac之Git/GitHub使用(2)——Create A Repo
- Mac之Git/GitHub使用(3)——Fork A Repo
- Set Up Git
- Set up Git
- 寂寞是爱永远的主题
- 4年之后我们又相见了
- 为一个不爱的人难过太不值了
- 将Android和iOS设备屏幕映射到电脑屏幕工具
- 《高效学习OpenGL》 之 显示列表实例 glCallList(),glGenLists(),glNewList(),glEndList()
- Mac之Git/GitHub使用(1)——Set up Git
- 数字图像处理—采样和量化
- ECoMark Platform搭建
- 树的直径,树的重心,树的分冶
- The current branch is not configured for pull No value for key branch.master.merge found in configur
- poj 2677 Tour(双调欧几里德旅行商问题,dp)
- EASY_PAT_ADVANCED LEVEL 1008_简单的面向对象 队列的使用
- UVa11127 - Triple-Free Binary Strings
- Unity3D游戏制作(三)——移动平台上的角色阴影制作