ASP.NET Web API详解
来源:互联网 发布:淘宝开店有什么要求 编辑:程序博客网 时间:2024/05/17 17:55

public class Product{public int Id{ get; set; }public string Name{ get; set; }public string Category{ get; set; }public decimal Price{ get; set; }}表1: 定义产品模型
创建产品数据模型后,我们可以在Controllers文件夹中创建一个新的API控制器,用来处理产品数据模型。默认情况下,一个基于Web API模版的MVC项目可以添加两个控制器: 一个继承于Controller类,另一个继承于ApiController类。在解决方案资源文件夹中右击Controllers文件夹,在弹出窗口中选择“Empty API controller”,添加一个新的controller。如图3所示:

图3:添加Empty API controllerController代码如表2所示:
public class ProductsController : ApiController { List<Product> products = new List<Product>(); public IEnumerable<Product> GetAllProducts() { GetProducts(); return products; } private void GetProducts() { products.Add(new Product {Id = 1, Name = "Television", Category="Electronic", Price=82000}); products.Add(new Product { Id = 2, Name = "Refrigerator", Category = "Electronic", Price = 23000 }); products.Add(new Product { Id = 3, Name = "Mobiles", Category = "Electronic", Price = 20000 }); products.Add(new Product { Id = 4, Name = "Laptops", Category = "Electronic", Price = 45000 }); products.Add(new Product { Id = 5, Name = "iPads", Category = "Electronic", Price = 67000 }); products.Add(new Product { Id = 6, Name = "Toys", Category = "Gift Items", Price = 15000 }); } public IEnumerable<Product> GetProducts(int selectedId) { if (products.Count() > 0) { return products.Where(p => p.Id == selectedId); } else { GetProducts(); return products.Where(p => p.Id == selectedId); } }
public class SampleController : ApiController { /// <summary> /// Get time /// </summary> /// <param name="t"></param> /// <returns></returns> public string GetTime(Time t) { return string.Format("Received Time: {0}:{1}.{2}", t.Hour, t.Minute, t.Second); } } public class Time { public int Hour { get; set; } public int Minute { get; set; } public int Second { get; set; } }
public string GetTime([FromUri] Time t) { -------------------}现在我们通过这个方法,传递相同的值,将会有不同的结果,如图5所示:

// asynchronous accessing of web api method async Task GetData() { StringBuilder result = new StringBuilder(); // Define the httpClient object using (HttpClient client = new HttpClient()) { // Define the base address of the MVC application hosting the web api // accessing the web api from the same solution client.BaseAddress = new Uri(HttpContext.Current.Request.Url.AbsoluteUri); // Define the serialization used json/xml/ etc client.DefaultRequestHeaders.Accept.Add( new MediaTypeWithQualityHeaderValue("application/json")); // Call the method HttpResponseMessage response = client.GetAsync("api/products").Result; if (response.IsSuccessStatusCode) { // Convert the result into business object var products = response.Content.ReadAsAsync<IEnumerable<Product>>().Result; foreach (var p in products) { result.Append(string.Format("{0} --- [Price: {1} Category: {2}] ", p.Name, p.Price, p.Category)); } } else { result.Append(string.Format("Error Code:-{0} Error Details: {1}", (int)response.StatusCode, response.ReasonPhrase)); } } data.Text = result.ToString(); }表4:创建一个HttpClient对象去访问实例中的API方法
<head> <title></title> <script src="Scripts/jquery-1.8.2.js"></script> <script type="text/javascript"> $.getJSON("api/products", function (data) { //Clear the div displaying the result $("#productView").empty(); //Create a table and append the table body var $table = $('<table border="2">'); var $tbody = $table.append('<tbody />').children('tbody'); //data - return value from the Web API method for (var i = 0; i < data.length; i++) { //add a new row to the table var $trow=$tbody.append('<tr />').children('tr:last'); //add a new column to display Name var $tcol = $trow.append("<td/>").children('td:last') .append(data[i].Name); //add a new column to display Category var $tcol = $trow.append("<td/>").children('td:last') .append(data[i].Category); //add a new column to display Price var $tcol = $trow.append("<td/>").children('td:last') .append(data[i].Price); } //display the table in the div $table.appendTo('#productView'); }); </script></head><body> <div id="productView"></div></body></html>表5:使用jQuery从Product API方法查找数据
$.getJSON("api/products", { selectedId: '4' }, function (data) { ….});你也可以在一个集合中传递多个参数,示范如下:
$.getJSON("api/products", { selectedId: '4', name: 'TV' }, function (data) { ….});$.getJSON("api/products?selectedId =4", function (data) { ….});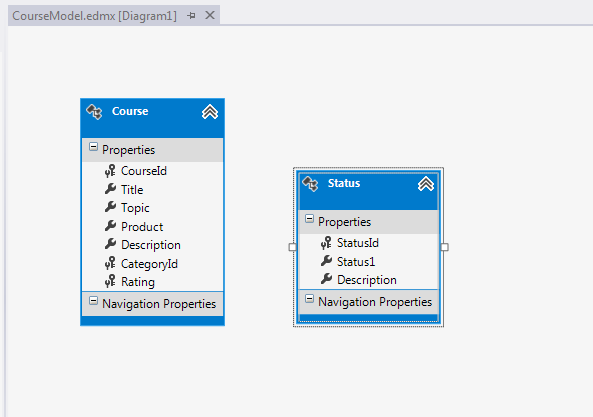

public class CourseController : ApiController{ private SampleDBEntities db = new SampleDBEntities(); // GET api/Course public IEnumerable<Course> GetCourses() { return db.Courses.AsEnumerable(); }// GET api/Course/5 public Course GetCourse(int id) { Course course = db.Courses.Single(c => c.CourseId == id); if (course == null) { throw new HttpResponseException(Request.CreateResponse(HttpStatusCode.NotFound)); } return course;}// PUT api/Course/5 public HttpResponseMessage PutCourse(int id, Course course) { if (!ModelState.IsValid) {return Request.CreateErrorResponse(HttpStatusCode.BadRequest, ModelState);}if (id != course.CourseId){return Request.CreateResponse(HttpStatusCode.BadRequest);}db.Courses.Attach(course);db.ObjectStateManager.ChangeObjectState(course, EntityState.Modified);try{db.SaveChanges();}catch (DbUpdateConcurrencyException ex){return Request.CreateErrorResponse(HttpStatusCode.NotFound, ex);}return Request.CreateResponse(HttpStatusCode.OK);}// POST api/Coursepublic HttpResponseMessage PostCourse(Course course){if (ModelState.IsValid){db.Courses.AddObject(course);db.SaveChanges();HttpResponseMessage response = Request.CreateResponse(HttpStatusCode.Created, course); response.Headers.Location = new Uri(Url.Link("DefaultApi", new { id = course.CourseId }));return response;}else{return Request.CreateErrorResponse(HttpStatusCode.BadRequest, ModelState);}}// DELETE api/Course/5public HttpResponseMessage DeleteCourse(int id){Course course = db.Courses.Single(c => c.CourseId == id);if (course == null) {return Request.CreateResponse(HttpStatusCode.NotFound);}db.Courses.DeleteObject(course);try{db.SaveChanges();}catch (DbUpdateConcurrencyException ex){return Request.CreateErrorResponse(HttpStatusCode.NotFound, ex);}return Request.CreateResponse(HttpStatusCode.OK, course);}protected override void Dispose(bool disposing){db.Dispose();base.Dispose(disposing);}}表6:CourseController API controller生成的代码
config.Routes.MapHttpRoute(name: "DefaultApi",routeTemplate: "api/{controller}/{action}/{id}",defaults: new { id = RouteParameter.Optional });更新规则后,我们可以在Web API方法上使用ActionName属性去指定action名字,代码片断如下:
[ActionName("GetAllProducts")]public IEnumerable<Product> GetAllProducts(){……………………………..} 注意:使用[NonAction]属性可以指明Web API方法不是一个API action方法。
[HttpGet]public IEnumerable<Product> GetProducts(int selectedId){………….. }[HttpPost]public void AddProduct(Product p){………….. } [AcceptVerbs("GET","PUT")]public IEnumerable<Product> GetProducts(int selectedId){………….. } private void GetProducts() { for (int i = 0; i < 5000; i++) { products.Add(new Product { Id = i, Name = "Product - "+i, Category = "The ASP.NET and Visual Web Developer teams have released the ASP.NET and Web Tools 2012.2 update, which extends the existing ASP.NET runtime and adds new web tooling to Visual Studio 2012. Whether you use Web Forms, MVC, Web API, or any other ASP.NET technology, there is something cool in this update for you.", Price = 1 }); } }表7:更新GetProducts()方法
GlobalConfiguration.Configuration.Formatters.RemoveAt(0);GlobalConfiguration.Configuration.Formatters.XmlFormatter.UseXmlSerializer = true;
执行XML序列化方法后,你可以使用http://<;<server>>:<<port>>/api/Products查看详情。
public class MediaTypeFormatterCompatibleMessagePack : MediaTypeFormatter { private readonly string _mime = "application/x-msgpack"; Func<Type, bool> IsAllowedType = (t) => { if (!t.IsAbstract && !t.IsInterface && t != null && !t.IsNotPublic) return true; if (typeof(IEnumerable).IsAssignableFrom(t)) return true; return false; }; public MediaTypeFormatterCompatibleMessagePack() { SupportedMediaTypes.Add(new MediaTypeHeaderValue(_mime)); } public override bool CanWriteType(Type type) { if (type == null) throw new ArgumentNullException("Type is null"); return IsAllowedType(type); } public override Task WriteToStreamAsync(Type type, object value, System.IO.Stream stream, HttpContent content, TransportContext transportContext) { if (type == null) throw new ArgumentNullException("type is null"); if (stream == null) throw new ArgumentNullException("Write stream is null"); var tcs = new TaskCompletionSource<object>(); if (type != typeof(string) && typeof(IEnumerable).IsAssignableFrom(type)) { value = (value as IEnumerable<object>).ToList(); } var serializer = MessagePackSerializer.Create<dynamic>(); serializer.Pack(stream, value); tcs.SetResult(null); return tcs.Task; } public override Task<object> ReadFromStreamAsync(Type type,Stream stream, HttpContent content, IFormatterLogger formatterLogger) { var tcs = new TaskCompletionSource<object>(); if (content.Headers != null && content.Headers.ContentLength == 0) return null; try { var serializer = MessagePackSerializer.Create(type); object result; using (var mpUnpacker = Unpacker.Create(stream)) { mpUnpacker.Read(); result = serializer.UnpackFrom(mpUnpacker); } tcs.SetResult(result); } catch (Exception e) { if (formatterLogger == null) throw; formatterLogger.LogError(String.Empty, e.Message); tcs.SetResult(GetDefaultValueForType(type)); } return tcs.Task; } public override bool CanReadType(Type type) { if (type == null) throw new ArgumentNullException("type is null"); return IsAllowedType(type); } }表8: 创建一个MessagePack媒体类型格式。
GlobalConfiguration.Configuration.Formatters.Clear(); GlobalConfiguration.Configuration.Formatters.Add(new MediaTypeFormatterCompatibleMessagePack());


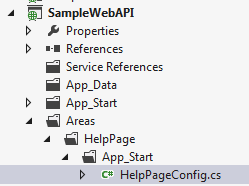
config.SetDocumentationProvider(new XmlDocumentationProvider(HttpContext.Current.Server.MapPath("~/App_Data/XmlDocument.xml"))); 下一步,在项目属性的Build章节的XML documentation file选项中选择启用XML documentation,复制config文件中指定的文件名到XML documentation filet选项,如图11所示。

图11:在Web API project项目中启用XML docmentation file
现在我们在API controller实例中添加XML文档,如表9所示。只需要每个方法定义前面指定”///“,得到这个方法默认的XML文档。进一步修改注解内容。
/// <summary> /// Get All products for our Sample /// </summary> /// <returns></returns> public IEnumerable<Product> GetAllProducts() { --------------- } /// <summary> /// Return the details of selected product depends on the product id passed. /// </summary> /// <param name="selectedId"></param> /// <param name="name"></param> /// <returns></returns> public IEnumerable<Product> GetProducts(int selectedId) { ------------------ }表 9: 在API controller实例中添加XML文档
一旦你更新完controller,运行应用并点击屏幕右上方的API链接,如图12:

注意XML文档注释已经添加到Controller,如图13。
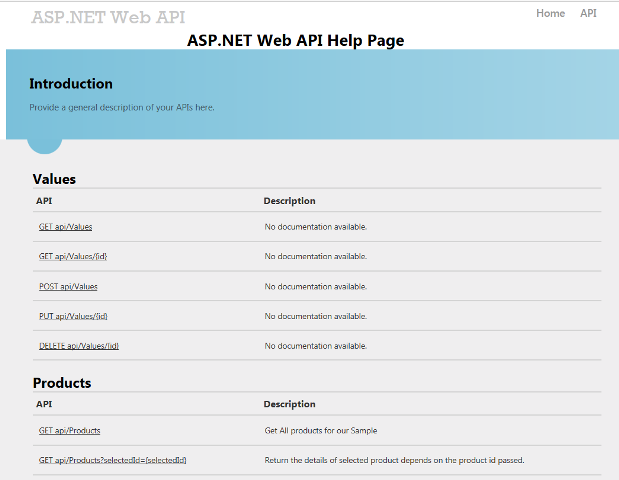
图13:在Web API帮助文件中显示注释
11. 对比WCF与Web API
WCF支持多种协义和messaging格式。在Web API中,我们只可以创建基于HTTP的服务。显然,WCF也可以创建HTTP服务,但是他里面隐藏了个别的抽象层。另外,WCF的执行要比Web API复杂。WCF中的HTTP执行使用的是Post方式,并且我们不能使用HTTP协义相关的主要功能,例如缓存和HTTP状态代码。使用Web API,我们可以执行所有的动作,如Get,Post,和Put,并且我们可以使用HTTP协义的多种功能。
WCF需要复杂的生成和地址操作,还有配置,但是Web API简单并直接的使用。Web API也是创建RESTfull服务的较好选择。通过这篇文章你能看到WCF和Web API的详细对比:WCF and ASP.NET Web API.
更新1:
使用jQuery传递复杂的数据类型给Web API方法,可以用JSON.Stringify。
例如:下面的代码代显示你可以传递自定义数据”user“给Web API方法
var user = {};<br /> user.name = 'Mathew';<br /> user.job = 'ITA';<br /> user.rating = 'Good';$.getJSON("api/getEmployeeDetail",<br /> {JSON.stringify(user)},<br /> function (data) { ......}<br /> ); - ASP.NET Web API详解
- ASP.NET Web API 入门示例详解
- asp.net web api
- ASP.NET Web API
- asp.net web api
- asp.net web api
- asp.net web api
- 实战 ASP.NET Web API
- ASP.NET Web Api 教程
- ASP.NET Web API 简介
- ASP.NET Web API GZip
- ASP.NET WEB API 读书笔记
- ASP.NET Web API 简介
- ASP.NET Web API 简介
- asp.net web api理解
- ASP.NET Web API 简介
- ASP.NET Web API(一)
- asp.net web api实例
- OC之基本控件三
- 哲理小故事
- 面对编程领域战场的惨烈厮杀, 如何找到一份符合自己意愿的编程工作?
- hdu 3306 Another kind of Fibonacci ---矩阵快速幂
- linux下的信号处理
- ASP.NET Web API详解
- extract indecies 源码 为什么reader读不进去pcd文件呢?我想是否因为配置问题?
- 数字图像处理—像素间联系-连接-连通
- C++由于指针对象释放,造成Std::__non_rtti_Object例外发生
- smarty模板引擎之if, elseif else
- 单向链栈实现进制转换(十进制转换成N进制数【正数】)
- PHP中die()与exit()的区别
- win8.1 VMware9 安装(仅供同学参考)
- Remove Duplicates from Sorted List - LeetCode