eclipse下编译cocos2dx工程
来源:互联网 发布:安卓模拟器linux版 编辑:程序博客网 时间:2024/05/17 00:10
## Prerequisites:
* Android NDK
* Android SDK **OR** Eclipse ADT Bundle
* Android AVD target installed
## Building project
There are two ways of building Android projects.
1. Eclipse
2. Command Line
### Import Project in Eclipse
#### Features:
1. Complete workflow from Eclipse, including:
* Build C++.
* Clean C++.
* Build and Run whole project.
* Logcat view.
* Debug Java code.
* Javascript editor.
* Project management.
2. True C++ editing, including:
* Code completion.
* Jump to definition.
* Refactoring tools etc.
* Quick open C++ files.
#### Setup Eclipse Environment (only once)
**NOTE:** This step needs to be done only once to setup the Eclipse environment for cocos2d-x projects. Skip this section if you've done this before.
1. Download Eclipse ADT bundle from [Google ADT homepage](http://developer.android.com/sdk/index.html)
**OR**
Install Eclipse with Java. Add ADT and CDT plugins.
2. Only for Windows
1. Install [Cygwin](http://www.cygwin.com/) with make (select make package from the list during the install).
2. Add `Cygwin\bin` directory to system PATH variable.
3. Add this line `none /cygdrive cygdrive binary,noacl,posix=0,user 0 0` to `Cygwin\etc\fstab` file.
3. Set up Variables:
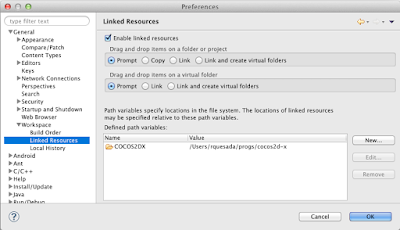
1. Path Variable `COCOS2DX`:
* Eclipse->Preferences->General->Workspace->**Linked Resources**
* Click **New** button to add a Path Variable `COCOS2DX` pointing to the root cocos2d-x directory.
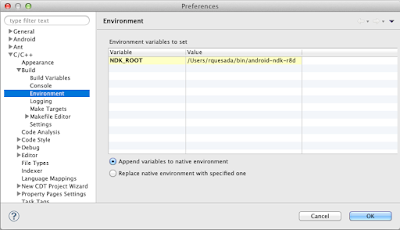
2. C/C++ Environment Variable `NDK_ROOT`:
* Eclipse->Preferences->C/C++->Build->**Environment**.
* Click **Add** button and add a new variable `NDK_ROOT` pointing to the root NDK directory.
* Only for Windows: Add a new variable **CYGWIN** with value `nodosfilewarning`
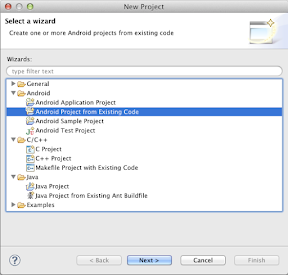
4. Import libcocos2dx library project:
1. File->New->Project->Android Project From Existing Code.
2. Click **Browse** button and open `cocos2d-x/cocos2dx/platform/android/java` directory.
3. Click **Finish** to add project.
#### Adding and running from Eclipse
 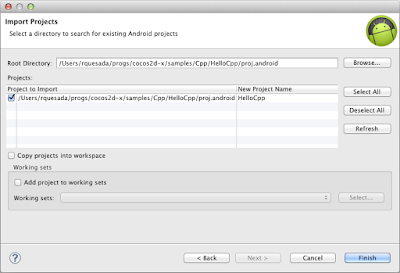
1. File->New->Project->Android Project From Existing Code
2. **Browse** to your project directory. eg: `cocos2d-x/cocos2dx/samples/Cpp/TestCpp/proj.android/`
3. Add the project
4. Click **Run** or **Debug** to compile C++ followed by Java and to run on connected device or emulator.
### Running project from Command Line
$ cd cocos2d-x/samples/Cpp/TestCpp/proj.android/
$ export NDK_ROOT=/path/to/ndk
$ ./build_native.sh
$ ant debug install
If the last command results in sdk.dir missing error then do:
$ android list target
$ android update project -p . -t (id from step 6)
$ android update project -p cocos2d-x/cocos2dx/platform/android/java/ -t (id from step 6)
* Android NDK
* Android SDK **OR** Eclipse ADT Bundle
* Android AVD target installed
## Building project
There are two ways of building Android projects.
1. Eclipse
2. Command Line
### Import Project in Eclipse
#### Features:
1. Complete workflow from Eclipse, including:
* Build C++.
* Clean C++.
* Build and Run whole project.
* Logcat view.
* Debug Java code.
* Javascript editor.
* Project management.
2. True C++ editing, including:
* Code completion.
* Jump to definition.
* Refactoring tools etc.
* Quick open C++ files.
#### Setup Eclipse Environment (only once)
**NOTE:** This step needs to be done only once to setup the Eclipse environment for cocos2d-x projects. Skip this section if you've done this before.
1. Download Eclipse ADT bundle from [Google ADT homepage](http://developer.android.com/sdk/index.html)
**OR**
Install Eclipse with Java. Add ADT and CDT plugins.
2. Only for Windows
1. Install [Cygwin](http://www.cygwin.com/) with make (select make package from the list during the install).
2. Add `Cygwin\bin` directory to system PATH variable.
3. Add this line `none /cygdrive cygdrive binary,noacl,posix=0,user 0 0` to `Cygwin\etc\fstab` file.
3. Set up Variables:
1. Path Variable `COCOS2DX`:
* Eclipse->Preferences->General->Workspace->**Linked Resources**
* Click **New** button to add a Path Variable `COCOS2DX` pointing to the root cocos2d-x directory.

2. C/C++ Environment Variable `NDK_ROOT`:
* Eclipse->Preferences->C/C++->Build->**Environment**.
* Click **Add** button and add a new variable `NDK_ROOT` pointing to the root NDK directory.

* Only for Windows: Add a new variable **CYGWIN** with value `nodosfilewarning`
4. Import libcocos2dx library project:
1. File->New->Project->Android Project From Existing Code.
2. Click **Browse** button and open `cocos2d-x/cocos2dx/platform/android/java` directory.
3. Click **Finish** to add project.
#### Adding and running from Eclipse
 
1. File->New->Project->Android Project From Existing Code
2. **Browse** to your project directory. eg: `cocos2d-x/cocos2dx/samples/Cpp/TestCpp/proj.android/`
3. Add the project
4. Click **Run** or **Debug** to compile C++ followed by Java and to run on connected device or emulator.
### Running project from Command Line
$ cd cocos2d-x/samples/Cpp/TestCpp/proj.android/
$ export NDK_ROOT=/path/to/ndk
$ ./build_native.sh
$ ant debug install
If the last command results in sdk.dir missing error then do:
$ android list target
$ android update project -p . -t (id from step 6)
$ android update project -p cocos2d-x/cocos2dx/platform/android/java/ -t (id from step 6)
0 0
- eclipse下编译cocos2dx工程
- eclipse下编译cocos2dx工程(windows下无cygwin)
- WIN7下,用Eclipse/NDK/CDT编译Cocos2dx的工程
- cocos2dx创建android独立工程及eclipse编译
- windows下cocos2dx 2.2.x编译安卓工程
- windows下cocos2dx 3.x编译安卓工程
- windows下cocos2dx 2.2.x编译安卓工程
- Win7下eclipse ADT调试cocos2dx-lua工程
- 在Eclipse下编译Keil MDK工程
- 在Eclipse下编译Keil MDK工程
- mac 下命令行编译eclipse 工程
- 将cocos2dx项目工程移植到eclipse中编译打包APK
- 将cocos2dx项目工程移植到eclipse中编译打包APK
- cocos2dx:ndk编译加入eclipse
- Eclipse 不编译工程
- eclipse 重新编译工程
- 在windows下使用eclipse编译VDSP工程的方法
- Ubuntu 下用 Eclipse 编译调试 Android NDK 工程
- 纯CSS实现倒计时动画
- Mobile 上pre的特殊处理
- jQuery中点击+-加减号改变表单数值
- 网关啊,路由啊
- RDIFramework.NET ━ .NET快速信息化系统开发框架 V2.7 版本发布
- eclipse下编译cocos2dx工程
- Android位置策略
- 《程序员2013精华本》
- 嵌入式 C语言实现进度条以及实现带进度条的CP命令等编程示例收集二
- iOS 如何选择delegate、notification、KVO?
- javascript 清除字符串空格
- 简单工厂 VS 工厂方法
- UFLFL Exercise:Self-Taught Learning
- mysql : Lock wait timeout exceeded; try restarting transaction