Android 常用控件讲解
来源:互联网 发布:mac 替换war文件 编辑:程序博客网 时间:2024/05/16 15:49
1
2
3
4
5
6
7
8
9
10
11
12
13
14
15
16
<?xml version="1.0" encoding="utf-8"?><LinearLayout xmlns:android="http://schemas.android.com/apk/res/android" android:layout_width="fill_parent" android:layout_height="fill_parent" android:orientation="horizontal"> <EditText android:id="@+id/edit_message" android:layout_weight="1" android:layout_width="0dp" android:layout_height="wrap_content" android:hint="@string/edit_message" /> <Button android:id="@+id/button_send" android:layout_width="wrap_content" android:layout_height="wrap_content" android:text="@string/button_send" android:onClick="sendMessage" /></LinearLayout>常规控制元件
Buttons
1
2
3
4
5
6
<Button android:layout_width="wrap_content" android:layout_height="wrap_content" android:text="@string/button_text" ... />1
2
3
4
5
<ImageButton android:layout_width="wrap_content" android:layout_height="wrap_content" android:src="@drawable/button_icon" ... />1
2
3
4
5
6
<Button android:layout_width="wrap_content" android:layout_height="wrap_content" android:text="@string/button_text" android:drawableLeft="@drawable/button_icon" ... />如何响应Button的点击事件
1
2
3
4
5
6
Button button = (Button) findViewById(R.id.button_send);button.setOnClickListener(new View.OnClickListener() { public void onClick(View v) { // 响应按钮点击事件 }});1
2
3
4
5
6
7
<?xml version="1.0" encoding="utf-8"?><Button xmlns:android="http://schemas.android.com/apk/res/android" android:id="@+id/button_send" android:layout_width="wrap_content" android:layout_height="wrap_content" android:text="@string/button_send" android:onClick="sendMessage" />1
2
3
4
/** 点击Button时调用*/publicvoid sendMessage(View view){ // 处理逻辑}定义Button的样式
无框Button
1
2
3
4
5
6
7
<Button android:id="@+id/button_send" android:layout_width="wrap_content" android:layout_height="wrap_content" android:text="@string/button_send" android:onClick="sendMessage" style="?android:attr/borderlessButtonStyle" />自定义Button的背景
1
2
3
4
5
6
7
8
<?xml version="1.0" encoding="utf-8"?><selector xmlns:android="http://schemas.android.com/apk/res/android"> <item android:drawable="@drawable/button_pressed" android:state_pressed="true" /> <item android:drawable="@drawable/button_focused" android:state_focused="true" /> <item android:drawable="@drawable/button_default" /></selector>1
2
3
4
5
6
7
<Button android:id="@+id/button_send" android:layout_width="wrap_content" android:layout_height="wrap_content" android:text="@string/button_send" android:onClick="sendMessage" android:background="@drawable/button_custom" />Text Fields
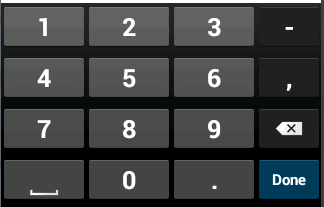
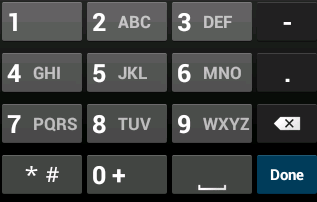
为文本指定特定的软键盘类型
1
2
3
4
5
6
<EditText android:id="@+id/email_address" android:layout_width="fill_parent" android:layout_height="wrap_content" android:hint="@string/email_hint" android:inputType="textEmailAddress" />定制键盘的其他表现形式
1
2
3
4
5
6
<EditText android:id="@+id/postal_address" android:layout_width="fill_parent" android:layout_height="wrap_content" android:hint="@string/postal_address_hint" android:inputType="textCapWords|textNoSuggestions" />定制键盘指定键的Action
1
2
3
4
5
6
7
<EditText android:id="@+id/search" android:layout_width="fill_parent" android:layout_height="wrap_content" android:hint="@string/search_hint" android:inputType="text" android:imeOptions="actionSend" />监听“回车键”的Action
1
2
3
4
5
6
7
8
9
10
11
12
EditText editText = (EditText) findViewById(R.id.search);editText.setOnEditorActionListener(new OnEditorActionListener() { @Override public boolean onEditorAction(TextView v, int actionId, KeyEvent event) { boolean handled = false; if (actionId == EditorInfo.IME_ACTION_SEND) { sendMessage(); handled = true; } return handled; }});1
2
3
4
5
6
7
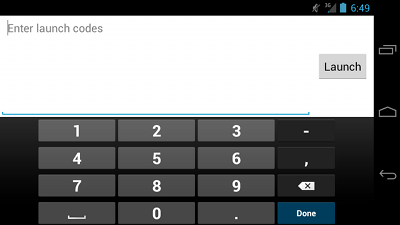
<EditText android:id="@+id/launch_codes" android:layout_width="fill_parent" android:layout_height="wrap_content" android:hint="@string/enter_launch_codes" android:inputType="number" android:imeActionLabel="@string/launch" />创建带有提示文的文本域
1
2
3
4
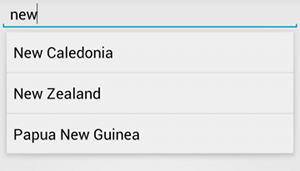
<AutoCompleteTextView xmlns:android="http://schemas.android.com/apk/res/android" android:id="@+id/autocomplete_country" android:layout_width="fill_parent" android:layout_height="wrap_content" />1
2
3
4
5
6
7
8
9
10
11
12
13
14
15
16
<?xml version="1.0" encoding="utf-8"?><resources> <string-array name="countries_array"> <item>Afghanistan</item> <item>Albania</item> <item>Algeria</item> <item>American Samoa</item> <item>Andorra</item> <item>Angola</item> <item>Anguilla</item> <item>Antarctica</item> ... <item>China</item> ... </string-array></resources>1
2
3
4
5
6
7
// 获得AutoCompleteTextView组件AutoCompleteTextView textView = (AutoCompleteTextView) findViewById(R.id.autocomplete_country);// 从strings.xml获得国家名称的数组String[] countries = getResources().getStringArray(R.array.countries_array);// 创建适配器,并用setAdapter()为AutoCompleteTextView设置此适配器ArrayAdapter<String> adapter = new ArrayAdapter<String>(this, android.R.layout.simple_list_item_1, countries);textView.setAdapter(adapter);Checkboxes(复选框)
监听CheckBox的点击事件
1
2
3
4
5
6
7
8
9
10
11
12
13
14
15
16
<?xml version="1.0" encoding="utf-8"?><LinearLayout xmlns:android="http://schemas.android.com/apk/res/android" android:orientation="vertical" android:layout_width="fill_parent" android:layout_height="fill_parent"> <CheckBox android:id="@+id/checkbox_meat" android:layout_width="wrap_content" android:layout_height="wrap_content" android:text="@string/meat" android:onClick="onCheckboxClicked"/> <CheckBox android:id="@+id/checkbox_cheese" android:layout_width="wrap_content" android:layout_height="wrap_content" android:text="@string/cheese" android:onClick="onCheckboxClicked"/></LinearLayout>1
2
3
4
5
6
7
8
9
10
11
12
13
14
15
16
17
18
19
20
public void onCheckboxClicked(View view) { // 获得checkBox的选中状态(选中或不选) boolean checked = ((CheckBox) view).isChecked(); switch(view.getId()) {//通过Id获得改变了状态的CheckBox case R.id.checkbox_meat: if (checked) // 选中状态下的逻辑 else // 没有选中状态下的逻辑 break; case R.id.checkbox_cheese: if (checked) //选中状态下的逻辑 else //没有选中状态下的逻辑 break; // ... }}1
2
3
4
5
6
7
8
9
10
11
12
meat = (CheckBox) findViewById(R.id.checkbox_meat);// 给CheckBox设置事件监听meat.setOnCheckedChangeListener(new CompoundButton.OnCheckedChangeListener() { @Override public void onCheckedChanged(CompoundButton buttonView, boolean isChecked) { if (isChecked) { // 选中状态下的逻辑 } else { // 没有选中状态下的逻辑 } } });Radio Buttons
1
2
3
4
5
6
7
8
9
10
11
12
13
14
15
16
<?xml version="1.0" encoding="utf-8"?><RadioGroup xmlns:android="http://schemas.android.com/apk/res/android" android:layout_width="fill_parent" android:layout_height="wrap_content" android:orientation="vertical"> <RadioButton android:id="@+id/radio_pirates" android:layout_width="wrap_content" android:layout_height="wrap_content" android:text="@string/pirates" android:onClick="onRadioButtonClicked"/> <RadioButton android:id="@+id/radio_ninjas" android:layout_width="wrap_content" android:layout_height="wrap_content" android:text="@string/ninjas" android:onClick="onRadioButtonClicked"/></RadioGroup>1
2
3
4
5
6
7
8
9
10
11
12
13
14
15
public void onRadioButtonClicked(View view) { // 获得RadioButton的选中状态(选还是没选) boolean checked = ((RadioButton) view).isChecked(); switch(view.getId()) {//通过Id获得改变了状态的CheckBox case R.id.radio_pirates: if (checked) // 选中了R.id.radio_pirates break; case R.id.radio_ninjas: if (checked) // 选中了R.id.radio_ninjas break; }}同样地,可以在java代码里添加监听器(RadioGroup.OnCheckedChangeListener,注意这里的监听器和上文提到的CompoundButton.OnCheckedChangeListener是不一样的),实现方法与上文类似,在此需要为RadioGroup添加一个Id(radioGroup)
1
2
3
4
5
6
7
8
9
10
11
12
13
14
15
// 通过findViewById获得RadioGroup对象 raGroup = (RadioGroup) findViewById(R.id.radioGroup); // 添加事件监听器 raGroup.setOnCheckedChangeListener(new RadioGroup.OnCheckedChangeListener() { @Override public void onCheckedChanged(RadioGroup group, int checkedId) { if (checkedId == R.id.radio_pirates) { // 选中R.id. radio_pirates的逻辑 } else if (checkedId == R.id.radio_ninjas) { // 选中R.id.radio_ninjas的逻辑 } else { // 其他逻辑 } } });Toggle Buttons
1
2
3
4
5
6
7
<ToggleButton android:id="@+id/togglebutton" android:layout_width="wrap_content" android:layout_height="wrap_content" android:textOn="on" android:textOff="off" android:onClick="onToggleClicked"/>1
2
3
4
5
6
7
8
9
10
public void onToggleClicked (View view) { // 判断是否处在“on”状态下 boolean on = ((ToggleButton) view).isChecked(); if (on) { // on 状态下的逻辑 } else { // off 状态下的逻辑 }}1
2
3
4
5
6
7
8
9
10
ToggleButton toggle = (ToggleButton) findViewById(R.id.togglebutton);toggle.setOnCheckedChangeListener(new CompoundButton.OnCheckedChangeListener() { public void onCheckedChanged(CompoundButton buttonView, boolean isChecked) { if (isChecked) { // on 状态下的逻辑 } else { // off状态下的逻辑 } }});Spinners
1
2
3
4
<Spinner android:id="@+id/planets_spinner" android:layout_width="fill_parent" android:layout_height="wrap_content" />1
2
3
4
5
6
7
8
9
10
11
12
13
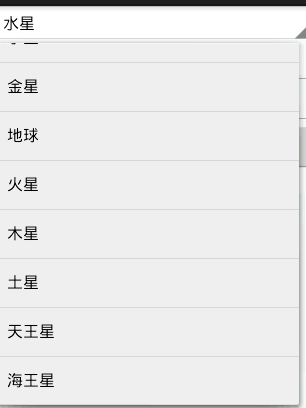
<?xml version="1.0" encoding="utf-8"?><resources> <string-arrayname="planets_array"> <item>水星</item> <item>金星</item> <item>地球</item> <item>火星</item> <item>木星</item> <item>土星</item> <item>天王星</item> <item>海王星</item> </string-array></resources>1
2
3
4
5
6
7
Spinner spinner =(Spinner) findViewById(R.id.spinner);// 使用默认的下拉列表布局和数组plants_array来创建数组适配器ArrayAdapterArrayAdapter<CharSequence> adapter =ArrayAdapter.createFromResource(this,R.array.planets_array, android.R.layout.simple_spinner_item);// 指定所弹出的下拉列表的布局方式adapter.setDropDownViewResource(android.R.layout.simple_spinner_dropdown_item);// 为spinner设置适配器spinner.setAdapter(adapter);1
2
3
4
5
<Spinner android:id="@+id/planets_spinner" android:layout_width="fill_parent" android:layout_height="wrap_content" android:entries="@array/planets_array"/>响应用户的选择
1
2
3
4
5
6
7
8
9
10
public class SpinnerActivity extends Activity implements OnItemSelectedListener { ... public void onItemSelected(AdapterView<?> parent, View view, int pos, long id) { //可以使用方法parent.getItemAtPosition(pos)获得用户选择的选项 } public void onNothingSelected(AdapterView<?> parent) { //用户没有选取任何选项时触发此方法 }}1
2
Spinner spinner =(Spinner) findViewById(R.id.spinner);spinner.setOnItemSelectedListener(this);Pickers(选择器)
创建时间选择器Time Picker
1
2
3
4
5
6
7
8
9
10
11
12
13
14
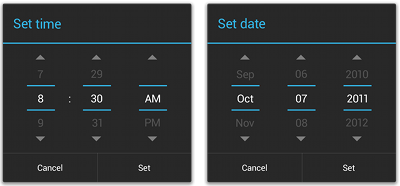
public static class TimePickerFragment extends DialogFragment implements TimePickerDialog.OnTimeSetListener { @Override public Dialog onCreateDialog(Bundle savedInstanceState) { //用当前时间作为picker的默认时间 final Calendar c = Calendar.getInstance(); int hour = c.get(Calendar.HOUR_OF_DAY); int minute = c.get(Calendar.MINUTE); // 创建TimePickerDialog对象并返回该对象 return new TimePickerDialog(getActivity(), this, hour, minute,DateFormat.is24HourFormat(getActivity())); } public void onTimeSet(TimePicker view, int hourOfDay, int minute) { //当用户设置好(点击“Set”按钮)之后的逻辑 }}1
2
3
4
5
<Button android:layout_width="wrap_content" android:layout_height="wrap_content" android:text="@string/pick_time" android:onClick="showTimePickerDialog" />1
2
3
4
public void showTimePickerDialog(View v) { DialogFragment newFragment = new TimePickerFragment(); newFragment.show(getSupportFragmentManager(), "timePicker");}1
2
3
4
5
6
7
8
9
10
11
12
13
14
15
public static class DatePickerFragment extends DialogFragment implements DatePickerDialog.OnDateSetListener { @Override public Dialog onCreateDialog(Bundle savedInstanceState) { //使用当前日期作为date picker 的默认显示日期 final Calendar c = Calendar.getInstance(); int year = c.get(Calendar.YEAR); int month = c.get(Calendar.MONTH); int day = c.get(Calendar.DAY_OF_MONTH); // 创建 DatePickerDialog 对象并返回给对象 return new DatePickerDialog(getActivity(), this, year, month, day); } public void onDateSet(DatePicker view, int year, int month, int day) { //当用户设置好(点击“Set”按钮)之后的逻辑 }}1
2
3
4
5
<Button android:layout_width="wrap_content" android:layout_height="wrap_content" android:text="@string/pick_date" android:onClick="showDatePickerDialog" />1
2
3
4
public void showDatePickerDialog(View v) { DialogFragment newFragment = new DatePickerFragment(); newFragment.show(getSupportFragmentManager(), "datePicker");} 0 0
- Android 常用控件讲解
- Android 常用控件讲解 --控件
- Android基础控件讲解
- Android 讲解:基本UI 控件
- Android 讲解:UI 自定义控件
- Android常用空间textview讲解
- android控件与常用控件
- android 常用控件 时钟控件
- android控件与常用控件
- Android常用控件
- Android常用控件-spinner
- Android常用控件-AutoCompleteTextView
- android常用控件(转)
- android 的常用控件
- Android常用控件总结
- Android常用控件总结
- Android控件常用属性
- Android常用控件总结
- Java 中使用HttpURLConnection发起POST 请求
- 纳德拉干得不错!微软股价逼近14年最高点
- HDU 3518 Boring counting 重复出现不重叠子串个数(后缀数组)
- 在Eclipse中使用JUnit4进行单元测试
- Twitter野心:收购两家欧洲电视数据分析公司
- Android 常用控件讲解
- java中main函数解析
- C++编程->异常处理入门
- POJ 2336 Ferry Loading II (贪心或动态规划)
- 安装StatTransfer过程的错误libstdc++.so.5解决
- 《深入浅出WPF》笔记——绘画与动画
- 深入java基础
- TCP WINDOW 详解
- Java内存管理
