The Continuous Improvement Project
来源:互联网 发布:中国书画网络展 编辑:程序博客网 时间:2024/05/16 19:17
Using ActionBarSherlock in Android Studio (0.1.9)
Update 05 Aug 2013 : A better way to use Action Bar on Android 2.1 and above, see Using Action Bar on Android 2.1 (API Level 7) and above using Support Library (Rev. 18) in Android Studio 0.2.3
Preparing Android Studio Packages
Make sure the following packages are installed:
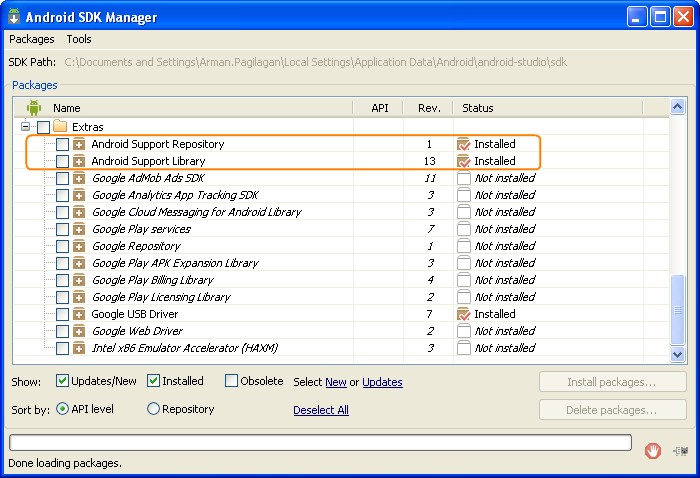
Preparing the Action Bar Sherlock Library
Download the Action Bar Sherlock library from https://api.github.com/repos/JakeWharton/ActionBarSherlock/zipball/4.3.1 or go to http://actionbarsherlock.com/ to get the latest version.
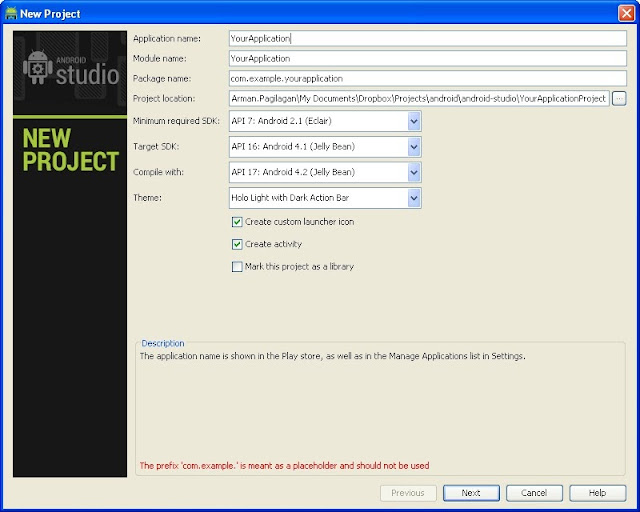
Creating the Android Project
Create a project in Android Studio called YourProject. Click Next to continue until you have created the project.
Your Project Root directory should look like this:

Importing Action Bar Sherlock Library to your Project
Open the Action Bar Sherlock Library you have downloaded earlier and extract it somewhere (for example to your Desktop). After extraction, the directory should look like this:
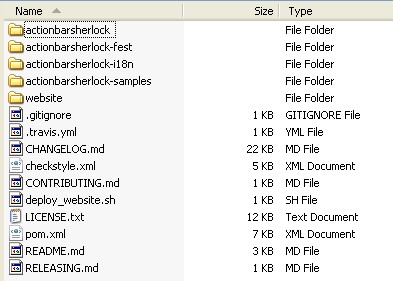
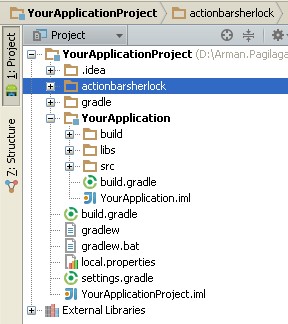
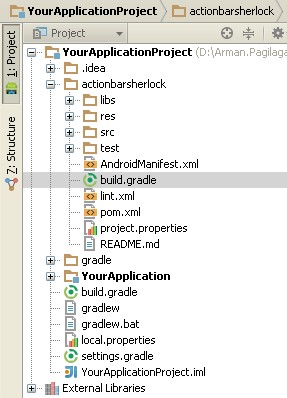
Copy the directory called "actionbarsherlock" to your Project Root directory. After copying, your Project Root directory should look like this:
Fixing your Gradles
First, modify the settings.gradle to tell Gradle that we have to include another project on our build. settings.gradle is located on your Project Root (YourApplicationProject/settings.gradle).
Let us include the actionbarsherlock directory in your settings.gradle:


Preparing Android Studio Packages
Make sure the following packages are installed:
Preparing the Action Bar Sherlock Library
Download the Action Bar Sherlock library from https://api.github.com/repos/JakeWharton/ActionBarSherlock/zipball/4.3.1 or go to http://actionbarsherlock.com/ to get the latest version.
Creating the Android Project
Create a project in Android Studio called YourProject. Click Next to continue until you have created the project.
Your Project Root directory should look like this:
Importing Action Bar Sherlock Library to your Project
Open the Action Bar Sherlock Library you have downloaded earlier and extract it somewhere (for example to your Desktop). After extraction, the directory should look like this:
Copy the directory called "actionbarsherlock" to your Project Root directory. After copying, your Project Root directory should look like this:
Fixing your Gradles
First, modify the settings.gradle to tell Gradle that we have to include another project on our build. settings.gradle is located on your Project Root (YourApplicationProject/settings.gradle).
Let us include the actionbarsherlock directory in your settings.gradle:
Now that we have included the actionbarsherlock directory, we need to create a build.gradle file in the actionbarsherlock directory. We can copy the build.gradle file from our Application Directory (Note that there are two build.gradle file currently in our Project Directory. One is located at the Project Root Directory YourApplicationProject/build.gradle, another one is located at the Application Directory YourApplicationProject/YourApplication/build.gradle. The later is what we need to copy to YourApplicationProject/actionbarsherlock).
After copying, the actionbarsherlock directory should look like this:
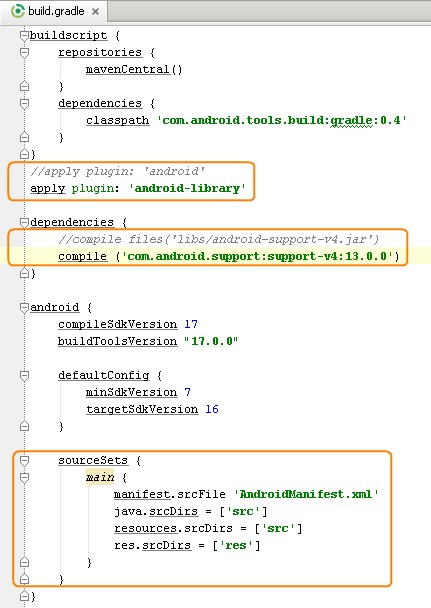
Modify the copied build.gradle from the actionbarshelock directory. For the first change, plugin is changed from android to android-library. The second change will tell Gradle that this library is needed and include it once as compared to the original code where it will always include the library file even though it might have been included already on other build.gradle. This could cause issues when compiling the project. The last code block tells Gradle where are the relevant files and directory for it to compile the library.
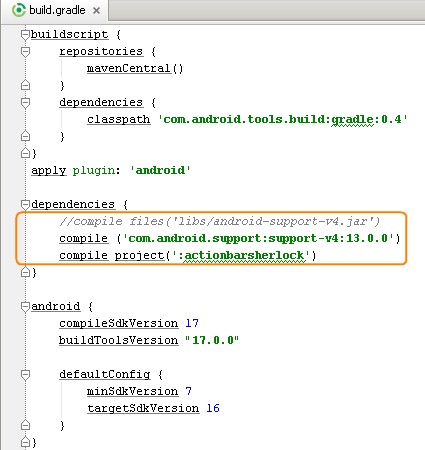
Lastly, we need to modify the build.gradle from our Application Directory (YourApplicationProject/YourApplication/build.gradle) to include the actionbarsherlock library project and replace the compile file line with compile to prevent the errors when including libraries more than once.
Now your Gradle are ready to compile. But before you can start coding, we need to configure Android Studio and tell about the library.
Adding Action Bar Sherlock library to Android Studio
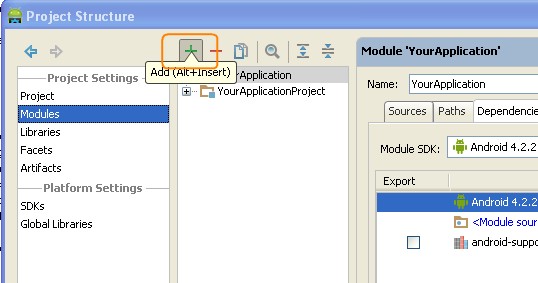
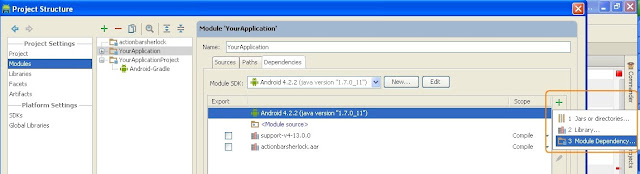
Go to File then Project Structure. In Project Settings, click the Modules from the list and then click the "+" plus sign on the next list as seen below:
Choose Import Module and Select the actionbarsherlock directory. Click OK when finished. On the Import Module dialog box, click Next until finished. Apply and then OK on the Project Structure Dialog Box. In Android Studio 0.1.9, I have to restart the IDE for the modules to appear in the List.
After restarting, Go to File then Project Structure again, and then select YourApplication from the list. On the right side, select Dependencies tab and click the "+" sign and choose Module Dependency.
Select the actionbarsherlock and then click Apply then OK to quit the Project Structure. Restart again the Android Studio.
You can now start coding your project using the Action Bar Sherlock.
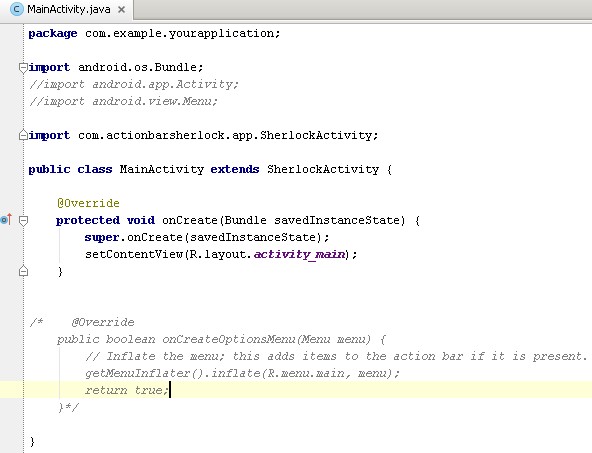
Testing the Action Bar Sherlock Library
In MainAcitivity.java, lets change the Activity to SherlockActivity. We need to remove the onCreateOptionsMenu override method as this does not exists.
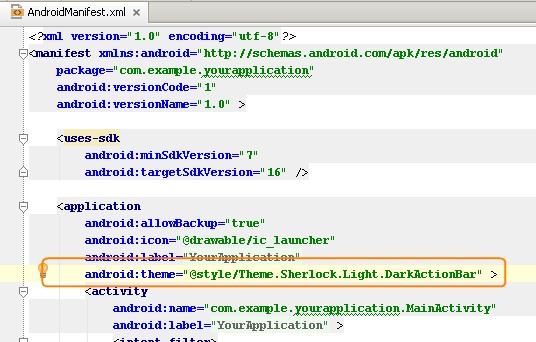
Finally we need to modify the AndroidManifest.xml of our application to change the theme to the Action Bar Sherlock library themes.
Your application will now able to run the Action Bar Sherlock library for Android 2.X and above. This is an emulator running on Android 2.2:
I hope this helps you to get started with Action Bar Sherlock Library in Android Studio (0.1.9).
Updated on 2013/07/16 : Here is the source code for the whole project in a zip file.
转自:http://armanpagilagan.blogspot.com/2013/07/using-actionbarsherlock-in-android.html
0 0
- The Continuous Improvement Project
- Project Management Process Improvement
- Software Testing and Continuous Quality Improvement, Second Edition
- Continuous integration for Xcode Project
- Interpreting the CMMI: A Process Improvement Approach
- Real Process Improvement Using the CMMI
- The Project
- Review of Debugging the development process 6. Constant, Unceasing Improvement
- Interpreting the CMMI (R): A Process Improvement Approach, Second Edition
- Is the Improvement of String.substring() in Java7 Really Reasonable?
- The improvement of IPC——(1)pipe
- Automation for the people: Continuous Inspection
- Automation for the people: Continuous feedback
- Automation for the people: Continuous testing
- ROI of Software Process Improvement: Metrics for Project Managers and Software Engineers
- Test Experience Share: We should consider the impact of the hardware improvement to the test code
- Road Improvement
- Automation for the people: Choosing a Continuous Integration server
- postgrsql 查看物理空间函数
- MFC小结
- 金管家:储值卡可以设置密码吗?
- shell和python中互调
- java基础教程2---->程序执行过程映射到内存怎么变化
- The Continuous Improvement Project
- 关于浮点数的原理详解
- Chitika北美网络流量报告:WP KO黑莓、iOS超Android
- Python中常见的文件对象内建函数
- Consistent Hash 一致性哈希
- C#中成员初始化顺序
- android String的使用
- Lua脚本在C++下的舞步(一)
- java中volatile关键字的含义