CAS单点登录
来源:互联网 发布:qq群关系数据库 种子 编辑:程序博客网 时间:2024/06/06 20:52
原文:http://blog.csdn.net/fei1502816/article/details/6695117
----------------------
最近项目中需要做单点登录,客户端包含java和php,java有几个应用程序,php是discuz+supesite+ucenter,需
要这几个客户端都要能单点登录和登出,在网上找了许多相关资料,今天终于配置成功,步骤如下:
1、cas服务端:下载地址:http://downloads.jasig.org/cas/,cas的服务端和客户端有许多版本,最新版本和老版本
有很大的区别,目前服务端最新版本为:cas-server-3.4.4-release.zip
解压cas-server-3.4.4-release.zip将modules目录下的cas-server-webapp-3.4.4.war改名称为cas.war复制到
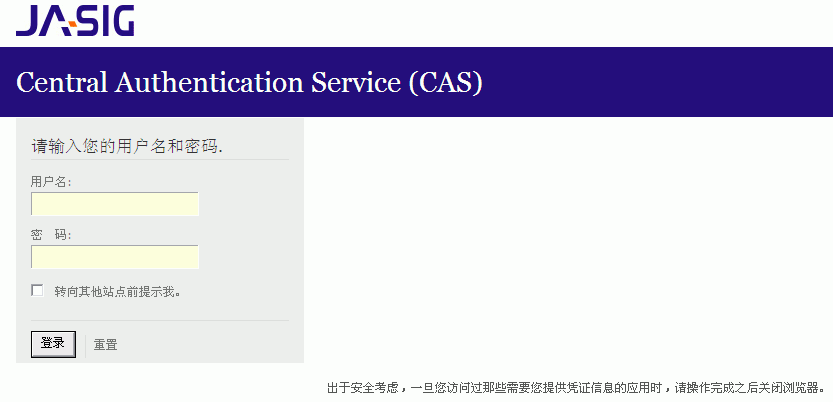
tomcat的webapps下,启动tomcat,访问:http://localhost:8080/cas/login 就可以看到登录界面了:
(如下:图一)

cas服务端默认采用的是 用户名=密码的验证,并且采用的是https验证,需要给tomact配置证书,本系统没有采用https验证,若采用https验证可参考:
http://blog.csdn.net/haydenwang8287/archive/2010/07/26/5765941.aspx。
1.1、若不采用https验证,服务器端需要配置
1)、
- cas\WEB-INF\deployerConfigContext.xml
- <bean class="org.jasig.cas.authentication.handler.support.HttpBasedServiceCredentialsAuthenticationHandler"
- p:httpClient-ref="httpClient"/>
增加参数p:requireSecure="false",是否需要安全验证,即HTTPS,false为不采用,加上去之后如下:
- <bean class="org.jasig.cas.authentication.handler.support.HttpBasedServiceCredentialsAuthenticationHandler"
- p:httpClient-ref="httpClient" p:requireSecure="false"/>
2)、
- cas\WEB-INF\spring-configuration\
- ticketGrantingTicketCookieGenerator.xml
- <bean id="ticketGrantingTicketCookieGenerator" class="org.jasig.cas.web.support.CookieRetrievingCookieGenerator"
- p:cookieSecure="true"
- p:cookieMaxAge="-1"
- p:cookieName="CASTGC"
- p:cookiePath="/cas" />
参数p:cookieSecure="true",同理为HTTPS验证相关,TRUE为采用HTTPS验证,FALSE为不采用https验证。
参数p:cookieMaxAge="-1",简单说是COOKIE的最大生命周期,-1为无生命周期,即只在当前打开的IE窗口有效,IE关闭或重新打开其它窗口,仍会要求验证。可以根据需要修改为大于0的数字,比如3600等,意思是在3600秒内,打开任意IE窗口,都不需要验证。
1.2、服务器端退出访问:http://localhost:8080/cas/logout,
(如下图二)
若希望退出后能返回则需要配置
服务端cas-servlet.xml配置
<bean id="logoutController" class="org.jasig.cas.web.LogoutController" ... .../>
增加属性 p:followServiceRedirects="true"
退出链接为:http://localhost:8080/cas/logout?service=http://localhost:8080/Casclient/index.jsp
1.3、更改服务器端验证方式,采用数据库验证:
修改配置文件deployerConfigContext.xml,加dbcp连接池:(以oracle为例)
- <bean id="casDataSource" class="org.apache.commons.dbcp.BasicDataSource">
- <property name="driverClassName">
- <value>oracle.jdbc.driver.OracleDriver</value>
- </property>
- <property name="url">
- <value>jdbc:oracle:thin:@192.168.18.26:1521:orcl</value>
- </property>
- <property name="username">
- <value>test</value>
- </property>
- <property name="password">
- <value>test</value>
- </property>
- </bean>
需要的jar包有:(见附件:cas-server-support-jdbc-3.4.4.jar,commons-dbcp-1.2.1.jar,commons-pool-1.3.jar,ojdbc14_g.jar)
配置加密方式,cas内置的有MD5加密,也可以写自己的加密类,实现org.jasig.cas.authentication.handler.PasswordEncoder接口即可:
- <bean id="passwordEncoder"
- class="org.jasig.cas.authentication.handler.DefaultPasswordEncoder" autowire="byName">
- <constructor-arg value="MD5"/>
- </bean>
注释掉默认的验证方式,采用数据库查询验证:
- <property name="authenticationHandlers">
- <list>
- <!----注释掉这里的默认验证方式,采用以下验证QueryDatabaseAuthenticationHandler-->
- <!--
- <bean
- class="org.jasig.cas.authentication.handler.support.SimpleTestUsernamePasswordAuthenticationHandler" /> -->
- <bean class="org.jasig.cas.adaptors.jdbc.QueryDatabaseAuthenticationHandler">
- <property name="dataSource" ref="casDataSource" />
- <property name="sql"
- value="select password from userinfo where lower(username) = lower(?)" />
- <property name="passwordEncoder" ref="passwordEncoder"/>
- </bean>
- </list>
- </property>
---------------到这里cas服务端的配置就完成了。
2、java客户端配置,下载客户端:http://downloads.jasig.org/cas-clients/,目前最新版本为:cas-client-3.2.0
将modules下的jar复制到java客户端Casclient1的lib下,在web.xml中配置过滤器,配置如下(详情见附件):
- <?xml version="1.0" encoding="UTF-8"?>
- <web-app version="2.4"
- xmlns="http://java.sun.com/xml/ns/j2ee"
- xmlns:xsi="http://www.w3.org/2001/XMLSchema-instance"
- xsi:schemaLocation="http://java.sun.com/xml/ns/j2ee
- http://java.sun.com/xml/ns/j2ee/web-app_2_4.xsd">
- <!-- 用于单点退出,该过滤器用于实现单点登出功能,通知其他应用单点登出-->
- <listener>
- <listener-class>org.jasig.cas.client.session.SingleSignOutHttpSessionListener</listener-class>
- </listener>
- <!-- 该过滤器用于实现单点登出功能,可选配置。 -->
- <filter>
- <filter-name>CAS Single Sign Out Filter</filter-name>
- <filter-class>org.jasig.cas.client.session.SingleSignOutFilter</filter-class>
- </filter>
- <filter-mapping>
- <filter-name>CAS Single Sign Out Filter</filter-name>
- <url-pattern>/*</url-pattern>
- </filter-mapping>
- <!-- 该过滤器负责用户的认证工作,必须启用它 -->
- <filter>
- <filter-name>CASFilter</filter-name>
- <filter-class>org.jasig.cas.client.authentication.AuthenticationFilter</filter-class>
- <init-param>
- <param-name>casServerLoginUrl</param-name>
- <param-value>http://192.168.18.8:8080/cas/login</param-value>
- <!--这里的server是服务端的IP-->
- </init-param>
- <init-param>
- <param-name>serverName</param-name>
- <param-value>http://192.168.18.8:8989</param-value>
- </init-param>
- </filter>
- <filter-mapping>
- <filter-name>CASFilter</filter-name>
- <url-pattern>/*</url-pattern>
- </filter-mapping>
- <!-- 该过滤器负责对Ticket的校验工作,必须启用它 -->
- <filter>
- <filter-name>CAS Validation Filter</filter-name>
- <filter-class>
- org.jasig.cas.client.validation.Cas20ProxyReceivingTicketValidationFilter</filter-class>
- <init-param>
- <param-name>casServerUrlPrefix</param-name>
- <param-value>http://192.168.18.8:8080/cas</param-value>
- </init-param>
- <init-param>
- <param-name>serverName</param-name>
- <param-value>http://192.168.18.8:8989</param-value>
- </init-param>
- </filter>
- <filter-mapping>
- <filter-name>CAS Validation Filter</filter-name>
- <url-pattern>/*</url-pattern>
- </filter-mapping>
- <!--
- 该过滤器负责实现HttpServletRequest请求的包裹,
- 比如允许开发者通过HttpServletRequest的getRemoteUser()方法获得SSO登录用户的登录名,可选配置。
- -->
- <filter>
- <filter-name>CAS HttpServletRequest Wrapper Filter</filter-name>
- <filter-class>
- org.jasig.cas.client.util.HttpServletRequestWrapperFilter</filter-class>
- </filter>
- <filter-mapping>
- <filter-name>CAS HttpServletRequest Wrapper Filter</filter-name>
- <url-pattern>/*</url-pattern>
- </filter-mapping>
- <filter>
- <filter-name>CAS Assertion Thread Local Filter</filter-name>
- <filter-class>org.jasig.cas.client.util.AssertionThreadLocalFilter</filter-class>
- </filter>
- <filter-mapping>
- <filter-name>CAS Assertion Thread Local Filter</filter-name>
- <url-pattern>/*</url-pattern>
- </filter-mapping>
- <welcome-file-list>
- <welcome-file>index.jsp</welcome-file>
- </welcome-file-list>
- </web-app>
页面为:
- <%
- AttributePrincipal principal = (AttributePrincipal)request.getUserPrincipal();
- String username = principal.getName();
- %>
- <br/>----------------------------------------------------------<br/>
- <h1>登录成功,这是客户端1啊</h1><br/>
- 用户名:<%=username %><br/>
- <a href="http://localhost:8989/Casclient2/index.jsp">进入客户端2</a><br/>
- <a href="http://localhost:8080/cas/logout?service=http://localhost:8989/Casclient1/index.jsp">退出</a><br/>
-----------到这里java客户端配置成功,发布到tomcat,复制Casclient1改名为Casclient2,启动tomcat,
访问Casclient1,跳转到登录页面,登录成功后成功转向登录成功页面,这时访问Casclient2发现不需要登录即显示登录成功页面,java单点登录成功。
3、配置php客户端,下载php客户端:http://downloads.jasig.org/cas-clients/php/ ,目前最新版本为:CAS-1.2.0RC2
新建php工程:Phpcasclient1,将CAS文件夹和CAS.php复制到工程中,修改CAS/client.php,将其中的https改为http,将docs/examples/example_simple.php
复制到工程中,修改如下:
- <?php
- //
- // phpCAS simple client
- //
- // import phpCAS lib
- include_once('CAS.php');
- phpCAS::setDebug();
- // initialize phpCAS
- phpCAS::client(CAS_VERSION_2_0,'192.168.18.8',8080,'cas');
- // no SSL validation for the CAS server
- phpCAS::setNoCasServerValidation();
- // force CAS authentication
- phpCAS::forceAuthentication();
- // at this step, the user has been authenticated by the CAS server
- // and the user's login name can be read with phpCAS::getUser().
- // logout if desired
- if (isset($_REQUEST['logout'])) {
- $param=array("service"=>"http://localhost/Phpcasclient1/example_simple.php");//退出登录后返回
- phpCAS::logout($param);
- }
- // for this test, simply print that the authentication was successfull
- ?>
- <html>
- <head>
- <title>phpCAS simple client</title>
- </head>
- <body>
- <h1>Successfull Authentication!这是客户端1</h1>
- <p>the user's login is <b><?php echo phpCAS::getUser(); ?></b>.</p>
- <p>phpCAS version is <b><?php echo phpCAS::getVersion(); ?></b>.</p>
- <p><a href="http://192.168.18.8:8989/Casclient1/index.jsp">去java客户端1</a></p>
- <p><a href="?logout=">退出</a></p>
- </body>
- </html>
php配置需要开启php_curl,可以复制Phpcasclient1为Phpcasclient2
访问:http://localhost/Phpcasclient1/example_simple.php,跳转到登录页面,登录成功后访问Phpcasclient2,不需要登录,
php单点登录成功,这时再访问java客户端发现也不需要登录,php和java应用之间单点登录成功。
注:php的phpCAS::client(CAS_VERSION_2_0,'192.168.18.8',8080,'cas');地址需要和java的web.xml中的cas服务器地址一致,我开始一个写的ip:192.168.18.8,一个写的localhost,
php和java总是不能同步登录,郁闷了好久
----------------到这里java和php的客户端已经配置完成,现在你会发现php和java之间不能单点登出,php端退出java客户端也退出,反之java退出但是php却没有同步退出
这里需要做一个配置,在
phpCAS::setNoCasServerValidation();
// force CAS authentication
phpCAS::forceAuthentication();
这里加上
phpCAS::setNoCasServerValidation();
// force CAS authentication
phpCAS::handleLogoutRequests(); 这里会检测服务器端java退出的通知,就能实现php和java间同步登出了。
phpCAS::forceAuthentication();
至于discuz+supesite的单点登录,再了解了php单点登录的原理后就需要改造discuz+supesite的登录代码了,discuz的为logging.php
supersite的为batch.login.php,俺是做java开发的,对php不是很熟悉,所以改造的觉得不是很靠谱,大致是先让discuz单点登录,获取用户名,根据用户
获取数据库中的密码再交给discuz系统自己的登录系统登录。discuz是采用cookie验证的,所以在java端退出后,discuz不会退出。
若谁有改造很成功的可以交流下。
参考网址:
http://blog.csdn.net/DL88250/archive/2008/08/20/2799522.aspx
http://www.wsria.com/archives/1349
http://tonrenyuye.blog.163.com/blog/static/30012576200922925820471/
http://www.discuz.net/thread-1416206-1-1.html
- cas实现单点登录
- CAS 单点登录原理
- cas 实现单点登录
- CAS 实现单点登录
- CAS单点登录
- CAS单点登录原理图
- CAS单点登录配置
- cas单点登录系统
- 单点登录 CAS分析
- cas实现单点登录
- cas 单点登录
- CAS单点登录
- cas单点登录
- CAS单点登录(SSO)
- CAS单点登录
- CAS单点登录
- cas单点登录系统
- CAS单点登录实例
- LeetCode Pascal's Triangle II
- 汽车租赁系统
- 程序员必须进行的10项投资
- IAR环境下stm32上ucos的移植
- poj2513
- CAS单点登录
- cisco全网互通
- 关于oj爆RE
- Cocos2d-x学习笔记(17)(TestCpp源码分析-1)
- 怎么在自己的SDK环境下运行网上下载的andengine做的游戏应用
- GRE E-rater Analysis
- jQuery.extend
- jquery ligerUI学习
- 公用继承


