构建自己的Android代码托管服务器
来源:互联网 发布:60天内禁止转出阿里云 编辑:程序博客网 时间:2024/04/30 06:41
研究android源码的都知道,在下载源码时,都是用repo init ,repo sync等命令去下载源码,repo内部是使用git进行版本控制的,之前没有仔细的了解,只知道跟着source.android.com的教程,当个打字员,然后编译,之后rom就出来了。让我进行这方面的研究的一个trigger是我现在进行的项目,需要对android的framework进行改动,我需要对音频模块进行修改,然后我小弟需要对另外一个模块进行修改,考虑到长久的代码管理及代码备份整合,有必要进行代码托管。之前我一直习惯使用svn,但是android那么庞大的数据量,用svn,再怎么多的硬盘也不够。先前就对git有所耳闻,但一直感觉它是个谜,没有勇气去触碰,趁着这个机会,也想好好学一学。
本文的目的是构建自己的android源码仓库,为此构建了一条龙的教程,进行了一系列服务端的安装配置,如repo,git,,gerrit,ssh rsa认证,并在此基础上从github上迁移Cyanogenmod仓库,达到最终的目的。
1、repo原理分析
由于设备的原因,我现在代码都是从Cyanogenmod 上拉取的。根据官方的教程,是从http://github.com/Cyanogenmod/android.git 下载下来的,我之前以为它的代码全都是在那,用浏览器打开下,居然只有两个文件:README.mkdn和default.xml,仔细的看了下它的内容,尤其是default.xml,发现了端倪.
http://github.com/Cyanogenmod/android.git内容:

default.xml:
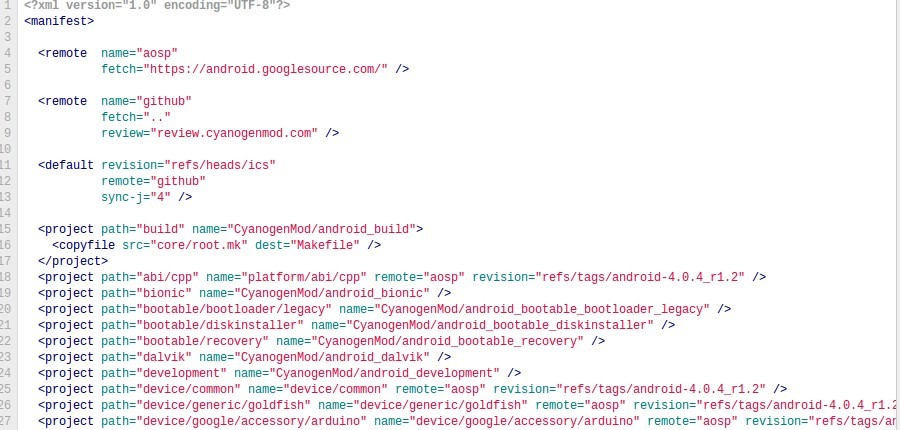
看着default.xml,仔细的跟源码进行对照,发现了其中的奥秘,也终于见识了git的分布式功能:git是个分布式的版本控制软件,它可以让你把代码分布在各个仓库,然后从各个仓库把各个项目取出来,这些仓库可以是你自己的,也可以是别人的。而repo正是对这些仓库进行统一的控制管理的工具。从default.xml,可以看到有<remote><project>标签,<remote>表示一个git源,而<project>是从那些源取出来的项目,在<project>可以使用remote指定源,如果没有指定,就从<default>使用定义的源<project>里的path表示下载到android source的目录,name表示从源处获取的项目git仓库位置,revision表示分支版本。如上图,我们可以看到,该版本,从aosp的android-4.0.4_r1.2分支取出device/common项目,放置在android源码根目录的device/common目录下。
repo会从指定的版本仓库里下载里面的default.xml文件,进行解析,然后根据不同的<remote>和<project>的配置,把项目从分布服务端下载下来,从而形成android的源码, 强大吧!
强大吧!
因此,我们可以修改里面的default.xml,更改部分的<project>成自己的版本仓库,便可进行分布式的开发了。自己可以github.com上构建个自己的仓库,进行开发。
repo在管理的时候,会使用gerrit进行Code Review,这个稍后再讲,不过《Git权威指南》的作者有一篇《脱离 Gerrit 审核服务器,使用 repo》,据称可以脱离Gerrit,很惭愧,按照他的教程我没有成功,也不想去深究了,求各路大牛指教。
repo的命令详见:http://source.android.com/source/using-repo.html
2、git服务端架设
具体git的命令不详细描述了,有几个个人认为好的资源分享下:
《Pro Git》
《看日记学Git》
《Git权威指南》 --- 未读,听说口碑很好
Git的架设通常需要openssh server, Git, Gitosis, Apache2,我的服务端是ubuntu,这里用了两台机器:
- Server:表示我的Git服务端
- Client: 表示我的Git客户端
2.1、Server上安装Git服务
- sudo apt-get install git-core
2.2、Server上安装Gitosis
- sudo apt-get install python-setuptools
- mkdir ~/src
- cd ~/src
- git clone https://github.com/tv42/gitosis.git
- cd gitosis
- sudo python setup.py install
2.3、为Gitosis创建系统用户
- sudo adduser git
- sudo passwd git
2.4、安装远程管理客户端
- ssh-keygen -t rsa
- scp ~/.ssh/id_rsa.pub git@Server:/home/git
- sudo -H -u git gitosis-init < /home/git/id_rsa.pub
- sudo chmod 755 /home/git/repositories/gitosis-admin.git/hooks/post-update
- git clone git@Server:repositories/gitosis-admin.git
- [group gitosis-admin]
- members =emos@emos.com
- writable = gitosis-admin
2.5、添加新用户
2.6、创建新项目
- cd ~
- mkdir sample.git
- git --bare init
之后可以再gitosis.conf,修改配置文件,配置权限
- [group sample]
- members = emos@emos.com
- writable = sample
可以通过http://your-server-ip/cgi-bin/gitweb.cgi,查看你当前的Git仓库。
2.7、ssh rsa认证
- RSAAuthentication yes
- PubkeyAuthentication yes
- AuthorizedKeysFile %h/.ssh/authorized_keys
- cd /home/git
- cp /home/git/id_rsa.pub .ssh/authorized_keys
3、Gerrit服务端配置

3.1、gerrit安装
3.2、安装配置apache2
- sudo apt-get install apache2
- ln -s /etc/apache2/mods-available/proxy.conf /etc/apache2/mods-enable/proxy.conf
- ln -s /etc/apache2/mods-available/proxy.load /etc/apache2/mods-enable/proxy.load
- ln -s /etc/apache2/mods-available/proxy_http.load /etc/apache2/mods-enable/proxy_http.load
- <VirtualHost *:8088>
- ServerName localhost
- ProxyRequests Off
- ProxyVia Off
- ProxyPreserveHost On
- <Proxy *>
- Order deny,allow
- Allow from all
- </Proxy>
- <Location /login/>
- AuthType Basic
- AuthName "Gerrit Code Review"
- AuthBasicProvider file
- AuthUserFile /path/to/gerrit/etc/passwords <!-- /path/to/gerrit为gerrit目录 -->
- Require valid-user
- </Location>
- ProxyPass / http://127.0.0.1:8080/
- </VirtualHost>
- NameVirtualHost *:8088
- Listen 8088
- htpasswd -c /path/to/gerrit/etc/passwords "gerrit_fisrt_username" (第一次时要加-c,之后就不用了)
- [httpd]
- listenUrl = proxy-http://127.0.0.1:8080/
- ssh -p 29418 gerrit_fisrt_username@your-server-ip
3.3、修正邮件地址
- remote: ERROR: You have not registered any email addresses.
- $ bin/gerrit.sh stop
- $ java -jar bin/gerrit.war gsql
- Welcome to Gerrit Code Review 2.1.6.1
- (H2 1.2.134 (2010-04-23))
- Type '\h' for help. Type '\r' to clear the buffer.
- gerrit> select * from ACCOUNT_EXTERNAL_IDS;
- ACCOUNT_ID | EMAIL_ADDRESS | PASSWORD | EXTERNAL_ID
- -----------+------------------------+----------+------------------------------------------
- 1000000 | NULL | NULL | uuid:ac1b8a08-2dd1-4aa1-8449-8b2994dffaed
- 1000000 | NULL | NULL | username:demo
- (2 rows; 23 ms)
- gerrit> update ACCOUNT_EXTERNAL_IDS set EMAIL_ADDRESS='alex.blewitt@example.com' where ACCOUNT_ID=1000000;
- UPDATE 2; 5 ms
- gerrit> select * from ACCOUNT_EXTERNAL_IDS;
- ACCOUNT_ID | EMAIL_ADDRESS | PASSWORD | EXTERNAL_ID
- -----------+------------------------+----------+------------------------------------------
- 1000000 | alex.blewitt@example.com | NULL | uuid:ac1b8a08-2dd1-4aa1-8449-8b2994dffaed
- 1000000 | alex.blewitt@example.com | NULL | username:demo
- (2 rows; 23 ms)
- gerrit> \q
- Bye
- $ bin/gerrit.sh start
3.4、Gerrit创建项目
- ssh -p 29418 git@your-server-ip gerrit create-project --name example.git
- $ git clone ssh://git@your-server-ip:29418/example.git
- $ cd example
- $ echo hello > world
- $ git add world
- $ git commit -m "The World"
- [master (root-commit) 06bf85e] The World
- 1 files changed, 1 insertions(+), 0 deletions(-)
- create mode 100644 world
- $ git push
- No refs in common and none specified; doing nothing.
- Perhaps you should specify a branch such as 'master'.
- $ git push origin master
- Counting objects: 3, done.
- Writing objects: 100% (3/3), 217 bytes, done.
- Total 3 (delta 0), reused 0 (delta 0)
- To ssh://me@localhost:29418/example.git
- ! [remote rejected] master -> master (prohibited by Gerrit)
- error: failed to push some refs to 'ssh://demo@localhost:29418/example.git'
- $ git config remote.origin.push refs/heads/*:refs/for/*
- $ git push origin
- Counting objects: 3, done.
- Writing objects: 100% (3/3), 217 bytes, done.
- Total 3 (delta 0), reused 0 (delta 0)
- To ssh://demo@localhost:29418/example.git
- * [new branch] master -> refs/for/master
Submit
+1和+2权限,并为每个权限添加用户组。 权限配置好以后, 点击某个commitid,在点击review,然后点击pulish或者submit, 顺序是先审核,再验证,再提交。
3.5、Gerrit创建分支
- $ git checkout -b gingerbead
- $ git push origin gingerbread

4、构建android仓库
4.1、制作android服务器镜像
- $ mkdir /home/git/mirror/
- $ cd /home/git/mirror/
- $ repo init -u http://github.com/CyanogenMod/android.git --mirror -b gingerbread
- $ repo sync
4.2、建立版本库
- $ mkdir /home/git/android/gingerbread
- $ cd /home/git/android/gingerbread
- $ repo init -u git@your-server-ip:mirror/CyanogenMod/android.git --mirror -b gingerbread
修改.repo/manifest.xml
- - fetch="git://android.git.kernel.org/"
- + fetch=".."
- $ repo sync
即可。构建完毕,之后就可以在Client使用repo -init -u git@your-server-ip:android/gingerbread/CyanogenMod/android.git -b ginerbread进行源码下载。
References: http://xxw8393.blog.163.com/blog/static/372568342011112111028926/
5、总结
总的来讲,构建过程还是比较顺利的,遇到问题查看网上的信息进行各种分析,比较蛋疼的是那android源码的下载,在ubuntu上搭建的过程很简洁,很适合俺这种新手。不过在构建过程中,没有对Git有一定的了解碰到问题是比较郁闷的,比如那个Gerrit的上传及创建分支的问题,没有对它深入的理解,对那些命令估计也只是抄来抄去的,不能理解它的原理,我就属于这种,接下来要好好研究下。
文章出处:http://blog.csdn.net/billpig/article/details/7604828
- 构建自己的Android代码托管服务器
- 构建自己的Android代码托管服务器
- 构建自己的Android代码托管服务器
- 构建自己的Android代码托管服务器
- 构建自己的SVN 代码托管服务
- 将树莓派作为自己的软件代码托管服务器!!!
- 中小企业用户如何托管自己的服务器
- 将自己的代码托管到github
- 使用gitHup托管自己的代码
- 构建自己的 Git 服务器
- 构建自己的Ngrok服务器
- Android开发初级00_1如何在GIT上托管自己的代码的知识点
- SVN代码托管服务器
- 将自己的代码托管到GitHub上
- 如何将自己的代码上传到GitHub托管
- github构建自己的代码库
- 如何构建自己的代码库
- 托管代码的优点
- 网页中播放Mp3(兼容火狐,谷歌,ie主要浏览器)
- 爱你一万年
- 电商为什么总跳不出‘’怪圈‘’?
- 通过百度地图API,将百度坐标转换成GPS经纬度
- php 安装http 扩展
- 构建自己的Android代码托管服务器
- hibernate annotation 主键生成策略的相关配置
- https://github.com/Trinea/android-open-project
- 二分查找(折半查找)
- 经纬财富:莱芜现货白银(天通银)交易参数
- C语言程序连接MySQL数据库教程及注意事项 - C语言
- ios strong和weak
- phonegap3.4安装geolocation插件
- Spring DI基础实例解析