Android如何通过shareduserid获取系统权限
来源:互联网 发布:淘宝网 电脑版 官网 编辑:程序博客网 时间:2024/05/16 13:24
android会为每个apk进程分配一个单独的空间(比如只能访问/data/data/自己包名下面的文件),一般情况下apk之间是禁止相互访问数据的。通过Shared User id,拥有同一个User id的多个APK可以配置成运行在同一个进程中.所以默认就是可以互相访问任意数据. 也可以配置成运行成不同的进程, 同时可以访问其他APK的数据目录下的数据库和文件.就像访问本程序的数据一样(使用IPC机制,不同进程之间,比如AIDL)。
一、使用同一个shareuserid,多个apk运行到同一个进程,实现多个apk之间的数据访问
实现效果:把A.apk assets目录下的session.log拷贝到/data/data/A包名/目录下面
A.apk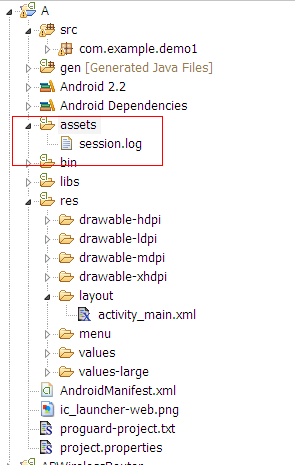
AndroidManifest.xml
01<manifest xmlns:android="http://schemas.android.com/apk/res/android"02 package="com.example.demo1"03 android:sharedUserId="com.example"04 android:versionCode="1"05 android:versionName="1.0" >06 <uses-sdk07 android:minSdkVersion="8"08 android:targetSdkVersion="15" />09 <application10 android:icon="@drawable/ic_launcher"11 android:label="@string/app_name"12 android:theme="@style/AppTheme" >13 <activity14 android:name=".MainActivity"15 android:label="@string/title_activity_main" >16 <intent-filter>17 <action android:name="android.intent.action.MAIN" />18 19 <category android:name="android.intent.category.LAUNCHER" />20 </intent-filter>21 </activity>22 </application>23 24</manifest>B.apk(实现访问资源并且拷贝)
MainActivity.java(如何访问assets资源文件请看上一篇http://my.oschina.net/zhoulc/blog/118693)
01package com.example.demo2;02 03import java.io.File;04import java.io.FileOutputStream;05import java.io.IOException;06import java.io.InputStream;07import java.io.OutputStream;08 09import android.os.Bundle;10import android.app.Activity;11import android.content.Context;12import android.content.pm.PackageManager.NameNotFoundException;13import android.view.Menu;14import android.view.MenuItem;15import android.support.v4.app.NavUtils;16 17public class MainActivity extends Activity {18 19 @Override20 public void onCreate(Bundle savedInstanceState) {21 super.onCreate(savedInstanceState);22 setContentView(R.layout.activity_main);23 Context context = null;24 InputStream input = null;25 OutputStream output = null;26 try {27 context = this.createPackageContext("com.example.demo1",28 Context.CONTEXT_IGNORE_SECURITY);29 30 File file = new File("/data/data/com.example.demo1/session.log");31 if (!file.exists()) {32 33 file.createNewFile();34 }35 input = context.getAssets().open("session.log");36 output = new FileOutputStream(file);37 byte[] buffer = new byte[1024];38 int readLength = 0;39 while((readLength = input.read(buffer)) != -1){40 output.write(buffer, 0, readLength);41 }42 } catch (Exception e) {43 // TODO Auto-generated catch block44 e.printStackTrace();45 }46 finally{47 try {48 if(input!=null || output!= null){49 input.close();50 output.close();51 input = null;52 output = null;53 }54 } catch (Exception e2) {55 // TODO: handle exception56 }57 }58 }59 60 @Override61 public boolean onCreateOptionsMenu(Menu menu) {62 getMenuInflater().inflate(R.menu.activity_main, menu);63 return true;64 }65 66}01<manifest xmlns:android="http://schemas.android.com/apk/res/android"02 package="com.example.demo2"03 android:versionCode="1"04 android:versionName="1.0"05 android:sharedUserId="com.example">06 <uses-sdk07 android:minSdkVersion="8"08 android:targetSdkVersion="15" />09 <application10 android:icon="@drawable/ic_launcher"11 android:label="@string/app_name"12 android:theme="@style/AppTheme" >13 <activity14 android:name=".MainActivity"15 android:label="@string/title_activity_main" >16 <intent-filter>17 <action android:name="android.intent.action.MAIN" />18 19 <category android:name="android.intent.category.LAUNCHER" />20 </intent-filter>21 </activity>22 </application>23 24</manifest>实现效果:

二、通过shareduserid来获取系统权限
(1)在AndroidManifest.xml中添加android:sharedUserId="android.uid.system"
(2)在Android.mk文件里面添加LOCAL_CERTIFICATE := platform(使用系统签名)
(3)在源码下面进行mm编译
这样生成的apk能够获取system权限,可以在任意system权限目录下面进行目录或者文件的创建,以及访问其他apk资源等(注意创建的文件(夹)只有创建者(比如system,root除外)拥有可读可写权限-rw-------)。
三、扩展
系统中所有使用android.uid.system作为共享UID的APK,都会首先在manifest节点中增加android:sharedUserId="android.uid.system",然后在Android.mk中增加LOCAL_CERTIFICATE := platform。可以参见Settings等
系统中所有使用android.uid.shared作为共享UID的APK,都会在manifest节点中增加android:sharedUserId="android.uid.shared",然后在Android.mk中增加LOCAL_CERTIFICATE := shared。可以参见Launcher等
系统中所有使用android.media作为共享UID的APK,都会在manifest节点中增加android:sharedUserId="android.media",然后在Android.mk中增加LOCAL_CERTIFICATE := media。可以参见Gallery等。
- Android如何通过shareduserid获取系统权限
- Android如何通过shareduserid获取系统权限
- Android如何通过shareduserid获取系统权限
- Android如何通过shareduserid获取系统权限
- Android如何通过shareduserid获取系统权限
- Android如何通过shareduserid获取系统权限
- Android如何通过shared_user_id获取系统权限
- 通过sharedUserId提高权限
- Android获取系统权限之sharedUserId和签名及实现关机重启
- Android-sharedUserId数据权限
- Android-sharedUserId数据权限
- Android-sharedUserId数据权限
- Android-sharedUserId数据权限
- Android-sharedUserId数据权限
- Android-sharedUserId数据权限
- Android-sharedUserId数据权限
- Android-sharedUserId数据权限
- Android-sharedUserId数据权限
- jsp用include指令引入html时的乱码问题
- hdu 3172 Virtual Friends(并查集+map)
- Solr操作中新手常见问题
- 学习与养生的境界
- uint8_t是什么数据类型
- Android如何通过shareduserid获取系统权限
- C++ 习题 输出日期时间--友元类
- Java线程:并发协作-生产者消费者模型
- Wince下自定义控件文字换行显示
- js中==和===的区别
- 6-11 编程练习题答案
- 6-13 编程练习题答案
- 6-14 编程练习题答案
- 6-15 编程练习题答案