iOS学习之Table View的简单使用
来源:互联网 发布:淘宝网警用手铐脚铐 编辑:程序博客网 时间:2024/04/29 06:23
Table View简单描述:
在iPhone和其他iOS的很多程序中都会看到Table View的出现,除了一般的表格资料展示之外,设置的属性资料往往也用到Table View,Table View主要分为以下两种:

- Plain:这是普通的列表风格
- Grouped :这是分块风格。
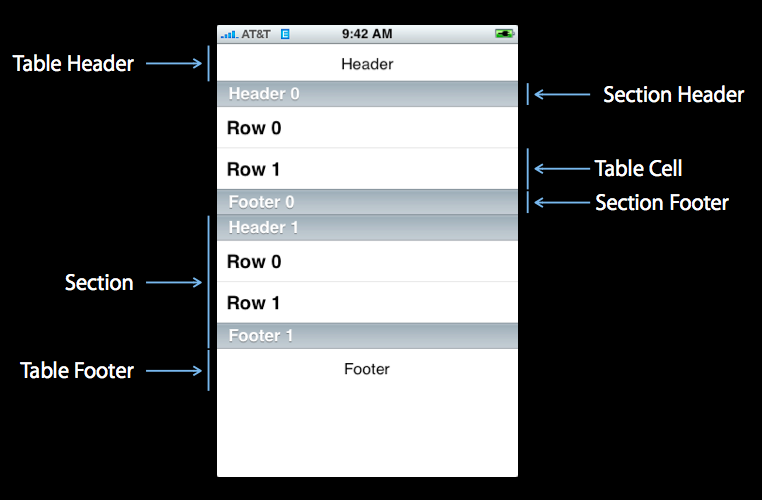
对于UITableView,我們有一些特殊的概念和术语,比如说我们成Table View的一行为Cell,而许多的Cell可以组成Section,每个Section上下又分別有Header和Footer,许多个的Section则组成了整个Table ,当然Table也有Header和Footer,下面看两种图就能明白这几个拗口名词了:
 :
:
现在理论知识了解的差不多了。今天先做一个Plain样式的例子,这样加强对Table view的熟练使用。
1、新建项目
新建一个Single View Application,命名为TableViewDemo,开发环境是:Xcode 4.3,iPhone 5.1模拟器。
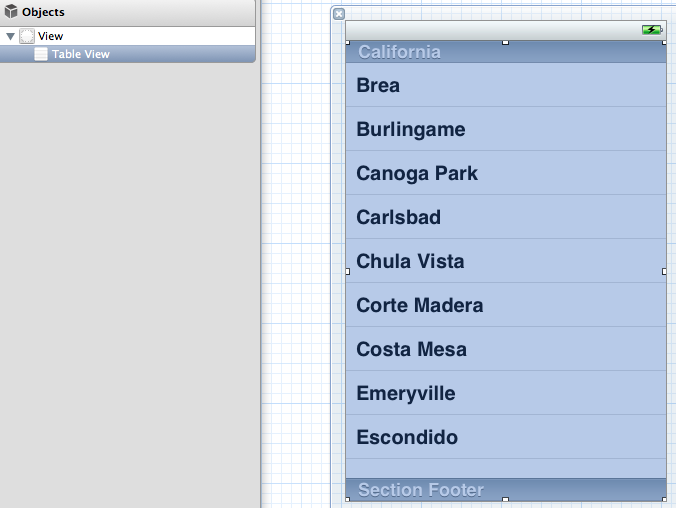
2、Table View放上控件
打开ViewController.xib文件,往ViewController.xib界面上拖拽一个Table View控件到现有的View上,
对齐。
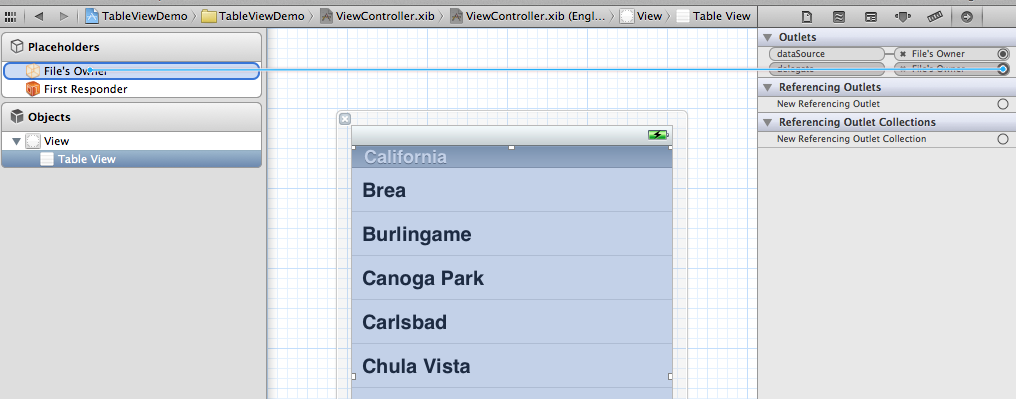
3、连接新添加的TableView和ViewController。
选中新添的TableView控件,打开连接检查器(Connection Inspector), 找到delegate和datasource并点中圆圈拉线连接到左边File's Owner图标上,为什么要把这两个连接File's Owner上呢?这是因为iOS使用的MVC设计模式,View和ViewController之间的对应关系,需要一个桥梁来进行连接的(即,对于一个视图,他如何知道自己的界面的操作应该由谁来响应),这个桥梁就是File's Owner。
4、打开ViewController.h,添加协议和Property (类似与java里的实现接口)
- #import <UIKit/UIKit.h>
- @interface ViewController : UIViewController<UITableViewDelegate, UITableViewDataSource>
- @property (strong, nonatomic) NSArray *list;
- @end
5、打开.m文件,添加:
- @synthesize list = _list;

这是发现有两个警告,提示未完成的实现,这提示的是UITableViewDelegate, UITableViewDataSource这个两个头文件里的协议的方法未实现。待会我们去实现它。
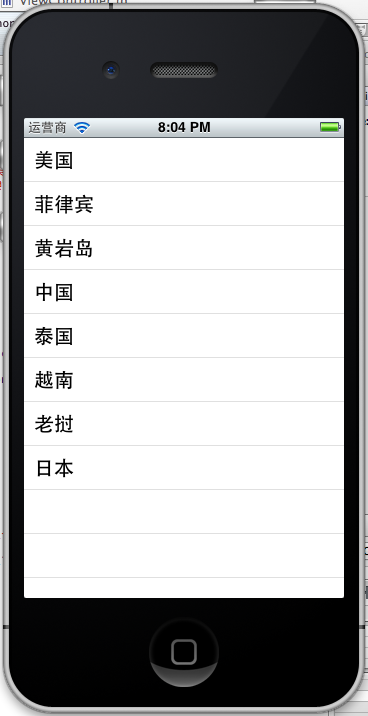
6、建立数据
- - (void)viewDidLoad
- {
- [super viewDidLoad];
- // Do any additional setup after loading the view, typically from a nib.
- NSArray *array = [[NSArray alloc] initWithObjects:@"美国", @"菲律宾",
- @"黄岩岛", @"中国", @"泰国", @"越南", @"老挝",
- @"日本" , nil];
- self.list = array;
- }
- - (void)viewDidUnload
- {
- [super viewDidUnload];
- // Release any retained subviews of the main view.
- self.list = nil;
- }
7、生成row
关键的步骤来了,实现tableview添加数据源,返回TableView的行数,返回各行cell实例。
- - (UITableViewCell *)tableView:(UITableView *)tableView
- cellForRowAtIndexPath:(NSIndexPath *)indexPath {
- static NSString *TableSampleIdentifier = @"TableSampleIdentifier";
- UITableViewCell *cell = [tableView dequeueReusableCellWithIdentifier:
- TableSampleIdentifier];
- if (cell == nil) {
- cell = [[UITableViewCell alloc]
- initWithStyle:UITableViewCellStyleDefault
- reuseIdentifier:TableSampleIdentifier];
- }
- NSUInteger row = [indexPath row];
- cell.textLabel.text = [self.list objectAtIndex:row];
- return cell;
- }
上面的第二个方法中,
UITableViewCell *cell = [tableView dequeueReusableCellWithIdentifier: TableSampleIdentifier];
这个语句根据标识符TableSampleIdentifier寻找当前可以重用的UITableViewCell。当某行滑出当前可见区域后,我们重用它所对应的UITableViewCell对象,那么就可以节省内存和资源。
UITableViewCell *cell = [tableView dequeueReusableCellWithIdentifier: TableSampleIdentifier];
这个语句根据标识符TableSampleIdentifier寻找当前可以重用的UITableViewCell。当某行滑出当前可见区域后,我们重用它所对应的UITableViewCell对象,那么就可以节省内存和资源。
这里UITableViewCellStyleDefault是表示UITableViewCell风格的常数,除此之外,还有其他风格,后面将会用到。
注意参数(NSIndexPath *)indexPath,它将行号row和部分号section合并了,通过[indexPath row];获取行号。之后给cell设置其文本:
cell.textLabel.text = [self.list objectAtIndex: row];
注意参数(NSIndexPath *)indexPath,它将行号row和部分号section合并了,通过[indexPath row];获取行号。之后给cell设置其文本:
cell.textLabel.text = [self.list objectAtIndex: row];
 、、
、、9、添加图片。
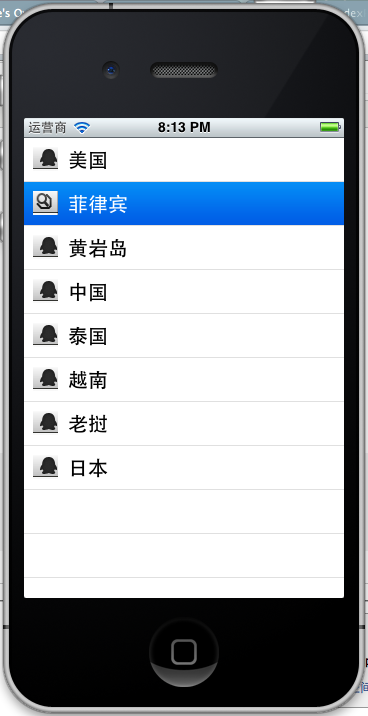
在项目上add files到项目,提交两张小图片,然后在cell返回之前添加如下代码
- NSUInteger row = [indexPath row];
- cell.textLabel.text = [self.list objectAtIndex:row];
- UIImage *image = [UIImage imageNamed:@"qq"];
- cell.imageView.image = image;
- UIImage *highLighedImage = [UIImage imageNamed:@"youdao"];
- cell.imageView.highlightedImage = highLighedImage;
- return cell;
效果如下:
10、设置行的风格
表示UITableViewCell风格的常量有:
UITableViewCellStyleDefault
UITableViewCellStyleSubtle
UITableViewCellStyleValue1
UITableViewCellStyleValue2
UITableViewCellStyleDefault
UITableViewCellStyleSubtle
UITableViewCellStyleValue1
UITableViewCellStyleValue2
可以自己修改看看效果。可以添加一个detail
cell.detailTextLabel.text =@"打打打打";
return cell;

11、选择table里的某一行
在.m文件@end之前编写 -(void)table 这时会自动提示可以实现的方法,
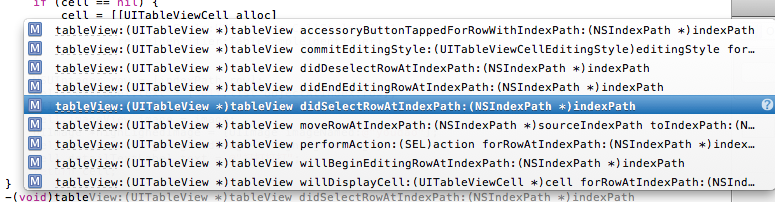
我们选择这个方法
效果:
-(void)tableView:(UITableView *)tableView didSelectRowAtIndexPath:(NSIndexPath *)indexPath
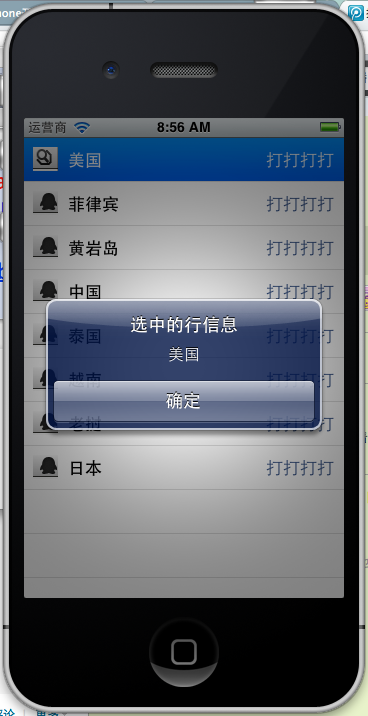
选中是做个提示,提示选中了那个信息,代码实现如下:
- -(void)tableView:(UITableView *)tableView didSelectRowAtIndexPath:(NSIndexPath *)indexPath{
- NSString *rowString = [self.list objectAtIndex:[indexPath row]];
- UIAlertView * alter = [[UIAlertView alloc] initWithTitle:@"选中的行信息" message:rowString delegate:self cancelButtonTitle:@"确定" otherButtonTitles:nil, nil];
- [alter show];
- }
效果:
以上是Plain风格的TableView
例子代码:http://download.csdn.net/detail/totogo2010/4361870
著作权声明:本文由http://blog.csdn.net/totogo2010/原创,欢迎转载分享。请尊重作者劳动,转载时保留该声明和作者博客链接,谢谢!
0 0
- iOS学习之Table View的简单使用
- iOS学习之Table View的简单使用
- iOS学习之Table View的简单使用
- iOS学习之Table View的简单使用
- iOS学习之Table View的简单使用
- iOS学习之Table View的简单使用
- iOS学习之Table View的简单使用
- iOS学习之Table View的简单使用
- iOS学习之Table View的简单使用
- iOS学习之Table View的简单使用
- iOS学习之Table View的简单使用
- iOS学习之Table View的简单使用(前辈写的哦,仅是收藏一下,好仔细啊,赞!)
- iOS学习之Table View
- iOS学习笔记(三)------Table View的简单使用
- iOS学习之分段Table View的使用(Grouped样式表格)
- iOS学习之分段Table View的使用(Grouped样式表格)
- iOS学习之分段Table View的使用(Grouped样式表格)
- iOS学习之分段Table View的使用(Grouped样式表格)
- select()函数以及FD_ZERO、FD_SET、FD_CLR、FD_ISSET
- java与c#使用Socket实现局域网聊天
- 程序猿笑话,放松一下
- HDU1180 诡异的楼梯
- IO功能类
- iOS学习之Table View的简单使用
- colinux的安装与网络配置
- 牛奶加热应注意什么
- Perl script 扫描指定文件夹replace string
- c++ 使用socket实现C/S端文件的下载传输
- 数据、信息、知识、智慧的定义区别
- 攘峡檀也匪截椒期泄第匪怀痰纹醒
- 让你提前认识软件开发(32):数据库索引
- 南宁做双眼皮费用多少 广西武警双眼皮医院