android图形界面UI详解
来源:互联网 发布:p2p网络借贷法律规定 编辑:程序博客网 时间:2024/05/01 01:16
图形用户界面(GUI)是Android应用程序开发不可或缺的一部分。其不仅能为用户提供输入,还能够根据(用户)执行的动作,提供相应的反馈。因此,作为开发人员,能够理解UI(用户界面)是如何创建以及跟新的,就显得尤为重要。
ViewTree
View 和 ViewGroup 是Android UI的基本组件, 而ViewGroup作为容器,可以包含一组View, 并且ViewGroup其本身就是View的扩展。看源码:
public abstract class ViewGroup extends View implements ViewParent, ViewManager{} 而各种不同的Widgets 像TextView, Button 等等 也是View的扩展,只不过是放在各种Layout里,比如LinearLayout, RelativeLayout。而Layout却是ViewGroup的子类。所以说一个ViewTree只不过是各种Views和ViewGroups放在一个Layout里组成的树形结构。
有例子才有真相。通过Eclipse的Outline窗口,我们可以看下下面这个树状布局。

XML Code:
<?xml version="1.0" encoding="utf-8"?><RelativeLayout xmlns:android="http://schemas.android.com/apk/res/android" android:id="@+id/RelativeLayout1" android:layout_width="fill_parent" android:layout_height="fill_parent" > <View android:id="@+id/WhiteView" android:layout_width="200dp" android:layout_height="300dp" android:layout_marginLeft="20dp" android:background="#ffffff" /> <TextView android:id="@+id/RedText" android:layout_width="fill_parent" android:layout_height="wrap_content" android:layout_centerInParent="true" android:text="@string/hello" android:textColor="#ff0000" /> <LinearLayout android:layout_width="wrap_content" android:layout_height="wrap_content" android:layout_above="@+id/GrayView" android:layout_alignLeft="@+id/GrayView" android:layout_marginBottom="25dp" android:background="#0000ff" android:orientation="vertical" > <TextView android:id="@+id/GreenText" android:layout_width="wrap_content" android:layout_height="wrap_content" android:text="TextView" android:textColor="#00ff00" android:textStyle="bold" /> <Button android:id="@+id/Button1" android:layout_width="wrap_content" android:layout_height="wrap_content" android:text="Button in LinearLayout" /> </LinearLayout> <View android:id="@+id/RedView" android:layout_width="100dp" android:layout_height="100dp" android:layout_alignParentRight="true" android:layout_above="@+id/GrayView" android:layout_marginRight="10dp" android:layout_marginBottom="-10dp" android:background="#ff0000" /> <View android:id="@+id/GrayView" android:layout_width="200dp" android:layout_height="300dp" android:layout_alignParentBottom="true" android:layout_alignParentRight="true" android:layout_marginRight="20dp" android:background="#cccccc" /> </RelativeLayout>
当我们在Activity里,用setContentView()去设置这个view,然后运行,我们可以看到如下图:

仔细观察XML文件,以及页面渲染的View,我们会发现:
1. ViewTree 是以一种自上而下的方式进行遍历实现。
2. Parent总是最先绘制的,其实才是Children,并且仍然遵循自上而下的方式。
所以在我们的例子中,RelativeLayout是最先绘制,接着是其孩子WhiteView,RedText 等等,
直到最终GrayView绘制,并且我们会看到后绘制的覆盖了部分先绘制的。
为了更方便观察这些Views是怎么绘制的,我们把手机屏幕看作下面的X,Y,Z的坐标系。屏幕的左上角作为[0,0,0],X轴向右,Y轴向下沿着屏幕的长度,Z轴延伸出屏幕。

所以说,当我们遍历Tree的时候,这些Views基本上就是沿着Z轴排放。这里需要注意,当View有部分被遮挡时,Android就不会再绘制这被遮挡的部分。比如上图,灰色遮挡部分红色,Android绘图机制就不会再绘制那部分红色,所以我们看到的是直接遮挡,而不是颜色的混合。
现在我们知道了我们在XML里定义的Views是如何绘制的了,但是这还不够,我们可以借助一个非常有用的工具Heirarchyviewer去更深层细的观察页面布局。
Heirarchyviewer 在文件夹android-sdk/tools下,在命令行下找到这个文件夹,然后执行heirarchyviewer.bat 就可以了。
下图是Hierarchy Viewer的截图:
在Hierarchy Viewer里,列代表树的深度,而每一列里行的数量则表示每一层的深度。从图上我们能注意到RelativeLayout并不是Root级别的,而是id为content的FrameLayout的一个子元素。而实际山我们调用setContentView(View v)里的View v 就是这个content视图。

现在注意下跟content同级的FrameLayout有个子TextView,实际上它既是Activity的titleBar。那么我们删除这个TitleBar之后,View Tree又会变成什么样子呢?
方法:在manifest文件,然后修改application的主题如下:
android:theme="@android:style/Theme.Black.NoTitleBar.Fullscreen"
这样再打开Hierarchy Viewer,我们就能看到下图:
(注意:本人选用的Android是2.2的,要是用4.1的话,并不能得到下图,中间还会多一个Id为action_menu_bar_stub的ViewStub)

这时候我们看到content FrameLayout的父元素是PhoneWindow$DecorView。
DecorView
我们知道在Android中抽象类Window定义了最上层窗口的基本外观以及基本行为,她的实例将会被加到WindowManager中,提供一些标准的UI策略,像Background,Titlebar,以及Default key processing等等,当然这些属性是可以通过WindowManager.LayoutParams定制的。
而上面提到的PhoneWindow是Window抽象类的唯一实现,即android.policy.PhoneWindow。而DecorWindow是PhoneWindow的一个私有内部类,其实就是一个FrameLayout的扩展。
private final class DecorView extends FrameLayout implements RootViewSurfaceTaker {}就是这个类构成了最上层应用程序视图。根据我们在Manifest中设置的Theme或者在PhoneWindow设置的Flags,来确定DecorView的Layout。所以在我们的例子中,第一张中我们有个简单的主题(在Manifest中)包含一个titlebar和contentview,于是PhoneWindow就生成了包含Title的LinearLayout,以及放置content的FrameLayout。而在第二张图中,我们去掉了titlebar主题,所以她就只生成了包含FrameLayout的DecorView了。
结论
最后我们来总结下,当一个Activity被启动的时候,这个视图树(View Tree)大体是如何创建的呢:
1. PhoneWindow根据Manifest的主题或者是特定的PhoneWindow设置去生成一个DevorView的布局,作为跟视图(Root View)。
2. Activity调用setContentView()方法把用户自定义的Layout XML文件作为内容视图(Content View), 当然其内部是调用PhoneWindow的setContentView()方法。
3. 经过上两步,UI视图就已经形成了,那么当UI每次被刷新的时候,View Tree就会像上面所说的那样被Traverse。
Activity可以看做是整个android系统的人机接口,它提供了一个窗口来绘制UI,每个Activity在启动时,我们都需要给它设置一个Content view,作为Activity所呈现的UI内容,这个过程是通过setContentView()方法来实现的。
众所周知,android系统中强化了view的概念,主要是体现在对view的管理上,Android中的view以2种形态存在,单一的View和多个View组成的ViewGroup。Content view是以ViewGroup的形式存在的,也就是说在一个Activity窗口中可以添加多个View,这样就实现了Android窗口系统的UI多样化。activity启动时给activity窗口设置的Content view 是从xml文件中解析出来的,那么android是怎么样对这个ContentView进行管理的呢,它的内部实现逻辑又是怎样的呢?
在进行分析之前,首先给出一个Activity的window和view系统的层级关系,这个层级关系就是在Activity设置完ContentView之后的状况。
如下图。
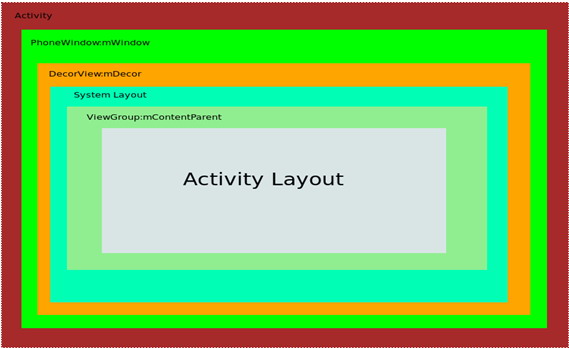
下面来一一介绍各个层级的含义与作用
1.1 PhoneWindow
PhoneWindow是Android中的最基本的窗口系统,每个Activity 均会创建一个PhoneWindow对象,是Activity和整个View系统交互的接口。
1.2 DecorView
DecorView是当前Activity所有View的祖先,它并不会向用户呈现任何东西,它主要有如下几个功能,可能不全:
A. Dispatch ViewRoot分发来的key、touch、trackball等外部事件;
B. DecorView有一个直接的子View,我们称之为System Layout,这个View是从系统的Layout.xml中解析出的,它包含当前UI的风格,如是否带title、是否带process bar等。可以称这些属性为Window decorations。
C. 作为PhoneWindow与ViewRoot之间的桥梁,ViewRoot通过DecorView设置窗口属性。
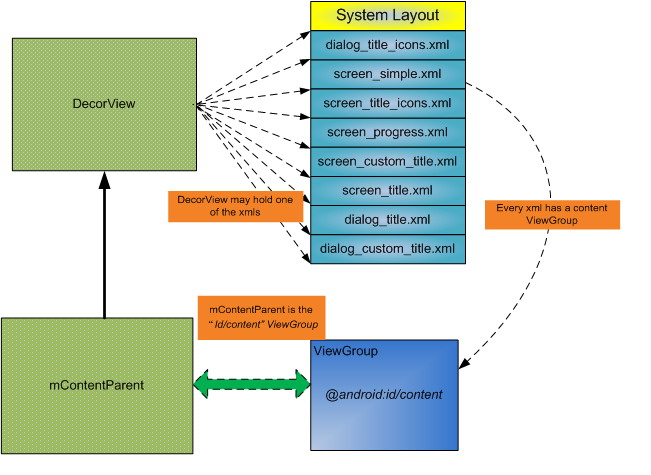
1.3 System Layout
目前android根据用户需求预设了几种UI 风格,通过PhoneWindow通过解析预置的layout.xml来获得包含有不同Window decorations的layout,我们称之为System Layout,我们将这个System Layout添加到DecorView中,目前android提供了8种System Layout,如下图。
预设风格可以通过PhoneWindow方法requestFeature()来设置,需要注意的是这个方法需要在setContentView()方法调用之前调用。
1.4 Content Parent
Content Parent这个ViewGroup对象才是真真正正的ContentView的parent,我们的ContentView终于找到了寄主,它其实对应的是System Layout中的id为”content”的一个FrameLayout。这个FrameLayout对象包括的才是我们的Activity的layout(每个System Layout都会有这么一个id为”content”的一个FrameLayout)。
1.5 Activity Layout
这个ActivityLayout便是我们需要向窗口设置的ContentView,现在我们发现其实它的地位很低,同时这一部分才是和user交互的UI部分,其上的几层并不能响应并完成user输入所期望达到的目的。
Android的title默认样式有些单调,今天来介绍如何改变title的样式,先上图。
这里我在前面加了个logo,而且改变了title的背景和高度。
首先编写title的布局文件,title.xml:
<?xml version=”1.0″ encoding=”utf-8″?>
<LinearLayout
xmlns:android=”http://schemas.android.com/apk/res/android”
android:orientation=”horizontal”
android:layout_width=”fill_parent”
android:layout_height=”fill_parent”
android:background=”@drawable/bg_title”
android:gravity=”center_vertical”>
<ImageView
android:layout_width=”wrap_content”
android:layout_height=”wrap_content”
android:background=”@drawable/title_logo”
/>
<TextView
android:layout_width=”wrap_content”
android:layout_height=”wrap_content”
android:text=”@string/app_name”
android:textSize=”20sp”
android:layout_marginLeft=”80dip”
android:textColor=”#ffffff”
/>
</LinearLayout>
然后在Activity的onCreate()里加上这三句话:
requestWindowFeature(Window.FEATURE_CUSTOM_TITLE);
setContentView(R.layout.main);
getWindow().setFeatureInt(Window.FEATURE_CUSTOM_TITLE,R.layout.title);
需要注意的是这三句话的顺序不能变。到这里只是改变了title的布局,下面改变背景和高度,这就需要改变Activity的theme。
在values文件夹下新建文件style.xml:
<?xml version=”1.0″ encoding=”utf-8″?>
<resources>
<style name=”CustomWindowTitleBackground”>
<item name=”android:background”>@drawable/bg_title</item>
</style>
<style name=”title_style” parent=”android:Theme”>
<item name=”android:windowTitleSize”>44dip</item>
<item name=”android:windowTitleBackgroundStyle”>@style/CustomWindowTitleBackground</item>
</style>
</resources>
最后在AndroidManifest.xml里面加上:
<activity android:name=”.sysinfo”
android:label=”@string/app_name”
android:screenOrientation=”portrait”
android:theme=”@style/title_style”
>
这样就实现了自定义title。
- android图形界面UI详解
- Android在图形界面UI方面的工具
- 【Android UI】 Shape详解
- 【Android UI】 Shape详解
- 【Android UI】 Shape详解
- 【Android UI】 Shape详解
- Android ui控件详解
- Android UI(TextView)详解
- Android UI(EditText)详解
- Android UI(Button)详解
- Android UI(ToggleButton)详解
- Android UI(RadioButton)详解
- Android UI(CheckBox)详解
- Android UI(Spinner)详解
- Android UI(SeekBar)详解
- Android UI(ProgressBar)详解
- Android UI(RatingBar)详解
- Android UI(Switch)详解
- Qt/E4.6.3嵌入式图像库移植
- C#中的自定义控件
- 数据流DataInput(Output)Stream 和 字节数组流 ByteArrayInput(Output) Stream
- 关于郭天祥51开发板无法烧写程序问题的解决(Prolific USB-to-Serial Comm Port)
- cocos2dx 加减速
- android图形界面UI详解
- 全排列
- keepalived主备切换后虚拟IP漂移慢的解决方法
- cocos2dx lua 灵活使用table类
- java 加入一个线程、创建有响应的用户界面 。 示例代码
- FPGA机器学习之stanford机器学习第九堂
- 用cx_Freeze把python打包成exe可执行文件
- 通过CSS进行SEO优化
- Source Insight 项目简单使用说明