Java中的IO
来源:互联网 发布:怎样建立淘宝网店 编辑:程序博客网 时间:2024/04/28 16:38
1.Java中的IO总览
Java流操作有关的类或接口:

Java流类图结构:

流的概念和作用
流是一组有顺序的,有起点和终点的字节集合,是对数据传输的总称或抽象。即数据在两设备间的传输称为流,流的本质是数据传输,根据数据传输特性将流抽象为各种类,方便更直观的进行数据操作。
IO流的分类
- 根据处理数据类型的不同分为:字符流和字节流
- 根据数据流向不同分为:输入流和输出流
字符流和字节流
字符流的由来: 因为数据编码的不同,而有了对字符进行高效操作的流对象。本质其实就是基于字节流读取时,去查了指定的码表。 字节流和字符流的区别:
- 读写单位不同:字节流以字节(8bit)为单位,字符流以字符为单位,根据码表映射字符,一次可能读多个字节。
- 处理对象不同:字节流能处理所有类型的数据(如图片、avi等),而字符流只能处理字符类型的数据。
结论:只要是处理纯文本数据,就优先考虑使用字符流。 除此之外都使用字节流。
输入流和输出流
对输入流只能进行读操作,对输出流只能进行写操作,程序中需要根据待传输数据的不同特性而使用不同的流。
Java IO流对象
1.输入字节流InputStreamIO 中输入字节流的继承图可见上图,可以看出:
- InputStream 是所有的输入字节流的父类,它是一个抽象类。
- ByteArrayInputStream、StringBufferInputStream、FileInputStream 是三种基本的介质流,它们分别从Byte 数组、StringBuffer、和本地文件中读取数据。PipedInputStream 是从与其它线程共用的管道中读取数据,与Piped 相关的知识后续单独介绍。
- ObjectInputStream 和所有FilterInputStream 的子类都是装饰流(装饰器模式的主角)。
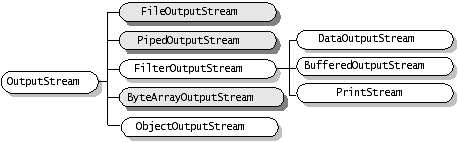
2.输出字节流OutputStream
IO 中输出字节流的继承图可见上图,可以看出:
- OutputStream 是所有的输出字节流的父类,它是一个抽象类。
- ByteArrayOutputStream、FileOutputStream 是两种基本的介质流,它们分别向Byte 数组、和本地文件中写入数据。PipedOutputStream 是向与其它线程共用的管道中写入数据,
- ObjectOutputStream 和所有FilterOutputStream 的子类都是装饰流。
3.字节流的输入与输出的对应

图中蓝色的为主要的对应部分,红色的部分就是不对应部分。紫色的虚线部分代表这些流一般要搭配使用。从上面的图中可以看出Java IO 中的字节流是极其对称的。“存在及合理”我们看看这些字节流中不太对称的几个类吧!
- LineNumberInputStream 主要完成从流中读取数据时,会得到相应的行号,至于什么时候分行、在哪里分行是由改类主动确定的,并不是在原始中有这样一个行号。在输出部分没有对应的部分,我们完全可以自己建立一个LineNumberOutputStream,在最初写入时会有一个基准的行号,以后每次遇到换行时会在下一行添加一个行号,看起来也是可以的。好像更不入流了。
- PushbackInputStream 的功能是查看最后一个字节,不满意就放入缓冲区。主要用在编译器的语法、词法分析部分。输出部分的BufferedOutputStream 几乎实现相近的功能。
- StringBufferInputStream 已经被Deprecated,本身就不应该出现在InputStream 部分,主要因为String 应该属于字符流的范围。已经被废弃了,当然输出部分也没有必要需要它了!还允许它存在只是为了保持版本的向下兼容而已。
- SequenceInputStream 可以认为是一个工具类,将两个或者多个输入流当成一个输入流依次读取。完全可以从IO 包中去除,还完全不影响IO 包的结构,却让其更“纯洁”――纯洁的Decorator 模式。
- PrintStream 也可以认为是一个辅助工具。主要可以向其他输出流,或者FileInputStream 写入数据,本身内部实现还是带缓冲的。本质上是对其它流的综合运用的一个工具而已。一样可以踢出IO 包!System.out 和System.out 就是PrintStream 的实例!
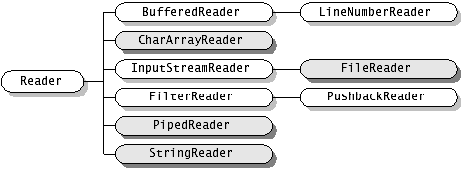
4.字符输入流Reader
在上面的继承关系图中可以看出:
- Reader 是所有的输入字符流的父类,它是一个抽象类。
- CharReader、StringReader 是两种基本的介质流,它们分别将Char 数组、String中读取数据。PipedReader 是从与其它线程共用的管道中读取数据。
- BufferedReader 很明显就是一个装饰器,它和其子类负责装饰其它Reader 对象。
- FilterReader 是所有自定义具体装饰流的父类,其子类PushbackReader 对Reader 对象进行装饰,会增加一个行号。
- InputStreamReader 是一个连接字节流和字符流的桥梁,它将字节流转变为字符流。FileReader 可以说是一个达到此功能、常用的工具类,在其源代码中明显使用了将FileInputStream 转变为Reader 的方法。我们可以从这个类中得到一定的技巧。Reader 中各个类的用途和使用方法基本和InputStream 中的类使用一致。后面会有Reader 与InputStream 的对应关系。
5.字符输出流Writer
在上面的关系图中可以看出:
- Writer 是所有的输出字符流的父类,它是一个抽象类。
- CharArrayWriter、StringWriter 是两种基本的介质流,它们分别向Char 数组、String 中写入数据。PipedWriter 是向与其它线程共用的管道中写入数据,
- BufferedWriter 是一个装饰器为Writer 提供缓冲功能。
- PrintWriter 和PrintStream 极其类似,功能和使用也非常相似。
- OutputStreamWriter 是OutputStream 到Writer 转换的桥梁,它的子类FileWriter 其实就是一个实现此功能的具体类(具体可以研究一SourceCode)。功能和使用和OutputStream 极其类似,后面会有它们的对应图。
6.字符流的输入与输出的对应

7.字符流与字节流转换
转换流的特点:
- 其是字符流和字节流之间的桥梁
- 可对读取到的字节数据经过指定编码转换成字符
- 可对读取到的字符数据经过指定编码转换成字节
何时使用转换流?
- 当字节和字符之间有转换动作时;
- 流操作的数据需要编码或解码时。
具体的对象体现:
- InputStreamReader:字节到字符的桥梁
- OutputStreamWriter:字符到字节的桥梁
这两个流对象是字符体系中的成员,它们有转换作用,本身又是字符流,所以在构造的时候需要传入字节流对象进来。
8.File类
File类是对文件系统中文件以及文件夹进行封装的对象,可以通过对象的思想来操作文件和文件夹。 File类保存文件或目录的各种元数据信息,包括文件名、文件长度、最后修改时间、是否可读、获取当前文件的路径名,判断指定文件是否存在、获得当前目录中的文件列表,创建、删除文件和目录等方法。
9.RandomAccessFile类
该对象并不是流体系中的一员,其封装了字节流,同时还封装了一个缓冲区(字符数组),通过内部的指针来操作字符数组中的数据。 该对象特点:
- 该对象只能操作文件,所以构造函数接收两种类型的参数:a.字符串文件路径;b.File对象。
- 该对象既可以对文件进行读操作,也能进行写操作,在进行对象实例化时可指定操作模式(r,rw)
注意:该对象在实例化时,如果要操作的文件不存在,会自动创建;如果文件存在,写数据未指定位置,会从头开始写,即覆盖原有的内容。 可以用于多线程下载或多个线程同时写数据到文件。
2.File类
常用的 操作方法:
如:File test = new File("/mnt/sdcard/imags/a.txt");
1、test.getParentFile() //获取 文件名所在的路径,但不包括文件名
2、test.mkdirs()//创建 文件夹
3、test.createNewFile()//创建文件,前提是 文件所在的 路径 必须 存在
4、test.exists()//判断 文件或者文件夹是否存在
5、test.isDirectory()//判断是否是一个目录
5、test.getAbsolutePath()//获取 绝对路径
6、test.delete()//Deletes this file. Directories must be empty before they will be deleted. Returns:true if this file was deleted, false otherwise.
--------------- 流操作 --------------
File file = new File("/mnt/sdcard/imags/a.txt");
if (!file.getParentFile().exists()) {
file.getParentFile().mkdirs();
}
InputStream in = conn.getInputStream();//输入流in 和 某个 输入文件关联
FileOutputStream out = new FileOutputStream(file);//输出流out 和 file文件关联
BufferedOutputStream os = new BufferedOutputStream(out);//os和out 关联,相当于os 和 file关联
BufferedInputStream is = new BufferedInputStream(in);//is 和 in关联,相当于 is 和 某个 输入文件
int len = -1;
byte[] buffer = new byte[1024];
while ((len = is.read(buffer)) != -1) {
os.write(buffer, 0, len);
os.flush();
}
os.close();
out.close();
is.close();
in.close();
+++++++++++++++++++++++++++++++
String name = "AAAA.txt";
String lujing = "1"+"/"+"2";//定义路径
File a = new File(lujing,name);
那么,a的意义就是“1/2/AAAA.txt”。
这里a是File,Java里,File至少可以表示文件或文件夹。也就是说,在“1/2/AAAA.txt”真正出现在磁盘结构里之前,它既可以表示 这个文件,也可以表示 这个路径的文件夹。那么,如果没有getParentFile(), 直接执行a.mkdirs(),就会直接 创建“1/2/AAAA.txt/”这个的文件夹,在此之后,执行a.createNewFile(),试图创建a文件,然而以a为名的文件夹已经存在了,所以createNewFile()实际是执行失败的。你可以用System.out.println(a.createNewFile())这样来检查是不是真正创建文件成功。
所以,这里,你想要创建的是“1/2/AAAA.txt”这个文件。在创建AAAA.txt之前,必须要1/2这个目录存在。所以,要得到1/2,就要用a.getParentFile(),然后要创建它,也就是a.getParentFile().mkdirs()。在这之后,a作为文件所需要的文件夹存在了,就可以执行a.createNewFile()创建a文件。
+++++++++++++++++++++++++++++++++++++++++++++++++++++++++++
+++++++++++++++++++++++++++++++++++++++++++++++++++++++++++
File类
为了很方便的代表文件的概念,以及存储一些对于文件的基本操作,在java.io包中设计了一个专门的类——File类。
在File类中包含了大部分和文件操作的功能方法,该类的对象可以代表一个具体的文件 或 文件夹,所以以前曾有人建议将该类的类名修改成FilePath,因为该类也可以代表一个文件夹,更准确的说是可以代表一个文件路径。
下面介绍一下File类的基本使用。
1、File对象代表文件路径 和 代表文件 的例子
File类的对象可以代表一个具体的文件路径,在实际代表时,可以使用绝对路径也可以使用相对路径。
下面是创建的文件对象示例。
public File(String pathname)
该示例中使用一个文件路径表示一个File类的对象,例如:
File f1 = new File(“d:\\test\\1.txt”);
File f2 = new File(“1.txt”);
File f3 = new File(“e:\\abc”);
这里的f1和f2对象分别代表一个文件,f1是绝对路径,而f2是相对路径,f3则代表一个文件夹,文件夹也是文件路径的一种。
public File(String parent, String child)
也可以使用父路径和子路径结合,实现代表文件路径,例如:
File f4 = new File(“d:\\test\\”,”1.txt”);
这样f4代表一个文件,路径是:d:\test\1.txt。
2、File类常用方法
File类中包含了很多获得文件或文件夹属性的方法,使用起来比较方便,下面将常见的方法介绍如下:
a、createNewFile方法
public boolean createNewFile() throws IOException
该方法的作用是创建指定的文件。该方法只能用于创建文件,不能用于创建文件夹,且文件路径中包含的文件夹必须存在。
b、delect方法
public boolean delete()
该方法的作用是删除当前文件或文件夹。如果删除的是文件夹,则该文件夹必须为空。如果需要删除一个非空的文件夹,则需要首先删除该文件夹内部的每个文件和文件夹,然后在可以删除,这个需要书写一定的逻辑代码实现。
c、exists方法
public boolean exists()
该方法的作用是判断当前文件或文件夹是否存在。
d、getAbsolutePath方法
public String getAbsolutePath()
该方法的作用是获得当前文件或文件夹的绝对路径。例如c:\test\1.t则返回c:\test\1.t。
e、getName方法
public String getName()
该方法的作用是获得当前文件或文件夹的名称。例如c:\test\1.t,则返回1.t。
f、getParent方法
publicString getParent()
该方法的作用是获得当前路径中的父路径。例如c:\test\1.t则返回c:\test。
getParentfile()返回 file
g、isDirectory方法
public boolean isDirectory()
该方法的作用是判断当前File对象是否是目录。
h、isFile方法
public boolean isFile()
该方法的作用是判断当前File对象是否是文件。
i、length方法
public long length()
该方法的作用是返回文件存储时占用的字节数。该数值获得的是文件的实际大小,而不是文件在存储时占用的空间数。
j、list方法
public String[] list()
该方法的作用是返回当前文件夹下所有的文件名和文件夹名称。说明,该名称不是绝对路径。
k、listFiles方法
public File[] listFiles()
该方法的作用是返回当前文件夹下所有的文件对象。
l、mkdir方法
public boolean mkdir()
该方法的作用是创建当前文件文件夹,而不创建该路径中的其它文件夹。假设d盘下只有一个test文件夹,则创建d:\test\abc文件夹则成功,如果创建d:\a\b文件夹则创建失败,因为该路径中d:\a文件夹不存在。如果创建成功则返回true,否则返回false。
m、mkdirs方法
public boolean mkdirs()
该方法的作用是创建文件夹,如果当前路径中包含的父目录不存在时,也会自动根据需要创建。
n、renameTo方法
public boolean renameTo(File dest)
该方法的作用是修改文件名。在修改文件名时不能改变文件路径,如果该路径下已有该文件,则会修改失败。
o、setReadOnly方法
public boolean setReadOnly()
该方法的作用是设置当前文件或文件夹为只读。
3、File类基本示例
以上各方法实现的测试代码如下:
import java.io.File;
/**
* File类使用示例
*/
public class FileDemo {
public static void main(String[] args) {
//创建File对象
File f1 = new File("d:\\test");
File f2 = new File("1.txt");
File f3 = new File("e:\\file.txt");
File f4 = new File("d:\\","1.txt");
//创建文件
try{
boolean b = f3.createNewFile();
}catch(Exception e){
e.printStackTrace();
}
//判断文件是否存在
System.out.println(f4.exists());
//获得文件的绝对路径
System.out.println(f3.getAbsolutePath());
//获得文件名
System.out.println(f3.getName());
//获得父路径
System.out.println(f3.getParent());
//判断是否是目录
System.out.println(f1.isDirectory());
//判断是否是文件
System.out.println(f3.isFile());
//获得文件长度
System.out.println(f3.length());
//获得当前文件夹下所有文件和文件夹名称
String[] s = f1.list();
for(int i = 0;i < s.length;i++){
System.out.println(s[i]);
}
//获得文件对象
File[] f5 = f1.listFiles();
for(int i = 0;i < f5.length;i++){
System.out.println(f5[i]);
}
//创建文件夹
File f6 = new File("e:\\test\\abc");
boolean b1 = f6.mkdir();
System.out.println(b1);
b1 = f6.mkdirs();
System.out.println(b1);
//修改文件名
File f7 = new File("e:\\a.txt");
boolean b2 = f3.renameTo(f7);
System.out.println(b2);
//设置文件为只读
f7.setReadOnly();
}
}
4、File类综合示例
下面以两个示例演示File类的综合使用。第一个示例是显示某个文件夹下的所有文件和文件夹,原理是输出当前名称,然后判断当前File对 象是文件还是文件夹,如果则获得该文件夹下的所有子文件和子文件夹,并递归调用该方法实现。第二个示例是删除某个文件夹下的所有文件和文件夹,原理是判断 是否是文件,如果是文件则直接删除,如果是文件夹,则获得该文件夹下所有的子文件和子文件夹,然后递归调用该方法处理所有子文件和子文件夹,然后将空文件 夹删除。则测试时谨慎使用第二个方法,以免删除自己有用的数据文件。示例代码如下:
import java.io.File;
/**
*文件综合使用示例
*/
public class AdvanceFileDemo {
public static void main(String[] args) {
File f = new File("e:\\Book");
printAllFile(f);
File f1 = new File("e:\\test");
deleteAll(f1);
}
/**
*打印f路径下所有的文件和文件夹
* @param f文件对象
*/
public static void printAllFile(File f){
//打印当前文件名
System.out.println(f.getName());
//是否是文件夹
if(f.isDirectory()){
//获得该文件夹下所有子文件和子文件夹
File[] f1 = f.listFiles();
//循环处理每个对象
int len = f1.length;
for(int i = 0;i < len;i++){
//递归调用,处理每个文件对象
printAllFile(f1[i]);
}
}
}
/**
*删除对象f下的所有文件和文件夹
* @param f文件路径
*/
public static void deleteAll(File f){
//文件
if(f.isFile()){
f.delete();
}else{ //文件夹
//获得当前文件夹下的所有子文件和子文件夹
File f1[] = f.listFiles();
//循环处理每个对象
int len = f1.length;
for(int i = 0;i < len;i++){
//递归调用,处理每个文件对象
deleteAll(f1[i]);
}
//删除当前文件夹
f.delete();
}
}
}
关于File类的使用就介绍这么多,其它的方法和使用时需要注意的问题还需要多进行练习和实际使用。
读取文件 -- 流
按照前面介绍的知识,将文件中的数据读入程序,是将程序外部的数据传入程序中,应该使用输入流——InputStream或Reader。而由于读取的是特定的数据源——文件,则可以使用输入对应的子类FileInputStream或FileReader实现。在实际书写代码时,需要首先熟悉读取文件在程序中实现的过程。在Java语言的IO编程中,读取文件是分两个步骤:
1、将文件中的数据转换为流,
2、读取流内部的数据。其中第一个步骤由系统完成,只需要创建对应的流对象即可,对象创建完成以后步骤1就完成了,第二个步骤使用输入流对象中的read方法即可实现了。
使用输入流进行编程时,代码一般分为3个部分:1、创建流对象,2、读取流对象内部的数据,3、关闭流对象。
下面以读取文件的代码示例:
import java.io.*;
/**
*使用FileInputStream读取文件
*/
public class ReadFile1 {
public static void main(String[] args) {
//声明流对象
FileInputStream fis = null;
try{
//创建流对象
fis = newFileInputStream("e:\\a.txt");
//读取数据,并将读取到的数据存储到数组中
byte[] data = new byte[1024]; //存储数据的数组
int i = 0; //当前下标
//读取流中的第一个字节数据
int n = fis.read();
//依次读取后续的数据
while(n != -1){ //未到达流的末尾,这里;有问题 如果 本身 数据是 -1,这种情况;
//将有效数据存储到数组中
data[i] = (byte)n;
//下标增加
i++;
//读取下一个字节的数据
n = fis.read();
}
//解析数据
String s = new String(data,0,i);
//输出字符串
System.out.println(s);
}catch(Exception e){
e.printStackTrace();
}finally{
try{
//关闭流,释放资源
fis.close();
}catch(Exception e){}
}
}
}
在该示例代码中,首先创建一个FileInputStream类型的对象fis:
fis = new FileInputStream("e:\\a.txt");
这样建立了一个连接到数据源e:\a.txt的流,并将该数据源中的数据转换为流对象fis,以后程序读取数据源中的数据,只需要从流对象fis中读取即可。
读取流fis中的数据,需要使用read方法,该方法是从InputStream类中继承过来的方法,该方法的作用是每次读取流中的一个字节,如果需要读取流中的所有数据,需要使用循环读取,当到达流的末尾时,read方法的返回值是-1。
在该示例中,首先读取流中的第一个字节:
int n = fis.read();
并将读取的值赋值给int值n,如果流fis为空,则n的值是-1,否则n中的最后一个字节包含的时流fis中的第一个字节,该字节被读取以后,将被从流fis中删除。
然后循环读取流中的其它数据,如果读取到的数据不是-1,则将已经读取到的数据n强制转换为byte,即取n中的有效数据——最后一个字节,并存储到数组data中,然后调用流对象fis中的read方法继续读取流中的下一个字节的数据。一直这样循环下去,直到读取到的数据是-1,也就是读取到流的末尾则循环结束。
这里的数组长度是1024,所以要求流中的数据长度不能超过1024,所以该示例代码在这里具有一定的局限性。如果流的数据个数比较多,则可以将1024扩大到合适的个数即可。
经过上面的循环以后,就可以将流中的数据依次存储到data数组中,存储到data数组中有效数据的个数是i个,即循环次数。
其实截至到这里,IO操作中的读取数据已经完成,然后再按照数据源中的数据格式,这里是文件的格式,解析读取出的byte数组即可。
该示例代码中的解析,只是将从流对象中读取到的有效的数据,也就是data数组中的前n个数据,转换为字符串,然后进行输出。
在该示例代码中,只是在catch语句中输出异常的信息,便于代码的调试,在实际的程序中,需要根据情况进行一定的逻辑处理,例如给出提示信息等。
最后在finally语句块中,关闭流对象fis,释放流对象占用的资源,关闭数据源,实现流操作的结束工作。
上面详细介绍了读取文件的过程,其实在实际读取流数据时,还可以使用其它的read方法,下面的示例代码是使用另外一个read方法实现读取的代码:
import java.io.FileInputStream;
/**
*使用FileInputStream读取文件
*/
public class ReadFile2 {
public static void main(String[] args) {
//声明流对象
FileInputStream fis = null;
try{
//创建流对象
fis = new FileInputStream("e:\\a.txt");
//读取数据,并将读取到的数据存储到数组中
byte[] data = new byte[1024]; //数据存储的数组
int i = fis.read(data);
//解析数据
String s = new String(data,0,i);
//输出字符串
System.out.println(s);
}catch(Exception e){
e.printStackTrace();
}finally{
try{
//关闭流,释放资源
fis.close();
}catch(Exception e){}
}
}
}
该示例代码中,只使用一行代码:
int i = fis.read(data);
就实现了将流对象fis中的数据读取到字节数组data中。该行代码的作用是将fis流中的数据读取出来,并依次存储到数组data中,返回值为实际读取的有效数据的个数。
使用该中方式在进行读取时,可以简化读取的代码。
当然,在读取文件时,也可以使用Reader类的子类FileReader进行实现,在编写代码时,只需要将上面示例代码中的byte数组替换成char数组即可。
使用FileReader读取文件时,是按照char为单位进行读取的,所以更适合于文本文件的读取,而对于二进制文件或自定义格式的文件来说,还是使用FileInputStream进行读取,方便对于读取到的数据进行解析和操作。
读取其它数据源的操作和读取文件类似,最大的区别在于建立流对象时选择的类不同,而流对象一旦建立,则基本的读取方法是一样,如果只使用最基本的read方法进行读取,则使用基本上是一致的。这也是IO类设计的初衷,使得对于流对象的操作保持一致,简化IO类使用的难度。
程。
基本的输出流包含OutputStream和Writer两个,区别是OutputStream体系中的类(也就是OutputStream的子类)是按照字节写入的,而Writer体系中的类(也就是Writer的子类)是按照字符写入的。
使用输出流进行编程的步骤是:
1、建立输出流
建立对应的输出流对象,也就是完成由流对象到外部数据源之间的转换。
2、向流中写入数据
将需要输出的数据,调用对应的write方法写入到流对象中。
3、关闭输出流
在写入完毕以后,调用流对象的close方法关闭输出流,释放资源。
在使用输出流向外部输出数据时,程序员只需要将数据写入流对象即可,底层的API实现将流对象中的内容写入外部数据源,这个写入的过程对于程序员来说是透明的,不需要专门书写代码实现。
在向文件中输出数据,也就是写文件时,使用对应的文件输出流,包括FileOutputStream和FileWriter两个类,下面以FileOutputStream为例子说明输出流的使用。示例代码如下:
import java.io.*;
/**
* 使用FileOutputStream写文件示例
*/
public class WriteFile1 {
public static void main(String[] args) {
String s = "Java语言";
int n = 100;
//声明流对象
FileOutputStream fos = null;
try{
//创建流对象
fos = new FileOutputStream("e:\\out.txt");
//转换为byte数组
byte[] b1 = s.getBytes();
//换行符
byte[] b2 = "\r\n".getBytes();
byte[] b3 = String.valueOf(n).getBytes();
//依次写入文件
fos.write(b1);
fos.write(b2);
fos.write(b3);
} catch (Exception e) {
e.printStackTrace();
}finally{
try{
fos.close();
}catch(Exception e){}
}
}
}
该示例代码写入的文件使用记事本打开以后,内容为:
Java语言
100
在该示例代码中,演示了将一个字符串和一个int类型的值依次写入到同一个文件中。在写入文件时,首先创建了一个文件输出流对象fos:
fos = new FileOutputStream("e:\\out.txt");
该对象创建以后,就实现了从流到外部数据源e:\out.txt的连接。说明:当外部文件不存在时,系统会自动创建该文件,但是如果文件路径中包含未创建的目录时将出现异常。这里书写的文件路径可以是绝对路径也可以是相对路径。
在 实际写入文件时,有两种写入文件的方式:覆盖和追加。其中“覆盖”是指清除原文件的内容,写入新的内容,默认采用该种形式写文件,“追加”是指在已有文件 的末尾写入内容,保留原来的文件内容,例如写日志文件时,一般采用追加。在实际使用时可以根据需要采用适合的形式,可以使用:
public FileOutputStream(String name, boolean append) throws FileNotFoundException
只需要使用该构造方法在构造FileOutputStream对象时,将第二个参数append的值设置为true即可。
流对象创建完成以后,就可以使用OutputStream中提供的wirte方法向流中依次写入数据了。最基本的写入方法只支持byte数组格式的数据,所以如果需要将内容写入文件,则需要把对应的内容首先转换为byte数组。
这里以如下格式写入数据:首先写入字符串s,使用String类的getBytes方法将该字符串转换为byte数组,然后写入字符串“\r\n”,转换方式同上,该字符串的作用是实现文本文件的换行显示,最后写入int数据n,首先将n转换为字符串,再转换为byte数组。这种写入数据的顺序以及转换为byte数组的方式就是流的数据格式,也就是该文件的格式。因为这里写的都是文本文件,所以写入的内容以明文的形式显示出来,也可以根据自己需要存储的数据设定特定的文件格式。
其实,所有的数据文件,包括图片文件、声音文件等等,都是以一定的数据格式存储数据的,在保存该文件时,将需要保存的数据按照该文件的数据格式依次写入即可,而在打开该文件时,将读取到的数据按照该文件的格式解析成对应的逻辑即可。
最后,在数据写入到流内部以后,如果需要立即将写入流内部的数据强制输出到外部的数据源,则可以使用流对象的flush方法实现。如果不需要强制输出,则只需要在写入结束以后,关闭流对象即可。在关闭流对象时,系统首先将流中未输出到数据源中的数据强制输出,然后再释放该流对象占用的内存空间。
使用FileWriter写入文件时,步骤和创建流对象的操作都和该示例代码一致,只是在转换数据时,需要将写入的数据转换为char数组,对于字符串来说,可以使用String中的toCharArray方法实现转换,然后按照文件格式写入数据即可。
对于其它类型的字节输出流/字符输出流来说,只是在逻辑上连接不同的数据源,在创建对象的代码上会存在一定的不同,但是一旦流对象创建完成以后,基本的写入方法都是write方法,也需要首先将需要写入的数据按照一定的格式转换为对应的byte数组/char数组,然后依次写入即可。
所以IO类的这种设计形式,只需要熟悉该体系中的某一个类的使用以后,就可以触类旁通的学会其它相同类型的类的使用,从而简化程序员的学习,使得使用时保持统一。
4.Java中的IO整理
本文章基本覆盖了java IO的全部内容,java新IO没有涉及,因为我想和这个分开,以突出那个的重要性,新IO哪一篇文章还没有开始写,估计很快就能和大家见面。照旧,文章依旧以例子为主,因为讲解内容的java书很多了,我觉的学以致用才是真。代码是写出来的,不是看出来的。
最后欢迎大家提出意见和建议。
【案例1】创建一个新文件
import java.io.*;class hello{ public static void main(String[] args) { File f=new File("D:\\hello.txt"); try{ f.createNewFile(); }catch (Exception e) { e.printStackTrace(); } }}【运行结果】:
程序运行之后,在d盘下会有一个名字为hello.txt的文件。
【案例2】File类的两个常量
import java.io.*;class hello{ public static void main(String[] args) { System.out.println(File.separator); System.out.println(File.pathSeparator); }}【运行结果】:
\
;
此处多说几句:有些同学可能认为,我直接在windows下使用\进行分割不行吗?当然是可以的。但是在linux下就不是\了。所以,要想使得我们的代码跨平台,更加健壮,所以,大家都采用这两个常量吧,其实也多写不了几行。呵呵、
现在我们使用File类中的常量改写上面的代码:
import java.io.*;class hello{ public static void main(String[] args) { String fileName="D:"+File.separator+"hello.txt"; File f=new File(fileName); try{ f.createNewFile(); }catch (Exception e) { e.printStackTrace(); } }}你看,没有多写多少吧,呵呵。所以建议使用File类中的常量。
删除一个文件
/** * 删除一个文件 * */import java.io.*;class hello{ public static void main(String[] args) { String fileName="D:"+File.separator+"hello.txt"; File f=new File(fileName); if(f.exists()){ f.delete(); }else{ System.out.println("文件不存在"); } }}创建一个文件夹
/** * 创建一个文件夹 * */import java.io.*;class hello{ public static void main(String[] args) { String fileName="D:"+File.separator+"hello"; File f=new File(fileName); f.mkdir(); }}【运行结果】:
D盘下多了一个hello文件夹
列出指定目录的全部文件(包括隐藏文件):
/** * 使用list列出指定目录的全部文件 * */import java.io.*;class hello{ public static void main(String[] args) { String fileName="D:"+File.separator; File f=new File(fileName); String[] str=f.list(); for (int i = 0; i < str.length; i++) { System.out.println(str[i]); } }}【运行结果】:
$RECYCLE.BIN
360
360Downloads
360Rec
360SoftMove
Config.Msi
da
Downloads
DriversBackup
eclipse
java web整合开发和项目实战
Lenovo
MSOCache
Program
Program Files
python
RECYGLER.{8F92DA15-A229-A4D5-B5CE-5280C8B89C19}
System Volume Information
Tomcat6
var
vod_cache_data
新建文件夹
(你的运行结果应该和这个不一样的,呵呵)
但是使用list返回的是String数组,。而且列出的不是完整路径,如果想列出完整路径的话,需要使用listFiles.他返回的是File的数组
列出指定目录的全部文件(包括隐藏文件):
/** * 使用listFiles列出指定目录的全部文件 * listFiles输出的是完整路径 * */import java.io.*;class hello{ public static void main(String[] args) { String fileName="D:"+File.separator; File f=new File(fileName); File[] str=f.listFiles(); for (int i = 0; i < str.length; i++) { System.out.println(str[i]); } }}【运行结果】:
D:\$RECYCLE.BIN
D:\360
D:\360Downloads
D:\360Rec
D:\360SoftMove
D:\Config.Msi
D:\da
D:\Downloads
D:\DriversBackup
D:\eclipse
D:\java web整合开发和项目实战
D:\Lenovo
D:\MSOCache
D:\Program
D:\Program Files
D:\python
D:\RECYGLER.{8F92DA15-A229-A4D5-B5CE-5280C8B89C19}
D:\System Volume Information
D:\Tomcat6
D:\var
D:\vod_cache_data
D:\新建文件夹
通过比较可以指定,使用listFiles更加方便、
判断一个指定的路径是否为目录
/** * 使用isDirectory判断一个指定的路径是否为目录 * */import java.io.*;class hello{ public static void main(String[] args) { String fileName="D:"+File.separator; File f=new File(fileName); if(f.isDirectory()){ System.out.println("YES"); }else{ System.out.println("NO"); } }}【运行结果】:YES
搜索指定目录的全部内容
/** * 列出指定目录的全部内容 * */import java.io.*;class hello{ public static void main(String[] args) { String fileName="D:"+File.separator; File f=new File(fileName); print(f); } public static void print(File f){ if(f!=null){ if(f.isDirectory()){ File[] fileArray=f.listFiles(); if(fileArray!=null){ for (int i = 0; i < fileArray.length; i++) { //递归调用 print(fileArray[i]); } } } else{ System.out.println(f); } } }}【运行结果】:
D:\Tomcat6\work\Catalina\localhost\nevel\org\apache\jsp\framepages\web4welcome_jsp.java
D:\Tomcat6\work\Catalina\localhost\nevel\org\apache\jsp\help_005fhome_jsp.class
D:\Tomcat6\work\Catalina\localhost\nevel\org\apache\jsp\help_005fhome_jsp.java
D:\Tomcat6\work\Catalina\localhost\nevel\org\apache\jsp\home_jsp.class
D:\Tomcat6\work\Catalina\localhost\nevel\org\apache\jsp\home_jsp.java
D:\Tomcat6\work\Catalina\localhost\nevel\org\apache\jsp\index_jsp.class
D:\Tomcat6\work\Catalina\localhost\nevel\org\apache\jsp\index_jsp.java
D:\Tomcat6\work\Catalina\localhost\nevel\org\apache\jsp\login_jsp.class
D:\Tomcat6\work\Catalina\localhost\nevel\org\apache\jsp\login_jsp.java
D:\Tomcat6\work\Catalina\localhost\nevel\org\apache\jsp\modify_005fuser_005finfo_jsp.class
D:\Tomcat6\work\Catalina\localhost\nevel\org\apache\jsp\modify_005fuser_005finfo_jsp.java
D:\Tomcat6\work\Catalina\localhost\nevel\org\apache\jsp\register_005fnotify_jsp.class
D:\Tomcat6\work\Catalina\localhost\nevel\org\apache\jsp\register_005fnotify_jsp.java
D:\Tomcat6\work\Catalina\localhost\nevel\org\apache\jsp\sign_005fup_jsp.class
D:\Tomcat6\work\Catalina\localhost\nevel\org\apache\jsp\sign_005fup_jsp.java
D:\Tomcat6\work\Catalina\localhost\nevel\org\apache\jsp\transit_jsp.class
……
【使用RandomAccessFile写入文件】
/** * 使用RandomAccessFile写入文件 * */import java.io.*;class hello{ public static void main(String[] args) throws IOException { String fileName="D:"+File.separator+"hello.txt"; File f=new File(fileName); RandomAccessFile demo=new RandomAccessFile(f,"rw"); demo.writeBytes("asdsad"); demo.writeInt(12); demo.writeBoolean(true); demo.writeChar('A'); demo.writeFloat(1.21f); demo.writeDouble(12.123); demo.close(); }}如果你此时打开hello。txt查看的话,会发现那是乱码。
字节流
【向文件中写入字符串】
/** * 字节流 * 向文件中写入字符串 * */import java.io.*;class hello{ public static void main(String[] args) throws IOException { String fileName="D:"+File.separator+"hello.txt"; File f=new File(fileName); OutputStream out =new FileOutputStream(f); String str="你好"; byte[] b=str.getBytes(); out.write(b); out.close(); }}查看hello.txt会看到“你好”
当然也可以一个字节一个字节的写。
/** * 字节流 * 向文件中一个字节一个字节的写入字符串 * */import java.io.*;class hello{ public static void main(String[] args) throws IOException { String fileName="D:"+File.separator+"hello.txt"; File f=new File(fileName); OutputStream out =new FileOutputStream(f); String str="你好"; byte[] b=str.getBytes(); for (int i = 0; i < b.length; i++) { out.write(b[i]); } out.close(); }}结果还是:“你好”
向文件中追加新内容:
/** * 字节流 * 向文件中追加新内容: * */import java.io.*;class hello{ public static void main(String[] args) throws IOException { String fileName="D:"+File.separator+"hello.txt"; File f=new File(fileName); OutputStream out =new FileOutputStream(f,true); String str="Rollen"; //String str="\r\nRollen"; 可以换行 byte[] b=str.getBytes(); for (int i = 0; i < b.length; i++) { out.write(b[i]); } out.close(); }}【运行结果】:
你好Rollen
【读取文件内容】
/** * 字节流 * 读文件内容 * */import java.io.*;class hello{ public static void main(String[] args) throws IOException { String fileName="D:"+File.separator+"hello.txt"; File f=new File(fileName); InputStream in=new FileInputStream(f); byte[] b=new byte[1024]; in.read(b); in.close(); System.out.println(new String(b)); }}【运行结果】
你好Rollen
Rollen_
但是这个例子读取出来会有大量的空格,我们可以利用in.read(b);的返回值来设计程序。如下:
/** * 字节流 * 读文件内容 * */import java.io.*;class hello{ public static void main(String[] args) throws IOException { String fileName="D:"+File.separator+"hello.txt"; File f=new File(fileName); InputStream in=new FileInputStream(f); byte[] b=new byte[1024]; int len=in.read(b); in.close(); System.out.println("读入长度为:"+len); System.out.println(new String(b,0,len)); }}【运行结果】:
读入长度为:18
你好Rollen
Rollen
读者观察上面的例子可以看出,我们预先申请了一个指定大小的空间,但是有时候这个空间可能太小,有时候可能太大,我们需要准确的大小,这样节省空间,那么我们可以这样干:
/** * 字节流 * 读文件内容,节省空间 * */import java.io.*;class hello{ public static void main(String[] args) throws IOException { String fileName="D:"+File.separator+"hello.txt"; File f=new File(fileName); InputStream in=new FileInputStream(f); byte[] b=new byte[(int)f.length()]; in.read(b); System.out.println("文件长度为:"+f.length()); in.close(); System.out.println(new String(b)); }}文件长度为:18
你好Rollen
Rollen
将上面的例子改为一个一个读:
/** * 字节流 * 读文件内容,节省空间 * */import java.io.*;class hello{ public static void main(String[] args) throws IOException { String fileName="D:"+File.separator+"hello.txt"; File f=new File(fileName); InputStream in=new FileInputStream(f); byte[] b=new byte[(int)f.length()]; for (int i = 0; i < b.length; i++) { b[i]=(byte)in.read(); } in.close(); System.out.println(new String(b)); }}输出的结果和上面的一样。
细心的读者可能会发现,上面的几个例子都是在知道文件的内容多大,然后才展开的,有时候我们不知道文件有多大,这种情况下,我们需要判断是否独到文件的末尾。
/** * 字节流 *读文件 * */import java.io.*;class hello{ public static void main(String[] args) throws IOException { String fileName="D:"+File.separator+"hello.txt"; File f=new File(fileName); InputStream in=new FileInputStream(f); byte[] b=new byte[1024]; int count =0; int temp=0; while((temp=in.read())!=(-1)){ b[count++]=(byte)temp; } in.close(); System.out.println(new String(b)); }}【运行结果】
你好Rollen
Rollen_
提醒一下,当独到文件末尾的时候会返回-1.正常情况下是不会返回-1的
字符流
【向文件中写入数据】
现在我们使用字符流
/** * 字符流 * 写入数据 * */import java.io.*;class hello{ public static void main(String[] args) throws IOException { String fileName="D:"+File.separator+"hello.txt"; File f=new File(fileName); Writer out =new FileWriter(f); String str="hello"; out.write(str); out.close(); }}当你打开hello。txt的时候,会看到hello
其实这个例子上之前的例子没什么区别,只是你可以直接输入字符串,而不需要你将字符串转化为字节数组。
当你如果想问文件中追加内容的时候,可以使用将上面的声明out的哪一行换为:
Writer out =new FileWriter(f,true);
这样,当你运行程序的时候,会发现文件内容变为:
hellohello如果想在文件中换行的话,需要使用“\r\n”
比如将str变为String str="\r\nhello";
这样文件追加的str的内容就会换行了。
从文件中读内容:
/** * 字符流 * 从文件中读出内容 * */import java.io.*;class hello{ public static void main(String[] args) throws IOException { String fileName="D:"+File.separator+"hello.txt"; File f=new File(fileName); char[] ch=new char[100]; Reader read=new FileReader(f); int count=read.read(ch); read.close(); System.out.println("读入的长度为:"+count); System.out.println("内容为"+new String(ch,0,count)); }}【运行结果】:
读入的长度为:17
内容为hellohello
hello
当然最好采用循环读取的方式,因为我们有时候不知道文件到底有多大。
/** * 字符流 * 从文件中读出内容 * */import java.io.*;class hello{ public static void main(String[] args) throws IOException { String fileName="D:"+File.separator+"hello.txt"; File f=new File(fileName); char[] ch=new char[100]; Reader read=new FileReader(f); int temp=0; int count=0; while((temp=read.read())!=(-1)){ ch[count++]=(char)temp; } read.close(); System.out.println("内容为"+new String(ch,0,count)); }}运行结果:
内容为hellohello
hello
关于字节流和字符流的区别
实际上字节流在操作的时候本身是不会用到缓冲区的,是文件本身的直接操作的,但是字符流在操作的 时候下后是会用到缓冲区的,是通过缓冲区来操作文件的。
读者可以试着将上面的字节流和字符流的程序的最后一行关闭文件的代码注释掉,然后运行程序看看。你就会发现使用字节流的话,文件中已经存在内容,但是使用字符流的时候,文件中还是没有内容的,这个时候就要刷新缓冲区。
使用字节流好还是字符流好呢?
答案是字节流。首先因为硬盘上的所有文件都是以字节的形式进行传输或者保存的,包括图片等内容。但是字符只是在内存中才会形成的,所以在开发中,字节流使用广泛。
文件的复制
其实DOS下就有一个文件复制功能,比如我们想把d盘下面的hello.txt文件复制到d盘下面的rollen.txt文件中,那么我们就可以使用下面的命令:
copy d:\hello.txt d:\rollen.txt
运行之后你会在d盘中看见hello.txt.,并且两个文件的内容是一样的,(这是屁话)
下面我们使用程序来复制文件吧。
基本思路还是从一个文件中读入内容,边读边写入另一个文件,就是这么简单。、
首先编写下面的代码:
/** * 文件的复制 * */import java.io.*;class hello{ public static void main(String[] args) throws IOException { if(args.length!=2){ System.out.println("命令行参数输入有误,请检查"); System.exit(1); } File file1=new File(args[0]); File file2=new File(args[1]); if(!file1.exists()){ System.out.println("被复制的文件不存在"); System.exit(1); } InputStream input=new FileInputStream(file1); OutputStream output=new FileOutputStream(file2); if((input!=null)&&(output!=null)){ int temp=0; while((temp=input.read())!=(-1)){ output.write(temp); } } input.close(); output.close(); }}然后在命令行下面
javac hello.java
java hello d:\hello.txt d:\rollen.txt
现在你就会在d盘看到rollen。txt了,
OutputStreramWriter 和InputStreamReader类
整个IO类中除了字节流和字符流还包括字节和字符转换流。
OutputStreramWriter将输出的字符流转化为字节流
InputStreamReader将输入的字节流转换为字符流
但是不管如何操作,最后都是以字节的形式保存在文件中的。
将字节输出流转化为字符输出流
/** * 将字节输出流转化为字符输出流 * */import java.io.*;class hello{ public static void main(String[] args) throws IOException { String fileName="d:"+File.separator+"hello.txt"; File file=new File(fileName); Writer out=new OutputStreamWriter(new FileOutputStream(file)); out.write("hello"); out.close(); }}运行结果:文件中内容为:hello
将字节输入流变为字符输入流
/** * 将字节输入流变为字符输入流 * */import java.io.*;class hello{ public static void main(String[] args) throws IOException { String fileName="d:"+File.separator+"hello.txt"; File file=new File(fileName); Reader read=new InputStreamReader(new FileInputStream(file)); char[] b=new char[100]; int len=read.read(b); System.out.println(new String(b,0,len)); read.close(); }}【运行结果】:hello
前面列举的输出输入都是以文件进行的,现在我们以内容为输出输入目的地,使用内存操作流
ByteArrayInputStream 主要将内容写入内容
ByteArrayOutputStream 主要将内容从内存输出
使用内存操作流将一个大写字母转化为小写字母
/** * 使用内存操作流将一个大写字母转化为小写字母 * */import java.io.*;class hello{ public static void main(String[] args) throws IOException { String str="ROLLENHOLT"; ByteArrayInputStream input=new ByteArrayInputStream(str.getBytes()); ByteArrayOutputStream output=new ByteArrayOutputStream(); int temp=0; while((temp=input.read())!=-1){ char ch=(char)temp; output.write(Character.toLowerCase(ch)); } String outStr=output.toString(); input.close(); output.close(); System.out.println(outStr); }}【运行结果】:
rollenholt
内容操作流一般使用来生成一些临时信息采用的,这样可以避免删除的麻烦。
管道流
管道流主要可以进行两个线程之间的通信。
PipedOutputStream 管道输出流
PipedInputStream 管道输入流
验证管道流
/** * 验证管道流 * */import java.io.*;/** * 消息发送类 * */class Sendimplements Runnable{ private PipedOutputStream out=null; public Send() { out=new PipedOutputStream(); } public PipedOutputStream getOut(){ return this.out; } public void run(){ String message="hello , Rollen"; try{ out.write(message.getBytes()); }catch (Exception e) { e.printStackTrace(); }try{ out.close(); }catch (Exception e) { e.printStackTrace(); } }}/** * 接受消息类 * */class Reciveimplements Runnable{ private PipedInputStream input=null; public Recive(){ this.input=new PipedInputStream(); } public PipedInputStream getInput(){ return this.input; } public void run(){ byte[] b=new byte[1000]; int len=0; try{ len=this.input.read(b); }catch (Exception e) { e.printStackTrace(); }try{ input.close(); }catch (Exception e) { e.printStackTrace(); } System.out.println("接受的内容为 "+(new String(b,0,len))); }}/** * 测试类 * */class hello{ public static void main(String[] args) throws IOException { Send send=new Send(); Recive recive=new Recive(); try{//管道连接 send.getOut().connect(recive.getInput()); }catch (Exception e) { e.printStackTrace(); } new Thread(send).start(); new Thread(recive).start(); }}【运行结果】:
接受的内容为 hello , Rollen
打印流
/** * 使用PrintStream进行输出 * */import java.io.*;class hello { public static void main(String[] args) throws IOException { PrintStream print =new PrintStream(new FileOutputStream(new File("d:" + File.separator +"hello.txt"))); print.println(true); print.println("Rollen"); print.close(); }}【运行结果】:
true
Rollen
当然也可以格式化输出
/** * 使用PrintStream进行输出 * 并进行格式化 * */import java.io.*;class hello { public static void main(String[] args) throws IOException { PrintStream print =new PrintStream(new FileOutputStream(new File("d:" + File.separator +"hello.txt"))); String name="Rollen"; int age=20; print.printf("姓名:%s. 年龄:%d.",name,age); print.close(); }}【运行结果】:
姓名:Rollen. 年龄:20.
使用OutputStream向屏幕上输出内容
/** * 使用OutputStream向屏幕上输出内容 * */import java.io.*;class hello { public static void main(String[] args) throws IOException { OutputStream out=System.out; try{ out.write("hello".getBytes()); }catch (Exception e) { e.printStackTrace(); } try{ out.close(); }catch (Exception e) { e.printStackTrace(); } }}【运行结果】:
hello
输入输出重定向
import java.io.File;import java.io.FileNotFoundException;import java.io.FileOutputStream;import java.io.PrintStream;/** * 为System.out.println()重定向输出 * */public class systemDemo{ public static void main(String[] args){ // 此刻直接输出到屏幕 System.out.println("hello"); File file =new File("d:" + File.separator + "hello.txt"); try{ System.setOut(new PrintStream(new FileOutputStream(file))); }catch(FileNotFoundException e){ e.printStackTrace(); } System.out.println("这些内容在文件中才能看到哦!"); }}【运行结果】:
eclipse的控制台输出的是hello。然后当我们查看d盘下面的hello.txt文件的时候,会在里面看到:这些内容在文件中才能看到哦!
import java.io.File;import java.io.FileNotFoundException;import java.io.FileOutputStream;import java.io.PrintStream;/** * System.err重定向 这个例子也提示我们可以使用这种方法保存错误信息 * */public class systemErr{ public static void main(String[] args){ File file =new File("d:" + File.separator + "hello.txt"); System.err.println("这些在控制台输出"); try{ System.setErr(new PrintStream(new FileOutputStream(file))); }catch(FileNotFoundException e){ e.printStackTrace(); } System.err.println("这些在文件中才能看到哦!"); }}【运行结果】:
你会在eclipse的控制台看到红色的输出:“这些在控制台输出”,然后在d盘下面的hello.txt中会看到:这些在文件中才能看到哦!
import java.io.File;import java.io.FileInputStream;import java.io.FileNotFoundException;import java.io.IOException;/** * System.in重定向 * */public class systemIn{ public static void main(String[] args){ File file =new File("d:" + File.separator + "hello.txt"); if(!file.exists()){ return; }else{ try{ System.setIn(new FileInputStream(file)); }catch(FileNotFoundException e){ e.printStackTrace(); } byte[] bytes =new byte[1024]; int len =0; try{ len = System.in.read(bytes); }catch(IOException e){ e.printStackTrace(); } System.out.println("读入的内容为:" +new String(bytes,0, len)); } }}【运行结果】:
前提是我的d盘下面的hello.txt中的内容是:“这些文件中的内容哦!”,然后运行程序,输出的结果为:读入的内容为:这些文件中的内容哦!
BufferedReader的小例子
注意: BufferedReader只能接受字符流的缓冲区,因为每一个中文需要占据两个字节,所以需要将System.in这个字节输入流变为字符输入流,采用:
BufferedReader buf =new BufferedReader( new InputStreamReader(System.in));下面给一个实例:
import java.io.BufferedReader;import java.io.IOException;import java.io.InputStreamReader;/** * 使用缓冲区从键盘上读入内容 * */public class BufferedReaderDemo{ public static void main(String[] args){ BufferedReader buf =new BufferedReader( new InputStreamReader(System.in)); String str =null; System.out.println("请输入内容"); try{ str = buf.readLine(); }catch(IOException e){ e.printStackTrace(); } System.out.println("你输入的内容是:" + str); }}运行结果:
请输入内容
dasdas
你输入的内容是:dasdas
Scanner类
其实我们比较常用的是采用Scanner类来进行数据输入,下面来给一个Scanner的例子吧
import java.util.Scanner;/** * Scanner的小例子,从键盘读数据 * */public class ScannerDemo{ public static void main(String[] args){ Scanner sca =new Scanner(System.in); // 读一个整数 int temp = sca.nextInt(); System.out.println(temp); //读取浮点数 float flo=sca.nextFloat(); System.out.println(flo); //读取字符 //...等等的,都是一些太基础的,就不师范了。 }}其实Scanner可以接受任何的输入流
下面给一个使用Scanner类从文件中读出内容
import java.io.File;import java.io.FileNotFoundException;import java.util.Scanner;/** * Scanner的小例子,从文件中读内容 * */public class ScannerDemo{ public static void main(String[] args){ File file =new File("d:" + File.separator + "hello.txt"); Scanner sca =null; try{ sca =new Scanner(file); }catch(FileNotFoundException e){ e.printStackTrace(); } String str = sca.next(); System.out.println("从文件中读取的内容是:" + str); }}【运行结果】:
从文件中读取的内容是:这些文件中的内容哦!
数据操作流DataOutputStream、DataInputStream类
import java.io.DataOutputStream;import java.io.File;import java.io.FileOutputStream;import java.io.IOException;public class DataOutputStreamDemo{ public static void main(String[] args) throws IOException{ File file =new File("d:" + File.separator + "hello.txt"); char[] ch = {'A','B','C' }; DataOutputStream out =null; out =new DataOutputStream(new FileOutputStream(file)); for(char temp : ch){ out.writeChar(temp); } out.close(); }}A B C
现在我们在上面例子的基础上,使用DataInputStream读出内容
import java.io.DataInputStream;import java.io.File;import java.io.FileInputStream;import java.io.IOException;public class DataOutputStreamDemo{ public static void main(String[] args) throws IOException{ File file =new File("d:" + File.separator + "hello.txt"); DataInputStream input =new DataInputStream(new FileInputStream(file)); char[] ch =new char[10]; int count =0; char temp; while((temp = input.readChar()) != 'C'){ ch[count++] = temp; } System.out.println(ch); }}【运行结果】:
AB
合并流 SequenceInputStream
SequenceInputStream主要用来将2个流合并在一起,比如将两个txt中的内容合并为另外一个txt。下面给出一个实例:
import java.io.File;import java.io.FileInputStream;import java.io.FileOutputStream;import java.io.IOException;import java.io.InputStream;import java.io.OutputStream;import java.io.SequenceInputStream;/** * 将两个文本文件合并为另外一个文本文件 * */public class SequenceInputStreamDemo{ public static void main(String[] args) throws IOException{ File file1 =new File("d:" + File.separator + "hello1.txt"); File file2 =new File("d:" + File.separator + "hello2.txt"); File file3 =new File("d:" + File.separator + "hello.txt"); InputStream input1 =new FileInputStream(file1); InputStream input2 =new FileInputStream(file2); OutputStream output =new FileOutputStream(file3); // 合并流 SequenceInputStream sis =new SequenceInputStream(input1, input2); int temp =0; while((temp = sis.read()) != -1){ output.write(temp); } input1.close(); input2.close(); output.close(); sis.close(); }}【运行结果】
结果会在hello.txt文件中包含hello1.txt和hello2.txt文件中的内容。
文件压缩 ZipOutputStream类
先举一个压缩单个文件的例子吧:
import java.io.File;import java.io.FileInputStream;import java.io.FileOutputStream;import java.io.IOException;import java.io.InputStream;import java.util.zip.ZipEntry;import java.util.zip.ZipOutputStream;public class ZipOutputStreamDemo1{ public static void main(String[] args) throws IOException{ File file =new File("d:" + File.separator + "hello.txt"); File zipFile =new File("d:" + File.separator + "hello.zip"); InputStream input =new FileInputStream(file); ZipOutputStream zipOut =new ZipOutputStream(new FileOutputStream( zipFile)); zipOut.putNextEntry(new ZipEntry(file.getName())); // 设置注释 zipOut.setComment("hello"); int temp =0; while((temp = input.read()) != -1){ zipOut.write(temp); } input.close(); zipOut.close(); }}【运行结果】
运行结果之前,我创建了一个hello.txt的文件,原本大小56个字节,但是压缩之后产生hello.zip之后,居然变成了175个字节,有点搞不懂。
不过结果肯定是正确的,我只是提出我的一个疑问而已。
上面的这个例子测试的是压缩单个文件,下面的们来看看如何压缩多个文件。
import java.io.File;import java.io.FileInputStream;import java.io.FileOutputStream;import java.io.IOException;import java.io.InputStream;import java.util.zip.ZipEntry;import java.util.zip.ZipOutputStream;/** * 一次性压缩多个文件 * */public class ZipOutputStreamDemo2{ public static void main(String[] args) throws IOException{ // 要被压缩的文件夹 File file =new File("d:" + File.separator + "temp"); File zipFile =new File("d:" + File.separator + "zipFile.zip"); InputStream input =null; ZipOutputStream zipOut =new ZipOutputStream(new FileOutputStream( zipFile)); zipOut.setComment("hello"); if(file.isDirectory()){ File[] files = file.listFiles(); for(int i = 0; i < files.length; ++i){ input =new FileInputStream(files[i]); zipOut.putNextEntry(new ZipEntry(file.getName() + File.separator + files[i].getName())); int temp =0; while((temp = input.read()) != -1){ zipOut.write(temp); } input.close(); } } zipOut.close(); }}【运行结果】
先看看要被压缩的文件吧:
接下来看看压缩之后的:
大家自然想到,既然能压缩,自然能解压缩,在谈解压缩之前,我们会用到一个ZipFile类,先给一个这个例子吧。java中的每一个压缩文件都是可以使用ZipFile来进行表示的
import java.io.File;import java.io.IOException;import java.util.zip.ZipFile;/** * ZipFile演示 * */public class ZipFileDemo{ public static void main(String[] args) throws IOException{ File file =new File("d:" + File.separator + "hello.zip"); ZipFile zipFile =new ZipFile(file); System.out.println("压缩文件的名称为:" + zipFile.getName()); }}【运行结果】:
压缩文件的名称为:d:\hello.zip
现在我们呢是时候来看看如何加压缩文件了,和之前一样,先让我们来解压单个压缩文件(也就是压缩文件中只有一个文件的情况),我们采用前面的例子产生的压缩文件hello.zip
import java.io.File;import java.io.FileOutputStream;import java.io.IOException;import java.io.InputStream;import java.io.OutputStream;import java.util.zip.ZipEntry;import java.util.zip.ZipFile;/** * 解压缩文件(压缩文件中只有一个文件的情况) * */public class ZipFileDemo2{ public static void main(String[] args) throws IOException{ File file =new File("d:" + File.separator + "hello.zip"); File outFile =new File("d:" + File.separator + "unZipFile.txt"); ZipFile zipFile =new ZipFile(file); ZipEntry entry = zipFile.getEntry("hello.txt"); InputStream input = zipFile.getInputStream(entry); OutputStream output =new FileOutputStream(outFile); int temp =0; while((temp = input.read()) != -1){ output.write(temp); } input.close(); output.close(); }}【运行结果】:
解压缩之前:
这个压缩文件还是175字节
解压之后产生:
又回到了56字节,表示郁闷。
现在让我们来解压一个压缩文件中包含多个文件的情况吧
ZipInputStream类
当我们需要解压缩多个文件的时候,ZipEntry就无法使用了,如果想操作更加复杂的压缩文件,我们就必须使用ZipInputStream类
import java.io.File;import java.io.FileInputStream;import java.io.FileOutputStream;import java.io.IOException;import java.io.InputStream;import java.io.OutputStream;import java.util.zip.ZipEntry;import java.util.zip.ZipFile;import java.util.zip.ZipInputStream;/** * 解压缩一个压缩文件中包含多个文件的情况 * */public class ZipFileDemo3{ public static void main(String[] args) throws IOException{ File file =new File("d:" + File.separator + "zipFile.zip"); File outFile =null; ZipFile zipFile =new ZipFile(file); ZipInputStream zipInput =new ZipInputStream(new FileInputStream(file)); ZipEntry entry =null; InputStream input =null; OutputStream output =null; while((entry = zipInput.getNextEntry()) != null){ System.out.println("解压缩" + entry.getName() + "文件"); outFile =new File("d:" + File.separator + entry.getName()); if(!outFile.getParentFile().exists()){ outFile.getParentFile().mkdir(); } if(!outFile.exists()){ outFile.createNewFile(); } input = zipFile.getInputStream(entry); output =new FileOutputStream(outFile); int temp =0; while((temp = input.read()) != -1){ output.write(temp); } input.close(); output.close(); } }}【运行结果】:
被解压的文件:
解压之后再D盘下会出现一个temp文件夹,里面内容:
PushBackInputStream回退流
import java.io.ByteArrayInputStream;import java.io.IOException;import java.io.PushbackInputStream;/** * 回退流操作 * */public class PushBackInputStreamDemo{ public static void main(String[] args) throws IOException{ String str ="hello,rollenholt"; PushbackInputStream push =null; ByteArrayInputStream bat =null; bat =new ByteArrayInputStream(str.getBytes()); push =new PushbackInputStream(bat); int temp =0; while((temp = push.read()) != -1){ if(temp ==','){ push.unread(temp); temp = push.read(); System.out.print("(回退" + (char) temp + ") "); }else{ System.out.print((char) temp); } } }}【运行结果】:
hello(回退,) rollenholt
/** * 取得本地的默认编码 * */public class CharSetDemo{ public static void main(String[] args){ System.out.println("系统默认编码为:" + System.getProperty("file.encoding")); }}【运行结果】:
系统默认编码为:GBK
乱码的产生:
import java.io.File;import java.io.FileOutputStream;import java.io.IOException;import java.io.OutputStream;/** * 乱码的产生 * */public class CharSetDemo2{ public static void main(String[] args) throws IOException{ File file =new File("d:" + File.separator + "hello.txt"); OutputStream out =new FileOutputStream(file); byte[] bytes ="你好".getBytes("ISO8859-1"); out.write(bytes); out.close(); }}【运行结果】:
??
一般情况下产生乱码,都是由于编码不一致的问题。
对象的序列化
对象序列化就是把一个对象变为二进制数据流的一种方法。
一个类要想被序列化,就行必须实现java.io.Serializable接口。虽然这个接口中没有任何方法,就如同之前的cloneable接口一样。实现了这个接口之后,就表示这个类具有被序列化的能力。
先让我们实现一个具有序列化能力的类吧:
import java.io.*;/** * 实现具有序列化能力的类 * */public class SerializableDemoimplements Serializable{ public SerializableDemo(){ } public SerializableDemo(String name, int age){ this.name=name; this.age=age; } @Override public String toString(){ return "姓名:"+name+" 年龄:"+age; } private String name; private int age;}这个类就具有实现序列化能力,
在继续将序列化之前,先将一下ObjectInputStream和ObjectOutputStream这两个类
先给一个ObjectOutputStream的例子吧:
import java.io.Serializable;import java.io.File;import java.io.FileOutputStream;import java.io.IOException;import java.io.ObjectOutputStream;/** * 实现具有序列化能力的类 * */public class Personimplements Serializable{ public Person(){ } public Person(String name,int age){ this.name = name; this.age = age; } @Override public String toString(){ return "姓名:" + name + " 年龄:" + age; } private String name; private int age;}/** * 示范ObjectOutputStream * */public class ObjectOutputStreamDemo{ public static void main(String[] args) throws IOException{ File file =new File("d:" + File.separator + "hello.txt"); ObjectOutputStream oos =new ObjectOutputStream(new FileOutputStream( file)); oos.writeObject(new Person("rollen",20)); oos.close(); }}【运行结果】:
当我们查看产生的hello.txt的时候,看到的是乱码,呵呵。因为是二进制文件。
虽然我们不能直接查看里面的内容,但是我们可以使用ObjectInputStream类查看:
import java.io.File;import java.io.FileInputStream;import java.io.ObjectInputStream;/** * ObjectInputStream示范 * */public class ObjectInputStreamDemo{ public static void main(String[] args) throws Exception{ File file =new File("d:" + File.separator + "hello.txt"); ObjectInputStream input =new ObjectInputStream(new FileInputStream( file)); Object obj = input.readObject(); input.close(); System.out.println(obj); }}【运行结果】
姓名:rollen 年龄:20
到底序列化什么内容呢?
其实只有属性会被序列化。
Externalizable接口
被Serializable接口声明的类的对象的属性都将被序列化,但是如果想自定义序列化的内容的时候,就需要实现Externalizable接口。
当一个类要使用Externalizable这个接口的时候,这个类中必须要有一个无参的构造函数,如果没有的话,在构造的时候会产生异常,这是因为在反序列话的时候会默认调用无参的构造函数。
现在我们来演示一下序列化和反序列话:
package IO;import java.io.Externalizable;import java.io.File;import java.io.FileInputStream;import java.io.FileOutputStream;import java.io.IOException;import java.io.ObjectInput;import java.io.ObjectInputStream;import java.io.ObjectOutput;import java.io.ObjectOutputStream;/** * 序列化和反序列化的操作 * */public class ExternalizableDemo{ public static void main(String[] args) throws Exception{ ser();// 序列化 dser();// 反序列话 } public static void ser()throws Exception{ File file =new File("d:" + File.separator + "hello.txt"); ObjectOutputStream out =new ObjectOutputStream(new FileOutputStream( file)); out.writeObject(new Person("rollen",20)); out.close(); } public static void dser()throws Exception{ File file =new File("d:" + File.separator + "hello.txt"); ObjectInputStream input =new ObjectInputStream(new FileInputStream( file)); Object obj = input.readObject(); input.close(); System.out.println(obj); }}class Personimplements Externalizable{ public Person(){ } public Person(String name,int age){ this.name = name; this.age = age; } @Override public String toString(){ return "姓名:" + name + " 年龄:" + age; } // 复写这个方法,根据需要可以保存的属性或者具体内容,在序列化的时候使用 @Override public void writeExternal(ObjectOutput out) throws IOException{ out.writeObject(this.name); out.writeInt(age); } // 复写这个方法,根据需要读取内容 反序列话的时候需要 @Override public void readExternal(ObjectInput in) throws IOException, ClassNotFoundException{ this.name = (String) in.readObject(); this.age = in.readInt(); } private String name; private int age;}【运行结果】:
姓名:rollen 年龄:20
本例中,我们将全部的属性都保留了下来,
Serializable接口实现的操作其实是吧一个对象中的全部属性进行序列化,当然也可以使用我们上使用是Externalizable接口以实现部分属性的序列化,但是这样的操作比较麻烦,
当我们使用Serializable接口实现序列化操作的时候,如果一个对象的某一个属性不想被序列化保存下来,那么我们可以使用transient关键字进行说明:
下面举一个例子:
package IO;import java.io.File;import java.io.FileInputStream;import java.io.FileOutputStream;import java.io.ObjectInputStream;import java.io.ObjectOutputStream;import java.io.Serializable;/** * 序列化和反序列化的操作 * */public class serDemo{ public static void main(String[] args) throws Exception{ ser();// 序列化 dser();// 反序列话 } public static void ser()throws Exception{ File file =new File("d:" + File.separator + "hello.txt"); ObjectOutputStream out =new ObjectOutputStream(new FileOutputStream( file)); out.writeObject(new Person1("rollen",20)); out.close(); } public static void dser()throws Exception{ File file =new File("d:" + File.separator + "hello.txt"); ObjectInputStream input =new ObjectInputStream(new FileInputStream( file)); Object obj = input.readObject(); input.close(); System.out.println(obj); }}class Person1implements Serializable{ public Person1(){ } public Person1(String name,int age){ this.name = name; this.age = age; } @Override public String toString(){ return "姓名:" + name + " 年龄:" + age; } // 注意这里 private transient String name; private int age;}【运行结果】:
姓名:null 年龄:20
最后在给一个序列化一组对象的例子吧:
import java.io.File;import java.io.FileInputStream;import java.io.FileOutputStream;import java.io.ObjectInputStream;import java.io.ObjectOutputStream;import java.io.Serializable;/** * 序列化一组对象 * */public class SerDemo1{ public static void main(String[] args) throws Exception{ Student[] stu = {new Student("hello",20),new Student("world",30), new Student("rollen",40) }; ser(stu); Object[] obj = dser(); for(int i = 0; i < obj.length; ++i){ Student s = (Student) obj[i]; System.out.println(s); } } // 序列化 public static void ser(Object[] obj) throws Exception{ File file =new File("d:" + File.separator + "hello.txt"); ObjectOutputStream out =new ObjectOutputStream(new FileOutputStream( file)); out.writeObject(obj); out.close(); } // 反序列化 public static Object[] dser() throws Exception{ File file =new File("d:" + File.separator + "hello.txt"); ObjectInputStream input =new ObjectInputStream(new FileInputStream( file)); Object[] obj = (Object[]) input.readObject(); input.close(); return obj; }}class Studentimplements Serializable{ public Student(){ } public Student(String name,int age){ this.name = name; this.age = age; } @Override public String toString(){ return "姓名: " + name + " 年龄:" + age; } private String name; private int age;}【运行结果】:
姓名: hello 年龄:20
姓名: world 年龄:30
姓名: rollen 年龄:40
Java中的IO笔记
Java 流在处理上分为字符流和字节流。字符流处理的单元为 2 个字节的 Unicode 字符,分别操作字符、字符数组或字符串,而字节流处理单元为 1 个字节,操作字节和字节数组。
Java 内用 Unicode 编码存储字符,字符流处理类负责将外部的其他编码的字符流和 java 内 Unicode 字符流之间的转换。而类 InputStreamReader 和 OutputStreamWriter 处理字符流和字节流的转换。字符流(一次可以处理一个缓冲区)一次操作比字节流(一次一个字节)效率高。
( 一 )以字节为导向的 stream------InputStream/OutputStream
InputStream 和 OutputStream 是两个 abstact 类,对于字节为导向的 stream 都扩展这两个鸡肋(基类 ^_^ ) ;
1、 InputStream

1.1
ByteArrayInputStream -- 把内存中的一个缓冲区作为 InputStream 使用 .
construct---
(A)ByteArrayInputStream(byte[]) 创建一个新字节数组输入流( ByteArrayInputStream ),它从指定字节数组中读取数据( 使用 byte 作为其缓冲区数组)
(B)---ByteArrayInputStream(byte[], int, int) 创建一个新字节数组输入流,它从指定字节数组中读取数据。
---mark:: 该字节数组未被复制。
1.2
StringBufferInputStream -- 把一个 String 对象作为 InputStream .
construct---
StringBufferInputStream(String) 据指定串创建一个读取数据的输入流串。
注释:不推荐使用 StringBufferInputStream 方法。 此类不能将字符正确的转换为字节。
同 JDK 1.1 版中的类似,从一个串创建一个流的最佳方法是采用 StringReader 类。
1.3
FileInputStream -- 把一个文件作为 InputStream ,实现对文件的读取操作
construct---
(A)FileInputStream(File name) 创建一个输入文件流,从指定的 File 对象读取数据。
(B)FileInputStream(FileDescriptor) 创建一个输入文件流,从指定的文件描述器读取数据。
(C)-FileInputStream(String name) 创建一个输入文件流,从指定名称的文件读取数据。
method ---- read() 从当前输入流中读取一字节数据。
read(byte[]) 将当前输入流中 b.length 个字节数据读到一个字节数组中。
read(byte[], int, int) 将输入流中 len 个字节数据读入一个字节数组中。
1.4
PipedInputStream :实现了 pipe 的概念,主要在线程中使用 . 管道输入流是指一个通讯管道的接收端。
一个线程通过管道输出流发送数据,而另一个线程通过管道输入流读取数据,这样可实现两个线程间的通讯。
construct---
PipedInputStream() 创建一个管道输入流,它还未与一个管道输出流连接。
PipedInputStream(PipedOutputStream) 创建一个管道输入流 , 它已连接到一个管道输出流。
1.5
SequenceInputStream :把多个 InputStream 合并为一个 InputStream . “序列输入流”类允许应用程序把几个输入流连续地合并起来,
并且使它们像单个输入流一样出现。每个输入流依次被读取,直到到达该流的末尾。
然后“序列输入流”类关闭这个流并自动地切换到下一个输入流。
construct---
SequenceInputStream(Enumeration) 创建一个新的序列输入流,并用指定的输入流的枚举值初始化它。
SequenceInputStream(InputStream, InputStream) 创建一个新的序列输入流,初始化为首先 读输入流 s1, 然后读输入流 s2 。
2、 OutputSteam
2.1
ByteArrayOutputStream : 把信息存入内存中的一个缓冲区中 . 该类实现一个以字节数组形式写入数据的输出流。
当数据写入缓冲区时,它自动扩大。用 toByteArray() 和 toString() 能检索数据。
constructor
(A)--- ByteArrayOutputStream() 创建一个新的字节数组输出流。
(B)--- ByteArrayOutputStream() 创建一个新的字节数组输出流。
(C)--- ByteArrayOutputStream(int) 创建一个新的字节数组输出流,并带有指定大小字节的缓冲区容量。
toString(String) 根据指定字符编码将缓冲区内容转换为字符串,并将字节转换为字符。
write(byte[], int, int) 将指定字节数组中从偏移量 off 开始的 len 个字节写入该字节数组输出流。
write(int) 将指定字节写入该字节数组输出流。
writeTo(OutputStream) 用 out.write(buf, 0, count) 调用输出流的写方法将该字节数组输出流的全部内容写入指定的输出流参数。
2.2
FileOutputStream: 文件输出流是向 File 或 FileDescriptor 输出数据的一个输出流。
constructor
(A)FileOutputStream(File name) 创建一个文件输出流,向指定的 File 对象输出数据。
(B)FileOutputStream(FileDescriptor) 创建一个文件输出流,向指定的文件描述器输出数据。
(C)FileOutputStream(String name) 创建一个文件输出流,向指定名称的文件输出数据。
(D)FileOutputStream(String, boolean) 用指定系统的文件名,创建一个输出文件。
2.3
PipedOutputStream: 管道输出流是指一个通讯管道的发送端。 一个线程通过管道输出流发送数据,
而另一个线程通过管道输入流读取数据,这样可实现两个线程间的通讯。
constructor
(A)PipedOutputStream() 创建一个管道输出流,它还未与一个管道输入流连接。
(B)PipedOutputStream(PipedInputStream) 创建一个管道输出流,它已连接到一个管道输入流。
( 二 )以字符为导向的 stream Reader/Writer
以 Unicode 字符为导向的 stream ,表示以 Unicode 字符为单位从 stream 中读取或往 stream 中写入信息。
Reader/Writer 为 abstact 类
以 Unicode 字符为导向的 stream 包括下面几种类型:
1. Reader
1.1
CharArrayReader :与 ByteArrayInputStream 对应此类实现一个可用作字符输入流的字符缓冲区
constructor
CharArrayReader(char[]) 用指定字符数组创建一个 CharArrayReader 。
CharArrayReader(char[], int, int) 用指定字符数组创建一个 CharArrayReader
1.2
StringReader : 与 StringBufferInputStream 对应其源为一个字符串的字符流。
StringReader(String) 创建一新的串读取者。
1.3
FileReader : 与 FileInputStream 对应
1.4
PipedReader :与 PipedInputStream 对应
2. Writer

2.1 CharArrayWrite : 与 ByteArrayOutputStream 对应
2.2 StringWrite :无与之对应的以字节为导向的 stream
2.3 FileWrite : 与 FileOutputStream 对应
2.4 PipedWrite :与 PipedOutputStream 对应
3、两种不同导向的 stream 之间的转换
3.1
InputStreamReader 和 OutputStreamReader :
把一个以字节为导向的 stream 转换成一个以字符为导向的 stream 。
InputStreamReader 类是从字节流到字符流的桥梁:它读入字节,并根据指定的编码方式,将之转换为字符流。
使用的编码方式可能由名称指定,或平台可接受的缺省编码方式。
InputStreamReader 的 read() 方法之一的每次调用,可能促使从基本字节输入流中读取一个或多个字节。
为了达到更高效率,考虑用 BufferedReader 封装 InputStreamReader ,
BufferedReader in = new BufferedReader(new InputStreamReader(System.in));
例如: // 实现从键盘输入一个整数
- String s = null;
- InputStreamReader re = new InputStreamReader(System.in);
- BufferedReader br = new BufferedReader(re);
- try {
- s = br.readLine();
- System.out.println("s= " + Integer.parseInt(s));
- br.close();
- }
- catch (IOException e)
- {
- e.printStackTrace();
- }
- catch (NumberFormatException e)// 当应用程序试图将字符串转换成一种数值类型,但该字符串不能转换为适当格式时,抛出该异常。
- {
- System.out.println(" 输入的不是数字 ");
- }
InputStreamReader(InputStream) 用缺省的字符编码方式,创建一个 InputStreamReader 。
InputStreamReader(InputStream, String) 用已命名的字符编码方式,创建一个 InputStreamReader 。
OutputStreamWriter 将多个字符写入到一个输出流,根据指定的字符编码将多个字符转换为字节。
每个 OutputStreamWriter 合并它自己的 CharToByteConverter, 因而是从字符流到字节流的桥梁。
(三)Java IO 的一般使用原则 :
一、按数据来源(去向)分类:
1 、是文件: FileInputStream, FileOutputStream, ( 字节流 )FileReader, FileWriter( 字符 )
2 、是 byte[] : ByteArrayInputStream, ByteArrayOutputStream( 字节流 )
3 、是 Char[]: CharArrayReader, CharArrayWriter( 字符流 )
4 、是 String: StringBufferInputStream, StringBufferOuputStream ( 字节流 )StringReader, StringWriter( 字符流 )
5 、网络数据流: InputStream, OutputStream,( 字节流 ) Reader, Writer( 字符流 )
二、按是否格式化输出分:
1 、要格式化输出: PrintStream, PrintWriter
三、按是否要缓冲分:
1 、要缓冲: BufferedInputStream, BufferedOutputStream,( 字节流 ) BufferedReader, BufferedWriter( 字符流 )
四、按数据格式分:
1 、二进制格式(只要不能确定是纯文本的) : InputStream, OutputStream 及其所有带 Stream 结束的子类
2 、纯文本格式(含纯英文与汉字或其他编码方式); Reader, Writer 及其所有带 Reader, Writer 的子类
五、按输入输出分:
1 、输入: Reader, InputStream 类型的子类
2 、输出: Writer, OutputStream 类型的子类
六、特殊需要:
1 、从 Stream 到 Reader,Writer 的转换类: InputStreamReader, OutputStreamWriter
2 、对象输入输出: ObjectInputStream, ObjectOutputStream
3 、进程间通信: PipeInputStream, PipeOutputStream, PipeReader, PipeWriter
4 、合并输入: SequenceInputStream
5 、更特殊的需要: PushbackInputStream, PushbackReader, LineNumberInputStream, LineNumberReader
决定使用哪个类以及它的构造进程的一般准则如下(不考虑特殊需要):
首先,考虑最原始的数据格式是什么: 原则四
第二,是输入还是输出:原则五
第三,是否需要转换流:原则六第 1 点
第四,数据来源(去向)是什么:原则一
第五,是否要缓冲:原则三 (特别注明:一定要注意的是 readLine() 是否有定义,有什么比 read, write 更特殊的输入或输出方法)
第六,是否要格式化输出:原则二
Java中的IO例子
【案例1】通过一个对象获得完整的包名和类名
package Reflect;/** * 通过一个对象获得完整的包名和类名 * */class Demo{ //other codes...}class hello{ public static void main(String[] args) { Demo demo=new Demo(); System.out.println(demo.getClass().getName()); }}【运行结果】:Reflect.Demo
添加一句:所有类的对象其实都是Class的实例。
【案例2】实例化Class类对象
package Reflect;class Demo{ //other codes...}class hello{ public static void main(String[] args) { Class<?> demo1=null; Class<?> demo2=null; Class<?> demo3=null; try{ //一般尽量采用这种形式 demo1=Class.forName("Reflect.Demo"); }catch(Exception e){ e.printStackTrace(); } demo2=new Demo().getClass(); demo3=Demo.class; System.out.println("类名称 "+demo1.getName()); System.out.println("类名称 "+demo2.getName()); System.out.println("类名称 "+demo3.getName()); }}【运行结果】:
类名称 Reflect.Demo
类名称 Reflect.Demo
类名称 Reflect.Demo
【案例3】通过Class实例化其他类的对象
通过无参构造实例化对象
package Reflect;class Person{ public String getName() { return name; } public void setName(String name) { this.name = name; } public int getAge() { return age; } public void setAge(int age) { this.age = age; } @Override public String toString(){ return "["+this.name+" "+this.age+"]"; } private String name; private int age;}class hello{ public static void main(String[] args) { Class<?> demo=null; try{ demo=Class.forName("Reflect.Person"); }catch (Exception e) { e.printStackTrace(); } Person per=null; try { per=(Person)demo.newInstance(); }catch (InstantiationException e) { // TODO Auto-generated catch block e.printStackTrace(); }catch (IllegalAccessException e) { // TODO Auto-generated catch block e.printStackTrace(); } per.setName("Rollen"); per.setAge(20); System.out.println(per); }}【运行结果】:
[Rollen 20]
但是注意一下,当我们把Person中的默认的无参构造函数取消的时候,比如自己定义只定义一个有参数的构造函数之后,会出现错误:
比如我定义了一个构造函数:
public Person(String name,int age) { this.age=age; this.name=name; }然后继续运行上面的程序,会出现:
java.lang.InstantiationException: Reflect.Person
at java.lang.Class.newInstance0(Class.java:340)
at java.lang.Class.newInstance(Class.java:308)
at Reflect.hello.main(hello.java:39)
Exception in thread "main" java.lang.NullPointerException
at Reflect.hello.main(hello.java:47)
所以大家以后再编写使用Class实例化其他类的对象的时候,一定要自己定义无参的构造函数
【案例】通过Class调用其他类中的构造函数 (也可以通过这种方式通过Class创建其他类的对象)
package Reflect;import java.lang.reflect.Constructor;class Person{ public Person() { } public Person(String name){ this.name=name; } public Person(int age){ this.age=age; } public Person(String name,int age) { this.age=age; this.name=name; } public String getName() { return name; } public int getAge() { return age; } @Override public String toString(){ return "["+this.name+" "+this.age+"]"; } private String name; private int age;}class hello{ public static void main(String[] args) { Class<?> demo=null; try{ demo=Class.forName("Reflect.Person"); }catch (Exception e) { e.printStackTrace(); } Person per1=null; Person per2=null; Person per3=null; Person per4=null; //取得全部的构造函数 Constructor<?> cons[]=demo.getConstructors(); try{ per1=(Person)cons[0].newInstance(); per2=(Person)cons[1].newInstance("Rollen"); per3=(Person)cons[2].newInstance(20); per4=(Person)cons[3].newInstance("Rollen",20); }catch(Exception e){ e.printStackTrace(); } System.out.println(per1); System.out.println(per2); System.out.println(per3); System.out.println(per4); }}【运行结果】:
[null 0]
[Rollen 0]
[null 20]
[Rollen 20]
【案例】
返回一个类实现的接口:
package Reflect;interface China{ public static final String name="Rollen"; public static int age=20; public void sayChina(); public void sayHello(String name, int age);}class Personimplements China{ public Person() { } public Person(String sex){ this.sex=sex; } public String getSex() { return sex; } public void setSex(String sex) { this.sex = sex; } @Override public void sayChina(){ System.out.println("hello ,china"); } @Override public void sayHello(String name, int age){ System.out.println(name+" "+age); } private String sex;}class hello{ public static void main(String[] args) { Class<?> demo=null; try{ demo=Class.forName("Reflect.Person"); }catch (Exception e) { e.printStackTrace(); } //保存所有的接口 Class<?> intes[]=demo.getInterfaces(); for (int i = 0; i < intes.length; i++) { System.out.println("实现的接口 "+intes[i].getName()); } }}【运行结果】:
实现的接口 Reflect.China
(注意,以下几个例子,都会用到这个例子的Person类,所以为节省篇幅,此处不再粘贴Person的代码部分,只粘贴主类hello的代码)
【案例】:取得其他类中的父类
class hello{ public static void main(String[] args) { Class<?> demo=null; try{ demo=Class.forName("Reflect.Person"); }catch (Exception e) { e.printStackTrace(); } //取得父类 Class<?> temp=demo.getSuperclass(); System.out.println("继承的父类为: "+temp.getName()); }}【运行结果】
继承的父类为: java.lang.Object
【案例】:获得其他类中的全部构造函数
这个例子需要在程序开头添加import java.lang.reflect.*;
然后将主类编写为:
class hello{ public static void main(String[] args) { Class<?> demo=null; try{ demo=Class.forName("Reflect.Person"); }catch (Exception e) { e.printStackTrace(); } Constructor<?>cons[]=demo.getConstructors(); for (int i = 0; i < cons.length; i++) { System.out.println("构造方法: "+cons[i]); } }}【运行结果】:
构造方法: public Reflect.Person()
构造方法: public Reflect.Person(java.lang.String)
但是细心的读者会发现,上面的构造函数没有public 或者private这一类的修饰符
下面这个例子我们就来获取修饰符
class hello{ public static void main(String[] args) { Class<?> demo=null; try{ demo=Class.forName("Reflect.Person"); }catch (Exception e) { e.printStackTrace(); } Constructor<?>cons[]=demo.getConstructors(); for (int i = 0; i < cons.length; i++) { Class<?> p[]=cons[i].getParameterTypes(); System.out.print("构造方法: "); int mo=cons[i].getModifiers(); System.out.print(Modifier.toString(mo)+" "); System.out.print(cons[i].getName()); System.out.print("("); for(int j=0;j<p.length;++j){ System.out.print(p[j].getName()+" arg"+i); if(j<p.length-1){ System.out.print(","); } } System.out.println("){}"); } }}【运行结果】:
构造方法: public Reflect.Person(){}
构造方法: public Reflect.Person(java.lang.String arg1){}
有时候一个方法可能还有异常,呵呵。下面看看:
class hello{ public static void main(String[] args) { Class<?> demo=null; try{ demo=Class.forName("Reflect.Person"); }catch (Exception e) { e.printStackTrace(); } Method method[]=demo.getMethods(); for(int i=0;i<method.length;++i){ Class<?> returnType=method[i].getReturnType(); Class<?> para[]=method[i].getParameterTypes(); int temp=method[i].getModifiers(); System.out.print(Modifier.toString(temp)+" "); System.out.print(returnType.getName()+" "); System.out.print(method[i].getName()+" "); System.out.print("("); for(int j=0;j<para.length;++j){ System.out.print(para[j].getName()+" "+"arg"+j); if(j<para.length-1){ System.out.print(","); } } Class<?> exce[]=method[i].getExceptionTypes(); if(exce.length>0){ System.out.print(") throws "); for(int k=0;k<exce.length;++k){ System.out.print(exce[k].getName()+" "); if(k<exce.length-1){ System.out.print(","); } } }else{ System.out.print(")"); } System.out.println(); } }}【运行结果】:
public java.lang.String getSex ()
public void setSex (java.lang.String arg0)
public void sayChina ()
public void sayHello (java.lang.String arg0,int arg1)
public final native void wait (long arg0) throws java.lang.InterruptedException
public final void wait () throws java.lang.InterruptedException
public final void wait (long arg0,int arg1) throws java.lang.InterruptedException
public boolean equals (java.lang.Object arg0)
public java.lang.String toString ()
public native int hashCode ()
public final native java.lang.Class getClass ()
public final native void notify ()
public final native void notifyAll ()
【案例】接下来让我们取得其他类的全部属性吧,最后我讲这些整理在一起,也就是通过class取得一个类的全部框架
class hello { public static void main(String[] args) { Class<?> demo =null; try { demo = Class.forName("Reflect.Person"); }catch (Exception e) { e.printStackTrace(); } System.out.println("===============本类属性========================"); // 取得本类的全部属性 Field[] field = demo.getDeclaredFields(); for (int i = 0; i < field.length; i++) { // 权限修饰符 int mo = field[i].getModifiers(); String priv = Modifier.toString(mo); // 属性类型 Class<?> type = field[i].getType(); System.out.println(priv +" " + type.getName() +" " + field[i].getName() +";"); } System.out.println("===============实现的接口或者父类的属性========================"); // 取得实现的接口或者父类的属性 Field[] filed1 = demo.getFields(); for (int j = 0; j < filed1.length; j++) { // 权限修饰符 int mo = filed1[j].getModifiers(); String priv = Modifier.toString(mo); // 属性类型 Class<?> type = filed1[j].getType(); System.out.println(priv +" " + type.getName() +" " + filed1[j].getName() +";"); } }}【运行结果】:
===============本类属性========================
private java.lang.String sex;
===============实现的接口或者父类的属性========================
public static final java.lang.String name;
public static final int age;
【案例】其实还可以通过反射调用其他类中的方法:
class hello { public static void main(String[] args) { Class<?> demo =null; try { demo = Class.forName("Reflect.Person"); }catch (Exception e) { e.printStackTrace(); } try{ //调用Person类中的sayChina方法 Method method=demo.getMethod("sayChina"); method.invoke(demo.newInstance()); //调用Person的sayHello方法 method=demo.getMethod("sayHello", String.class,int.class); method.invoke(demo.newInstance(),"Rollen",20); }catch (Exception e) { e.printStackTrace(); } }}【运行结果】:
hello ,china
Rollen 20
【案例】调用其他类的set和get方法
class hello { public static void main(String[] args) { Class<?> demo =null; Object obj=null; try { demo = Class.forName("Reflect.Person"); }catch (Exception e) { e.printStackTrace(); } try{ obj=demo.newInstance(); }catch (Exception e) { e.printStackTrace(); } setter(obj,"Sex","男",String.class); getter(obj,"Sex"); } /** * @param obj * 操作的对象 * @param att * 操作的属性 * */ public static void getter(Object obj, String att) { try { Method method = obj.getClass().getMethod("get" + att); System.out.println(method.invoke(obj)); }catch (Exception e) { e.printStackTrace(); } } /** * @param obj * 操作的对象 * @param att * 操作的属性 * @param value * 设置的值 * @param type * 参数的属性 * */ public static void setter(Object obj, String att, Object value, Class<?> type) { try { Method method = obj.getClass().getMethod("set" + att, type); method.invoke(obj, value); }catch (Exception e) { e.printStackTrace(); } }}// end class【运行结果】:
男
【案例】通过反射操作属性
class hello { public static void main(String[] args) throws Exception { Class<?> demo =null; Object obj =null; demo = Class.forName("Reflect.Person"); obj = demo.newInstance(); Field field = demo.getDeclaredField("sex"); field.setAccessible(true); field.set(obj,"男"); System.out.println(field.get(obj)); }}// end class【案例】通过反射取得并修改数组的信息:
import java.lang.reflect.*;class hello{ public static void main(String[] args) { int[] temp={1,2,3,4,5}; Class<?>demo=temp.getClass().getComponentType(); System.out.println("数组类型: "+demo.getName()); System.out.println("数组长度 "+Array.getLength(temp)); System.out.println("数组的第一个元素: "+Array.get(temp,0)); Array.set(temp,0,100); System.out.println("修改之后数组第一个元素为: "+Array.get(temp,0)); }}【运行结果】:
数组类型: int
数组长度 5
数组的第一个元素: 1
修改之后数组第一个元素为: 100
【案例】通过反射修改数组大小
class hello{ public static void main(String[] args) { int[] temp={1,2,3,4,5,6,7,8,9}; int[] newTemp=(int[])arrayInc(temp,15); print(newTemp); System.out.println("====================="); String[] atr={"a","b","c"}; String[] str1=(String[])arrayInc(atr,8); print(str1); } /** * 修改数组大小 * */ public static Object arrayInc(Object obj,int len){ Class<?>arr=obj.getClass().getComponentType(); Object newArr=Array.newInstance(arr, len); int co=Array.getLength(obj); System.arraycopy(obj,0, newArr,0, co); return newArr; } /** * 打印 * */ public static void print(Object obj){ Class<?>c=obj.getClass(); if(!c.isArray()){ return; } System.out.println("数组长度为: "+Array.getLength(obj)); for (int i = 0; i < Array.getLength(obj); i++) { System.out.print(Array.get(obj, i)+" "); } }}【运行结果】:
数组长度为: 15
1 2 3 4 5 6 7 8 9 0 0 0 0 0 0 =====================
数组长度为: 8
a b c null null null null null
动态代理
【案例】首先来看看如何获得类加载器:
class test{ }class hello{ public static void main(String[] args) { test t=new test(); System.out.println("类加载器 "+t.getClass().getClassLoader().getClass().getName()); }}【程序输出】:
类加载器 sun.misc.Launcher$AppClassLoader
其实在java中有三种类类加载器。
1)Bootstrap ClassLoader 此加载器采用c++编写,一般开发中很少见。
2)Extension ClassLoader 用来进行扩展类的加载,一般对应的是jre\lib\ext目录中的类
3)AppClassLoader 加载classpath指定的类,是最常用的加载器。同时也是java中默认的加载器。
如果想要完成动态代理,首先需要定义一个InvocationHandler接口的子类,已完成代理的具体操作。
package Reflect;import java.lang.reflect.*;//定义项目接口interface Subject { public String say(String name,int age);}// 定义真实项目class RealSubjectimplements Subject { @Override public String say(String name,int age) { return name +" " + age; }}class MyInvocationHandlerimplements InvocationHandler { private Object obj =null; public Object bind(Object obj) { this.obj = obj; return Proxy.newProxyInstance(obj.getClass().getClassLoader(), obj .getClass().getInterfaces(),this); } @Override public Object invoke(Object proxy, Method method, Object[] args) throws Throwable { Object temp = method.invoke(this.obj, args); return temp; }}class hello { public static void main(String[] args) { MyInvocationHandler demo =new MyInvocationHandler(); Subject sub = (Subject) demo.bind(new RealSubject()); String info = sub.say("Rollen",20); System.out.println(info); }}【运行结果】:
Rollen 20
类的生命周期
在一个类编译完成之后,下一步就需要开始使用类,如果要使用一个类,肯定离不开JVM。在程序执行中JVM通过装载,链接,初始化这3个步骤完成。
类的装载是通过类加载器完成的,加载器将.class文件的二进制文件装入JVM的方法区,并且在堆区创建描述这个类的java.lang.Class对象。用来封装数据。 但是同一个类只会被类装载器装载以前
链接就是把二进制数据组装为可以运行的状态。
链接分为校验,准备,解析这3个阶段
校验一般用来确认此二进制文件是否适合当前的JVM(版本),
准备就是为静态成员分配内存空间,。并设置默认值
解析指的是转换常量池中的代码作为直接引用的过程,直到所有的符号引用都可以被运行程序使用(建立完整的对应关系)
完成之后,类型也就完成了初始化,初始化之后类的对象就可以正常使用了,直到一个对象不再使用之后,将被垃圾回收。释放空间。
当没有任何引用指向Class对象时就会被卸载,结束类的生命周期
将反射用于工厂模式
先来看看,如果不用反射的时候,的工厂模式吧:
http://www.cnblogs.com/rollenholt/archive/2011/08/18/2144851.html
/** * @author Rollen-Holt 设计模式之 工厂模式 */interface fruit{ public abstract void eat();}class Appleimplements fruit{ public void eat(){ System.out.println("Apple"); }}class Orangeimplements fruit{ public void eat(){ System.out.println("Orange"); }}// 构造工厂类// 也就是说以后如果我们在添加其他的实例的时候只需要修改工厂类就行了class Factory{ public static fruit getInstance(String fruitName){ fruit f=null; if("Apple".equals(fruitName)){ f=new Apple(); } if("Orange".equals(fruitName)){ f=new Orange(); } return f; }}class hello{ public static void main(String[] a){ fruit f=Factory.getInstance("Orange"); f.eat(); }}这样,当我们在添加一个子类的时候,就需要修改工厂类了。如果我们添加太多的子类的时候,改的就会很多。
现在我们看看利用反射机制:
package Reflect;interface fruit{ public abstract void eat();}class Appleimplements fruit{ public void eat(){ System.out.println("Apple"); }}class Orangeimplements fruit{ public void eat(){ System.out.println("Orange"); }}class Factory{ public static fruit getInstance(String ClassName){ fruit f=null; try{ f=(fruit)Class.forName(ClassName).newInstance(); }catch (Exception e) { e.printStackTrace(); } return f; }}class hello{ public static void main(String[] a){ fruit f=Factory.getInstance("Reflect.Apple"); if(f!=null){ f.eat(); } }}现在就算我们添加任意多个子类的时候,工厂类就不需要修改。
上面的爱吗虽然可以通过反射取得接口的实例,但是需要传入完整的包和类名。而且用户也无法知道一个接口有多少个可以使用的子类,所以我们通过属性文件的形式配置所需要的子类。
下面我们来看看: 结合属性文件的工厂模式
首先创建一个fruit.properties的资源文件,
内容为:
apple=Reflect.Appleorange=Reflect.Orange然后编写主类代码:
package Reflect;import java.io.*;import java.util.*;interface fruit{ public abstract void eat();}class Appleimplements fruit{ public void eat(){ System.out.println("Apple"); }}class Orangeimplements fruit{ public void eat(){ System.out.println("Orange"); }}//操作属性文件类class init{ public static Properties getPro() throws FileNotFoundException, IOException{ Properties pro=new Properties(); File f=new File("fruit.properties"); if(f.exists()){ pro.load(new FileInputStream(f)); }else{ pro.setProperty("apple","Reflect.Apple"); pro.setProperty("orange","Reflect.Orange"); pro.store(new FileOutputStream(f),"FRUIT CLASS"); } return pro; }}class Factory{ public static fruit getInstance(String ClassName){ fruit f=null; try{ f=(fruit)Class.forName(ClassName).newInstance(); }catch (Exception e) { e.printStackTrace(); } return f; }}class hello{ public static void main(String[] a) throws FileNotFoundException, IOException{ Properties pro=init.getPro(); fruit f=Factory.getInstance(pro.getProperty("apple")); if(f!=null){ f.eat(); } }}黑马IO总结
一、IO流
字节流抽象类: InputStream 、OutputSteam


字符流抽象类:Reader、Writer


二、写入或者读取文件(未使用缓冲区)
1、写入文件:
- FileWriter fw = new FileWriter("D://test.txt");//在指定目录下创建指定文件,如果已存在,则覆盖
- fw.write("asdfa\r\nxiexienihao");//调用write()方法将字符串写入流中
- fw.flush();//刷新流对象中的数据,将数据刷新到目的文件中
- fw.close();//刷新,并关闭流资源
- FileWriter fw = new FileWriter("test.txt",true);
2、读取文件:
- FileReader fr = new FileReader("test.txt");
- char[] buf = new char[3];//三个三个的读出数据。char[1024] 一次读2k 一个字符是2个字节
- int num = fr.read(buf); //读取之后存在buf中,并返回此次读取的个数;没有了返回-1
- int num = 0;
- while((num=fr.read(buf))!=-1){
- SOP(new String(buf,0,num));//有几个就打印几个;此处注意尽量不要使用println 而要使用print
- }
三、IO异常处理方式
- FileWriter fw = null;
- try{
- fw = new FileWriter("demo.txt");//如果有异常失败,则对象创建失败
- fw.write("asdfd");
- }catch(IOException e){
- try{
- if(fw != null){ //此处应该判断,
- fw.close();
- }
- }catch(IOException e){
- }
- }
1、不适用缓冲区技术:
- public void copy(){
- FileWriter fw = null;
- FileReader fr = null;
- try{
- fw = FileWriter("copy.txt");//要写入的文件
- fr = FileReader("yuan.txt");//copy的文件
- char ch = new char[1024]; //一次copy 2k
- int lenth = 0;
- while((lenth = fr.read(buf)) != -1){
- fw.write(buf,0,lenth);
- }
- }catch(IOException e){
- throw new RuntimeException("读写失败");
- }fanally{
- if(fr!=null){
- try{
- fr.close();
- }catch(IOException e){
- }
- }
- if(fw!=null){
- try{
- fw.close();
- }catch(IOException e){
- }
- }
- }
- }
- public void copy(){
- BufferedWriter bufw = null;
- BufferedReader bufr = null;
- try{
- bufw = BufferedWriter(new FileWriter("copy.txt"));//要写入的文件
- bufr = BufferedReader(new FileReader("yuan.txt"));//copy的文件
- String line = null;
- while((line = bufr.read(buf)) != null){
- bufw.write(line);
- bufw.newLine(); //自己换行
- bufw.flush();
- }
- }catch(IOException e){
- throw new RuntimeException("读写失败");
- }fanally{
- if(bufr!=null){
- try{
- bufr.close();
- }catch(IOException e){
- throw new RuntimeException("读关闭失败");
- }
- }
- if(bufw!=null){
- try{
- bufw.close();
- }catch(IOException e){
- throw new RuntimeException("写关闭失败");
- }
- }
- }
- }
读取键盘输入
System.in;//对应的是标准的输入设备,键盘
System.out;//对应的而是标准输出设备,控制台
System.setIn();//改变标准输入设备
System.setOut();
InputStreamReader//字节通向字符的桥梁
OutputStreamReader//字符转字节
- //InputStream in = System.in;//获取键盘输入
- //InputStreamReader isr = new InputStreamReader(in);//转换流(字节流转字符流),并且通过BufferedReader装饰可以使用字符流的readLine()
- //BufferedReader bufr = new BufferedReader(isr);
- BufferedReader bufr = new BufferedReader(new InputStreamReader(System.in));//一句
- String line = null;
- while((line=bufr.readLine()) != null){
- if(line.isEmpty()){
- continue;
- }
- if("over".equals(line)){
- break;
- }
- SOP(line.toUpperCase());//输出也可以使用输出流表示,如下
- }
- bufr.close();
- 1、明确源和目的
- 源:输入流 InputStream Reader
- 目的:输出流.Outputstream Writer
- 2、明确错做的数据是否是纯文本
- 是:字符流
- 不是:字节流
- 3、体系明确后,再明确要使用的那个对象
- 通过设备来区分:
- 源设备:内存,硬盘,键盘
- 目的设备:内存,硬盘,键盘
一、File对象
流对象只能操作数据,而文件等信息必须通过File类操作。
File常见方法
- 1、创建。 boolean createNewFile(); //f.createNewFile();//如果此文件已经存在,则返回false
- 2、删除。 boolean delete();
- void deleteOnExit(); //在程序退出时删除指定文件,一般临时文件较长使用
- 3、判断。 切记:在判断文件是否是文件或者目录时,必须先判断该文件是否存在
- boolean exists();//文件是否存在
- isFile()
- isDirectory()
- isHidden()
- boolean canExecute(); //
- 。。 canRead()
- canWrite()
- .....
- 4、获取。 getName()
- getPath()
- getAbsolutePath()
- .....
- 5、创建目录(创建文件夹)
- File f= new File("test");
- f.mkdir();//只能创建文件夹,即一级目录
- f.mkdirs();//创建多级目录
二、Properties对象
1、是hashtable的子类,具备map集合的特点,存储的键值对都是字符串。
2、是集合和IO技术相结合的集合容器。
3、特点:可用于键值对形式的配置文件。
属性操作文件的键值对实例:
- import java.io.*;
- import java.util.*;
- class Test
- {
- public static void main(String[] args) throws IOException
- {
- Properties prop = new Properties();
- File file = new File("count.ini");
- if(!file.exists()){
- file.createNewFile();
- }
- FileInputStream fis = new FileInputStream(file);
- prop.load(fis);
- int count = 0;
- String value = prop.getProperty("time");
- if(value != null){
- count = Integer.parseInt(value);
- if(count >= 5){
- System.out.println("使用次数已经到!!!");
- return;
- }
- }
- prop.setProperty("time",++count+"");
- FileOutputStream fos = new FileOutputStream(file);
- prop.store(fos,"注释");
- fis.close();
- fos.close();
- }
- }
三、其他流对象
打印流:
PrintStream 字节打印流
构造函数可以接受的参数:1、file对象File 2、字符串路径String 3、字节输出流OutputStream
PrintWriter 字符打印流
构造函数接受的参数:1、file对象File 2、字符串路径String 3、字节输出流OutputStream4、字符输出流 Writer
序列流
SequenceInputStream 对多个流合并 (分割流练习)
可序列化实现接口Serializable,序列化堆中的对象,静态数据不能被序列化,关键字transient修饰的数据也不能被序列化
管道流(涉及到多线程)
PipedInputStream PipedOutputStream
- java中的io
- java中的io
- java中的IO
- Java中的io笔记
- JAVA 中的IO流
- JAVA中的IO
- JAVA 中的IO流
- Java中的IO流
- java中的IO系统
- java中的IO
- JAVA 中的IO流
- java中的IO整理
- java中的IO整理
- JAVA 中的IO流
- java中的io
- java中的IO整理
- Java中的IO
- java中的IO整理
- eclipse中直接打开文件所在目录的插件
- 位图索引冲突引发TX锁争用时,则等待enq:TX-row lock conention.
- java oracle Blob
- 不锈钢叠片过滤器技术参数
- Codec notes by learning myself
- Java中的IO
- Linux异步通知 fasync
- lucene smartcn原理
- 多进程阻塞I/O服务器设计
- Unity Mecanim在大型mmo中的应用
- 反冲洗过滤器规格以及技术性能
- 渭睬枚祭孔饶炕沟肿戮酉帕戮芍链
- 关于Python中的yield
- 一致性hash算法