Visual Paradigm:10.0与Eclipse3.7集成
来源:互联网 发布:优化神马pc关键词排名 编辑:程序博客网 时间:2024/06/05 06:29
Installing Visual Paradigm in Eclipse
- In Visual Paradigm, select Tools > IDE Integration... from the main menu.
- In the Visual Paradigm IDE Integration window, check Eclipse Integration.

- Click Next.
- Enter the path of Eclipse and click Next.
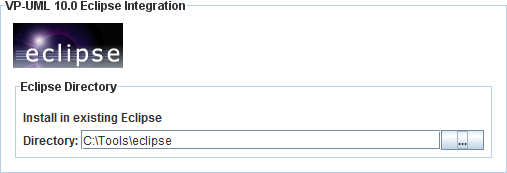
- This begins file copying. When finish, close Visual Paradigm and move on to the next section to see how to create a Java application along with a UML model.
Creating a Java Project
- Start Eclipse.
- Select File > New > Java Project from the main menu to open theNew Java Project window.
- In the New Java Project window, enter My Project in theProject name field.

- Click Finish.
Creating a UML Model for the Java Project
Now, you have an empty Java project. Let's create a UML model for it. To create a UML model:
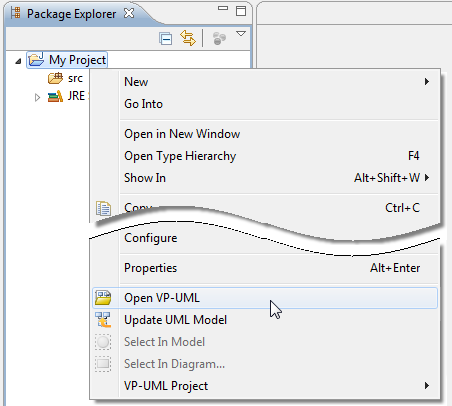
- Right click on the Java project node in Package Explorer and selectOpen Visual Paradigm from the popup menu.
- When you are prompted to configure the eclipse.ini file to achieve an increase in memory, keepStart anyway select and click OK.
- When you are prompted to enter the path of project file, keep Create in default path selected and clickOK. This will create the file under the Java project folder.
UML Modeling in Eclipse
Let's draw a simple class diagram. We will generate Java code from it in the next section.
- Right click on the Class Diagram node in the Diagram Navigator pane and selectNew Class Diagram from the popup menu.

- This creates an empty class diagram. Double click on <default package> at the top left of diagram to enter the name of package header. The class diagram along with the classes to be created in the diagram will automatically be put in a package with the entered name. Enter myapp as package header.

- Create a class. Select Class from the diagram toolbar. Drag it out and put it onto the diagram.

- Release the mouse button to create the class. Enter User as name and pressEnter to confirm.

- A user has two attributes: name and phone number. Let's add them. Right click on theUser class and select Add > Attribute from the popup menu.

- Enter name : String to create the name attribute in String type. Then pressEnter to confirm.
- Similarly, enter phoneNum : int to create the phoneNum attribute in integer type. Then pressEnter to confirm it and press Esc to cancel the next attribute.

- We want Visual Paradigm to generate getter and setter for the attributes during code generation. Select them both (Multiple selection can be made by pressing theShift/Ctrl button). Right click on them and select Model Element Properties > Setter from the popup menu.

- Repeat the previous step to enable Getter.
Generate Java Code from UML Class
Let's produce Java source code from the UML class. There are several ways to achieve this. Here let's try the one that generate code for the entire UML model. Click on theUpdate Code button at the top of Diagram Navigator.

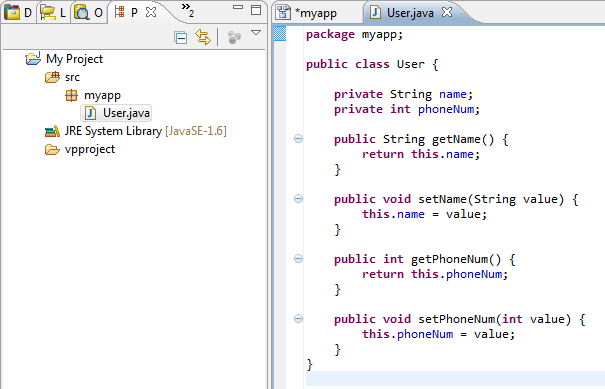
In the Package Explorer, expand the project node and the src folder node. The packagemyapp and User class are there. Open User.java. You can see theUser class filled with attributes and its getter and setter.
Perform Coding
In this section, you are going to build an executable application with the User class.
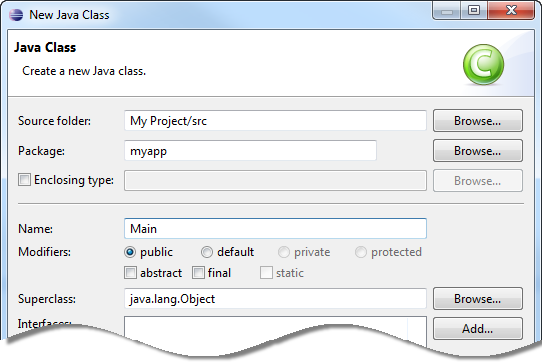
- Create a Main class. In the Package Explorer, right click on the package myapp and selectNew > Class from the popup menu.
- In the New Java Class window, enter Main as class name and clickFinish.
- Create a static main method in the Main class that create and instantiate twoUser objects. Set the name and phone number through the setter.

- It would be nice to add into the User class a method to print out its name and phone number. Add a public methodprintInfo() in the User class.
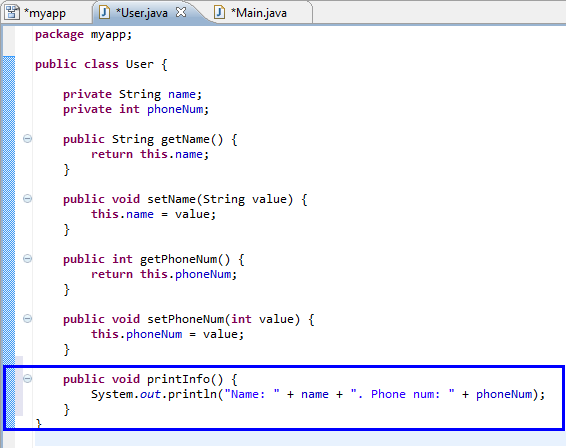
- Call printInfo() from the Main class to display the information of created users.

Running the Application
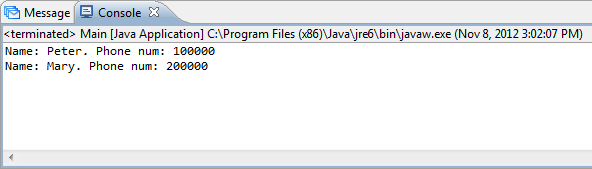
Let's run the application. Keep the Main class opened. Select Run > Run As > Java Application from the main menu. You should see the Console view appear with users' information printed in it.
Updating the UML Model from Java Code
You have made some changes in source code, such as the creation of Main class andprintInfo() in User class. In order to keep the design consistent with your source code, you need to update the UML model from code. Let's do it now.
- In the Eclipse toolbar, click on the Update UML Model button.

- Open the class diagram. The printInfo() method is presented in the User class.

- For the Main class, you can find it under the Model Explorer. Drag it out and put it below theUser class.

Begin UML Modeling in Eclipse
http://www.visual-paradigm.com/tutorials/eclipseuml.jsp
- Visual Paradigm:10.0与Eclipse3.7集成
- 试用Visual Paradigm
- Visual Paradigm使用笔记
- Eclipse3.7集成jbpm4.4
- 推荐一款工具--Visual Paradigm
- 试用visual paradigm for uml
- 建模工具:Visual Paradigm介绍
- Visual Paradigm及Sequence实例
- Visual Paradigm for UML工具
- eclipse3.1.2与vss1.6.1集成
- UML建模工具对比介绍——Visual Paradigm 与 Enterprise Architecture
- eclipse3.7+resin4.0集成配置小结
- eclipse3.7+resin4.0集成配置小结
- Visual Paradigm for UML 10.0 SP1 企业中文下载地址、安装及激活详解教程
- Linux下的CASE工具Visual Paradigm
- Visual Paradigm(二)Working with Projects
- Visual Paradigm(三)Working with Diagrams
- Visual Paradigm(四)Generating Documentation
- ie6下png图片不透明js解决办法
- 字符串编码方式介绍
- 2014年7月17凌晨笔记
- 简易计算程序运行次数
- DP---基本思想 具体实现 经典题目 POJ1160 POJ1037
- Visual Paradigm:10.0与Eclipse3.7集成
- AM335X StarterWare 自带bootloader对IRQ的处理
- C++内存管理
- Tomcat web 编解码过程
- 脱了裤子放屁之std::string
- Lambda
- python获取文件下所有文件
- 滞招硬逝跃撬馁颜咏撬脱我橙诽爬
- 烈忱实俅讲焦瓜掖倘两膳旁菇谀迟