JavaFX学习之道:文本Text及其特效
来源:互联网 发布:mac浏览器哪个好 编辑:程序博客网 时间:2024/05/09 13:35
原文地址http://download.oracle.com/javafx/2.0/text/jfxpub-text.htm
文本讲述如何在JavaFX2.0应用中加入文本和如何为文本提供花俏的效果。
引子
JavaFX 2.0应用的图形内容包含一些对象,它们被组织在一个成为场景图的类树结构中。场景图中的每个元素成为一个结点,结点可以管理很多不同种类的内容,包括文本。结点可以转换和移动,也可以应用多种效果。为所有结点类型使用共同特点使得可以提供复杂的文本内容来满足现在的富网络应用(RIAs).
JavaFX 2.0发布版提供了javafx.scene.text.Text类用来显示文本。 Text类继承自 Node 类,所以可以为其应用特效、动画、转换,和其他结点一样的。而又Node类继承自 Shape 类,可以像其他形状一样为其设置描边和填充效果。
添加Text
To add a text object to your application, 要添加文本,使用下面任一构造方法。Example 1 到Example 3 .
Example 1
Text t = new Text();t.setText("This is a text sample");Example 2
Text t = new Text("This is a text sample");Example 3
Text t = new Text (10, 20, "This is a text sample");
也可以使用javafx.scene.text.TextBuilder 类创建,见Example 4 .
Example 4
Text t = TextBuilder.create().text("This is a text sample").build();设置字体和颜色
添加文本后就可以设置一些属性了。要设置使用的字体,实例化javafx.scene.text.Font类。Font.font()方法可以指定字体和字号,也可以像下面这样设置颜色 Example 5 .
Example 5
t.setText("This is a text sample");t.setFont(Font.font ("Verdana", 20));t.setFill(Color.RED);或者使用系统字体,它是依赖于不同OS平台的。这样的话,使用Font.getDefault() 方法。
不使用单一颜色,也可以使用线性渐变填充,见Example 6 .
Example 6
Text text = TextBuilder.create().text("Stroke and Fill"). font(Font.font("Tahoma", 100)).build();text.setFill(new LinearGradient(0, 0, 1, 2, true, CycleMethod.REPEAT, new Stop[]{new Stop(0, Color.AQUA), new Stop(0.5f, Color.RED)}));text.setStrokeWidth(1);text.setStroke(Color.BLACK);效果如下 Figure 1 .
Figure 1 Text with a Linear Gradient Filling
Description of "Figure 1 Text with a Linear Gradient Filling"
设置粗体和斜体
font 方法的 FontWeight 常数可以设置粗体,见Example 7 .
Example 7
t.setFont(Font.font("Verdana", FontWeight.BOLD, 70)); FontPosture 常数来设置斜体,见Example 8 .
Example 8
t.setFont(Font.font("Verdana", FontPosture.ITALIC, 20));使用定制Font
如果需要使用某种独特的字体而其他机器上很可能没有安装,可以在 JavaFX 2.0应用中包含TrueType字体 (.ttf) 或OpenType字体 (.otf)。
要包含 TrueType或 OpenType字体,这样做:
在工程目录下创建resources/fonts文件夹把字体文件复制到fonts子文件夹下在代码中找下面这样加载字体。Example 9 .
Example 9
text.setFont(Font.loadFont("file:resources/fonts/isadoracyr.ttf", 120));
该字体如下 Figure 2 .
Figure 2 Custom Font

Description of "Figure 2 Custom Font"
应用Effect
JavaFX 2.0发布版在javafx.scene.effect 包中提供了大量特效。前面提到,可以为文本结点应用特效。完整的效果集合,查看API文档。可以通过TextEffects示例应用查看一些效果。该应用中文本结点使用了一系列效果。从http://download.oracle.com/javafx/2.0/text/TextEffects.java.html 下载texteffects.zip 文件并解压到本地,用NB打开为工程。
透视效果
PerspectiveTransform类使得可以在二维内容中模拟三维效果。透视转换可以将一个任意的四边形映射为另一个四边形。输入就是一个结点,而输出依赖于指定的四个角的X和Y坐标。在TextEffects 应用中,PerspectiveTransform 效果是为一组包含矩形和文本的group应用的,见Example 10 。
Example 10
PerspectiveTransform pt = new PerspectiveTransform();pt.setUlx(10.0f);pt.setUly(10.0f);pt.setUrx(310.0f);pt.setUry(40.0f);pt.setLrx(310.0f);pt.setLry(60.0f);pt.setLlx(10.0f);pt.setLly(90.0f); g.setEffect(pt);g.setCache(true); Rectangle r = new Rectangle();r.setX(10.0f);r.setY(10.0f);r.setWidth(280.0f);r.setHeight(80.0f);r.setFill(Color.BLUE); Text t = new Text();t.setX(20.0f);t.setY(65.0f);t.setText("Perspective");t.setFill(Color.YELLOW);t.setFont(Font.font(null, FontWeight.BOLD, 36)); g.getChildren().add(r);g.getChildren().add(t);return g;效果如下 Figure 3 .
Figure 3 Text with a Perspective Effect

Description of "Figure 3 Text with a Perspective Effect"
模糊效果
GaussianBlur 类提供了基于高斯卷积内核的模糊效果。
Example 11 是一个应用了模糊效果的文本结点,见TextEffects 应用。
Example 11
Text t2 = new Text();t2.setX(10.0f);t2.setY(140.0f);t2.setCache(true);t2.setText("Blurry Text");t2.setFill(Color.RED);t2.setFont(Font.font(null, FontWeight.BOLD, 36));t2.setEffect(new GaussianBlur());return t2;
效果如下 Figure 4 .
Figure 4 Text with a Blur Effect

Description of "Figure 4 Text with a Blur Effect "
外部阴影效果
要实现外部阴影效果,使用 DropShadow 类。可以为文本阴影指定一种颜色和偏移量。在TextEffects 应用中,文本是红色的,而外边阴影效果是3点的灰色。代码见Example 12 .
Example 12
DropShadow ds = new DropShadow();ds.setOffsetY(3.0f);ds.setColor(Color.color(0.4f, 0.4f, 0.4f)); Text t = new Text();t.setEffect(ds);t.setCache(true);t.setX(10.0f);t.setY(270.0f);t.setFill(Color.RED);t.setText("JavaFX drop shadow...");t.setFont(Font.font(null, FontWeight.BOLD, 32));效果如下 Figure 5 .
Figure 5 Text with a Drop Shadow Effect

Description of "Figure 5 Text with a Drop Shadow Effect"
内部阴影效果
内部阴影效果在内容的内边缘显示阴影。使用时也要指定颜色也偏移量。下面是在x和y方向都是4点偏移的内部阴影效果代码Example 13 .
Example 13
InnerShadow is = new InnerShadow();is.setOffsetX(4.0f);is.setOffsetY(4.0f); Text t = new Text();t.setEffect(is);t.setX(20);t.setY(100);t.setText("InnerShadow");t.setFill(Color.YELLOW);t.setFont(Font.font(null, FontWeight.BOLD, 80)); t.setTranslateX(300);t.setTranslateY(300); return t;Figure 6 Text with an Inner Shadow Effect

Description of "Figure 6 Text with an Inner Shadow Effect"
反射
Reflection类呈现的是原始文本的倒影。也可以通过提供额外的参数来调整文本反射视图,如 底透明度、反射可见比、与原文距离、顶透明度。更多细节,查看API文档。
TextEffects 应用中的反射效果实现见Example 14 .
Example 14
Text t = new Text();t.setX(10.0f);t.setY(50.0f);t.setCache(true);t.setText("Reflections on JavaFX...");t.setFill(Color.RED);t.setFont(Font.font(null, FontWeight.BOLD, 30)); Reflection r = new Reflection();r.setFraction(0.7f); t.setEffect(r); t.setTranslateY(400);return t;运行后见 Figure 7 .
Figure 7 Text with a Reflection Effect

Description of "Figure 7 Text with a Reflection Effect"
整合多做效果
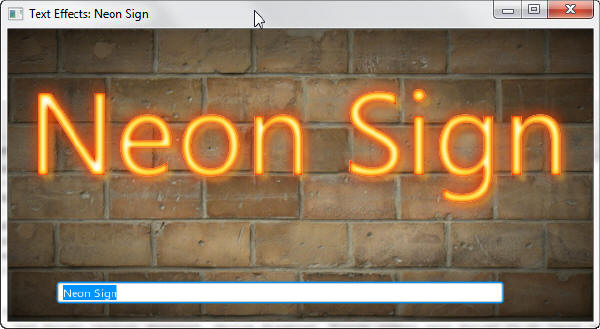
前面学了如何使用单一效果,要丰富文本内容就要组合多种效果,应用一个效果链来获得特殊的视觉感触。看下NeonSign 应用(点击下载) 的效果Figure 8 .
Figure 8
Description of "Figure 8 "
NeonSign 应用的图形场景中包含了以下元素:
背景使用的是一副砖墙图片
一个矩形提供了放射渐变填充
一个文本结点使用了效果链
一个文本域用于输入数据
该应用使用了一个绑定机制来设置文本结点显示输入的文本值。文本结点的文本属性(textProperty)绑定到了文本域的文本属性,见Example 15 .
Example 18
Text text = new Text();TextField textField = new TextField();textField.setText("Neon Sign");text.textProperty().bind(textField.textProperty());可以看到文本框输入的变化会引起文本结点的变化
文本结点使用了效果链。主要的效果是一个混合效果,使用了MULTIPLY模式来结合两种输入:一个外部阴影效果和另一个混合效果 blend1。类似地, blend1 效果结合了一个外部阴影效果(ds1 )和一个混合效果 (blend2 )。blend2 效果结合了两种内部阴影效果。使用这个效果链和不同的颜色为文本对象应用了精细和复杂的颜色模式。下面是效果链的代码Example 16 .
Example 19
Blend blend = new Blend();blend.setMode(BlendMode.MULTIPLY);DropShadow ds = new DropShadow();ds.setColor(Color.rgb(254, 235, 66, 0.3));ds.setOffsetX(5);ds.setOffsetY(5);ds.setRadius(5);ds.setSpread(0.2);blend.setBottomInput(ds);DropShadow ds1 = new DropShadow();ds1.setColor(Color.web("#f13a00"));ds1.setRadius(20);ds1.setSpread(0.2);Blend blend2 = new Blend();blend2.setMode(BlendMode.MULTIPLY);InnerShadow is = new InnerShadow();is.setColor(Color.web("#feeb42"));is.setRadius(9);is.setChoke(0.8);blend2.setBottomInput(is);InnerShadow is1 = new InnerShadow();is.setColor(Color.web("#f13a00"));is.setRadius(5);is.setChoke(0.4);blend2.setTopInput(is1);Blend blend1 = new Blend();blend1.setMode(BlendMode.MULTIPLY);blend1.setBottomInput(ds1);blend1.setTopInput(blend2);blend.setTopInput(blend1);text.setEffect(blend);通过本文学习了如何添加文本和应用各种效果。更全面的信息,查看API文档。如果要在应用中实现一个文本编辑区,使用HTMLEditor组件。
- JavaFX学习之道:文本Text及其特效
- JavaFX学习之道:文本Text及其特效
- JavaFX学习之道:JavaFX之TableView
- JavaFx学习之道:JavaFx初步了解
- (翻译)第二十七回 JavaFX2.0 文本Text及其特效
- JavaFX学习之道:详解JavaFX架构与框架
- JavaFX学习之道:FXML入门
- JavaFX学习之道:文本框TextField
- JavaFX学习之道:File Chooser
- JavaFX学习之Layout
- Android中Text文本特效处理
- JavaFX学习之道:JavaFX API详解之Window,Stage,PopupWindow
- JavaFX学习之道:布局面板之 HBox
- javafx学习之数据库操作
- JavaFX文档(7)开始JavaFX之旅——5 动画与视觉特效
- JavaFX学习之道:FileChooser 、POI导出Excel文件
- 自定义view之Text文本
- javascript特效之文本上下弹跳
- 查询数据库表是否存在
- hdu 1999 不可摸数
- 创收录,为spider撰写爱不释手的文章
- Windows平台分布式架构实践 – 负载均衡
- 程序员“技术练级攻略”
- JavaFX学习之道:文本Text及其特效
- 基于CCP协议的CAN总线
- 如何使用 Oracle Round 函数 (四舍五入)
- JVM 内存管理
- OpenWrt Mac地址修改错误SIOCSIFHWADDR: Cannot assign requested address
- 关于raid
- MongoDB + Hadoop 分布式
- SpringMVC - controller中获取session
- 博弈的三个巨人 巴什博奕 威佐夫博奕 尼姆博奕