OFBiz中JOB的运行机制
来源:互联网 发布:frp客户端 windows 编辑:程序博客网 时间:2024/05/14 17:32
http://www.cnblogs.com/Ivan-j2ee/archive/2012/04/13/2445421.html
OFBiz执行后台任务的类在org.ofbiz.service.job中。
JobPoller和JobInvoker是主要的两个类,一个负责查询可以执行的Job,另一个执行Job任务。Job类图如下所示。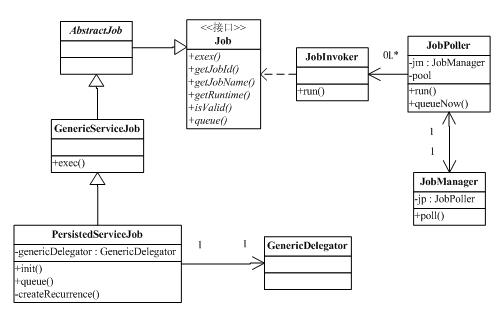
1.Job轮询
创建JobManager时,会创建JobPoller的一个实例。JobPoller实现了Runnable接口,以此创建线程后
通过JobManager一直轮询是否有Job需要执行,如果有奖将其放入队列中。
2 try {
3 // wait 30 seconds before the first poll
4 java.lang.Thread.sleep(30000);
5 } catch (InterruptedException e) {
6 }
7 while (isRunning) {
8 try {
9 // grab a list of jobs to run.
10 List<Job> pollList= jm.poll();
11 //Debug.logInfo("Received poll list from JobManager [" + pollList.size() + "]", module);
12
13 for (Job job : pollList) {
14 if (job.isValid()) {
15 queueNow(job);
16 //Debug.logInfo("Job [" + job.getJobId() + "] is queued", module);
17 }
18 }
19 // NOTE: using sleep instead of wait for stricter locking
20 java.lang.Thread.sleep(pollWaitTime());
21 }catch (InterruptedException e) {
22 Debug.logError(e, module);
23 stop();
24 }
25 }
26 }
27
queueNow方法将要执行job放入到队列中,如果队列中的等待执行的job数量很多,那么就创建一定数量的线程执行这些job。
2 synchronized (run) {
6 run.add(job);
7 }
8 if (Debug.verboseOn()) Debug.logVerbose("New run queue size:" + run.size(), module);
9 if (run.size() > pool.size() && pool.size() < maxThreads()) {
10 synchronized (pool) {
11 if (run.size()> pool.size()&& pool.size()< maxThreads()) {
12 int calcSize = (run.size() / jobsPerThread())- (pool.size());
13 int addSize = calcSize > maxThreads() ? maxThreads() : calcSize;
14
15 for (int i= 0; i< addSize; i++) {
16 JobInvoker iv= new JobInvoker(this, invokerWaitTime());
17 pool.add(iv);
18 }
19 }
20 }
21 }
22 }
JobInvoker就是执行的线程,它从queue中取job并执行。JobInvoker线程不是一直运行下去,运行的时间长度超过一定的值(见 serviceengine.xml中ttl的值)线程就会停止并从pool中删除。JobInvoker的run方法中job.exec()执行具体的 任务。
2.Job执行
Job类都有一个exec方法,用户执行Job的service。如GenericServiceJob中的exec方法如下:
2 init();
3
4 // no transaction is necessary since runSync handles this
5 try {
6 // get the dispatcher and invoke the service via runSync -- will run all ECAs
7 LocalDispatcher dispatcher= dctx.getDispatcher();
8 Map<String, Object> result= dispatcher.runSync(getServiceName(), getContext());
9
10 // check for a failure
11 boolean isError= ModelService.RESPOND_ERROR.equals(result.get(ModelService.RESPONSE_MESSAGE));
12 if (isError) {
13 String errorMessage= (String) result.get(ModelService.ERROR_MESSAGE);
14 this.failed(new Exception(errorMessage));
15 }
16
17 if (requester!= null) {
18 requester.receiveResult(result);
19 }
20
21 }catch (Throwable t) {
22 // pass the exception back to the requester.
23 if (requester!= null) {
24 requester.receiveThrowable(t);
25 }
26
27 // call the failed method
28 this.failed(t);
29 }
30
31 // call the finish method
32 this.finish();
33 }
34
在执行service执行,有一个init方法,在PersistedServiceJob类中init方法主要是生成下一个执行的任务,如果有的话。也 即是说每一个job是由当时执行的这个job生成的,根据是什么呢?主要是两个变量:tempExprId和 maxRecurrenceCount,init方法中:
2 ……
3
4 if (expr ==null && UtilValidate.isNotEmpty(job.getString("tempExprId"))) {
5 try {
6 expr= TemporalExpressionWorker.getTemporalExpression(this.delegator, job.getString("tempExprId"));
7 }catch (GenericEntityException e) {
8 throw new RuntimeException(e.getMessage());
9 }
10 }
11
TemporalExpressionWorker里面有一个makeTemporalExpression方法很重要,从这个方法可以知道怎么配置 TemporalExpression实体数据了,当然要结合TemporalExpressions类,里面定义了各种配置的细节。
tempExprTypeId有如下几种:
DateRange
DayInMonth
DayOfMonthRange
DayOfWeekRange
Difference
Frequency
Intersection
MonthRange
TimeOfDayRange
Union
比如如果希望服务只执行一次,可以如下配置:
<TemporalExpression tempExprId="RUNONCE" tempExprTypeId="FREQUENCY" integer1="1" integer2="1"/>
<JobSandbox jobId="CurrencyRateSynAll" jobName="Currency Rate SynAll" runTime="2010-02-26 09:38:00.000" serviceName="currencyRateSynAll" poolId="pool" runAsUser="system" tempExprId="RUNONCE" maxRecurrenceCount="0"/>
maxRecurrenceCount="0" 表示,不重复。tempExprTypeId="FREQUENCY" integer1="1" integer2="1"表示一年执行一次。所以总共执行一次就结束了。
每天都执行可以这样配置:
<TemporalExpression tempExprId="MIDNIGHT_DAILY" tempExprTypeId="TIME_OF_DAY_RANGE" string1="20:00:00" string2="20:00:00"/>
<JobSandbox jobId="MailNotification" jobName="Mail Notification Job" runTime="2010-02-25 18:00:00.000" serviceName="mailNotificantion" poolId="pool" runAsUser="system" tempExprId="MIDNIGHT_DAILY" maxRecurrenceCount="-1"/>
maxRecurrenceCount="-1"表示无限循环下去。tempExprId="MIDNIGHT_DAILY" tempExprTypeId="TIME_OF_DAY_RANGE" string1="20:00:00" string2="20:00:00"/>表示每天晚上八点执行。
每个月一次任务可以如下配置:
<TemporalExpression tempExprId="ONCEINMONTH" tempExprTypeId="FREQUENCY" date1="2010-02-26 11:05:00.000" integer1="2" integer2="1"/>
<JobSandbox jobId="CurrencyRateSyn" jobName="Currency Rate Syn" runTime="2010-02-26 11:05:00.000" serviceName="currencyRateSyn" poolId="pool" runAsUser="system" tempExprId="ONCEINMONTH" maxRecurrenceCount="-1"/>
tempExprTypeId="FREQUENCY" date1="2010-02-26 11:05:00.000" integer1="2" integer2="1"表示每月一次,时间就是date1定义的时间,如果没用定义date1,那么就是当前时间。
这里的配置相当灵活,好好掌握。
仅供个人收藏 转载自:http://www.blogjava.net/persister/archive/2010/02/26/313974.html
- OFBiz 中JOB的运行机制
- OFBiz中JOB的运行机制
- OFBiz中JOB的运行机制
- OFBiz中JOB的运行机制
- OFBiz中JOB的运行机制
- OFBiz中JOB的运行机制
- OFBiz中JOB的运行机制
- OFBiz中JOB的运行机制
- ofbiz job 运行机制
- OFBiz实现任务调度和JOB运行机制
- OFBiz实现任务调度和JOB运行机制
- OFBiz实现任务调度和JOB运行机制
- OFbiz关于job
- oracle job运行机制
- 开源电子商务 OFBIZ10.04组件开发入门 OFBIZ的运行机制
- 开源电子商务 OFBIZ10.04组件开发入门 OFBIZ的运行机制
- spring中DispatcherServlet的运行机制
- Spring中DispatcherServlet的运行机制
- win32读取注册表
- POJ 2987 Firing 最大权闭合图
- 内部类实现多重继承
- 软件的可维护性问题知识与分析
- orcal连接字符串
- OFBiz中JOB的运行机制
- 关于android 的onTouch 事件失效问题
- The python challenge 00————python不怕大数
- hdu4971 最大权闭合图
- 茅台拒绝与电商合作暗藏三大玄机?
- 可编程对象
- 【HDU】3191 How Many Paths Are There 次短路计数
- centos yum源改为163镜像源
- JS 无法清除Cookie的解决方法