[摘]直接在ECLIPSE中JETTY调试方式
来源:互联网 发布:unity3d物体沿轴运动 编辑:程序博客网 时间:2024/06/05 08:05
Maven2代比1代改进很多,其中主要强调的是--它不仅仅是个依赖包管理器!
开始先要推荐一个专讲Maven2的电子书给大家,对MAVEN学习相当有助益:Better Builds with Maven
下面就专门介绍下Maven2对WEBAPP在管理和调试方面的支持。
1.创建项目
mvn archetype:create -DgroupId=com.mycompany.app -DartifactId=my-webapp -DarchetypeArtifactId=maven-archetype-webapp
也可参看这里
创建要注意遵循MAVEN的目录结构,尤其要注意源文件要放在main/java下:
2. POM文件的配置
这里要特别注意对resource一节的配置,因为我的SPRING以及WEB相关的XML是放在WEB-INF目录,为了在unit test的时候也能用,加入了对这些配置文件的引用。相当于加了一个classpath。
这里还有个插曲:不知为何MAVEN2里没有JTA的包,自动下载时会有提示教你如何手工通过命令加入,非常简单。
JETTY的plugin是为后面用它来调试做准备。
DWR也是目前WEB开发一个热选。
另外,为使用JAVA5代来编译,加入了maven-compiler-plugin一节。
 <project xmlns="http://maven.apache.org/POM/4.0.0" xmlns:xsi="http://www.w3.org/2001/XMLSchema-instance" xsi:schemaLocation="http://maven.apache.org/POM/4.0.0 http://maven.apache.org/maven-v4_0_0.xsd"> <modelVersion>4.0.0</modelVersion> <groupId>com.exchangebit.nms</groupId> <artifactId>ebnms</artifactId> <packaging>war</packaging> <version>1.0-SNAPSHOT</version> <name>ebnms Maven Webapp</name> <url>http://maven.apache.org</url> <build> <finalName>ebnms</finalName> <resources> <resource> <directory>src/main/java</directory> <includes> <include>**/*.xml</include> </includes> </resource> <resource> <directory>src/main/webapp/WEB-INF</directory> <includes> <include>**/*.xml</include> <include>**/log4j.properties</include> </includes> </resource> </resources> <plugins> <plugin> <groupId>org.apache.maven.plugins</groupId> <artifactId>maven-compiler-plugin</artifactId> <configuration> <source>1.5</source> <target>1.5</target> </configuration> </plugin> <plugin> <groupId>org.mortbay.jetty</groupId> <artifactId>maven-jetty-plugin</artifactId> </plugin> </plugins> </build> <dependencies> <dependency> <groupId>junit</groupId> <artifactId>junit</artifactId> <version>3.8.1</version> <scope>test</scope> </dependency> <dependency> <groupId>org.hibernate</groupId> <artifactId>hibernate</artifactId> <version>3.1</version> </dependency> <dependency> <groupId>log4j</groupId> <artifactId>log4j</artifactId> <version>1.2.11</version> </dependency> <dependency> <groupId>mysql</groupId> <artifactId>mysql-connector-java</artifactId> <version>3.1.11</version> <scope>runtime</scope> </dependency> <dependency> <groupId>javax.servlet</groupId> <artifactId>servlet-api</artifactId> <version>2.4</version> <scope>provided</scope> </dependency> <dependency> <groupId>javax.servlet</groupId> <artifactId>jstl</artifactId> <version>1.1.2</version> <scope>runtime</scope> </dependency> <dependency> <groupId>taglibs</groupId> <artifactId>standard</artifactId> <version>1.1.2</version> <scope>runtime</scope> </dependency> <dependency> <groupId>org.springframework</groupId> <artifactId>spring</artifactId> <version>1.2.6</version> </dependency> <dependency> <groupId>dwr</groupId> <artifactId>dwr</artifactId> <version>1.1.3</version> </dependency> </dependencies> </project>
代码放入/main/java后,可以在项目目录下执行:
mvn compile来做编译尝试,
也可以用mvn war直接生成打包文件,
当然最后可以用 mvn jetty:run来运行你的WEBAPP!
3. 在Eclipse中配置jetty进行调试
要把之前的项目导入Eclipse首先让maven为我们生成Eclipse工程文件,执行:
mvn eclipse:eclipse
再把M2_REPO加入到Eclipse的classpath中,有两种方法,其中的b)方法是有效的:
a) mvn -Declipse.workspace=<path-to-eclipse-workspace> eclipse:add-maven-repo
b) Window > Preferences. Select the Java > Build Path > Classpath Variables page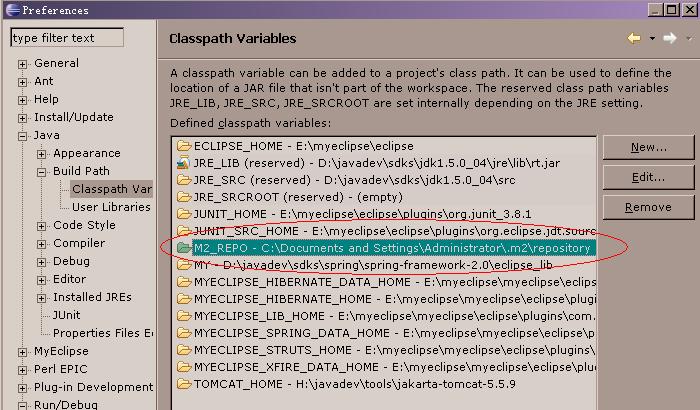
之后,就可以通过Eclipse的File->Import功能将工程导入。
有人为了使用WEBAPP开发功能,而装象MYECLIPSE这样的巨物。有了JETTY,通过轻松配置就可以实现比TOMCAT更快更便捷的容器,所以在调试时强力推荐这个东东。下面就来看下如何配置。
先下配置一个外部工具,来运行JETTY:
选择菜单Run->External Tools->External Tools ...在左边选择Program,再点New:
配置Location为mvn完整命令行。
选择Working Directory为本项目。
Arguments填写:jetty:run
再点选Enviroment页:加入MAVEN_OPTS变量,值为:
-Xdebug -Xnoagent -Djava.compiler=NONE -Xrunjdwp:transport=dt_socket,address=4000,server=y,suspend=y
其中,如果suspend=n 表示不调试,直接运行。
然后,点APPLY,再关闭本对话框。
另外注意一点,好像external tool菜单项在java browering的perspective下才会出现。如果在java下看不见,可以切换下试试。
下面新建运行配置:
点选run->debug...
选中左树中的Remote Java Application,再点New。
选择你的项目,关键是要填和之前设置外部工具时相同的端口号。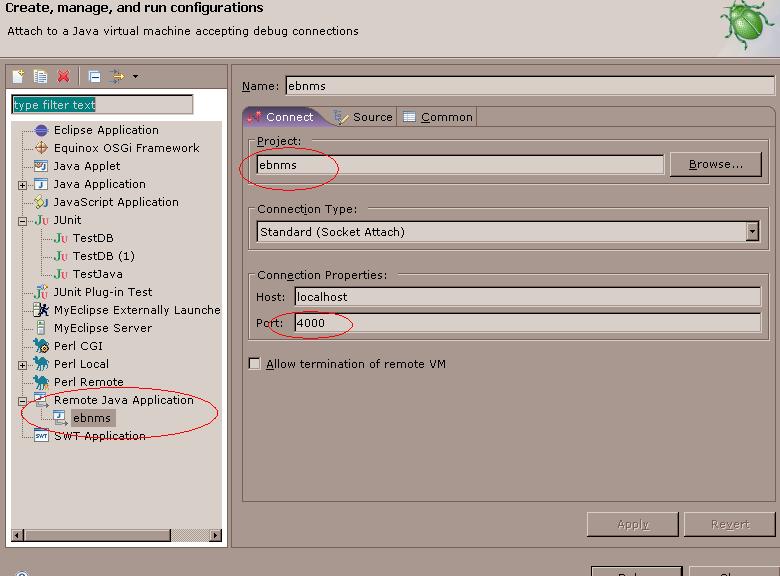
配置就完成了,正面开始调试运行:
首先要把JETTY运行起来(有点象TOMCAT里的运行APPSERVER),从Run->External Tools中选择之前配置的外部工具运行,这时LOG里会显示:
listening at port 4000字样,
再选择Run->Debug选择我们刚建的运行配置,这时程序就RUN起来了,可以通过WEB进行访问,设置断点调试了。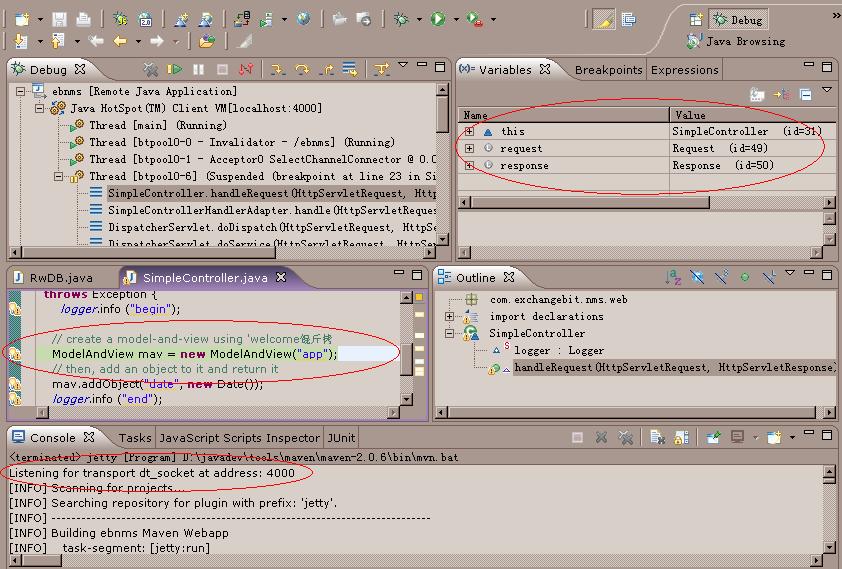
============================================================================
适用于6.1.3以上,包括6.1.5的JETTY。
它主要是利用了JDK的代码自动更换性能(code hot replace),可以不用重启JETTY就调试、更换资源文件。注意:一定是DEBUG方式运行才有这项功能。
所以应该说这篇文章的方法更好:
在Run->Debug中,New一个Java Application的配置,填入:
org.mortbay.xml.XmlConfiguration
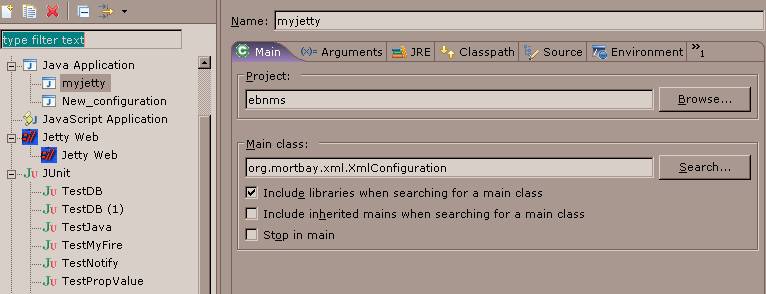
参数填入一个自己的JETTY配置文件:

完成的myjetty.xml配置文件,请将其中的相应目录修改成自己项目的目录:
<?xml version="1.0"?><!DOCTYPE Configure PUBLIC "-//Mort Bay Consulting//DTD Configure//EN" "http://jetty.mortbay.org/configure.dtd"><!-- =============================================================== --><!-- Configure the Jetty Server --><!-- --><!-- Documentation of this file format can be found at: --><!-- http://docs.codehaus.org/display/JETTY/jetty.xml --><!-- --><!-- =============================================================== --><Configure id="Server" class="org.mortbay.jetty.Server"> <!-- =========================================================== --> <!-- Server Thread Pool --> <!-- =========================================================== --> <Set name="ThreadPool"> <!-- Default bounded blocking threadpool --> <New class="org.mortbay.thread.BoundedThreadPool"> <Set name="minThreads">10</Set> <Set name="maxThreads">250</Set> <Set name="lowThreads">25</Set> </New> <!-- Optional Java 5 bounded threadpool with job queue <New class="org.mortbay.thread.concurrent.ThreadPool"> <Set name="corePoolSize">250</Set> <Set name="maximumPoolSize">250</Set> </New> --> </Set> <!-- =========================================================== --> <!-- Set connectors --> <!-- =========================================================== --> <!-- One of each type! --> <!-- =========================================================== --> <!-- Use this connector for many frequently idle connections and for threadless continuations. --> <Call name="addConnector"> <Arg> <New class="org.mortbay.jetty.nio.SelectChannelConnector"> <Set name="port"><SystemProperty name="jetty.port" default="8080"/></Set> <Set name="maxIdleTime">30000</Set> <Set name="Acceptors">2</Set> <Set name="statsOn">false</Set> <Set name="confidentialPort">8443</Set> <Set name="lowResourcesConnections">5000</Set> <Set name="lowResourcesMaxIdleTime">5000</Set> </New> </Arg> </Call> <!-- Use this connector if NIO is not available. <Call name="addConnector"> <Arg> <New class="org.mortbay.jetty.bio.SocketConnector"> <Set name="port">8081</Set> <Set name="maxIdleTime">50000</Set> <Set name="lowResourceMaxIdleTime">1500</Set> </New> </Arg> </Call> --> <!-- - - - - - - - - - - - - - - - - - - - - - - - - - - - - - - - - --> <!-- To add a HTTPS SSL listener --> <!-- see jetty-ssl.xml to add an ssl connector. use --> <!-- java -jar start.jar etc/jetty.xml etc/jetty-ssl.xml --> <!-- - - - - - - - - - - - - - - - - - - - - - - - - - - - - - - - - --> <!-- =========================================================== --> <!-- Set up global session ID manager --> <!-- =========================================================== --> <!-- <Set name="sessionIdManager"> <New class="org.mortbay.jetty.servlet.HashSessionIdManager"> <Set name="workerName">node1</Set> </New> </Set> --> <!-- =========================================================== --> <!-- Set handler Collection Structure --> <!-- =========================================================== --> <Set name="handler"> <New id="Handlers" class="org.mortbay.jetty.handler.HandlerCollection"> <Set name="handlers"> <Array type="org.mortbay.jetty.Handler"> <Item> <New id="Contexts" class="org.mortbay.jetty.handler.ContextHandlerCollection"/> </Item> <Item> <New id="DefaultHandler" class="org.mortbay.jetty.handler.DefaultHandler"/> </Item> <Item> <New id="RequestLog" class="org.mortbay.jetty.handler.RequestLogHandler"/> </Item> </Array> </Set> </New> </Set> <Set name="handler"> <New id="Handlers" class="org.mortbay.jetty.handler.HandlerCollection"> <Set name="handlers"> <Array type="org.mortbay.jetty.Handler"> <!--Item> <New id="RequestLog" class="org.mortbay.jetty.handler.RequestLogHandler"/> </Item--> <Item> <New class="org.mortbay.jetty.webapp.WebAppContext"> <Set name="contextPath">/ebnms</Set> <Set name="resourceBase">E:/Prj2/ForMe/Src/flower/src/main/webapp</Set> <Call name="addServlet"> <Arg>org.mortbay.jetty.servlet.DefaultServlet</Arg> <Arg>/</Arg> </Call> </New> </Item> </Array> </Set> </New> </Set> <!-- =========================================================== --> <!-- Configure Authentication Realms --> <!-- Realms may be configured for the entire server here, or --> <!-- they can be configured for a specific web app in a context --> <!-- configuration (see $(jetty.home)/contexts/test.xml for an --> <!-- example). --> <!-- =========================================================== --> <Set name="UserRealms"> <Array type="org.mortbay.jetty.security.UserRealm"> <!-- <Item> <New class="org.mortbay.jetty.security.HashUserRealm"> <Set name="name">Test Realm</Set> <Set name="config"><SystemProperty name="jetty.home" default="."/>/etc/realm.properties</Set> </New> </Item> --> </Array> </Set> <!-- =========================================================== --> <!-- Configure Request Log --> <!-- Request logs may be configured for the entire server here, --> <!-- or they can be configured for a specific web app in a --> <!-- contexts configuration (see $(jetty.home)/contexts/test.xml --> <!-- for an example). --> <!-- =========================================================== --> <!--Ref id="RequestLog"> <Set name="requestLog"> <New id="RequestLogImpl" class="org.mortbay.jetty.NCSARequestLog"> <Set name="filename"><SystemProperty name="jetty.logs" default="./logs"/>/yyyy_mm_dd.request.log</Set> <Set name="filenameDateFormat">yyyy_MM_dd</Set> <Set name="retainDays">90</Set> <Set name="append">true</Set> <Set name="extended">true</Set> <Set name="logCookies">false</Set> <Set name="LogTimeZone">GMT</Set> </New> </Set> </Ref--> <!-- =========================================================== --> <!-- extra options --> <!-- =========================================================== --> <Set name="stopAtShutdown">true</Set> <Set name="sendServerVersion">true</Set> <!--Set name="sendDateHeader">true</Set--> <!--Set name="gracefulShutdown">1000</Set--></Configure>- Maven
1. 创建普通工程:mvn archetype:create -DgroupId=com.example -DartifactId=example
2. 创建Web工程:mvn archetype:create -DgroupId=com.example -DartifactId=example -DarchetypeArtifactId=maven-archetype-webapp - eclipse
1. 转为eclipse工程:mvn eclipse:eclipse
2. 添加repository路径变量m2_repo:mvneclipse:add-maven-repo -Declipse.workspace=your eclipse workspace path - Jetty
1. 修改POM.xml文件,指定工程使用Jetty及Java5
xml 代码- <build>
- <finalName>examplefinalName>
- <plugins>
- <plugin>
- <groupId>org.apache.maven.pluginsgroupId>
- <artifactId>maven-compiler-pluginartifactId>
- <configuration>
- <source>1.5source>
- <target>1.5target>
- configuration>
- plugin>
- <plugin>
- <groupId>org.mortbay.jettygroupId>
- <artifactId>maven-jetty-pluginartifactId>
- plugin>
- plugins>
- build>
2. 工程调试:添加外部工具
Step 1
Go to the Run/External Tools/External Tools ..." menu item on the "Run" menu bar. Select "Program" and click the "New" button. On the "Main" tab, fill in the "Location:" as the full path to your "mvn" executable. For the "Working Directory:" select the workspace that matches your webapp. For "Arguments:" add jetty:run.Move to the "Environment" tab and click the "New" button to add a new variable named MAVEN_OPTS with the value:
-Xdebug -Xnoagent -Djava.compiler=NONE -Xrunjdwp:transport=dt_socket,address=4000,server=y,suspend=n
If you supply suspend=n instead of suspend=y you can start immediately without running the debugger and launch the debugger at anytime you really wish to debug.
Step 2
Then, pull up the "Run/Debug/Debug ..." menu item and select "Remote Java Application" and click the "New" button. Fill in the dialog by selecting your webapp project for the "Project:" field, and ensure you are using the same port number as you specified in the address= property above.Now all you need to do is to Run/External Tools and select the name of the maven tool setup you created in step 1 to start the plugin and then Run/Debug and select the name of the debug setup you setup in step2.
3. js、css等静态文件无法更新的问题(save could not be completed)
原文出处
Jetty启动后,如果修改javascript文件,将不能保存,使调试很麻烦。这是因为使用了CACHE,JETTY说是WINDOWS下的一个限制。可以通过如下方法修正:
解压出jetty.jar中的org/mortbay/jetty/webapp/webdefault.xml文件,将这一选项由true改为false,另存到src/main/resources目录,或者其它自选目录。xml 代码<!-- change to false -->
- <init-param> <param-name>useFileMappedBufferparam-name>
- <param-value>trueparam-value> <!-- change to false --> init-param>
在pom.xml中加入对这个文件的指向:
xml 代码- <plugin>
- <groupId>org.mortbay.jettygroupId>
- <artifactId>maven-jetty-pluginartifactId>
- <configuration>
- <webDefaultXml>src/main/resources/webdefault.xmlwebDefaultXml>
- >
- >
-
其他参考
1. 图文并茂的介绍Maven2+Jetty -
经常查询的地方
src/main/java Application/Library sources src/main/resources Application/Library resources src/main/filters Resource filter files src/main/assembly Assembly descriptors src/main/config Configuration files src/main/webapp Web application sources src/test/java Test sources src/test/resources Test resources src/test/filters Test resource filter files src/site Site LICENSE.txt Project's license README.txt Project's readme
1.文件结构
-
附件为运行jetty的批处理文件
1. 使用时将批处理文件中的PROJECT_DIR、CURRENT_DISK设置为实际的工程所有目录及盘符
- 直接在ECLIPSE中JETTY调试方式
- [摘]直接在ECLIPSE中JETTY调试方式
- 目前发现的最好最快的直接在ECLIPSE中JETTY调试方式
- 目前发现的最好最快的直接在ECLIPSE中JETTY调试方式
- eclipse maven jetty调试方式
- eclipse maven jetty调试方式
- 在eclipse远程调试jetty
- 在eclipse远程调试jetty
- Eclipse中调试Maven+Jetty
- 在eclipse中配置jetty
- Eclipse中采用Jetty调试Maven工程
- eclipse中使用jetty进行远程调试
- 天生一对"Maven2+Jetty" -- Maven2创建并管理WebApp,并使用Maven Jetty Plugin在Eclipse中调试
- 天生一对"Maven2+Jetty" -- Maven2创建并管理WebApp,并使用Maven Jetty Plugin在Eclipse中调试
- Maven2创建并管理WebApp并使用Maven Jetty Plugin在Eclipse中调试
- 用jetty插件运行maven项目 在eclipse中如何debug 调试程序
- eclipse远程调试jetty
- 在Eclipse 中安装和配置 Jetty
- 黑客视频教程:netstat命令的使用
- 基于Google Maps与Ajax在Java Web集成地图信息(下)
- 内容发布系统的开发
- IT生活
- 上下左右无空隙不间断图片连续滚动代码
- [摘]直接在ECLIPSE中JETTY调试方式
- 写给想当程序员的朋友—一个还不太老的普通程序员的体会
- Windows Mobile asp.net第一個程序
- asp.net(c#)文件生成HTML文件
- 怎样评估ERP成本?
- C#中委托和事件
- JDBC连接数据库
- 顶部自动消失图片
- 程序员的酸甜苦辣—写在即将告别coding的时刻