Android开发之杂记(3)
来源:互联网 发布:php替换字符串中一部分 编辑:程序博客网 时间:2024/06/05 18:14
1,<merge/>标签
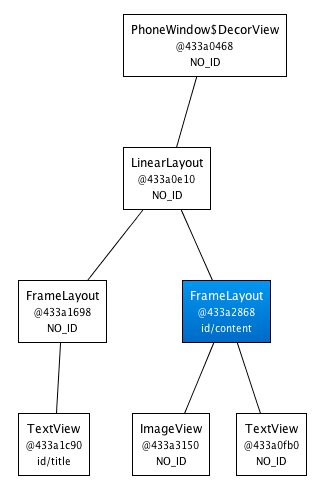
<merge />标签闪亮登场了。当LayoutInflater遇到这个标签时,它会跳过它,并将<merge />内的元素添加到<merge />的父元素里。迷惑了吗?让我们用<merge />来替换FrameLayout,并重写之前的XML布局:
<merge xmlns:android="http://schemas.android.com/apk/res/android"> <ImageView android:layout_width="fill_parent" android:layout_height="fill_parent" android:scaleType="center" android:src="@drawable/golden_gate" /> <TextView android:layout_width="wrap_content" android:layout_height="wrap_content" android:layout_marginBottom="20dip" android:layout_gravity="center_horizontal|bottom" android:padding="12dip" android:background="#AA000000" android:textColor="#ffffffff" android:text="Golden Gate" /></merge>新的代码中,TextView和ImageView都直接添加到上一层的FrameLayout里。虽然视觉上看起来一样,但View的层次更加简单了:
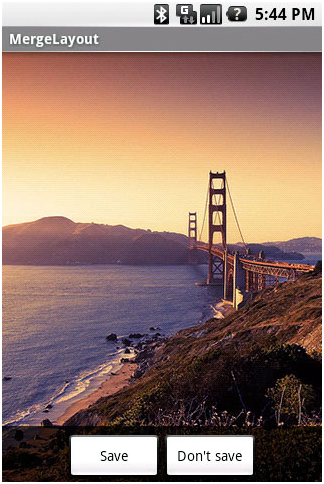
很显然,在这个场合使用<merge />是因为Activity的ContentView的父元素始终是FrameLayout。如果你的布局使用LinearLayout作为它的根标签(举例),那么你就不能使用这个技巧。<merge />在其它的一些场合也很有用的。例如,它与<include />标签结合起来就能表现得很完美。你还可以在创建一个自定义的组合View时使用<merge />。让我们看一个使用<merge />创建一个新View的例子——OkCancelBar,包含两个按钮,并可以设置按钮标签。下面的XML用于在一个图片上显示自定义的View:
<merge xmlns:android="http://schemas.android.com/apk/res/android" xmlns:okCancelBar="http://schemas.android.com/apk/res/com.example.android.merge"> <ImageView android:layout_width="fill_parent" android:layout_height="fill_parent" android:scaleType="center" android:src="@drawable/golden_gate" /> <com.example.android.merge.OkCancelBar android:layout_width="fill_parent" android:layout_height="wrap_content" android:layout_gravity="bottom" android:paddingTop="8dip" android:gravity="center_horizontal" android:background="#AA000000" okCancelBar:okLabel="Save" okCancelBar:cancelLabel="Don't save" /></merge>新的布局效果如下图所示:
OkCancelBar的代码很简单,因为这两个按钮在外部的XML文件中定义,通过LayoutInflate类导入。如下面的代码片段所示,R.layout.okcancelbar以OkCancelBar为父元素:
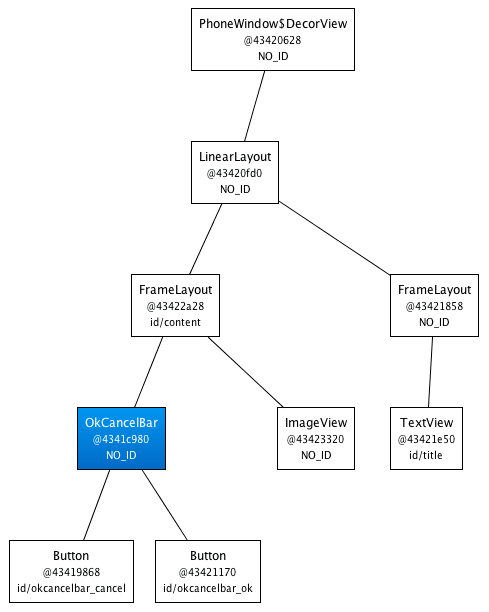
public class OkCancelBar extends LinearLayout { public OkCancelBar(Context context, AttributeSet attrs) { super(context, attrs); setOrientation(HORIZONTAL); setGravity(Gravity.CENTER); setWeightSum(1.0f); LayoutInflater.from(context).inflate(R.layout.okcancelbar, this, true); TypedArray array = context.obtainStyledAttributes(attrs, R.styleable.OkCancelBar, 0, 0); String text = array.getString(R.styleable.OkCancelBar_okLabel); if (text == null) text = "Ok"; ((Button) findViewById(R.id.okcancelbar_ok)).setText(text); text = array.getString(R.styleable.OkCancelBar_cancelLabel); if (text == null) text = "Cancel"; ((Button) findViewById(R.id.okcancelbar_cancel)).setText(text); array.recycle(); }}两个按钮的定义如下面的XML所示。正如你所看到的,我们使用<merge />标签直接添加两个按钮到OkCancelBar。每个按钮都是从外部相同的XML布局文件包含进来的,便于维护;我们只是简单地重写它们的id:
<merge xmlns:android="http://schemas.android.com/apk/res/android"> <include layout="@layout/okcancelbar_button" android:id="@+id/okcancelbar_ok" /> <include layout="@layout/okcancelbar_button" android:id="@+id/okcancelbar_cancel" /></merge>我们创建了一个灵活且易于维护的自定义View,它有着高效的View层次:
<merge />标签极其有用。然而它也有以下两个限制:
· <merge />只能作为XML布局的根标签使用
· 当Inflate以<merge />开头的布局文件时,必须指定一个父ViewGroup,并且必须设定attachToRoot为true(参看inflate(int, android.view.ViewGroup, Boolean)方法)。
2,多级下拉列表
package com.example.view;import java.util.ArrayList;import com.example.expandtabview.R;import android.app.Activity;import android.content.Context;import android.util.AttributeSet;import android.view.LayoutInflater;import android.view.View;import android.widget.LinearLayout;import android.widget.PopupWindow;import android.widget.PopupWindow.OnDismissListener;import android.widget.RelativeLayout;import android.widget.TextView;import android.widget.ToggleButton;/** * 菜单控件头部,封装了下拉动画,动态生成头部按钮个数 * * @author yueyueniao */public class ExpandTabView extends LinearLayout implements OnDismissListener {private static final String TAG = "ExpandTabView";private ToggleButton selectedButton;private ArrayList<String> mTextArray = new ArrayList<String>();private ArrayList<RelativeLayout> mViewArray = new ArrayList<RelativeLayout>();private ArrayList<ToggleButton> mToggleButton = new ArrayList<ToggleButton>();private Context mContext;private final int SMALL = 0;private int displayWidth;private int displayHeight;private PopupWindow popupWindow;private int selectPosition;public ExpandTabView(Context context) {super(context);init(context);}public ExpandTabView(Context context, AttributeSet attrs) {super(context, attrs);init(context);}/** * 根据选择的位置设置tabitem显示的值 */public void setTitle(String valueText, int position) {if (position < mToggleButton.size()) {mToggleButton.get(position).setText(valueText);}}public void setTitle(String title){}/** * 根据选择的位置获取tabitem显示的值 */public String getTitle(int position) {if (position < mToggleButton.size() && mToggleButton.get(position).getText() != null) {return mToggleButton.get(position).getText().toString();}return "";}/** * 设置tabitem的个数和初始值 */public void setValue(ArrayList<String> textArray, ArrayList<View> viewArray) {if (mContext == null) {return;}LayoutInflater inflater = (LayoutInflater) mContext.getSystemService(Context.LAYOUT_INFLATER_SERVICE);mTextArray = textArray;for (int i = 0; i < viewArray.size(); i++) {final RelativeLayout r = new RelativeLayout(mContext);int maxHeight = (int) (displayHeight * 0.7);RelativeLayout.LayoutParams rl = new RelativeLayout.LayoutParams(RelativeLayout.LayoutParams.FILL_PARENT, maxHeight);rl.leftMargin = 10;rl.rightMargin = 10;r.addView(viewArray.get(i), rl);mViewArray.add(r);r.setTag(SMALL);ToggleButton tButton = (ToggleButton) inflater.inflate(R.layout.toggle_button, this, false);addView(tButton);View line = new TextView(mContext);line.setBackgroundResource(R.drawable.choosebar_line);if (i < viewArray.size() - 1) {LinearLayout.LayoutParams lp = new LinearLayout.LayoutParams(2, LinearLayout.LayoutParams.FILL_PARENT);addView(line, lp);}mToggleButton.add(tButton);tButton.setTag(i);tButton.setText(mTextArray.get(i));r.setOnClickListener(new OnClickListener() {@Overridepublic void onClick(View v) {onPressBack();}});r.setBackgroundColor(mContext.getResources().getColor(R.color.popup_main_background));tButton.setOnClickListener(new OnClickListener() {@Overridepublic void onClick(View view) {// initPopupWindow();ToggleButton tButton = (ToggleButton) view;if (selectedButton != null && selectedButton != tButton) {selectedButton.setChecked(false);}selectedButton = tButton;selectPosition = (Integer) selectedButton.getTag();startAnimation();if (mOnButtonClickListener != null && tButton.isChecked()) {mOnButtonClickListener.onClick(selectPosition);}}});}}private void startAnimation() {if (popupWindow == null) {popupWindow = new PopupWindow(mViewArray.get(selectPosition), displayWidth, displayHeight);popupWindow.setAnimationStyle(R.style.PopupWindowAnimation);popupWindow.setFocusable(false);popupWindow.setOutsideTouchable(true);}if (selectedButton.isChecked()) {if (!popupWindow.isShowing()) {showPopup(selectPosition);} else {popupWindow.setOnDismissListener(this);popupWindow.dismiss();hideView();}} else {if (popupWindow.isShowing()) {popupWindow.dismiss();hideView();}}}private void showPopup(int position) {View tView = mViewArray.get(selectPosition).getChildAt(0);if (tView instanceof ViewBaseAction) {ViewBaseAction f = (ViewBaseAction) tView;f.show();}if (popupWindow.getContentView() != mViewArray.get(position)) {popupWindow.setContentView(mViewArray.get(position));}popupWindow.showAsDropDown(this, 0, 0);}/** * 如果菜单成展开状态,则让菜单收回去 */public boolean onPressBack() {if (popupWindow != null && popupWindow.isShowing()) {popupWindow.dismiss();hideView();if (selectedButton != null) {selectedButton.setChecked(false);}return true;} else {return false;}}private void hideView() {View tView = mViewArray.get(selectPosition).getChildAt(0);if (tView instanceof ViewBaseAction) {ViewBaseAction f = (ViewBaseAction) tView;f.hide();}}private void init(Context context) {mContext = context;displayWidth = ((Activity) mContext).getWindowManager().getDefaultDisplay().getWidth();displayHeight = ((Activity) mContext).getWindowManager().getDefaultDisplay().getHeight();setOrientation(LinearLayout.HORIZONTAL);}@Overridepublic void onDismiss() {showPopup(selectPosition);popupWindow.setOnDismissListener(null);}private OnButtonClickListener mOnButtonClickListener;/** * 设置tabitem的点击监听事件 */public void setOnButtonClickListener(OnButtonClickListener l) {mOnButtonClickListener = l;}/** * 自定义tabitem点击回调接口 */public interface OnButtonClickListener {public void onClick(int selectPosition);}}- Android开发之杂记(3)
- android开发之杂记(1)
- Android开发之杂记(2)
- android开发杂记之Bundle&Context
- Android 开发杂记(不断更新中)
- Android 开发杂记
- Android开发杂记
- Android开发------------杂记
- 关于Android开发杂记
- android 开发笔记--杂记
- android开发杂记一
- android开发杂记二
- android之学习杂记(一)
- android之学习杂记(二)
- android之学习杂记(三)
- android之学习杂记(四)
- android之学习杂记(五)
- Android 系统开发学习杂记
- Android Manifest.xml 结构详解
- jquery mini ui
- PHP语言速成
- NRF24L01 无线通信模块使用方法
- storm UI界面各参数全解
- Android开发之杂记(3)
- 中国云服务质量评测系列报告-CPU专项评测结果
- Dubbo架构设计详解
- 呵护眼睛,从小事做起
- Java关键字this,super使用总结
- 开发中遇到的随手记
- Android自定义弹出框
- GPS坐标转换为百度坐标的方法
- iOS8推送消息的快速回复处理