How to create iOS 8 Today extension and share data with containing app – tutorial
来源:互联网 发布:hp1000扫描仪安装软件 编辑:程序博客网 时间:2024/04/29 20:00
转载自: http://www.glimsoft.com/06/28/ios-8-today-extension-tutorial/
App extensions were introduced a couple of weeks ago during WWDC 2014 Keynote as a way to extend the reach of your app to some parts of iOS (8), for example by creating a widget that will show up in Notification Center, or a custom sharing action. It’s no doubt a huge opportunity for iOS/Mac developers, so if you have an idea for a widget/extension, I suggest you start working on it as soon as you can.
If you are a registered iOS/Mac developer, definitely watch the WWDC Sessions Creating Extensions for iOS and OS X, Part 1 and 2 here. You will have a pretty good idea of what extensions are, how do they work and what you can do with them. The first part briefly explains how you can share data between your extension and containing app using NSUserDefaults, but neglects to point out some ‘pitfalls’ that you need to avoid in order to get it working. That’s where this tutorial comes in.
Warning: as of writing this (end of June’14), the Xcode 6 beta 2 (that you need to use to build your extension) has some bugs that might cause you some annoyance, but you can generally track down and then avoid the certain actions/scenarios that make problems.
What are you going to build
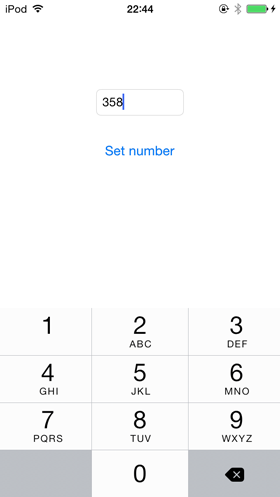
We are going to build a simple Today extension (that’s the name for iOS 8 widgets in Notification Center) that shows a number that can be set from the containing app (and changes made in the app will be reflected in the widget in real time). We’ll use sharedNSUserDefaults to accomplish this.

You can find the whole sample project on GitHub here.
Prerequisites
You’ll need Xcode 6 (beta 2 as of writing this, but any newer will do), and ideally a real iOS device running iOS 8 (beta 2 or higher). To obtain these beta releases, you need to be a registered iOS or Mac developer.
The step-by-step tutorial
Now I will guide you through the whole process of creating new project and doing everything necessary to get our extension to work.
1) Create new project
In Xcode 6, select File > New > Project. Select the Single view application template, and call itTodayExtensionSharingDefaults. You can use Swift if you feel like it, but we are going to stick with Objective-C for now.
Update (30 July)
If you are looking for Swift version of this code, take a look at the comments section bellow. Conrad has some hints that will help you out.
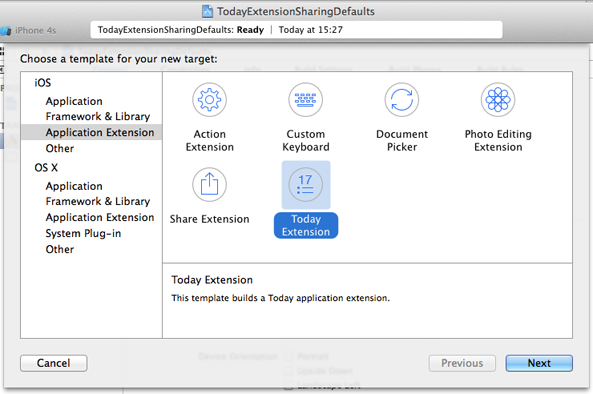
2) Add Application Extension target
In Xcode, select File > New > Target…. Then in the left pane, select Application extensionand under that choose Today Extension. Because our Today extension is going to show a number, give it the name NumberWidget.
You will be asked if you want to activate the “NumberWidget” scheme. Click Cancel, since we are going to debug it using the normal Application scheme.
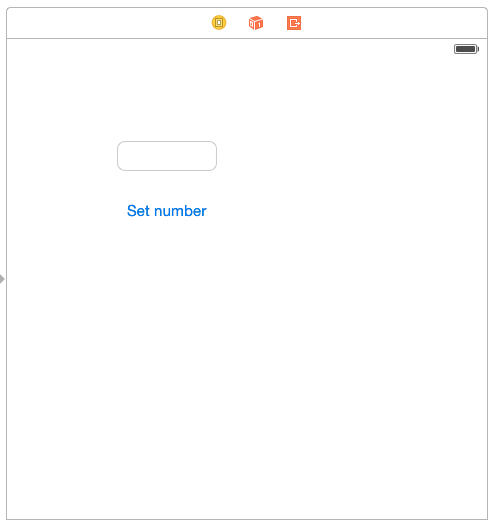
3) Set up application user interface
In Project navigator under TodayExtensionSharingDefaults group, click on Main.storyboard. Add a text field and a button.
Make the following adjustments the the text field:
– set its width to 100
– set its origin.x to 110
– set its Keyboard type to Number Pad
Make these adjustments to the button:
– set its name to “Set number”
– position it below the text field.
It should look something like this:
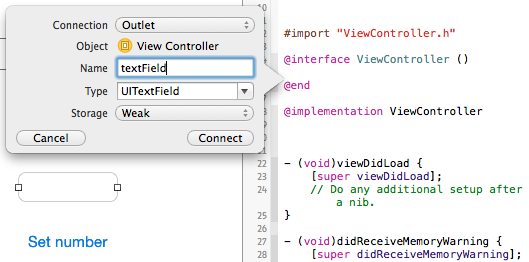
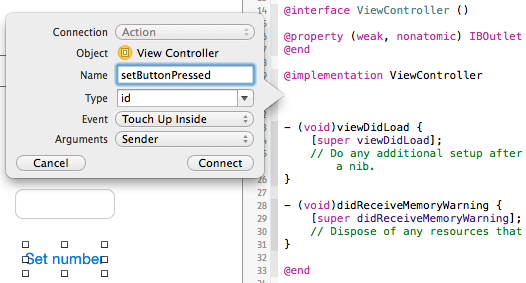
Next, switch to the Assistant Editor and create outlet connection by control dragging from the text field to the interface. Call the outlet “textField”.
Repeat the same for the button, but this time drag inside the implementation, and call the action “setButtonPressed”.
4) Set up widget user interface
The great thing about Today extensions is that they are built using UIViewControllers, which means that you can use storyboard to build its user interface. In the project navigator, expand NumberWidget group and click on MainInterface.storyboard. Then perform the following changes:
– select the File inspector and uncheck ‘Use Auto Layout’ (for simplicity of this tutorial, we won’t use it).
– change view controllers height to 50
– select the placeholder label with white text in the middle of the view and change its text to “Number:”; its color to Light grey so we can see it and position it to the left
– add new label, change its text to 111 and its color to green. Position it next to the ‘Number:’ label.
– similarly as in the previous step, connect the 111 label to its implementation file by switching to Assistant Editor and control dragging from the label to the interface. Call the outlet ‘numberLabel’
– make the labels a little bit bigger, the way you like it
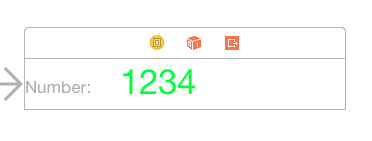
The interface should look something like this:
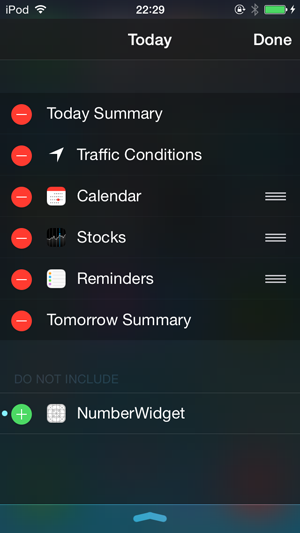
Now, you can run the project to test out the extension. When the app is launched (either on your device or in simulator), simply drag from top to show the notification center. At the bottom, tap edit and your NumberWidget should be listed in the ‘Do not include’ section. If it’s not, rebuild and then it should be there for sure.
You can tap the green plus button next to it to add it and then Done to go back to the Today view. But wait, the extension view has zero height now! Don’t worry, that’s because we removed auto layout and haven’t set the preferredContentSize yet. We’ll do that in a minute.
5) Enable App Groups for both targets
You need to do this to be able to share NSUserDefaults between your extension and the containing app. The process is very straightforward so lets jump right in.
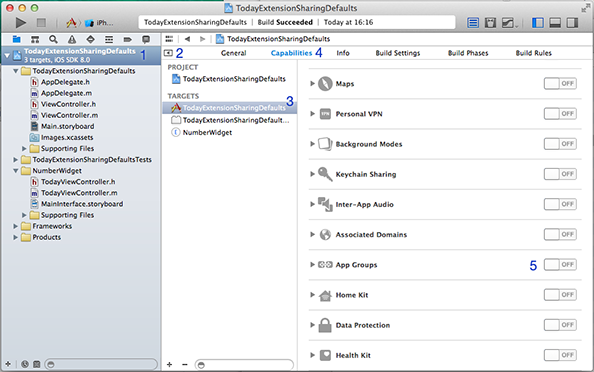
In Project Navigator, click on TodayExtensionSharingDefaults project icon, then in the upper left corner click on the tiny arrow to show list of targets, then click on TodayExtensionSharingDefaultsTarget, switch to Capabilities in the top menu, and scroll down to the App Groups. This might sound a little complicated, but the following screenshot should make it clear:
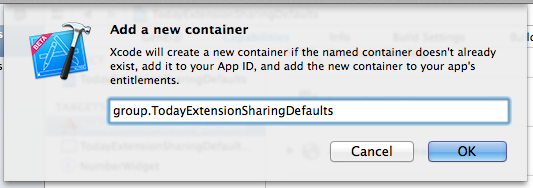
Now, turn on the App Groups switch. Select your Development Team to use for provisioning and click Choose. This will add the “App Groups” entitlement to your App ID. Depending on whether you did this before or not, there might be some other groups listed in the App Groups. Either way, click + to add new App Group and call itgroup.TodayExtensionSharingDefaults. Then, click OK.
Update 12 August ’14 As Malcolm Hall found out and shared in comments, the App Group name has to be unique since beta 5. So usegroup.yourcompany.TodayExtensionSharingDefaults instead in the rest of this tutorial.
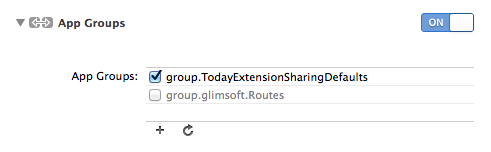
Xcode will now add “App Groups containers” entitlement to your App ID. If everything went as it should, the new App group should be there and it should be checked (as in the following screenshot).
Now you need to repeat these steps for the Extension target, only this time you’ll use the already created App Group instead of creating new one. Select NumberWidget from the Targets list, turn on App Groups, select the same development team as in previous step and click Choose, and then select the group.yourcompany.TodayExtensionSharingDefaults.
Great, now we are just one step from finish! Lets get to the code.
6) The Application code
Select ViewController.m and add the following code into the -setButtonPressed method:
Here, we just alloc/init new NSUserDefaults with our App Group, and store the number entered inside the textField under MyNumberKey. Normally, you would want to define these strings as constants somewhere, but for simplicity of this tutorial we’ll leave this way. The synchronize call is crucial because we need the default to be written to disk immediately, since we will be reading it in the extension in a moment.
7) The Extension code
Open TodayViewController.m and do the following changes:
Replace -initWithNibName with the following initializer.
↳ Here, we are adding an observer to the NSUserDefaultsDidChangeNotification. The NSNotificationCenter will now call our selector whenever a user default is changed.
In viewDidLoad, add these two lines:
↳ The first one signals to the Notification Center our desired size for the widget, and the second one updates the numberLabel based on the current value of @“MyNumberKey” default.
Next, add these two methods near the end of the file (above the @end directive)
↳ Here, we simply update the numberLabel’s text whenever defaults are changed. Note that the change notification will be posted whenever any default is changed, so if you’ll have more defaults, you might need to figure out a smarter way how/when update the values.
![]() Finish!
Finish!
Now you can Build and Run and you should be able to set any number inside the app and then see the change reflected in your widget immediately after opening the Notification Center.
Wrapping up
You should now have general idea how to build a very basic Today extensions and even how to share data between extension and the containing app. As I mentioned in the intro, you can find the sample app we built here on Github.
I know that this tutorial is a very rough draft and there is a lot that could be improved, but due to my other projects and deadlines, I couldn’t dedicate this more time to make it more polished. I hope it will be/was helpful to you anyway ![]() .
.
If you run into any other bugs or find something in this tutorial confusing, feel free to use the comments section below; I’ll try to help you out.
Troubleshooting
Since Xcode 6 beta 2 has quite a few bugs, you might encounter quite a few problems. What helped me:
– If, for some reason, the widget height is still 0 in the Simulator, test it on a real device
– if the widget is not reflecting new changes, you need to: delete the app from your device; reboot it; perform Clean in Xcode, and then Build and Run again. You might need to build twice in case the Today extension is not there after first Build and Run.
Where to go from here
As I mentioned in the beginning, I suggest you watch these WWDC Sessions:
– Creating App Extensions for iOS and OS X, Part 1
– Creating App Extensions for iOS and OS X, Part 2
Also, Apple has published a pretty good programming guide that goes in depth to what extensions are, how to use them and even provides best practices for common cases of each extension type. This is the guide:
– App Extension Programming Guide
- How to create iOS 8 Today extension and share data with containing app – tutorial
- 创建 iOS 8 Today extension and share data with containing app – tutorial
- Networking Tutorial for iOS: How To Create A Socket Based iPhone App and Server
- How To Create A Breakout Game with Box2D and Cocos2D Tutorial: Part 1/2
- How To Create A Breakout Game with Box2D and Cocos2D Tutorial: Part 2/2
- iOS 8 中 Extension 和 Containing App 之间的数据共享
- How To Debug Memory Leaks with XCode and Instruments Tutorial
- iOS开发之App Extension(应用扩展)之 -- Today Extension
- How To Create a Simple Magazine App with Core Text
- How To Create a Simple Magazine App with Core Text
- how-to-create-a-simple-magazine-app-with-core-text
- How to: Create and Use a Data Connection Library
- How to create and apply a patch with git
- How to create and apply a patch with Git
- How to Create Login Form with CSS3 and jQuery
- How to use Presenter and ViewHolder? – Android TV app Tutorial 3
- How To Create A Socket Based iPhone App and Server
- ios php mysql How To Make an iPhone App with MySQL and WordPress
- JAVACC 入门(转载)
- OpenERP-Java调用XML-RPC接口示例(Examples for calling XML-RPC interfaces by Java)
- 坦克大战项目
- POJ1656
- 面试题之输入一个数代表多少字节,输出其对应的GBytes/Mbytes/Kbytes/Bytes
- How to create iOS 8 Today extension and share data with containing app – tutorial
- C++中stl使用过程中的一些tips
- 分治法之快速排序
- hdu 5033 Building
- c++学习笔记之友元
- 调用dll的API
- BBS美化
- JDBC 初步笔记1
- C++ 遍历文件夹下面所有文件