nginx-rrd监控nginx 使用说明
来源:互联网 发布:proteus单片机教程 编辑:程序博客网 时间:2024/06/07 10:27
可以使用cacti、nagios等监控程序监控nginx服务器,不过有时候不用那么复杂,用nginx-rrd就能完成连接、请求的监控功能。
首先编译安装nginx,注意加载stub_status模块,Nginx中的stub_status模块主要用于查看Nginx的一些状态信息.
本模块默认是不会编译进Nginx的,如果你要使用该模块,则要在编译安装Nginx时指定
- tar xzvf nginx-1.2.0.tar.gz
- cd nginx-1.2.0
- ./configure --prefix=/usr/local/nginx --with-http_stub_status_module
- make && make install
yum安装相关的perl、rrdtool的rpm包
- yum install perl rrdtool perl-libwww-perl libwww-perl perl-rrdtool
确定 rrdtool 和相应的perl 被安装上后,开始安装nginx-rrd
- tar zxvf nginx-rrd-0.1.4.tgz
- cd nginx-rrd-0.1.4
- cp -p usr/sbin/* /usr/sbin //复制主程序文件到 /usr/sbin 下
- cp -p etc/nginx-rrd.conf /etc //复制配置文件到 /etc 下
- 创建nginx-rrd生成目录
- mkdir /usr/local/nginx/html/rrd
- cp html/index.php /usr/local/nginx/html
这里提醒需要修改 index.php文件的默认访问密码WCO。

编辑修改/etc/nginx-rrd.conf
- vim /etc/nginx-rrd.conf
- #####################################################
- #
- # dir where rrd databases are stored
- RRD_DIR="/usr/local/nginx/html/rrd";
- # dir where png images are presented
- WWW_DIR="/usr/local/nginx/html";
- # process nice level
- NICE_LEVEL="-19";
- # bin dir
- BIN_DIR="/usr/sbin";
- # servers to test
- # server_utl;server_name
- SERVERS_URL="http://www.linuxom.com/nginx_status;www.linuxom.com"
多个虚拟主机,可以SERVERS_URL中空格分开,前部分为nginx_status 的地址,后面为被监控主机的域名。
查看已安装的nginx是否包含stub_status模块
- /usr/local/nginx/sbin/nginx -V
- nginx version: Nginx/1.2.0
- configure arguments: --with-http_stub_status_module
确定支持stub_status模块后编辑修改nginx.conf
- vim /usr/local/nginx/conf/nginx.conf
- //server{} 中,需要已经加入如下内容
- location / {
- root html;
- index index.php index.html index.htm;
- location /nginx_status {
- stub_status on; //这个选项参数就是在编译时对stub_status模块的支持,如果不编译加入则会在启动nginx时有警告信息
- access_log off;
- }
- }
- #error_page 404 /404.html;
- # redirect server error pages to the static page /50x.html
- #
- error_page 500 502 503 504 /50x.html;
- location = /50x.html {
- root html;
- }
- # proxy the PHP scripts to Apache listening on 127.0.0.1:80
- #
- #location ~ \.php$ {
- # proxy_pass http://127.0.0.1;
- #}
- # pass the PHP scripts to FastCGI server listening on 127.0.0.1:9000
- #
- // 去掉如下内容的注释,这里是对php的支持,注意文件路径
- location ~ \.php$ {
- root html;
- fastcgi_pass 127.0.0.1:9000;
- fastcgi_index index.php;
- fastcgi_param SCRIPT_FILENAME /usr/local/nginx/html$fastcgi_script_name;
- include fastcgi_params;
- }
重启Nginx服务器
- /usr/local/nginx/sbin/nginx -s reload
设置定时收集数据
- crontab -e
- * * * * * root /usr/sbin/nginx-collect
- */10 * * * * root /usr/sbin/nginx-graph
访问页面http://域名/index.php,nginx的连接数如下图
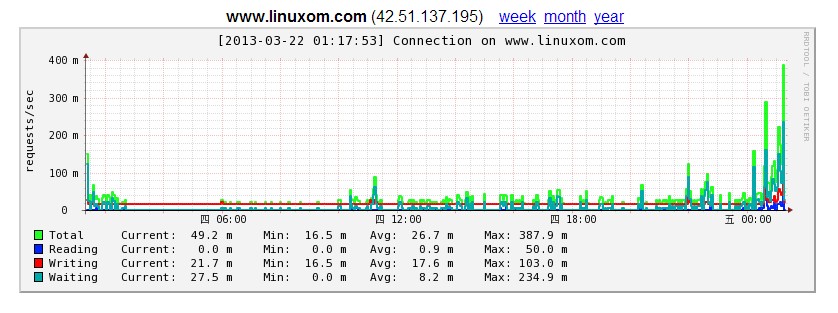
nginx请求数如下图

0 0
- nginx-rrd监控nginx 使用说明
- 用nginx-rrd监控nginx访问数
- 用nginx-rrd监控nginx访问数
- Nginx状态图形化监控工具,Nginx-rrd+rrdtool 配置
- Nginx-rrd 监i控nginx 使用方法
- 【Nginx】监控
- nginx Windows版使用说明
- Nginx使用说明以及注意事项
- lvs-rrd 监控LVS
- cacti监控nginx服务
- 开启nginx状态监控
- nginx状态监控
- nginx状态监控
- nagios 监控 nginx
- nginx开启监控模块
- 利用Zabbix监控Nginx
- nginx状态监控
- 简易nginx监控系统
- 后台批量分配物料--interface
- u盘文件乱码怎么恢复,小牛数据恢复
- 黑马程序员---c语言入门疑难点----指针
- vi简介
- iOS开发之微信聊天工具栏的封装
- nginx-rrd监控nginx 使用说明
- UDP知识详解
- 多线程同步互斥
- 很不错的JAVA异常总结,异常不是想象的那么简单
- 【内核研究】Binder客户端设计
- 打开多个unity项目
- u盘误删除恢复,迅龙数据恢复
- vi进入与离开
- 黑马程序员_java的异常机制