UIActionSheet与UIAlertView
来源:互联网 发布:unity3d 2d动画 编辑:程序博客网 时间:2024/06/05 13:01
iOS程序中的Action Sheet就像Windows中的 “确定-取消”对话框一样,用于强制用户进行选择。当用户将要进行的操作具有一定危险时,常常使用Action Sheet对用户进行危险提示,这样,用户有机会进行取消操作。
Alert相当于Windows中的Messagebox,跟Action Sheet也是类似的。不同的是,Alert可以只有一个选择项,而Action Sheet却至少要两个选项。
跟以往一样,假设我们已经建立了一个Single View Application,打开其中的ViewController.xib文件。
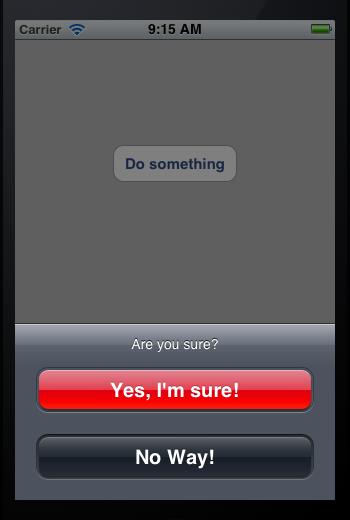
首先,我们先放一个Button在View上面,我们要的效果是:点击Button打开一个Action Sheet,接下来点击Action Sheet的一个按钮,弹出一个Alert。
1、首先,要在ViewController.h中添加代码,使其实现一个协议。添加代码的地方在@interface那行的最后添加<UIActionSheetDelegate>,添加之后那行代码是:
<span style="font-size:14px;">@interface ViewController : UIViewController<UIActionSheetDelegate></span>
2、拖放一个Button到View上,将Button的名称改为 Do something。
3、为这个Button建立Action映射,映射到ViewController.h中,事件类型默认,名称为 buttonPressed。
4、在ViewController.m中找到buttonPressed方法,添加以下代码:
<span style="font-size:14px;">- (IBAction)buttonPressed:(id)sender { <strong>UIActionSheet *actionSheet = [[UIActionSheet alloc] initWithTitle:@"Are you sure?" delegate:self cancelButtonTitle:@"No Way!" destructiveButtonTitle:@"Yes, I'm sure!" otherButtonTitles:nil]; [actionSheet showInView:self.view];</strong>}</span>如上面代码所示,创建一个Action Sheet需要多个参数:
(1)initWithTitle:设置标题,将会显示在Action Sheet的顶部
(2)delegate:设置Action Sheet的委托。当Action Sheet的一个按钮被按下后,它的delegate将会被通知,并且会执行这个delegate的actionSheet: didDismissWithButtonIndex方法将会执行。这里,我们将delegate设成self,这样可以保证执行我们自己在ViewController.m写的actionSheet: didDismissWithButtonIndex方法
(3)cancelButtonTitle:设置取消按钮的标题,这个取消按钮将会显示在Action Sheet的最下边
(4)destructiveButtonTitle:设置第一个确定按钮的标题,这个按钮可以理解成:"好的,继续"
(5)otherButtonTitles:可以设置任意多的确定按钮,想要添加两个按钮,可以写成:
<span style="font-size:14px;">otherButtonTitles: @”New Button 1”, @”New Button 2”, nil</span>
注意到,最后一个参数要是nil
[actionSheet showInView:self.view]这条语句用来显示Action Sheet,准确的说,这条语句是给这个Action Sheet设置Parent,而这个Parent必须是一个View,并且是当前正在显示的View。
5、然后,我们在ViewController.m中添加一个方法,完整代码为:
<span style="font-size:14px;">- (void)actionSheet:(UIActionSheet *)actionSheet didDismissWithButtonIndex:(NSInteger)buttonIndex { if (buttonIndex != [actionSheet cancelButtonIndex]) { NSString *msg = nil; msg = @"You can breathe easy, everything went OK."; <strong> UIAlertView *alert = [[UIAlertView alloc] initWithTitle:@"Something was done" message:msg delegate:self cancelButtonTitle:@"Prew!" otherButtonTitles: nil]; [alert show];</strong> }}</span>这个方法就是我们轻触了Action Sheet之后将会执行的代码。由于之前我们将Action Sheet的delegate设成self,因而这个方法将会被调用,这个方法的参数buttonIndex表示用户所轻触的按钮的编号,按钮编号是从上到下,从0开始的,例如,"Yes, I'm sure!"这个按钮的编号是0,因为它是第一个确定按钮,取消按钮是显示在最下边的。取消按钮的编号,可以通过[actionSheet cancelButtonIndex]直接获得。
构造一个Alert也要填写很多参数:
(1)initWithTitle:设置标题,将会显示在Alert的顶部
(2)message:设置提示消息内容
(3)delegate:设置Alert的委托。这里,我们设成self
(4)cancelButtonTitle:设置取消按钮的标题
(5)otherButtonTitles:与Action Sheet类似
[alert show]这条语句用来显示Alert。
6、运行一下,看看效果吧:

- UIActionSheet与UIAlertView
- UIActionSheet与UIAlertView
- UIActionSheet与UIAlertView
- UIActionSheet与UIAlertView
- iOS开发:UIActionSheet与UIAlertView
- UIAlertview UIActionSheet
- UIAlertView&UIActionSheet
- UIAlertView、UIActionSheet
- UIAlertView、UIActionSheet
- iOS开发6:UIActionSheet与UIAlertView
- UIAlertView与UIActionSheet的动态添加
- ios基础控件UIAlertView与UIActionSheet
- iOS UIAlertController代替代替UIAlertView与UIActionSheet
- 用block将UIAlertView与UIActionSheet统一起来
- UIAlertController的使用(ios9.0后代替UIAlertView与UIActionSheet)
- UIAlertView,UIActionSheet, UIMenuController
- UIAlertView vs UIActionSheet
- UIAlertView、UIActionSheet兼容iOS8
- Python学习笔记一
- QuickCHM V2.6
- matlab中randi代替randint生成随机均匀分布信号的用法
- Selenium-webdriver系列教程(17)————为firefox设置下载文件的保存目录
- 另外一篇关于JS页面跳转代码
- UIActionSheet与UIAlertView
- ADO CreateInstance(__uuidof(Connection))失败
- 第十周项目3-血型统计
- XMLHttpRequest 的使用······
- android 4.4 支持透明状态栏和透明导航栏
- 第十周项目3-血型统计
- hadoop(一)初识hadoop
- 汽车百科系列之(十七): 真人版正面碰撞测试
- 如何在UIAlertView中显示进度条