Jumpstart for Oracle Service Bus Development
来源:互联网 发布:程序员眼睛疼 编辑:程序博客网 时间:2024/06/05 19:06
http://www.oracle.com/technetwork/articles/jumpstart-for-osb-development-page--097357.html
Tutorial 1: First Spin
Getting to know Oracle Service Bus by exposing a simple service
Published October 2009
In this article:
- Introduction
- Installation and Configuration Guide
- Tutorial 1: First spin - Getting to know Oracle Service Bus by exposing a simple service
- Tutorial 2: New adapters
- Tutorial 3: Data enrichment
[ Page 1] [ Page 2] [Page 3] [ Page 4] [ Page 5]
The multinational Foo Inc. wants to reuse a service from its local Dutch subsidiary that exposes and retrieves customer information. The Dutch payload has to be transformed into Foo Inc.'s canonical data model that is in English.
In this tutorial we will develop an OSB project that invokes the KlantWebService; "klant" means customer in Dutch. The returned payload will be transformed into the English canonical data model using Assign and Replace activities. Deployment of the KlantWebService is described in theInstallation and Configuration Guide.
Goal
Getting to know OSB basics such as Business and Proxy Services and basic routing rules and transformation capabilities that are based on XQuery. Oracle ESB mainly uses XSLT for transformation. OSB supports XSLT next to XQuery. Getting to know Oracle Workshop as IDE. OESB development is done in JDeveloper.
Oracle Service Bus Project
Let's start by creating a new Oracle Service Bus project.
- Select File → New → Other.. . from the menu. Select Oracle Service Bus ? Oracle Service Bus Project. Click "Next". Enter "WAAI_Case1_Customer_Service" as the name and click "Finish."
- Create the following folders in the newly created project to structure the OSB artifacts: business, business/wsdl, proxy, proxy/wsdl, and xquery.
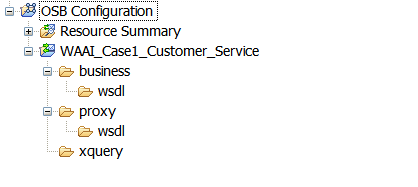 Figure 1: OSB project in Oracle Workshop after creating the folders
Business Service
OSB uses the notion of Business Services to define access to enterprise services such as Web Services, JMS destinations, and EJB's. A Business Service is configured by specifying its interface, type of transport it uses, its security requirements, and other characteristics. We will create a new Business Service for the "KlantWebService" based on its deployed WSDL.
First we need to import the WSDL and associated XSD's in our OSB project.
- Right-click the business/wsdl folder and select Import → Oracle Service Bus - Resources from URL. Enter the URL of the deployed "KlantWebService" WSDL as "URL" and "KlantWebService" as "Resource Name". Select "WSDL" as "Resource Type" and click "Finish".
Use the Oracle WebLogic Administration Console — normally located athttp://host:7001/console— in case you don't know the WSDL's URL. Log into Oracle WebLogic Management Console and browse to Deployments ? KlantWebServiceEAR. Expand the KlantWebServiceEAR deployment and select Web Services ? KlantWebService. Select the "Testing" tab, expand "KlantWebService", and click "?WSDL" to inspect the WSDL and its location.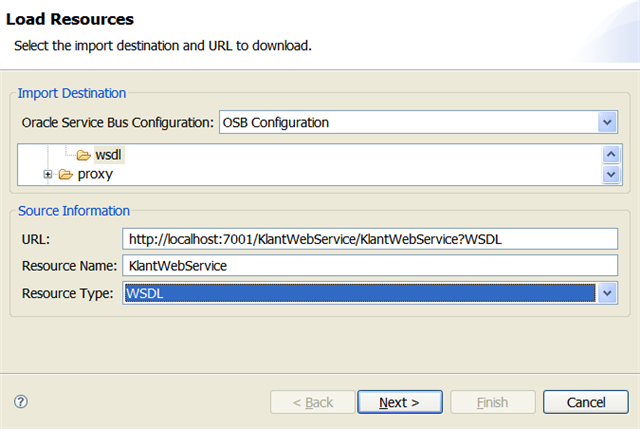 Figure 2: Importing the WSDL of the KlantWebService
The "Review Resources" dialog shows the resources that will be imported: "KlantWebSerice.wsdl" and two referenced XSD's. Click "Finish". The wizard will import the WSDL and XSD's.
Note that the XSD filenames are based on the URL's in the WSDL. These XSD filenames might include question marks that are not well understood by Oracle Workshop. We need to rename these XSD's if this is the case; otherwise you can skip this step.
- Rename the XSD with targetNamespace "http://www.waai.nl/klant" to "Klant.xsd" and the other XSD file — with targetNamespace "http://www.waai.nl/klant/service" — to "KlantWebService.xsd".
We continue by creating the Business Service that is based on the imported resources.
- Create a new Business Service in the business folder by right-clicking it and selecting New ? Business Service. Enter "KlantWebServiceBS" as "File Name" and click "Finish". This opens the "General Configuration" dialog of the Business Service.
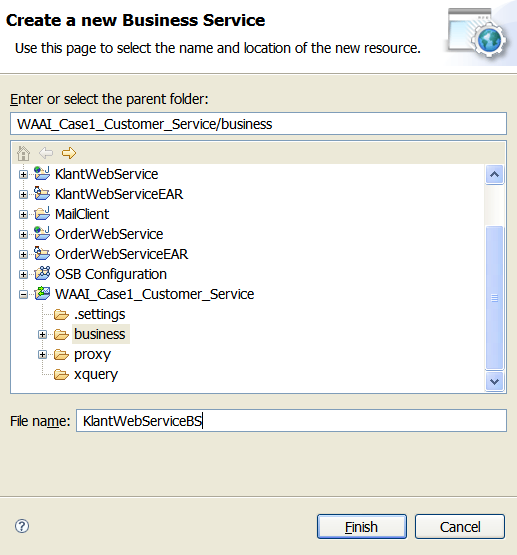 Figure 3: Creating the Business Service
 - Select "WSDL Web Service" as "Service Type", browse to the imported WSDL of the KlantWebService, select "KlantWebServicePort" port, and click "OK". Select "yes" in the "Transport Configuration Change" dialog asking you to keep the new WSDL transport configuration. Keep all other default settings and save the newly created Business Service.
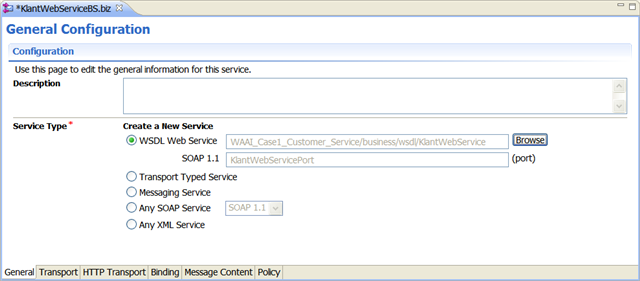 Figure 4: Selecting the imported WSDL of the KlantWebService during creation of the Business Service
You have now exposed the deployed Web Service as Business Service in the OSB project and made it available as endpoint to route to. Next step is to create a Proxy Service that exposes the OSB Service to service consumers.
Proxy Service
Proxy Services are the interface that service consumers use to connect with managed back-end services. Proxy Services are definitions of intermediary Web Services that the Oracle Service Bus implements locally. Proxy Services are configured by defining its interface using a WSDL and the type of transport it uses. Message processing logic is specified in message flow definitions when defining a Proxy Service.
The resources archive contains the WSDL and XSD of the Proxy Service we will be creating in the next steps.
- Copy the "CustomerService.wsdl" and "CustomerCDM.xsd" files from the WAAI_Case1_Customer_Service project in the resources archive to the proxy/wsdl folder of the OSB project. Refresh the OSB project in Oracle Workshop. The WSDL and XSD should be visible in the Project Explorer.
- Create a new Proxy Service by right-clicking the proxy folder and selecting New → Proxy Service . Enter "CustomerPS" as "File Name" and click "OK". This opens the "General Configuration" dialog.
- Select "WSDL Web Service" as "Service Type", browse to "CustomerService.wsdl", select the "CustomerServiceSOAP" port, and click "OK". Select "yes" in the "Transport Configuration Change" dialog asking you to keep the new WSDL transport configuration. Keep all other default settings and save the newly created Proxy Service.
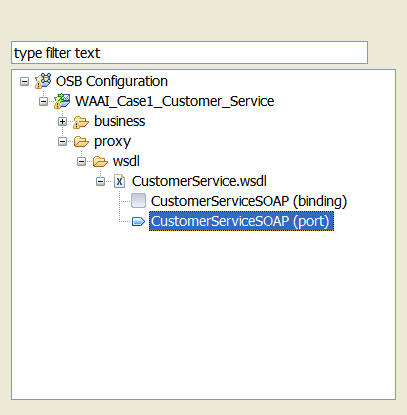 Figure 5: Selecting the binding of the Customer Proxy Service's WSDL
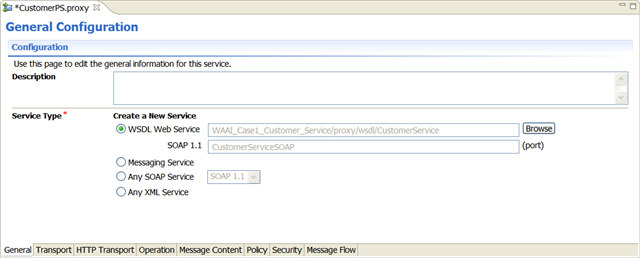 Figure 6: Configuring the Proxy Service
You have now created both the Business and Proxy Service. We continue by wiring these together and defining the transformation between the English canonical data model and the Dutch Web Service payload.
Message Flow
The implementation of a Proxy Service is specified by a Message Flow definition. A Message Flow defines the flow of request and response messages through the Proxy Service. The following elements are used to construct a Message Flow: pipeline pair (sequence of stages for request and response flows), branch node (branching based on message content or operation), route node (definition of message destinations such as Business Services), and start nodes. Message Flow elements can be combined in arbitrary ways to form a tree structure with the start node always (and only) occurring as the root of the tree and the route nodes. The last nodes in a branch (leaf nodes) may be Route nodes or Echo nodes.
We need to transform the input from the Proxy Service to the input of the Business Service and vice versa for the response. We're going to add activities to the Message Flow of the newly created Proxy Service to achieve this.
The "KlantWebService" Business Service has 3 operations: "getAllKlanten", "getKlantById", and "addKlant". The "CustomerPS" Proxy Service has three matching operations: "GetAllCustomers", "GetCustomerById", and "AddCustomer". These will be routed to their Dutch equivalents using an Operational Branch.
- If not already opened, open the "CustomerPS" Proxy Service by double-clicking it. Select the "Message Flow" tab to define the routing and transformation logic.
- Right-click the "CustomerPS" icon and select Insert Into → Operational Branch to branch the incoming request — based on the invoked operation — to the corresponding operation of the Business Service.
Oracle Workshop now creates a branch for the "GetAllCustomers" operation and a "Default" branch that is chosen in case of any other operation.
- Add branches for the two other operations ("GetCustomerById" and "AddCustomer") by using the "Add Branch" icon. Select the newly added branches and choose the appropriate operations from the dropdown list.
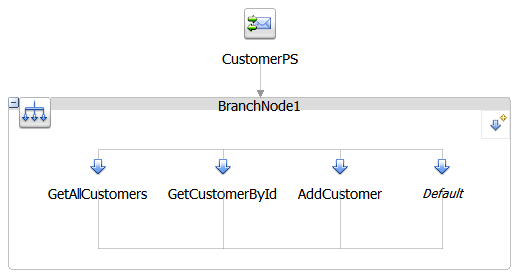 Figure 7: Message Flow after adding branches for all of the Proxy Service's operations
We continue by defining the routing logic for each operation using Route Nodes and Routing activities. The transformation logic will be added afterwards. We'll leave the "Default" branch as is.
A Route Node performs request/response communication with another service. It represents the boundary between request and response processing for the Proxy Service. When the Route Node dispatches a request message, the request processing is considered complete. When the Route Node receives a response message, the response processing begins. The Route Node supports conditional routing as well as request and response transformations. Because a Route Node represents the boundary between request and response processing, it cannot have any descendants in the Message Flow.
- Add a Route Node to all three operational branches by right-clicking a branch and selecting Insert Into ? Route. Add a Routing Node to all newly created Route Nodes by right-clicking the Route Node and selecting Insert Into → Communication → Routing .
Select the endpoint to be invoked in every Routing activity by clicking the Routing node and specifying the "Service" in the "Properties" tab. Browse to the "KlantWebServiceBS" Business Service and click "OK". A dropdown list displaying all operations of the Business Service will appear. Select the corresponding operation and save the Proxy Service.
Note that you can enter more meaningful names for the added nodes if you want.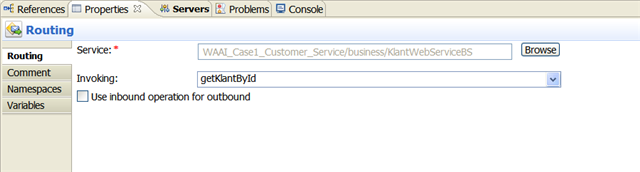 Figure 8: Selecting the Business Service and operation to invoke
After adding all routing activities the Message Flow looks like the following:

You have now defined the entire routing logic for the OSB project. We'll continue adding the required transformation logic using XQuery and OSB activities such as Assign and Replace. We need to transform the input of every Proxy Service operation to the input of the corresponding Business Service operation and vice versa for the output.
- Add an Assign activity in the Request Action flow of the "GetCustomerById" branch by right-clicking the flow and selecting Insert Into → Message Processing → Assign . Click "Expression" in the "Properties" tab of the new Assign activity. This opens the XQuery/XSLT Expression Editor. Enter "
$body/cus:GetCustomerByIdRequest/cus:id/text()" as expression — or drag it from the "Variables Structure". A dollar sign denotes a variable in OSB. Enter "customerId" as "Variable".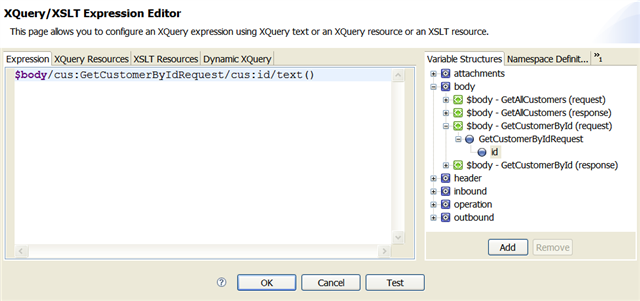 Figure 10: XPath expression extracting the customer id
Oracle Workshop might warn the expression is invalid since the "cus" namespace prefix that is used in the expression cannot be resolved. If this is the case you need to declare the namespace prefix. Select the "Namespaces" tab and add a user namespace with "cus" as prefix and "http://www.waai.nl/CustomerService" as URI. Save and refresh the project.
We have now extracted the customer id from the incoming payload of the "GetCustomerById" operation and assigned it to the "customerId" variable. Next we need to construct the appropriate request payload for the "getKlantById" operation.
- Inspect the request and response payload for the "getKlantById" operation. Log into to the Oracle WebLogic Management Console and browse to Deployments → KlantWebServiceEAR .
 Figure 11: Inspecting the deployed KlantWebServiceEAR project in Oracle Weblogic Management Console
Expand the deployment and select Web Services ? KlantWebService. Select the "Testing" tab and use the WebLogic Test Client to view the payload of the operation. Execute the operation to view the response payload. Note that the KlantWebService is a dummy WebService and always returns the same customer details.

Next step is to construct the request payload.
- Right-click the newly added Assign activity and select Insert After → Message Processing → Replace . In the new Replace activity click "XPath" and enter "." as "Expression". Back in the "Properties" tab, enter "body" as "In Variable", and select the "Replace node contents" option.
Click "Expression" to open the XQuery/XSLT Expression Editor. Enter the following code in the "Expression" tab:<getKlantById xmlns="http://www.waai.nl/klant/service" xmlns:klant="http://www.waai.nl/klant"> <klant:klantId>{$customerId}</klant:klantId></getKlantById>Finally you need to declare the "klant" namespace prefix which is also used later on in this tutorial. Select the "Namespaces" tab and add a user namespace with "klant" as prefix and "http://www.waai.nl/klant/service" as URI.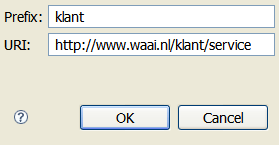 Figure 13: Adding the "klant" namespace to the default list of namespaces
You have now replaced the entire node contents (indicated by ".") of the request body (indicated by "body") with the "getKlantById" request payload using the value of the "customerId" variable. This completes the Request Action flow!
We continue by completing the Response Action flow of the "GetCustomerById" operation using an XQuery transformation.
- Add a new XQuery file by right-clicking the xquery folder and selecting New ? XQuery Transformation. Enter "GetKlantByIdToGetCustomerByIdResponse" as "File Name" and click "Next".
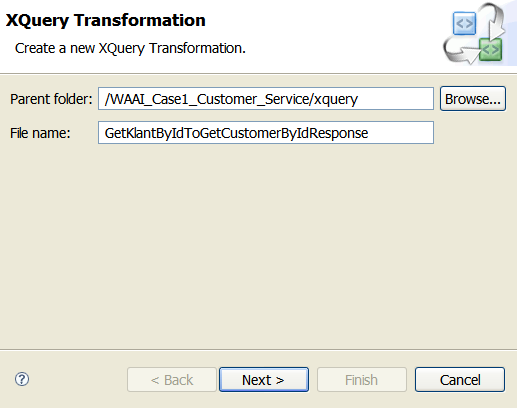 Figure 14: Creating a new XQuery transformation
 - Select the "GetKlantByIdResponse" element of the "KlantWebService.xsd" file as "Source Type". Click "Next". Select the "GetCustomerByIdResponse" element of the "CustomerCDM.xsd" file as "Target Type". Select "XML" as payload for both types.
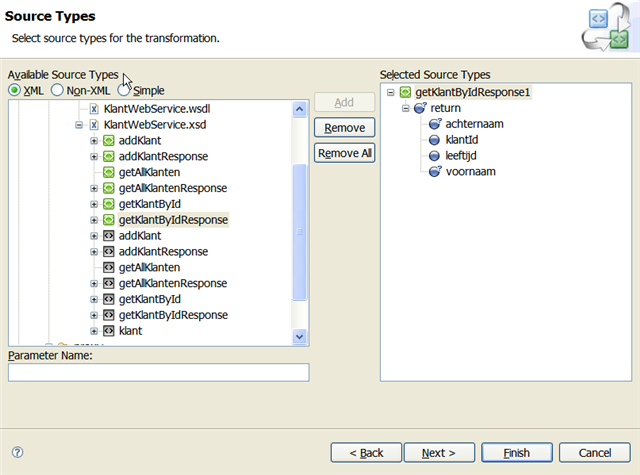 Figure 15: Selecting the Source Type of the XQuery transformationClick "Finish". This will open a new window in which the mapping can be graphically defined.
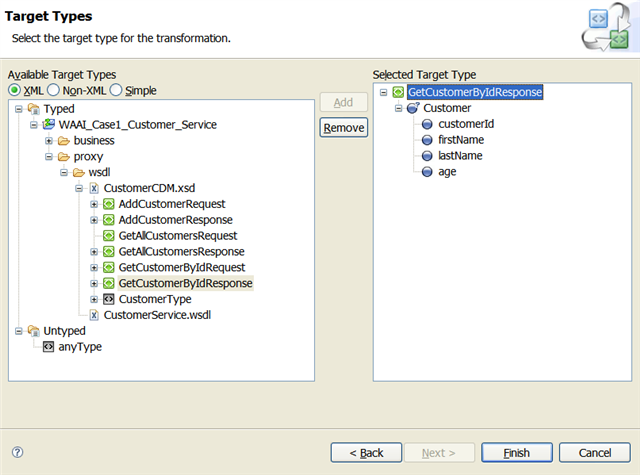 Figure 16: Selecting the Target Type of the XQuery transformation
 - Add the following mappings in the "Design" tab:
- voornaam → firstName
- achternaam → lastName
You might notice that the mappings for "firstName" and "lastName" are trivial since both source and target elements are of the same type: "xsd:string". The "age" and "customerId" elements however have different source and target types: "xsd:long", "xsd:int", and "xsd:nonNegativeInteger".
Select the "Source" tab to view the XQuery transformation. Add the following expression between the "<ns1:Customer>" and "<ns1:firstName>" elements: <ns1:customerId>{ xs:nonNegativeInteger(data($getKlantByIdResponse1/return/klantId)) }</ns1:customerId>
Add the following expression between the "<ns1:lastName>" and "</ns1:Customer>" elements:<ns1:age>{ xs:nonNegativeInteger(data($getKlantByIdResponse1/return/leeftijd)) }</ns1:age>
You have now applied a type conversion. Inspect the XQuery code in the "Source" tab. This should resemble the corresponding XQuery file in the projects archive containing the finished tutorials.
Switch back to the "Design" tab. All elements are now mapped. You can use the "Test" tab to test the XQuery transformation.

Next step is to use the XQuery transformation to create the response content with it.
- 20. Right-click the Response Action flow and select Insert Into ? Message Processing ? Assign to add an Assign activity. Click "Expression", select the "XQuery Resources" tab, and browse to the newly created XQuery file. Enter "$body/klant:getKlantByIdResponse" as "Binding" which specifies the response of the Business Service that will be transformed. Click "OK". Back in the "Properties" window enter "transformedResponse" as "Variable Name".
The outcome of the transformation is now assigned to the "transformedResponse" variable. The final step is to assign this value to the response payload.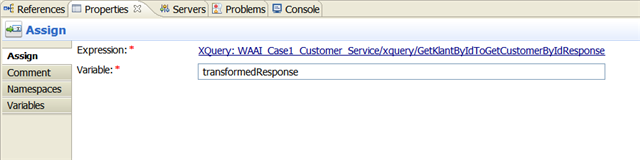 Figure 18: Assigning the result of the XQuery transformation to the "transformedResponse" variable
 - Right-click the newly added Assign activity and select Insert After → Message Processing → Replace . Click "XPath" in the new Replace activity and enter "." as "Expression". Back in the "Properties" tab, enter "body" as "In Variable", and select the "Replace node contents" option. Click "Expression" to open the XQuery/XSLT Expression Editor and enter "$transformedResponse" in the "Expression" tab.The complete routing and transformation flow for the "GetCustomerById" branch is finished! Complete the other two branches using the same approach.
 Figure 19: Replacing the body with the contents of the "transformedResponse" variable
 - Use the following sequence of Assign and Replace activities in the "AddCustomer" branch:
- Create an XQuery transformation named "AddCustomerRequestToAddKlant" that transforms the "AddCustomerRequest" request payload to the "addKlant" request payload. Add an Assign activity in the Request Action flow to assign the outcome of the transformation to the "transformedRequest" variable. Add the "cus" namespace prefix.
- Create a Replace activity in the Request Action flow to replace the body of the request payload with the contents of the "transformedRequest" variable.
- Create an XQuery transformation named "AddKlantToAddCustomerResponse" that transforms the "addKlantResponse" response payload of the Business Service to the "AddCustomerResponse" response payload of the Proxy Service. Add an Assign activity in the Response Action flow to assign the outcome of the transformation to the "transformedResponse" variable. Add the "klant" namespace prefix.
- Create a Replace activity in the Response Action flow to replace the body of the response payload with the contents of the "transformedResponse" variable.
- Create an XQuery transformation named "AddCustomerRequestToAddKlant" that transforms the "AddCustomerRequest" request payload to the "addKlant" request payload. Add an Assign activity in the Request Action flow to assign the outcome of the transformation to the "transformedRequest" variable. Add the "cus" namespace prefix.
- Use the following sequence of Assign and Replace activities in the "GetAllCustomers" branch:
- Create a Replace activity in the Request Action flow to replace the body of the request payload with the expression:
<getAllKlanten xmlns="http://www.waai.nl/klant/service"/> - Create an XQuery transformation named "GetAllKlantenToGetAllCustomersResponse" that transforms the "getAllKlantenResponse" response payload of the Business Service to the "GetAllCustomersResponse" response payload of the Proxy Service. Not only map the individual elements but also the "return" and "Customer" elements since this operation can return more than one customer element.
- Add an Assign activity in the Response Action flow to assign the outcome of the transformation to the "transformedResponse" variable. Add the "klant" namespace prefix.
- Create a Replace activity in the Response Action flow to replace the body of the response payload with the contents of the "transformedResponse" variable.
- Create a Replace activity in the Request Action flow to replace the body of the request payload with the expression:
When all activities are added the Message Flow looks like the following:

You have now completed the OSB project. It's time to take the project for a spin by deploying and testing it!
Deployment and Testing
Go to the server tab, right-click on the server connection, and select "Add and Remove Projects...". Add the "OSB Configuration" project and click "Finish" to deploy the OSB project. We will use Oracle Service Bus Console to test our project.
Oracle Service Bus Console enables you to control the service and policy configurations, and monitor system and operations tasks. Oracle Service Bus built-in test console is a browser-based test environment used to validate resources and inline XQuery expressions used in the Message Flow. It is an extension of the Oracle Service Bus Console. Using the test console, it is possible to configure the test object (Proxy Service, Business Service, XQuery, XSLT, MFL resource), execute the test, and view test results. It allows message flow tracing when testing a service, to examine the state of the message at specific trace points.
Log into Oracle Service Bus Console to view and test the OSB project. Click "Project Explorer", select the "WAAI_Case1_Customer_Service" project, and browse to the Customer Proxy Service you want to test. Click the "Launch Test Console" icon in the Actions dialog and test all operations of the Proxy Service.

The Testing Console shows the correct output of the Customer Proxy Service's operations. You can view the outcome of all individual steps in the "Invocation Trace" window.
Lessons Learned
You have completed the first tutorial in which you have developed an OSB project in Oracle Workshop that reuses a local Dutch service and exposes it using the English canonical data model. You should now have an understanding of OSB basic building blocks such as Business and Proxy Services, routing rules and transformation capabilities based on XQuery.
- Jumpstart for Oracle Service Bus Development
- Jumpstart for Oracle Service Bus Development
- Oracle Service Bus
- Oracle Service Bus白皮书
- Oracle Service Bus学习笔记
- Oracle Service Bus(OSB) Example
- Oracle Service Bus(OSB) Example
- Exposing a new service via Oracle Service Bus
- OSB实战开发【一】Oracle Service Bus的安装
- Oracle Service Bus 11gR1开发环境安装文档
- Oracle Service Bus 11g 的三种方案
- Oracle SQL, First Edition : Jumpstart with Examples
- Internet Service Bus
- ESB(Enterprise Service Bus)
- Internet Security: A Jumpstart for Systems Administrators and IT Managers
- Internet Security: A Jumpstart for Systems Administrators and IT Managers
- Microsoft Outlook 2007 Programming: Jumpstart for Power Users and Administrators
- Microsoft .NET: Jumpstart for Systems Administrators and Developers
- listView里面item中控件添加点击事件需要
- svn is already under version control问题解决
- 一个apk调用另一个apk的native方法
- jffs2挂flash时,报下面错误的一个解决方法
- CLOSE_WAIT状态 生产过程分析 linux系统sysctl.conf配置优化
- Jumpstart for Oracle Service Bus Development
- strncasecmp
- 为什么要预估点击率
- _beginthreadex CreateThread _beginthread
- web前端牛人博客整理
- 九度OJ 1153
- foreach循环遍历数组和集合
- Java虚拟机工作原理详解
- 诚敬网络学院