Android学习笔记之在图片特效
来源:互联网 发布:买mac还是ipad 编辑:程序博客网 时间:2024/05/29 04:48
1、涂鸦(能清屏)
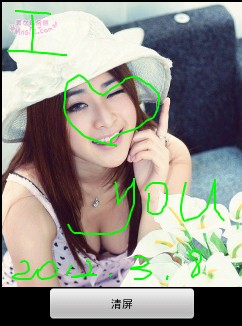

HandWritingActivity.java
- package xiaosi.handWriting;
- import android.app.Activity;
- import android.app.AlertDialog;
- import android.content.DialogInterface;
- import android.os.Bundle;
- import android.view.View;
- import android.view.View.OnClickListener;
- import android.widget.Button;
- public class HandWritingActivity extends Activity
- {
- /** Called when the activity is first created. */
- private HandWrite handWrite = null;
- private Button clear = null;
- @Override
- public void onCreate(Bundle savedInstanceState)
- {
- super.onCreate(savedInstanceState);
- setContentView(R.layout.main);
- handWrite = (HandWrite)findViewById(R.id.handwriteview);
- clear = (Button)findViewById(R.id.clear);
- clear.setOnClickListener(new clearListener());
- }
- private class clearListener implements OnClickListener{
- public void onClick(View v)
- {
- handWrite.clear();
- }
- }
- }
HandWrite.java
- public class HandWrite extends View
- {
- private Paint paint = null;
- private Bitmap originalBitmap = null;
- private Bitmap new1Bitmap = null;
- private Bitmap new2Bitmap = null;
- private float clickX = 0,clickY = 0;
- private float startX = 0,startY = 0;
- private boolean isMove = true;
- private boolean isClear = false;
- private int color = Color.GREEN;
- private float strokeWidth = 2.0f;
- public HandWrite(Context context, AttributeSet attrs)
- {
- super(context, attrs);
- originalBitmap = BitmapFactory.decodeResource(getResources(), R.drawable.girl_a);
- new1Bitmap = Bitmap.createBitmap(originalBitmap);
- }
- public void clear(){
- isClear = true;
- new2Bitmap = Bitmap.createBitmap(originalBitmap);
- invalidate();
- }
- public void setstyle(float strokeWidth){
- this.strokeWidth = strokeWidth;
- }
- @Override
- protected void onDraw(Canvas canvas)
- {
- super.onDraw(canvas);
- canvas.drawBitmap(HandWriting(new1Bitmap), 0, 0,null);
- }
- public Bitmap HandWriting(Bitmap originalBitmap)
- {
- Canvas canvas = null;
- if(isClear){
- canvas = new Canvas(new2Bitmap);
- }
- else{
- canvas = new Canvas(originalBitmap);
- }
- paint = new Paint();
- paint.setStyle(Style.STROKE);
- paint.setAntiAlias(true);
- paint.setColor(color);
- paint.setStrokeWidth(strokeWidth);
- if(isMove){
- canvas.drawLine(startX, startY, clickX, clickY, paint);
- }
- startX = clickX;
- startY = clickY;
- if(isClear){
- return new2Bitmap;
- }
- return originalBitmap;
- }
- @Override
- public boolean onTouchEvent(MotionEvent event)
- {
- clickX = event.getX();
- clickY = event.getY();
- if(event.getAction() == MotionEvent.ACTION_DOWN){
- isMove = false;
- invalidate();
- return true;
- }
- else if(event.getAction() == MotionEvent.ACTION_MOVE){
- isMove = true;
- invalidate();
- return true;
- }
- return super.onTouchEvent(event);
- }
- }
main.xml
- <?xml version="1.0" encoding="utf-8"?>
- <LinearLayout xmlns:android="http://schemas.android.com/apk/res/android"
- android:layout_width="fill_parent"
- android:layout_height="fill_parent"
- android:orientation="vertical" >
- <xiaosi.handWriting.HandWrite
- android:id="@+id/handwriteview"
- android:layout_width="fill_parent"
- android:layout_height="380dp" />
- <LinearLayout
- android:layout_width="fill_parent"
- android:layout_height="fill_parent"
- android:orientation="horizontal"
- android:gravity="center_horizontal" >
- <Button
- android:id="@+id/clear"
- android:layout_width="200dp"
- android:layout_height="wrap_content"
- android:text="清屏" />
- </LinearLayout>
- </LinearLayout>
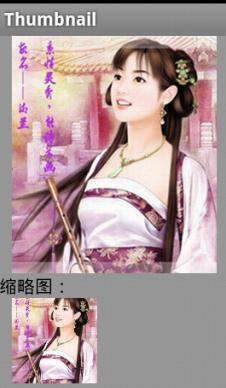
2、得到图片的缩略图
<1>简介
之前往往是通过Bitmap、Drawable和Canvas配合完成,需要写一系列繁杂的逻辑去缩小原有图片,从而得到缩略图。
现在我给大家介绍一种比较简单的方法:(网上有)
在Android 2.2版本中,新增了一个ThumbnailUtils工具类来是实现缩略图,此工具类的功能是强大的,使用是简单,它提供了一个常量和三个方法。利用这些常数和方法,可以轻松快捷的实现图片和视频的缩略图功能。
<2>ThumbnailUtils工具类
常量:
OPTIONS_RECYCLE_INPUT
从此常量用于表示应该回收extractThumbnail(Bitmap, int, int, int)输入源图片(第一个参数),除非输出图片就是输入图片。
方法:
Bitmap createVideoThumbnail(String filePath, int kind)
创建一张视频的缩略图。如果视频已损坏或者格式不支持可能返回null。
参数:
filePath: 视频文件路径
kind: 文件种类,可以是 MINI_KIND 或 MICRO_KIND
Bitmap extractThumbnail(Bitmap source, int width, int height, int options)
创建所需尺寸居中缩放的位图。
参数:
source: 需要被创造缩略图的源位图对象
width: 生成目标的宽度
height: 生成目标的高度
options:在缩略图抽取时提供的选项
Bitmap extractThumbnail(Bitmap source, int width, int height)
创建所需尺寸居中缩放的位图。
参数:
source: 需要被创造缩略图的源位图对象
width: 生成目标的宽度
height: 生成目标的高度
<3>具体实现:
- package xiaosi.thumbnail;
- import android.app.Activity;
- import android.graphics.Bitmap;
- import android.graphics.BitmapFactory;
- import android.graphics.drawable.BitmapDrawable;
- import android.graphics.drawable.Drawable;
- import android.media.ThumbnailUtils;
- import android.os.Bundle;
- import android.widget.ImageView;
- public class ThumbnailActivity extends Activity {
- private Bitmap bitmap = null;
- private ImageView image;
- @Override
- public void onCreate(Bundle savedInstanceState) {
- super.onCreate(savedInstanceState);
- setContentView(R.layout.main);
- image = (ImageView) findViewById(R.id.image);
- //得到原图片
- bitmap = BitmapFactory.decodeResource(getResources(), R.drawable.v);
- //得到缩略图
- bitmap = ThumbnailUtils.extractThumbnail(bitmap, 100, 100);
- image.setImageBitmap(bitmap);
- }
- }
main.xml
- <?xml version="1.0" encoding="utf-8"?>
- <LinearLayout
- xmlns:android="http://schemas.android.com/apk/res/android"
- android:orientation="vertical"
- android:background="#999999"
- android:layout_width="fill_parent"
- android:layout_height="fill_parent">
- <ImageView
- android:layout_width="wrap_content"
- android:layout_height="wrap_content"
- android:src="@drawable/v"
- android:layout_marginLeft="10dip"/>
- <TextView
- android:layout_width="wrap_content"
- android:layout_height="wrap_content"
- android:text="缩略图:"
- android:textColor="#000000"/>
- <ImageView android:id="@+id/image"
- android:layout_width="wrap_content"
- android:layout_height="wrap_content"
- android:layout_marginLeft="10dip"/>
- </LinearLayout>
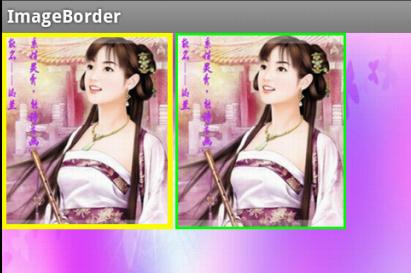
3、给图片加边框
- //设置颜色
- public void setColour(int color){
- co = color;
- }
- //设置边框宽度
- public void setBorderWidth(int width){
- borderwidth = width;
- }
具体实现:
- package xiaosi.imageborder;
- import android.app.Activity;
- import android.graphics.Color;
- import android.os.Bundle;
- public class ImageBorderActivity extends Activity {
- /** Called when the activity is first created. */
- private myImageView image = null;
- private myImageView image1 = null;
- @Override
- public void onCreate(Bundle savedInstanceState) {
- super.onCreate(savedInstanceState);
- setContentView(R.layout.main);
- image = (myImageView)findViewById(R.id.iamge);
- image.setColour(Color.YELLOW);
- image.setBorderWidth(10);
- image1 = (myImageView)findViewById(R.id.iamge1);
- image1.setColour(Color.GREEN);
- image1.setBorderWidth(5);
- }
- }
main.xml
- <LinearLayout
- xmlns:android="http://schemas.android.com/apk/res/android"
- android:background="@drawable/playerbackground"
- android:layout_width="fill_parent"
- android:layout_height="fill_parent">
- <xiaosi.imageborder.myImageView
- android:id="@+id/iamge"
- android:layout_width="200px"
- android:layout_height="230px"
- android:layout_alignParentRight="true"
- android:src="@drawable/v"
- android:layout_centerInParent="true"
- android:layout_marginRight="3px"
- />
- <xiaosi.imageborder.myImageView
- android:id="@+id/iamge1"
- android:layout_width="200px"
- android:layout_height="230px"
- android:layout_alignParentRight="true"
- android:src="@drawable/v"
- android:layout_centerInParent="true"
- android:layout_marginRight="3px"
- />
- </LinearLayout>
- package xiaosi.imageborder;
- import android.content.Context;
- import android.graphics.Canvas;
- import android.graphics.Paint;
- import android.graphics.Rect;
- import android.util.AttributeSet;
- import android.widget.ImageView;
- public class myImageView extends ImageView {
- private int co;
- private int borderwidth;
- public myImageView(Context context) {
- super(context);
- }
- public myImageView(Context context, AttributeSet attrs,
- int defStyle) {
- super(context, attrs, defStyle);
- }
- public myImageView(Context context, AttributeSet attrs) {
- super(context, attrs);
- }
- //设置颜色
- public void setColour(int color){
- co = color;
- }
- //设置边框宽度
- public void setBorderWidth(int width){
- borderwidth = width;
- }
- @Override
- protected void onDraw(Canvas canvas) {
- super.onDraw(canvas);
- // 画边框
- Rect rec = canvas.getClipBounds();
- rec.bottom--;
- rec.right--;
- Paint paint = new Paint();
- //设置边框颜色
- paint.setColor(co);
- paint.setStyle(Paint.Style.STROKE);
- //设置边框宽度
- paint.setStrokeWidth(borderwidth);
- canvas.drawRect(rec, paint);
- }
- }
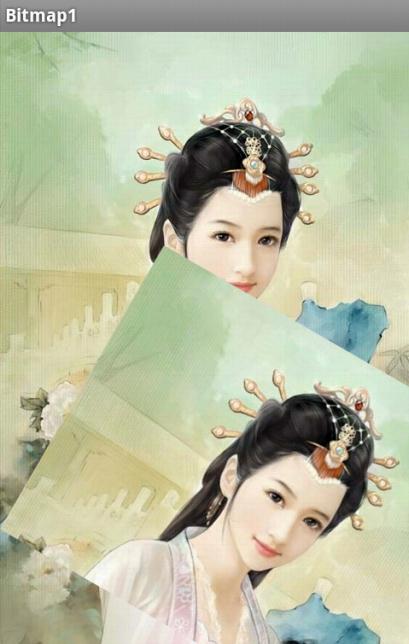
4、画图并保存图片到本地
1、首先创建一个Bitmap图片,并指定大小;
2、在该图片上创建一个新的画布Canvas,然后在画布上绘制,并保存即可;
3、需要保存的目录File,注意如果写的目录如“/sdcard/song/”如果不存在的话,要先创建(file.mkdirs).。
4、需要添加权限:<uses-permission android:name="android.permission.WRITE_EXTERNAL_STORAGE"/>
Canvas是一个画布,你可以建立一个空白的画布,就直接new一个Canvas对象,不需要参数。也可以先使用BitmapFactory创建一个Bitmap对象,作为新的Canvas对象的参数,也就是说这个画布不是空白的,如果你想保存图片的话,最好是Bitmap是一个新的,而不是从某个文件中读入进来的,或者是Drawable对象。然后使用Canvas画第一张图上去,在画第二张图上去,最后使用Canvas.save(int flag)的方法进行保存,注意save方法里面的参数可以保存单个图层,如果是保存全部图层的 话使用 save( Canvas.ALL_SAVE_FLAG )。
关于图片旋转问题不懂的话,请看博文:Android学习笔记之Bitmap位图的旋转
这是原图片和旋转后图片

这是保存到本地的图片800*600 JPG格式
具体实现:
- package xiaosi.bitmap;
- import android.app.Activity;
- import android.os.Bundle;
- public class mianActivity extends Activity
- {
- private BitmapView bitmapView = null;
- @Override
- protected void onCreate(Bundle savedInstanceState)
- {
- super.onCreate(savedInstanceState);
- bitmapView = new BitmapView(this);
- setContentView(bitmapView);
- }
- }
BitmapView.java
- package xiaosi.bitmap;
- import java.io.File;
- import java.io.FileOutputStream;
- import android.content.Context;
- import android.content.res.Resources;
- import android.graphics.Bitmap;
- import android.graphics.Bitmap.Config;
- import android.graphics.BitmapFactory;
- import android.graphics.Canvas;
- import android.graphics.Color;
- import android.graphics.Matrix;
- import android.view.View;
- public class BitmapView extends View
- {
- private Matrix matrix = null;
- public BitmapView(Context context)
- {
- super(context);
- }
- public void onDraw(Canvas canvas)
- {
- // 获取资源文件的引用res
- Resources res = getResources();
- // 获取图形资源文件
- Bitmap bmp = BitmapFactory.decodeResource(res, R.drawable.h);
- // 设置canvas画布背景为白色
- canvas.drawColor(Color.BLACK);
- canvas.drawBitmap(bmp, 0, 0, null);
- // 定义矩阵对象
- matrix = new Matrix();
- //旋转30度
- matrix.postRotate(30);
- Bitmap bitmap = Bitmap.createBitmap(bmp, 0, 50, bmp.getWidth(), bmp.getHeight()/2,
- matrix, true);
- canvas.drawBitmap(bitmap, 0, 250, null);
- SaveBitmap(bitmap);
- }
- //保存到本地
- public void SaveBitmap(Bitmap bmp)
- {
- Bitmap bitmap = Bitmap.createBitmap(800, 600, Config.ARGB_8888);
- Canvas canvas = new Canvas(bitmap);
- //加载背景图片
- Bitmap bmps = BitmapFactory.decodeResource(getResources(), R.drawable.playerbackground);
- canvas.drawBitmap(bmps, 0, 0, null);
- //加载要保存的画面
- canvas.drawBitmap(bmp, 10, 100, null);
- //保存全部图层
- canvas.save(Canvas.ALL_SAVE_FLAG);
- canvas.restore();
- //存储路径
- File file = new File("/sdcard/song/");
- if(!file.exists())
- file.mkdirs();
- try {
- FileOutputStream fileOutputStream = new FileOutputStream(file.getPath() + "/xuanzhuan.jpg");
- bitmap.compress(Bitmap.CompressFormat.JPEG, 100, fileOutputStream);
- fileOutputStream.close();
- System.out.println("saveBmp is here");
- } catch (Exception e) {
- e.printStackTrace();
- }
- }
- }
5、图片色调饱和度、色相、亮度处理
原图:

处理后:

下面贴代码:
一、图片处理层:
- package com.jacp.tone.view;
- import java.util.ArrayList;
- import android.content.Context;
- import android.graphics.Bitmap;
- import android.graphics.Canvas;
- import android.graphics.ColorMatrix;
- import android.graphics.ColorMatrixColorFilter;
- import android.graphics.Paint;
- import android.view.Gravity;
- import android.view.View;
- import android.widget.LinearLayout;
- import android.widget.SeekBar;
- import android.widget.SeekBar.OnSeekBarChangeListener;
- import android.widget.TextView;
- import com.jacp.tone.R;
- /**
- * 图片调色处理
- * @author maylian7700@126.com
- *
- */
- public class ToneLayer {
- /**
- * 饱和度标识
- */
- public static final int FLAG_SATURATION = 0x0;
- /**
- * 亮度标识
- */
- public static final int FLAG_LUM = 0x1;
- /**
- * 色相标识
- */
- public static final int FLAG_HUE = 0x2;
- /**
- * 饱和度
- */
- private TextView mSaturation;
- private SeekBar mSaturationBar;
- /**
- * 色相
- */
- private TextView mHue;
- private SeekBar mHueBar;
- /**
- * 亮度
- */
- private TextView mLum;
- private SeekBar mLumBar;
- private float mDensity;
- private static final int TEXT_WIDTH = 50;
- private LinearLayout mParent;
- private ColorMatrix mLightnessMatrix;
- private ColorMatrix mSaturationMatrix;
- private ColorMatrix mHueMatrix;
- private ColorMatrix mAllMatrix;
- /**
- * 亮度
- */
- private float mLumValue = 1F;
- /**
- * 饱和度
- */
- private float mSaturationValue = 0F;
- /**
- * 色相
- */
- private float mHueValue = 0F;
- /**
- * SeekBar的中间值
- */
- private static final int MIDDLE_VALUE = 127;
- /**
- * SeekBar的最大值
- */
- private static final int MAX_VALUE = 255;
- private ArrayList<SeekBar> mSeekBars = new ArrayList<SeekBar>();
- public ToneLayer(Context context) {
- init(context);
- }
- private void init(Context context) {
- mDensity = context.getResources().getDisplayMetrics().density;
- mSaturation = new TextView(context);
- mSaturation.setText(R.string.saturation);
- mHue = new TextView(context);
- mHue.setText(R.string.contrast);
- mLum = new TextView(context);
- mLum.setText(R.string.lightness);
- mSaturationBar = new SeekBar(context);
- mHueBar = new SeekBar(context);
- mLumBar = new SeekBar(context);
- mSeekBars.add(mSaturationBar);
- mSeekBars.add(mHueBar);
- mSeekBars.add(mLumBar);
- for (int i = 0, size = mSeekBars.size(); i < size; i++) {
- SeekBar seekBar = mSeekBars.get(i);
- seekBar.setMax(MAX_VALUE);
- seekBar.setProgress(MIDDLE_VALUE);
- seekBar.setTag(i);
- }
- LinearLayout saturation = new LinearLayout(context);
- saturation.setOrientation(LinearLayout.HORIZONTAL);
- saturation.setLayoutParams(new LinearLayout.LayoutParams(LinearLayout.LayoutParams.MATCH_PARENT, LinearLayout.LayoutParams.WRAP_CONTENT));
- LinearLayout.LayoutParams txtLayoutparams = new LinearLayout.LayoutParams((int) (TEXT_WIDTH * mDensity), LinearLayout.LayoutParams.MATCH_PARENT);
- mSaturation.setGravity(Gravity.CENTER);
- saturation.addView(mSaturation, txtLayoutparams);
- LinearLayout.LayoutParams seekLayoutparams = new LinearLayout.LayoutParams(LinearLayout.LayoutParams.MATCH_PARENT, LinearLayout.LayoutParams.WRAP_CONTENT);
- saturation.addView(mSaturationBar, seekLayoutparams);
- LinearLayout hue = new LinearLayout(context);
- hue.setOrientation(LinearLayout.HORIZONTAL);
- hue.setLayoutParams(new LinearLayout.LayoutParams(LinearLayout.LayoutParams.MATCH_PARENT, LinearLayout.LayoutParams.WRAP_CONTENT));
- mHue.setGravity(Gravity.CENTER);
- hue.addView(mHue, txtLayoutparams);
- hue.addView(mHueBar, seekLayoutparams);
- LinearLayout lum = new LinearLayout(context);
- lum.setOrientation(LinearLayout.HORIZONTAL);
- lum.setLayoutParams(new LinearLayout.LayoutParams(LinearLayout.LayoutParams.MATCH_PARENT, LinearLayout.LayoutParams.WRAP_CONTENT));
- mLum.setGravity(Gravity.CENTER);
- lum.addView(mLum, txtLayoutparams);
- lum.addView(mLumBar, seekLayoutparams);
- mParent = new LinearLayout(context);
- mParent.setOrientation(LinearLayout.VERTICAL);
- mParent.setLayoutParams(new LinearLayout.LayoutParams(LinearLayout.LayoutParams.MATCH_PARENT, LinearLayout.LayoutParams.WRAP_CONTENT));
- mParent.addView(saturation);
- mParent.addView(hue);
- mParent.addView(lum);
- }
- public View getParentView() {
- return mParent;
- }
- /**
- * 设置饱和度值
- * @param saturation
- */
- public void setSaturation(int saturation) {
- mSaturationValue = saturation * 1.0F / MIDDLE_VALUE;
- }
- /**
- * 设置色相值
- * @param hue
- */
- public void setHue(int hue) {
- mHueValue = hue * 1.0F / MIDDLE_VALUE;
- }
- /**
- * 设置亮度值
- * @param lum
- */
- public void setLum(int lum) {
- mLumValue = (lum - MIDDLE_VALUE) * 1.0F / MIDDLE_VALUE * 180;
- }
- public ArrayList<SeekBar> getSeekBars()
- {
- return mSeekBars;
- }
- /**
- *
- * @param flag
- * 比特位0 表示是否改变色相,比位1表示是否改变饱和度,比特位2表示是否改变明亮度
- */
- public Bitmap handleImage(Bitmap bm, int flag) {
- Bitmap bmp = Bitmap.createBitmap(bm.getWidth(), bm.getHeight(),
- Bitmap.Config.ARGB_8888);
- // 创建一个相同尺寸的可变的位图区,用于绘制调色后的图片
- Canvas canvas = new Canvas(bmp); // 得到画笔对象
- Paint paint = new Paint(); // 新建paint
- paint.setAntiAlias(true); // 设置抗锯齿,也即是边缘做平滑处理
- if (null == mAllMatrix) {
- mAllMatrix = new ColorMatrix();
- }
- if (null == mLightnessMatrix) {
- mLightnessMatrix = new ColorMatrix(); // 用于颜色变换的矩阵,android位图颜色变化处理主要是靠该对象完成
- }
- if (null == mSaturationMatrix) {
- mSaturationMatrix = new ColorMatrix();
- }
- if (null == mHueMatrix) {
- mHueMatrix = new ColorMatrix();
- }
- switch (flag) {
- case FLAG_HUE: // 需要改变色相
- mHueMatrix.reset();
- mHueMatrix.setScale(mHueValue, mHueValue, mHueValue, 1); // 红、绿、蓝三分量按相同的比例,最后一个参数1表示透明度不做变化,此函数详细说明参考
- // // android
- // doc
- break;
- case FLAG_SATURATION: // 需要改变饱和度
- // saturation 饱和度值,最小可设为0,此时对应的是灰度图(也就是俗话的“黑白图”),
- // 为1表示饱和度不变,设置大于1,就显示过饱和
- mSaturationMatrix.reset();
- mSaturationMatrix.setSaturation(mSaturationValue);
- break;
- case FLAG_LUM: // 亮度
- // hueColor就是色轮旋转的角度,正值表示顺时针旋转,负值表示逆时针旋转
- mLightnessMatrix.reset(); // 设为默认值
- mLightnessMatrix.setRotate(0, mLumValue); // 控制让红色区在色轮上旋转的角度
- mLightnessMatrix.setRotate(1, mLumValue); // 控制让绿红色区在色轮上旋转的角度
- mLightnessMatrix.setRotate(2, mLumValue); // 控制让蓝色区在色轮上旋转的角度
- // 这里相当于改变的是全图的色相
- break;
- }
- mAllMatrix.reset();
- mAllMatrix.postConcat(mHueMatrix);
- mAllMatrix.postConcat(mSaturationMatrix); // 效果叠加
- mAllMatrix.postConcat(mLightnessMatrix); // 效果叠加
- paint.setColorFilter(new ColorMatrixColorFilter(mAllMatrix));// 设置颜色变换效果
- canvas.drawBitmap(bm, 0, 0, paint); // 将颜色变化后的图片输出到新创建的位图区
- // 返回新的位图,也即调色处理后的图片
- return bmp;
- }
- }
二、主界面:
- package com.jacp.tone;
- import java.util.ArrayList;
- import android.app.Activity;
- import android.graphics.Bitmap;
- import android.graphics.BitmapFactory;
- import android.os.Bundle;
- import android.widget.ImageView;
- import android.widget.LinearLayout;
- import android.widget.SeekBar;
- import android.widget.SeekBar.OnSeekBarChangeListener;
- import com.jacp.tone.view.ToneLayer;
- /**
- * 启动的主界面
- * @author maylian7700@126.com
- *
- */
- public class ImageToneActivity extends Activity implements OnSeekBarChangeListener {
- private ToneLayer mToneLayer;
- private ImageView mImageView;
- private Bitmap mBitmap;
- @Override
- public void onCreate(Bundle savedInstanceState) {
- super.onCreate(savedInstanceState);
- setContentView(R.layout.main);
- init();
- }
- private void init()
- {
- mToneLayer = new ToneLayer(this);
- mBitmap = BitmapFactory.decodeResource(getResources(), R.drawable.test);
- mImageView = (ImageView) findViewById(R.id.img_view);
- mImageView.setImageBitmap(mBitmap);
- ((LinearLayout) findViewById(R.id.tone_view)).addView(mToneLayer.getParentView());
- ArrayList<SeekBar> seekBars = mToneLayer.getSeekBars();
- for (int i = 0, size = seekBars.size(); i < size; i++)
- {
- seekBars.get(i).setOnSeekBarChangeListener(this);
- }
- }
- @Override
- public void onProgressChanged(SeekBar seekBar, int progress,
- boolean fromUser) {
- int flag = (Integer) seekBar.getTag();
- switch (flag)
- {
- case ToneLayer.FLAG_SATURATION:
- mToneLayer.setSaturation(progress);
- break;
- case ToneLayer.FLAG_LUM:
- mToneLayer.setLum(progress);
- break;
- case ToneLayer.FLAG_HUE:
- mToneLayer.setHue(progress);
- break;
- }
- mImageView.setImageBitmap(mToneLayer.handleImage(mBitmap, flag));
- }
- @Override
- public void onStartTrackingTouch(SeekBar seekBar) {
- }
- @Override
- public void onStopTrackingTouch(SeekBar seekBar) {
- }
- }
三、布局文件:
- <?xml version="1.0" encoding="utf-8"?>
- <ScrollView xmlns:android="http://schemas.android.com/apk/res/android"
- android:layout_width="match_parent"
- android:layout_height="match_parent"
- >
- <LinearLayout
- android:layout_width="match_parent"
- android:layout_height="match_parent"
- android:orientation="vertical" >
- <ImageView
- android:layout_width="wrap_content"
- android:layout_height="wrap_content"
- android:layout_weight="1"
- android:id="@+id/img_view"
- android:layout_gravity="center"
- />
- <LinearLayout
- android:layout_width="match_parent"
- android:layout_height="wrap_content"
- android:id="@+id/tone_view"
- />
- </LinearLayout>
- </ScrollView>
算法:
一、简单算法:将像素点周围八个点包括自身一共九个点的RGB值分别相加后平均,作为当前像素点的RGB值,即可实现效果。
举例:
ABC
DEF
GHI
假如当前点是E,那么会有:
- E.r = (A.r + B.r + C.r + D.r + E.r + F.r + G.r + H.r + I.r) /9 // r表示的是E像素点RGB值的R值
- E.r = (A.r + B.r + C.r + D.r + E.r + F.r + G.r + H.r + I.r) / 9 // r表示的是E像素点RGB值的R值
E像素点的GB值类似。
二、采用高斯模糊:
高斯矩阵:
- int[] gauss = new int[] { 1, 2, 1, 2, 4, 2, 1, 2, 1 };
- int[] gauss = new int[] { 1, 2, 1, 2, 4, 2, 1, 2, 1 };
举例:(还是上面的九个点)
假如当前点是E,那么会有:
- int delta = 16;
- E.r =( A.r * gauss[0] + B.r * gauss[1] + C.r * gauss[2] + D.r * gauss[3] + E.r * gauss[4] + F.r * gauss[5] + G.r * gauss[6] + H.r * gauss[7] + I.r * gauss[8]) / delta
- int delta = 16;
- E.r =( A.r * gauss[0] + B.r * gauss[1] + C.r * gauss[2] + D.r * gauss[3] + E.r * gauss[4] + F.r * gauss[5] + G.r * gauss[6] + H.r * gauss[7] + I.r * gauss[8]) / delta
处理效果:
原图片:
处理后:

两种处理方式的代码:
- /**
- * 模糊效果
- * @param bmp
- * @return
- */
- private Bitmap blurImage(Bitmap bmp)
- {
- int width = bmp.getWidth();
- int height = bmp.getHeight();
- Bitmap bitmap = Bitmap.createBitmap(width, height, Bitmap.Config.RGB_565);
- int pixColor = 0;
- int newR = 0;
- int newG = 0;
- int newB = 0;
- int newColor = 0;
- int[][] colors = new int[9][3];
- for (int i = 1, length = width - 1; i < length; i++)
- {
- for (int k = 1, len = height - 1; k < len; k++)
- {
- for (int m = 0; m < 9; m++)
- {
- int s = 0;
- int p = 0;
- switch(m)
- {
- case 0:
- s = i - 1;
- p = k - 1;
- break;
- case 1:
- s = i;
- p = k - 1;
- break;
- case 2:
- s = i + 1;
- p = k - 1;
- break;
- case 3:
- s = i + 1;
- p = k;
- break;
- case 4:
- s = i + 1;
- p = k + 1;
- break;
- case 5:
- s = i;
- p = k + 1;
- break;
- case 6:
- s = i - 1;
- p = k + 1;
- break;
- case 7:
- s = i - 1;
- p = k;
- break;
- case 8:
- s = i;
- p = k;
- }
- pixColor = bmp.getPixel(s, p);
- colors[m][0] = Color.red(pixColor);
- colors[m][1] = Color.green(pixColor);
- colors[m][2] = Color.blue(pixColor);
- }
- for (int m = 0; m < 9; m++)
- {
- newR += colors[m][0];
- newG += colors[m][1];
- newB += colors[m][2];
- }
- newR = (int) (newR / 9F);
- newG = (int) (newG / 9F);
- newB = (int) (newB / 9F);
- newR = Math.min(255, Math.max(0, newR));
- newG = Math.min(255, Math.max(0, newG));
- newB = Math.min(255, Math.max(0, newB));
- newColor = Color.argb(255, newR, newG, newB);
- bitmap.setPixel(i, k, newColor);
- newR = 0;
- newG = 0;
- newB = 0;
- }
- }
- return bitmap;
- }
- /**
- * 柔化效果(高斯模糊)(优化后比上面快三倍)
- * @param bmp
- * @return
- */
- private Bitmap blurImageAmeliorate(Bitmap bmp)
- {
- long start = System.currentTimeMillis();
- // 高斯矩阵
- int[] gauss = new int[] { 1, 2, 1, 2, 4, 2, 1, 2, 1 };
- int width = bmp.getWidth();
- int height = bmp.getHeight();
- Bitmap bitmap = Bitmap.createBitmap(width, height, Bitmap.Config.RGB_565);
- int pixR = 0;
- int pixG = 0;
- int pixB = 0;
- int pixColor = 0;
- int newR = 0;
- int newG = 0;
- int newB = 0;
- int delta = 16; // 值越小图片会越亮,越大则越暗
- int idx = 0;
- int[] pixels = new int[width * height];
- bmp.getPixels(pixels, 0, width, 0, 0, width, height);
- for (int i = 1, length = height - 1; i < length; i++)
- {
- for (int k = 1, len = width - 1; k < len; k++)
- {
- idx = 0;
- for (int m = -1; m <= 1; m++)
- {
- for (int n = -1; n <= 1; n++)
- {
- pixColor = pixels[(i + m) * width + k + n];
- pixR = Color.red(pixColor);
- pixG = Color.green(pixColor);
- pixB = Color.blue(pixColor);
- newR = newR + (int) (pixR * gauss[idx]);
- newG = newG + (int) (pixG * gauss[idx]);
- newB = newB + (int) (pixB * gauss[idx]);
- idx++;
- }
- }
- newR /= delta;
- newG /= delta;
- newB /= delta;
- newR = Math.min(255, Math.max(0, newR));
- newG = Math.min(255, Math.max(0, newG));
- newB = Math.min(255, Math.max(0, newB));
- pixels[i * width + k] = Color.argb(255, newR, newG, newB);
- newR = 0;
- newG = 0;
- newB = 0;
- }
- }
- bitmap.setPixels(pixels, 0, width, 0, 0, width, height);
- long end = System.currentTimeMillis();
- Log.d("may", "used time="+(end - start));
- return bitmap;
- }
- /**
- * 模糊效果
- * @param bmp
- * @return
- */
- private Bitmap blurImage(Bitmap bmp)
- {
- int width = bmp.getWidth();
- int height = bmp.getHeight();
- Bitmap bitmap = Bitmap.createBitmap(width, height, Bitmap.Config.RGB_565);
- int pixColor = 0;
- int newR = 0;
- int newG = 0;
- int newB = 0;
- int newColor = 0;
- int[][] colors = new int[9][3];
- for (int i = 1, length = width - 1; i < length; i++)
- {
- for (int k = 1, len = height - 1; k < len; k++)
- {
- for (int m = 0; m < 9; m++)
- {
- int s = 0;
- int p = 0;
- switch(m)
- {
- case 0:
- s = i - 1;
- p = k - 1;
- break;
- case 1:
- s = i;
- p = k - 1;
- break;
- case 2:
- s = i + 1;
- p = k - 1;
- break;
- case 3:
- s = i + 1;
- p = k;
- break;
- case 4:
- s = i + 1;
- p = k + 1;
- break;
- case 5:
- s = i;
- p = k + 1;
- break;
- case 6:
- s = i - 1;
- p = k + 1;
- break;
- case 7:
- s = i - 1;
- p = k;
- break;
- case 8:
- s = i;
- p = k;
- }
- pixColor = bmp.getPixel(s, p);
- colors[m][0] = Color.red(pixColor);
- colors[m][1] = Color.green(pixColor);
- colors[m][2] = Color.blue(pixColor);
- }
- for (int m = 0; m < 9; m++)
- {
- newR += colors[m][0];
- newG += colors[m][1];
- newB += colors[m][2];
- }
- newR = (int) (newR / 9F);
- newG = (int) (newG / 9F);
- newB = (int) (newB / 9F);
- newR = Math.min(255, Math.max(0, newR));
- newG = Math.min(255, Math.max(0, newG));
- newB = Math.min(255, Math.max(0, newB));
- newColor = Color.argb(255, newR, newG, newB);
- bitmap.setPixel(i, k, newColor);
- newR = 0;
- newG = 0;
- newB = 0;
- }
- }
- return bitmap;
- }
- /**
- * 柔化效果(高斯模糊)(优化后比上面快三倍)
- * @param bmp
- * @return
- */
- private Bitmap blurImageAmeliorate(Bitmap bmp)
- {
- long start = System.currentTimeMillis();
- // 高斯矩阵
- int[] gauss = new int[] { 1, 2, 1, 2, 4, 2, 1, 2, 1 };
- int width = bmp.getWidth();
- int height = bmp.getHeight();
- Bitmap bitmap = Bitmap.createBitmap(width, height, Bitmap.Config.RGB_565);
- int pixR = 0;
- int pixG = 0;
- int pixB = 0;
- int pixColor = 0;
- int newR = 0;
- int newG = 0;
- int newB = 0;
- int delta = 16; // 值越小图片会越亮,越大则越暗
- int idx = 0;
- int[] pixels = new int[width * height];
- bmp.getPixels(pixels, 0, width, 0, 0, width, height);
- for (int i = 1, length = height - 1; i < length; i++)
- {
- for (int k = 1, len = width - 1; k < len; k++)
- {
- idx = 0;
- for (int m = -1; m <= 1; m++)
- {
- for (int n = -1; n <= 1; n++)
- {
- pixColor = pixels[(i + m) * width + k + n];
- pixR = Color.red(pixColor);
- pixG = Color.green(pixColor);
- pixB = Color.blue(pixColor);
- newR = newR + (int) (pixR * gauss[idx]);
- newG = newG + (int) (pixG * gauss[idx]);
- newB = newB + (int) (pixB * gauss[idx]);
- idx++;
- }
- }
- newR /= delta;
- newG /= delta;
- newB /= delta;
- newR = Math.min(255, Math.max(0, newR));
- newG = Math.min(255, Math.max(0, newG));
- newB = Math.min(255, Math.max(0, newB));
- pixels[i * width + k] = Color.argb(255, newR, newG, newB);
- newR = 0;
- newG = 0;
- newB = 0;
- }
- }
- bitmap.setPixels(pixels, 0, width, 0, 0, width, height);
- long end = System.currentTimeMillis();
- Log.d("may", "used time="+(end - start));
- return bitmap;
- }
在优化后的代码中要注意了,pixels数组不能超过规定的大小,也就是说图片的尺寸不能太大,否则会栈内存溢出。
7、锐化效果
这篇将讲到图片特效处理的锐化效果。跟前面一样是对像素点进行处理,算法是通用的。
算法原理:
一、简单算法:分别获取当前像素点和八个周围像素点的RGB值,先求出当前像素点的RGB值与八个像素点RGB值的和的平均数,再乘以相应的系数,然后在与当前像素点之和。
例:
ABC
DEF
GHI
对E点进行锐化:
- float delta = 0.3;
- E.r = (E.r - (A.r + B.r + C.r + D.r + F.r + G.r + H.r + I.r) / 8) * delta + E.r;
- float delta = 0.3;
- E.r = (E.r - (A.r + B.r + C.r + D.r + F.r + G.r + H.r + I.r) / 8) * delta + E.r;
E.g,E.b类似,delta建议取0.3,具体多少无所谓,试一下就知道了。但按照上面原理,没有达到预期的效果,改变delta的值也不行,所以后面代码就不贴出来了,感兴趣的可以研究一下。
二、拉普拉斯变换:将拉普拉斯矩阵中的项与相应点的RGB值之积再乘以相应的系数的和作为当前点的RGB值。
例:用上面的例子,还是对E点进行锐化。
- // 拉普拉斯矩阵
- int[] laplacian = new int[] { -1, -1, -1, -1, 9, -1, -1, -1, -1 };
- float delta = 0.3;
- E.r = A.r * laplacian[0] * delta + B.r * laplacian[1] * delta + C.r * laplacian[2] * delta + D.r * laplacian[3] * delta + E.r * laplacian[4] * delta + F.r * laplacian[5] * delta + G.r * laplacian[6] * delta + H.r * laplacian[7] * delta + I.r * laplacian[8] * delta;
- // E.g和E.b值类似
下面看效果图:
原图:
处理后:
貌似处理有点问题,中间会看到很多的竖线,很明显,可能是没有优化好,因为采用了getPiexels() 和setPixels()方法,所以一维数组的对应图片的宽高有点麻烦。
下面贴代码,仅供参数,同样注意图片的大小,数组大小不能超过虚拟机规定值。
- /**
- * 图片锐化(拉普拉斯变换)
- * @param bmp
- * @return
- */
- private Bitmap sharpenImageAmeliorate(Bitmap bmp)
- {
- long start = System.currentTimeMillis();
- // 拉普拉斯矩阵
- int[] laplacian = new int[] { -1, -1, -1, -1, 9, -1, -1, -1, -1 };
- int width = bmp.getWidth();
- int height = bmp.getHeight();
- Bitmap bitmap = Bitmap.createBitmap(width, height, Bitmap.Config.RGB_565);
- int pixR = 0;
- int pixG = 0;
- int pixB = 0;
- int pixColor = 0;
- int newR = 0;
- int newG = 0;
- int newB = 0;
- int idx = 0;
- float alpha = 0.3F;
- int[] pixels = new int[width * height];
- bmp.getPixels(pixels, 0, width, 0, 0, width, height);
- for (int i = 1, length = height - 1; i < length; i++)
- {
- for (int k = 1, len = width - 1; k < len; k++)
- {
- idx = 0;
- for (int m = -1; m <= 1; m++)
- {
- for (int n = -1; n <= 1; n++)
- {
- pixColor = pixels[(i + n) * width + k + m];
- pixR = Color.red(pixColor);
- pixG = Color.green(pixColor);
- pixB = Color.blue(pixColor);
- newR = newR + (int) (pixR * laplacian[idx] * alpha);
- newG = newG + (int) (pixG * laplacian[idx] * alpha);
- newB = newB + (int) (pixB * laplacian[idx] * alpha);
- idx++;
- }
- }
- newR = Math.min(255, Math.max(0, newR));
- newG = Math.min(255, Math.max(0, newG));
- newB = Math.min(255, Math.max(0, newB));
- pixels[i * width + k] = Color.argb(255, newR, newG, newB);
- newR = 0;
- newG = 0;
- newB = 0;
- }
- }
- bitmap.setPixels(pixels, 0, width, 0, 0, width, height);
- long end = System.currentTimeMillis();
- Log.d("may", "used time="+(end - start));
- return bitmap;
- }
算法原理:用前一个像素点的RGB值分别减去当前像素点的RGB值并加上127作为当前像素点的RGB值。
例:
ABC
求B点的浮雕效果如下:
B.r = C.r - B.r + 127;
B.g = C.g - B.g + 127;
B.b = C.b - B.b + 127;
注意RGB值在0~255之间。
效果图:


原图 效果图
- package com.color;
- import android.content.Context;
- import android.graphics.Bitmap;
- import android.graphics.BitmapFactory;
- import android.graphics.Canvas;
- import android.graphics.Color;
- import android.graphics.Paint;
- import android.util.AttributeSet;
- import android.widget.ImageView;
- public class ColorView extends ImageView {
- private Paint myPaint = null;
- private Bitmap bitmap = null;
- private int width,height;
- private int[] oldPixels;
- private int[] newPixels;
- private int color,color2;
- private int pixelsR,pixelsG,pixelsB,pixelsA,pixelsR2,pixelsG2,pixelsB2;
- public ColorView(Context context, AttributeSet attrs)
- {
- super(context, attrs);
- bitmap = BitmapFactory.decodeResource(context.getResources(),R.drawable.ww);
- width = bitmap.getWidth();
- height = bitmap.getHeight();
- oldPixels = new int[width*height];
- newPixels = new int[width*height];
- invalidate();
- }
- @Override
- protected void onDraw(Canvas canvas) {
- super.onDraw(canvas);
- //获取像素
- bitmap.getPixels(oldPixels, 0, width, 0, 0, width, height);
- for(int i = 1;i < height*width; i++){
- color = oldPixels[i-1];
- //前一个像素
- pixelsR = Color.red(color);
- pixelsG = Color.green(color);
- pixelsB = Color.blue(color);
- //当前像素
- color2 = oldPixels[i];
- pixelsR2 = Color.red(color2);
- pixelsG2 = Color.green(color2);
- pixelsB2 = Color.blue(color2);
- pixelsR = (pixelsR - pixelsR2 + 127);
- pixelsG = (pixelsG - pixelsG2 + 127);
- pixelsB = (pixelsB - pixelsB2 + 127);
- //均小于等于255
- if(pixelsR > 255){
- pixelsR = 255;
- }
- if(pixelsG > 255){
- pixelsG = 255;
- }
- if(pixelsB > 255){
- pixelsB = 255;
- }
- newPixels[i] = Color.argb(pixelsA, pixelsR, pixelsG, pixelsB);
- }
- bitmap.setPixels(newPixels, 0, width, 0, 0, width, height);
- canvas.drawBitmap(bitmap,0,0,myPaint);
- }
- }
算法原理:将当前像素点的RGB值分别与255之差后的值作为当前点的RGB值。
例:
ABC
求B点的底片效果:
B.r = 255 - B.r;
B.g = 255 - B.g;
B.b = 255 - B.b;
效果图:

效果图 原图
代码:
- package com.color;
- import android.content.Context;
- import android.graphics.Bitmap;
- import android.graphics.BitmapFactory;
- import android.graphics.Canvas;
- import android.graphics.Color;
- import android.graphics.Paint;
- import android.util.AttributeSet;
- import android.widget.ImageView;
- public class ColorView extends ImageView {
- private Paint myPaint = null;
- private Bitmap bitmap = null;
- private int width,height;
- private int[] oldPixels;
- private int[] newPixels;
- private int color,color2;
- private int pixelsR,pixelsG,pixelsB,pixelsA,pixelsR2,pixelsG2,pixelsB2;
- public ColorView(Context context, AttributeSet attrs)
- {
- super(context, attrs);
- bitmap = BitmapFactory.decodeResource(context.getResources(),R.drawable.ww);
- width = bitmap.getWidth();
- height = bitmap.getHeight();
- oldPixels = new int[width*height];
- newPixels = new int[width*height];
- invalidate();
- }
- @Override
- protected void onDraw(Canvas canvas) {
- super.onDraw(canvas);
- //获取像素
- bitmap.getPixels(oldPixels, 0, width, 0, 0, width, height);
- for(int i = 1;i < height*width; i++){
- color = oldPixels[i];
- //获取RGB分量
- pixelsA = Color.alpha(color);
- pixelsR = Color.red(color);
- pixelsG = Color.green(color);
- pixelsB = Color.blue(color);
- //转换
- pixelsR = (255 - pixelsR);
- pixelsG = (255 - pixelsG);
- pixelsB = (255 - pixelsB);
- //均小于等于255大于等于0
- if(pixelsR > 255){
- pixelsR = 255;
- }
- else if(pixelsR < 0){
- pixelsR = 0;
- }
- if(pixelsG > 255){
- pixelsG = 255;
- }
- else if(pixelsG < 0){
- pixelsG = 0;
- }
- if(pixelsB > 255){
- pixelsB = 255;
- }
- else if(pixelsB < 0){
- pixelsB = 0;
- }
- //根据新的RGB生成新像素
- newPixels[i] = Color.argb(pixelsA, pixelsR, pixelsG, pixelsB);
- }
- //根据新像素生成新图片
- bitmap.setPixels(newPixels, 0, width, 0, 0, width, height);
- canvas.drawBitmap(bitmap,0,0,myPaint);
- }
- }

代码:
- package com.color;
- import android.content.Context;
- import android.graphics.Bitmap;
- import android.graphics.BitmapFactory;
- import android.graphics.Canvas;
- import android.graphics.Color;
- import android.graphics.Paint;
- import android.util.AttributeSet;
- import android.widget.ImageView;
- public class ColorView extends ImageView {
- private Paint myPaint = null;
- private Bitmap bitmap = null;
- private int width, height;
- private int[] oldPixels;
- private int[] newPixels;
- private int color, color2;
- private int pixelsR, pixelsG, pixelsB, pixelsA, pixelsR2, pixelsG2,
- pixelsB2;
- public ColorView(Context context, AttributeSet attrs) {
- super(context, attrs);
- bitmap = BitmapFactory.decodeResource(context.getResources(),
- R.drawable.ww);
- width = bitmap.getWidth();
- height = bitmap.getHeight();
- oldPixels = new int[width * height];
- newPixels = new int[width * height];
- invalidate();
- }
- @Override
- protected void onDraw(Canvas canvas) {
- super.onDraw(canvas);
- // 获取像素
- bitmap.getPixels(oldPixels, 0, width, 0, 0, width, height);
- for (int i = 1; i < height * width; i++) {
- color = oldPixels[i];
- // 获取RGB分量
- pixelsA = Color.alpha(color);
- pixelsR = Color.red(color);
- pixelsG = Color.green(color);
- pixelsB = Color.blue(color);
- //R
- int pixel = pixelsR * 128 / (pixelsG + pixelsB + 1);
- if (pixel < 0) {
- pixel = 0;
- } else if (pixel > 255) {
- pixel = 255;
- }
- pixelsR = pixel;
- //G
- pixel = pixelsG * 128 / (pixelsB + pixelsR + 1);
- if (pixel < 0){
- pixel = 0;
- }
- else if (pixel > 255){
- pixel = 255;
- }
- pixelsG = pixel;
- //B
- pixel = pixelsB * 128 / (pixelsR + pixelsG + 1);
- if (pixel < 0){
- pixel = 0;
- }
- else if (pixel > 255){
- pixel = 255;
- }
- pixelsB = pixel;
- // 根据新的RGB生成新像素
- newPixels[i] = Color.argb(pixelsA, pixelsR, pixelsG, pixelsB);
- }
- // 根据新像素生成新图片
- bitmap.setPixels(newPixels, 0, width, 0, 0, width, height);
- canvas.drawBitmap(bitmap, 0, 0, myPaint);
- }
- }

原图 效果图
代码:
- package com.color;
- import android.content.Context;
- import android.graphics.Bitmap;
- import android.graphics.BitmapFactory;
- import android.graphics.Canvas;
- import android.graphics.Color;
- import android.graphics.Paint;
- import android.util.AttributeSet;
- import android.widget.ImageView;
- public class ColorView extends ImageView {
- private Paint myPaint = null;
- private Bitmap bitmap = null;
- private int width, height;
- private int[] oldPixels;
- private int[] newPixels;
- private int color, color2;
- private int pixelsR, pixelsG, pixelsB, pixelsA, pixelsR2, pixelsG2,
- pixelsB2;
- public ColorView(Context context, AttributeSet attrs) {
- super(context, attrs);
- bitmap = BitmapFactory.decodeResource(context.getResources(),
- R.drawable.ww);
- width = bitmap.getWidth();
- height = bitmap.getHeight();
- oldPixels = new int[width * height];
- newPixels = new int[width * height];
- invalidate();
- }
- @Override
- protected void onDraw(Canvas canvas) {
- super.onDraw(canvas);
- // 获取像素
- bitmap.getPixels(oldPixels, 0, width, 0, 0, width, height);
- for (int i = 1; i < height * width; i++) {
- color = oldPixels[i];
- // 获取RGB分量
- pixelsA = Color.alpha(color);
- pixelsR = Color.red(color);
- pixelsG = Color.green(color);
- pixelsB = Color.blue(color);
- //R
- int pixel = pixelsR - pixelsG - pixelsB;
- pixel = pixel * 3 / 2;
- if (pixel < 0) {
- pixel = -pixel;
- }
- if (pixel > 255){
- pixel = 255;
- }
- pixelsR = pixel; // 计算后重置R值,以下类同
- //G
- pixel = pixelsG - pixelsR - pixelsB;
- pixel = pixel * 3 / 2;
- if (pixel < 0) {
- pixel = -pixel;
- }
- if (pixel > 255){
- pixel = 255;
- }
- pixelsG = pixel;
- //B
- pixel = pixelsB - pixelsR - pixelsG;
- pixel = pixel * 3 / 2;
- if (pixel < 0) {
- pixel = -pixel;
- }
- if (pixel > 255){
- pixel = 255;
- }
- pixelsB = pixel;
- // 根据新的RGB生成新像素
- newPixels[i] = Color.argb(pixelsA, pixelsR, pixelsG, pixelsB);
- }
- // 根据新像素生成新图片
- bitmap.setPixels(newPixels, 0, width, 0, 0, width, height);
- canvas.drawBitmap(bitmap, 0, 0, myPaint);
- }
- }
这篇将讲到图片特效处理的图片叠加效果。叠加原理是两张图片的像素点按透明度叠加,不会进行颜色过滤。叠加图片可以是JPG格式,跟前在一样,最好是放大assets目录。下面看效果图:
+ =
=
代码:
- /**
- * 图片效果叠加
- * @param bmp 限制了尺寸大小的Bitmap
- * @return
- */
- private Bitmap overlay(Bitmap bmp)
- {
- long start = System.currentTimeMillis();
- int width = bmp.getWidth();
- int height = bmp.getHeight();
- Bitmap bitmap = Bitmap.createBitmap(width, height, Bitmap.Config.RGB_565);
- // 对边框图片进行缩放
- Bitmap overlay = BitmapFactory.decodeResource(mContext.getResources(), R.drawable.rainbow_overlay);
- int w = overlay.getWidth();
- int h = overlay.getHeight();
- float scaleX = width * 1F / w;
- float scaleY = height * 1F / h;
- Matrix matrix = new Matrix();
- matrix.postScale(scaleX, scaleY);
- Bitmap overlayCopy = Bitmap.createBitmap(overlay, 0, 0, w, h, matrix, true);
- int pixColor = 0;
- int layColor = 0;
- int pixR = 0;
- int pixG = 0;
- int pixB = 0;
- int pixA = 0;
- int newR = 0;
- int newG = 0;
- int newB = 0;
- int newA = 0;
- int layR = 0;
- int layG = 0;
- int layB = 0;
- int layA = 0;
- final float alpha = 0.5F;
- int[] srcPixels = new int[width * height];
- int[] layPixels = new int[width * height];
- bmp.getPixels(srcPixels, 0, width, 0, 0, width, height);
- overlayCopy.getPixels(layPixels, 0, width, 0, 0, width, height);
- int pos = 0;
- for (int i = 0; i < height; i++)
- {
- for (int k = 0; k < width; k++)
- {
- pos = i * width + k;
- pixColor = srcPixels[pos];
- layColor = layPixels[pos];
- pixR = Color.red(pixColor);
- pixG = Color.green(pixColor);
- pixB = Color.blue(pixColor);
- pixA = Color.alpha(pixColor);
- layR = Color.red(layColor);
- layG = Color.green(layColor);
- layB = Color.blue(layColor);
- layA = Color.alpha(layColor);
- newR = (int) (pixR * alpha + layR * (1 - alpha));
- newG = (int) (pixG * alpha + layG * (1 - alpha));
- newB = (int) (pixB * alpha + layB * (1 - alpha));
- layA = (int) (pixA * alpha + layA * (1 - alpha));
- newR = Math.min(255, Math.max(0, newR));
- newG = Math.min(255, Math.max(0, newG));
- newB = Math.min(255, Math.max(0, newB));
- newA = Math.min(255, Math.max(0, layA));
- srcPixels[pos] = Color.argb(newA, newR, newG, newB);
- }
- }
- bitmap.setPixels(srcPixels, 0, width, 0, 0, width, height);
- long end = System.currentTimeMillis();
- Log.d("may", "overlayAmeliorate used time="+(end - start));
- return bitmap;
- }
叠加的边框图片还是大点比较好,也要控制被叠加图片大小。alpha变量值可以根据需求修改,建议还是大于0.5比较好,不然原图会看不清楚。
图片特效处理系列将介绍图片的像素点的特效处理,这些物资注重的是原理。也就是说只要你知道这些算法不管是C++,VB,C#,JAVA都可以做出相同的特效。下面将介绍图片怀旧效果的算法。算法如下:
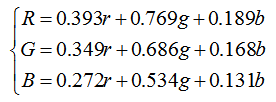
上面公式的意思是说将每个像素点的RGB值先分离出来,然后再按照上面的三个算式分别重新计算出RGB值然后做为当前点的RGB值。
下面看效果图片:
原图片:
处理后:

代码:
- /**
- * 怀旧效果(相对之前做了优化快一倍)
- * @param bmp
- * @return
- */
- private Bitmap oldRemeber(Bitmap bmp)
- {
- // 速度测试
- long start = System.currentTimeMillis();
- int width = bmp.getWidth();
- int height = bmp.getHeight();
- Bitmap bitmap = Bitmap.createBitmap(width, height, Bitmap.Config.RGB_565);
- int pixColor = 0;
- int pixR = 0;
- int pixG = 0;
- int pixB = 0;
- int newR = 0;
- int newG = 0;
- int newB = 0;
- int[] pixels = new int[width * height];
- bmp.getPixels(pixels, 0, width, 0, 0, width, height);
- for (int i = 0; i < height; i++)
- {
- for (int k = 0; k < width; k++)
- {
- pixColor = pixels[width * i + k];
- pixR = Color.red(pixColor);
- pixG = Color.green(pixColor);
- pixB = Color.blue(pixColor);
- newR = (int) (0.393 * pixR + 0.769 * pixG + 0.189 * pixB);
- newG = (int) (0.349 * pixR + 0.686 * pixG + 0.168 * pixB);
- newB = (int) (0.272 * pixR + 0.534 * pixG + 0.131 * pixB);
- int newColor = Color.argb(255, newR > 255 ? 255 : newR, newG > 255 ? 255 : newG, newB > 255 ? 255 : newB);
- pixels[width * i + k] = newColor;
- }
- }
- bitmap.setPixels(pixels, 0, width, 0, 0, width, height);
- long end = System.currentTimeMillis();
- Log.d("may", "used time="+(end - start));
- return bitmap;
- }
上面的代码是优化了的,也就是用到了这篇android图像处理系列之六--给图片添加边框(下)-图片叠加里面所说的getPixels()和setPixels()。自己简单的测试了一下,速度比原来getPixel()和setPixel()速度快了一倍。
- Android学习笔记之在图片特效
- android图片特效之取主色
- android图片特效处理之图片叠加
- Android图片特效处理之图片叠加
- android图片特效处理之图片叠加
- android图片特效处理之图片叠加
- android图片特效处理之图片叠加
- android图片特效处理之图片叠加
- Android图像处理之色彩特效处理(学习笔记)
- android图片特效处理之光晕效果
- android图片特效处理之光照效果
- android图片特效处理之锐化效果
- android图片特效处理之模糊效果
- android图片特效处理之怀旧效果
- android图片特效处理之光晕效果
- android图片特效处理之锐化效果
- android图片特效处理之模糊效果
- android图片特效处理之怀旧效果
- 阜阳的热带鱼水族店有哪些(照片)
- Hdu 2089 不要62(数位dp)
- 《治服自己,治死拖延》
- 中缀表达式变后缀表达式并求值
- TCPIP协议头定义
- Android学习笔记之在图片特效
- JAVA利用HttpClient进行POST请求(HTTPS)
- 《激活你自己》
- ubuntu12.04下hadoop-0.20.1伪模式安装
- hdu 4888 Redraw Beautiful Drawings 网络流+搜索
- XAMPP环境访问非Web DocumentRoot下绝对路径
- Hough变换-直线检测
- Unity发射射线
- leetcode: Remove Element