Configuring Floating IP addresses for Networking in OpenStack Public and Private Clouds
来源:互联网 发布:淘宝买家怎么提高心级 编辑:程序博客网 时间:2024/04/29 22:37
Recently I outlined how VlanManager works and how it ensures network scalability and tenant isolation. Up to this point, however, I’ve only dealt with fixed IP networks of different tenants. While fixed IPs are what instances are given by default, they do not ensure that the instance is immediately reachable from the outside world (or from the rest of the data center). Imagine the following scenario:
You run a small LAMP website with one www server, a database server, and a firewall that handles network address translation (NAT) and traffic filtering. Typically you want the following to apply:
- All the servers communicate internally on some private (unroutable) network range (e.g., 192.168.0.0/24).
- There is one publicly routable IP on which the www server is visible.
You do the following:
- Configure the firewall with the public IP.
- Create a NAT rule on the firewall to forward traffic from the public IP to the private IP of the www server.
Fixed IPs in OpenStack work the same way as the network range 192.168.0.0/16 in the example above. They ensure only inter-instance connectivity inside a single OpenStack cluster. But OpenStack also introduces another pool of IP addresses, called “floating IPs.” Floating IPs are just publicly routable IPs that you typically buy from an ISP (the one that you put on the firewall in the above example). Users can allocate them to their instances, thus making them reachable from the outside world.
Difference between floating and fixed IPs
Floating IPs are not allocated to instances by default. Cloud users need to explicitly “grab” them from the pool configured by the OpenStack administrator and then attach them to their instances. Once the user has grabbed a floating IP from the pool, he becomes the “owner” of it (i.e., at any time he can detach the IP from a given instance and attach it to another). If an instance dies for some reason, the user does not lose the floating IP—it remains his own resource, ready to be attached to another instance. (Unfortunately, right now it is not possible to share a single floating IP among many instances for load balancing purposes, as can be done with elastic load balancing on Amazon EC2. However, lately Mirantis has open sourced a plugin for OpenStack that aims to provide such a feature.)
On the other hand, fixed IPs are allocated dynamically by the nova-network component when instances boot up. There is no way to tell OpenStack to assign a specific fixed IP to an instance. So you will probably find yourself in a situation in which once you terminate a VM accidentally and restore it from a snapshot, the new instance will most likely boot up with another fixed IP.
Systems administrators can configure multiple floating IP pools. However, unlike fixed IP pools, floating IP pools cannot be mapped to specific tenants. Each user can “grab” a floating IP from whichever floating IP pool he wants. But the main motivation behind multiple floating IP pools is that each of them can be served by a different ISP. This way, we can ensure that we maintain connectivity, even if one of the ISPs faces a breakdown.
Just to summarize, the key features of floating IPs are:
- Floating IPs are not automatically allocated to instances by default (they need to be attached to instances manually).
- If an instance dies, the user can reuse the floating IP by attaching it to another instance.
- Users can grab floating IPs from different pools defined by the cloud administrator to ensure connectivity to instances from different ISPs or external networks.
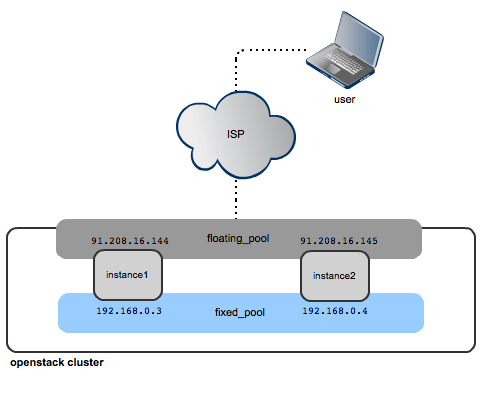
Floating IPs—internal vs. public clouds
The “public visibility” of floating IPs is a relative concept. For public clouds you probably want to define a floating IP pool as a pool of IPs publicly visible from the Internet. Your clients then assign them to instances to log into them via SSH from their home/office computers:
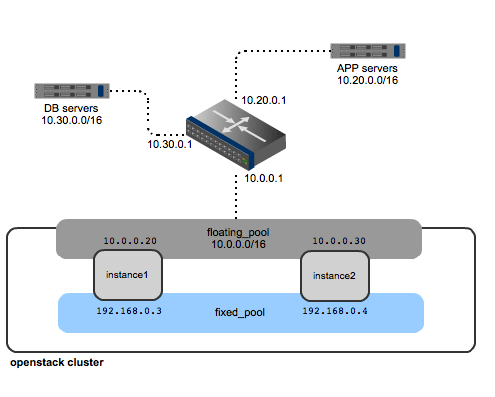
If you run a corporate cloud within in your data center, then a floating IP pool can be any IP range that exposes OpenStack instances to the rest of your data center.
For your data center traffic you might have the following range defined: 10.0.0.0/16.
Inside OpenStack you could have the following fixed IP range: 192.168.0.0/16 split into the tenants subnets.
To make OpenStack instances accessible from the rest of your data center, you could define the floating IP pool as a subnet of 10.0.0.0/8, (i.e., 10.0.0.0/16) and register it with OpenStack for the users to grab from.
Working with floating IPs
As I mentioned earlier, first, the systems administrator registers a floating IP pool in OpenStack:
nova-manage floating create --ip_range=PUBLICLY_ROUTABLE_IP_RANGE --pool POOL_NAME
This way the public pool is made available for tenants.
Now users follow this workflow:
- Boot an instance:
+--------------------------------------+---------+--------+--------------------------------+| ID | Name | Status | Networks |+--------------------------------------+---------+--------+--------------------------------+| 79935433-241a-4268-8aea-5570d74fcf42 | inst1 | ACTIVE | private=10.0.0.4 |+--------------------------------------+---------+--------+--------------------------------+
- List the available floating IP pools:
nova floating-ip-pool-list+------+| name |+------+| pub || test |+------+
- Grab a floating IP from the pool “pub” (or “test” if one wants):
nova floating-ip-create pub+---------------+-------------+----------+------+| Ip | Instance Id | Fixed Ip | Pool |+---------------+-------------+----------+------+| 172.24.4.225 | None | None | pub |+---------------+-------------+----------+------+
- Assign the floating IP to the instance:
nova add-floating-ip 79935433-241a-4268-8aea-5570d74fcf42 172.24.4.225
(where the first argument is the uuid of the instance and the second is the floating IP itself)
- Check if everything has been properly configured:
nova floating-ip-list+--------------+--------------------------------------+----------+------+| Ip | Instance Id | Fixed Ip | Pool |+--------------+--------------------------------------+----------+------+| 172.24.4.225 | 79935433-241a-4268-8aea-5570d74fcf42 | 10.0.0.4 | pub |+--------------+--------------------------------------+----------+------+
The instance should now be visible from outside the OpenStack cluster under the floating IP.
How floating IPs work
So what happens inside the instance once the floating IP is added? The answer is…nothing. If you log in to it via SSH and display the network configuration, you will see that there is still a single network interface with a fixed IP configured.
All the setup is done on the compute node itself. All the floating IP work is nova-network’s job, which means setting up NAT between the instance’s fixed and floating IPs. An explanation of how NAT works can be found here.
Take a look at the following diagram:
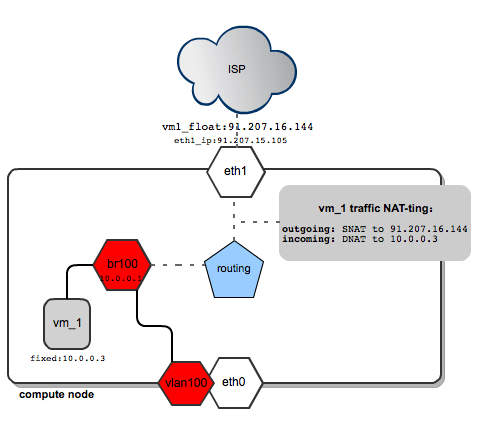
It shows a single compute node configured in multihost networking mode and VlanManager used to configure fixed IP networks. The compute node is equipped with two network interfaces: eth0 is dedicated to fixed IP/VLAN traffic and eth1 is the interface on which the compute node is connected to the outside world and where floating IPs go. (To get to know how VlanManager configures fixed IP networks, refer to this previous post.)
Please note that while on the eth0 (fixed/private) interface we have no address configured, eth1 has an IP assigned, which is also the default gateway for the compute node (91.207.15.105).
When the user assigns a floating IP (91.207.16.144) to the instance VM_1, two things are happening:
- The floating IP is configured as a secondary address on eth1: This is the output of “
ip addr show eth1"containing the relevant entries:inet 91.207.15.105/24 scope global eth1 # primary eth1 ipinet 91.207.16.144/32 scope global eth1 # floating ip of VM_1
- A set of NAT rules is configured in iptables for the floating IP. Below are all relevant entries from the compute node’s “nat” table (excerpt from the command: “
iptables –S -t nat". The detailed article on how to configure NAT with Linux iptables can be found here):# this rule ensures that packets originating from compute node# where the instance resides, will reach the instance via its floating IP:-A nova-network-OUTPUT -d 91.207.16.144/32 -j DNAT --to-destination 10.0.0.3 # ensures that all external traffic to the floating IP# is directed to the fixed IP of the instance-A nova-network-PREROUTING -d 91.207.16.144/32 -j DNAT --to-destination 10.0.0.3# all the traffic originating from the instance will be SNAT-ted to its floating IP-A nova-network-float-snat -s 10.0.0.3/32 -j SNAT --to-source 91.207.16.144
In general, nova-network adds some custom chains to those predefined in the NAT table. The order of those chains with respect to floating IP traffic is shown below (referring to the rules shown above):
Chain OUTPUT -Chain nova-network-OUTPUT -Rule: -d 91.207.16.144/32 -j DNAT --to-destination 10.0.0.3
Chain PREROUTING -Chain nova-network-PREROUTING -Rule: -d 91.207.16.144/32 -j DNAT --to-destination 10.0.0.3
Chain POSTROUTING -Chain nova-postrouting-bottom -Chain nova-network-snat -Chain nova-network-float-snat -Rule: -s 10.0.0.3/32 -j SNAT --to-source 91.207.16.144
- The code responsible for setting those rules resides in nova/network/linux_net.py in the function:
def floating_forward_rules(floating_ip, fixed_ip): return [('PREROUTING', '-d %s -j DNAT --to %s' % (floating_ip, fixed_ip)), ('OUTPUT', '-d %s -j DNAT --to %s' % (floating_ip, fixed_ip)), ('float-snat', '-s %s -j SNAT --to %s' % (fixed_ip, floating_ip))]
Getting back to the diagram. Once the user wants to access the instance on its floating IP from the outside world (e.g., “ping 91.20.16.144″):
- The traffic hits the compute node’s public interface (eth1). DNAT is performed in chain nova-network-PREROUTING so that the destination IP of the packets is changed from 91.207.16.144 to 10.0.0.3.
- Compute node consults its routing table and sees it has network 10.0.0.0 available on br100 interface (excerpt from
“ip route show”of the compute node):10.0.0.0/24 dev br100
So it directs the packet to br100 interface, which then reaches the instance.
If an instance sends a packet to the world (e.g. “ping 8.8.8.8):
- Since the destination address is not on instance’s local network, the packets are sent directly to instance’s default gateway, which is 10.0.0.1 (address of “br100″ device on the compute node).
- Compute node checks its routing tables and sees that it has no 8.8.8.8 on its directly connected networks, so it forwards the packet to its default gateway (which is eth1′s primary address 91.207.15.105 in this case).
- The packet falls into the POSTROUTING chain and gets passed to the “nova-network-float-snat” chain, where its source IP is rewritten to the instance’s floating ip (91.207.16.144).
Notes about security
When using OpenStack, the systems administrator gives complete control of iptables to nova daemons. The set of rules configured is very complex and easily broken by any external manipulation. Moreover, each time nova-network daemon is restarted, it reapplies all the rules in OpenStack-related iptables chains. If there is a need to modify iptables behavior in any way, it should be done by changing the code in relevant places of linux_net.py (for NAT rules it would be the function floating_forward_rules).
It is also worth mentioning that nova-network does not seem to be monitoring its tables in any way. So if we manually throw away some rules from OpenStack related chains, they will not be fixed until the next nova-network restart.
So a sysadmin could easily open unwanted access to the compute host itself by accident. Remember that nova-network placed the floating IP as the secondary address on eth1 and set DNAT rules that direct the traffic to the instance’s fixed IP:
-A nova-network-PREROUTING -d 91.207.16.144/32 -j DNAT --to-destination 10.0.0.3
So all traffic hitting 91.207.16.144 goes effectively to 10.0.0.3.
Now let’s imagine that the sysadmin was fixing some network connectivity issues during the night and flushed all the NAT rules by accident, typing:
iptables –F –t nat
The above NAT rule has been thrown away, but eth1 still has a secondary IP 91.207.16.144 on it. So we can still reach 91.207.16.144 from the outside world, but instead of hitting the instance, we now have access to the compute node itself (the destination IP is no longer DNATed as we flushed all the NAT rules). The hole will be open until the next restart of the nova-network process, which will set up the rules again.
Configuring floating IPs
These are flags in nova.conf that influence the behavior of floating IPs:
# the interface to which floating ips are attached# as secondary addressespublic_interface="eth1"# the pool from which floating IPs are taken by defaultdefault_floating_pool="pub"# we can add a floating ip automatically to every instance that is spawnedauto_assign_floating_ip=false
Final notes
The floating IP mechanism, besides exposing instances directly to the Internet, gives cloud users some flexibility. Having “grabbed” a floating IP from a pool, they can shuffle them (i.e., detach and attach them to different instances on the fly) thus facilitating new code releases and system upgrades. For sysadmins it poses a potential security risk, as the underlying mechanism (iptables) functions in a complicated way and lacks proper monitoring from the OpenStack side. Proper resource state monitoring in OpenStack is being addressed by this blueprint. Since it is still marked as a “work-in-progress”, it is very important to allow only the OpenStack software to touch firewall policies and not tamper with them by hand.
- Configuring Floating IP addresses for Networking in OpenStack Public and Private Clouds
- The difference between the private and public clouds
- Public and Private Interfaces in ruby
- public、protected、private in c++ and java
- OpenStack Networking - FlatManager and FlatDHCPManager - Mirantis for OpenStack.
- Comparing Microsoft and VMware Private Clouds
- Openstack Learning- Floating IP Related
- [Python]private and public
- public,private and protected
- OOP in JS, Part 1 : Public/Private Variables and Methods
- 私用IP地址(Private IP Addresses)
- Building Tag Clouds in Perl and PHP
- Public, Private, and Protected Inheritance
- Java public private and protected
- Openstack: change endpoint IP addresses after installation
- Ember Debug Adapter (ISA3) -- Configuring Static IP Addresses
- openstack Networking in too much detail
- Partial mock local private method or public method in the class and suppress static initial block
- C++标准程序库细节整理(二)第五章
- 【软件工程】第三、四章总结
- Cocos2d-x3.3RC0实现有米广告平台接入
- 算法导论学习记录之第一章
- 修复损坏的 ext4 大分区数据
- Configuring Floating IP addresses for Networking in OpenStack Public and Private Clouds
- 卡尔曼滤波
- display不能解决<jsp:include />的问题,jsp异步加载另外一个jsp页面
- UML类图几种关系的总结
- 程序员都需要学习什么
- 第十六周 百位数分解
- 配置Mybatis Generator不要生成Example类
- CSS布局:浮动与绝对定位的异同点
- 单例设计