[13]使用 MVC 5 的 EF6 Code First 入门 系列:补充:Deploy to Azure
来源:互联网 发布:傲剑绿色版紫霞数据 编辑:程序博客网 时间:2024/06/05 19:26
Deploy to Azure
So far the application has been running locally in IIS Express on your development computer. To make it available for other people to use over the Internet, you have to deploy it to a web hosting provider. In this section of the tutorial you'll deploy it to an Azure Web Site. This section is optional; you can skip this and continue with the following tutorial, or you can adapt the instructions in this section for a different hosting provider of your choice.
Using Code First Migrations to Deploy the Database
To deploy the database you'll use Code First Migrations. When you create the publish profile that you use to configure settings for deploying from Visual Studio, you'll select a check box labeled Execute Code First Migrations (runs on application start). This setting causes the deployment process to automatically configure the applicationWeb.config file on the destination server so that Code First uses the MigrateDatabaseToLatestVersion initializer class.
Visual Studio doesn't do anything with the database during the deployment process while it is copying your project to the destination server. When you run the deployed application and it accesses the database for the first time after deployment, Code First checks if the database matches the data model. If there's a mismatch, Code First automatically creates the database (if it doesn't exist yet) or updates the database schema to the latest version (if a database exists but doesn't match the model). If the application implements a Migrations Seed method, the method runs after the database is created or the schema is updated.
Your Migrations Seed method inserts test data. If you were deploying to a production environment, you would have to change the Seed method so that it only inserts data that you want to be inserted into your production database. For example, in your current data model you might want to have real courses but fictional students in the development database. You can write a Seed method to load both in development, and then comment out the fictional students before you deploy to production. Or you can write a Seed method to load only courses, and enter the fictional students in the test database manually by using the application's UI.
Get an Azure account
You'll need an Azure account. If you don't already have one, but you do have an MSDN subscription, you canactivate your MSDN subscription benefits. Otherwise, you can create a free trial account in just a couple of minutes. For details, see Azure Free Trial.
Create a web site and a SQL database in Azure
Your Azure Web Site will run in a shared hosting environment, which means it runs on virtual machines (VMs) that are shared with other Azure clients. A shared hosting environment is a low-cost way to get started in the cloud. Later, if your web traffic increases, the application can scale to meet the need by running on dedicated VMs.
You'll deploy the database to Azure SQL Database. SQL Database is a cloud-based relational database service that is built on SQL Server technologies. Tools and applications that work with SQL Server also work with SQL Database.
- In the Azure Management Portal, click Web Sites in the left tab, and then click New.

- Click CUSTOM CREATE.
The New Web Site - Custom Create wizard opens.
- In the New Web Site step of the wizard, enter a string in the URL box to use as the unique URL for your application. The complete URL will consist of what you enter here plus the suffix that you see next to the text box. The illustration shows "ConU", but that URL is probably taken so you will have to choose a different one.

- In the Region drop-down list, choose a region close to you. This setting specifies which data center your web site will run in.
- In the Database drop-down list, choose Create a free 20 MB SQL database.

- In the DB CONNECTION STRING NAME, enter SchoolContext.

- Click the arrow that points to the right at the bottom of the box. The wizard advances to the Database Settingsstep.
- In the Name box, enter ContosoUniversityDB.
- In the Server box, select New SQL Database server. Alternatively, if you previously created a server, you can select that server from the drop-down list.
- Enter an administrator LOGIN NAME and PASSWORD. If you selected New SQL Database server you aren't entering an existing name and password here, you're entering a new name and password that you're defining now to use later when you access the database. If you selected a server that you created previously, you’ll enter credentials for that server. For this tutorial, you won't select the Advanced check box. The Advanced options enable you to set the database collation.
- Choose the same Region that you chose for the web site.
- Click the check mark at the bottom right of the box to indicate that you're finished.

The Management Portal returns to the Web Sites page, and the Status column shows that the site is being created. After a while (typically less than a minute), the Status column shows that the site was successfully created. In the navigation bar at the left, the number of sites you have in your account appears next to the Web Sites icon, and the number of databases appears next to the SQL Databases icon.
Deploy the application to Azure
- In Visual Studio, right-click the project in Solution Explorer and select Publish from the context menu.

- In the Profile tab of the Publish Web wizard, click Import.
If you have not previously added your Azure subscription in Visual Studio, perform the following steps. These steps enable Visual Studio to connect to your Azure subscription so that the drop-down list under Import from an Azure web site will include your web site.
As an alternative, you can sign in directly to your Azure account without downloading a subscription file. To use this method, click Sign In instead of Manage subscriptions in the next step. This alternative is simpler, but as this tutorial is being written in November, 2013, only the subscription file download enables Server Explorer to connect to Azure SQL Database.
a. In the Import Publish Profile dialog box, click Manage subscriptions.

b. In the Manage Azure Subscriptions dialog box, click the Certificates tab, and then click Import.

c. In the Import Azure Subscriptions dialog box, click Download subscription file .

d. In your browser window, save the .publishsettings file.

Security Note: The publishsettings file contains your credentials (unencoded) that are used to administer your Azure subscriptions and services. The security best practice for this file is to store it temporarily outside your source directories (for example in the Downloads folder), and then delete it once the import has completed. A malicious user who gains access to the
.publishsettingsfile can edit, create, and delete your Azure services.e. In the Import Azure Subscriptions dialog box, click Browse and navigate to the .publishsettings file.

e. Click Import.

Close the Manage Azure Subscriptions box.
In the Import Publish Profile dialog box, select Import from an Azure web site, select your web site from the drop-down list, and then click OK.

- In the Connection tab, click Validate Connection to make sure that the settings are correct.

- When the connection has been validated, a green check mark is shown next to the Validate Connectionbutton. Click Next.

- Open the Remote connection string drop-down list under SchoolContext and select the connection string for the database you created.
- Select Execute Code First Migrations (runs on application start).

This setting causes the deployment process to automatically configure the application Web.config file on the destination server so that Code First uses the
MigrateDatabaseToLatestVersioninitializer class. - Click Next.
- In the Preview tab, click Start Preview.

The tab displays a list of the files that will be copied to the server. Displaying the preview isn't required to publish the application but is a useful function to be aware of. In this case, you don't need to do anything with the list of files that is displayed. The next time you deploy this application, only the files that have changed will be in this list.
- Click Publish.
Visual Studio begins the process of copying the files to the Azure server. - The Output window shows what deployment actions were taken and reports successful completion of the deployment.

- Upon successful deployment, the default browser automatically opens to the URL of the deployed web site.
The application you created is now running in the cloud. Click the Students tab.
At this point your SchoolContext database has been created in the Azure SQL Database because you selectedExecute Code First Migrations (runs on app start). The Web.config file in the deployed web site has been changed so that the MigrateDatabaseToLatestVersion initializer runs the first time your code reads or writes data in the database (which happened when you selected the Students tab):
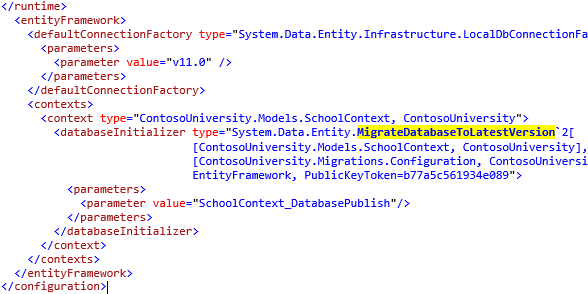
The deployment process also created a new connection string (SchoolContext_DatabasePublish) for Code First Migrations to use for updating the database schema and seeding the database.

You can find the deployed version of the Web.config file on your own computer inContosoUniversity\obj\Release\Package\PackageTmp\Web.config. You can access the deployed Web.config file itself by using FTP. For instructions, see ASP.NET Web Deployment using Visual Studio: Deploying a Code Update. Follow the instructions that start with "To use an FTP tool, you need three things: the FTP URL, the user name, and the password."

Advanced Migrations Scenarios
If you deploy a database by running migrations automatically as shown in this tutorial, and you are deploying to a web site that runs on multiple servers, you could get mutiple servers trying to run migrations at the same time. Migrations are atomic, so if two servers try to run the same migration, one will succeed and the other will fail (assuming the operations can't be done twice). In that scenario if you want to avoid those issues, you can call migrations manually and set up your own code so that it only happens once. For more information, see Running and Scripting Migrations from Code on Rowan Miller's blog and Migrate.exe (for executing migrations from the command line) on MSDN.
For information about other migrations scenarios, see Migrations Screencast Series.
Code First Initializers
In the deployment section you saw the MigrateDatabaseToLatestVersion initializer being used. Code First also provides other initializers, including CreateDatabaseIfNotExists (the default), DropCreateDatabaseIfModelChanges(which you used earlier) and DropCreateDatabaseAlways. The DropCreateAlways initializer can be useful for setting up conditions for unit tests. You can also write your own initializers, and you can call an initializer explicitly if you don't want to wait until the application reads from or writes to the database. At the time this tutorial is being written in November, 2013, you can only use the Create and DropCreate initializers before you enable migrations. The Entity Framework team is working on making these initializers usable with migrations as well.
For more information about initializers, see Understanding Database Initializers in Entity Framework Code First and chapter 6 of the book Programming Entity Framework: Code First by Julie Lerman and Rowan Miller.
Summary
In this tutorial you've seen how to enable migrations and deploy the application. In the next tutorial you'll begin looking at more advanced topics by expanding the data model.
Please leave feedback on how you liked this tutorial and what we could improve. You can also request new topics atShow Me How With Code.
Links to other Entity Framework resources can be found in ASP.NET Data Access - Recommended Resources.
This article was originally created on March 7, 2014
- [13]使用 MVC 5 的 EF6 Code First 入门 系列:补充:Deploy to Azure
- 使用MVC 5的EF6 Code First入门系列:为ASP.NET MVC应用程序处理并发
- MVC 5 的 EF6 Code First 入门
- [02] 使用 MVC 5 的 EF6 Code First 入门 系列:实现基本的CRUD功能
- [01] 使用 MVC 5 的 EF6 Code First 入门 系列:建立一个EF数据模型
- [03] 使用 MVC 5 的 EF6 Code First 入门 系列:排序、筛选和分页
- [09] 使用 MVC 5 的 EF6 Code First 入门 系列:为ASP.NET MVC应用程序使用异步及存储过程
- [12] 使用 MVC 5 的 EF6 Code First 入门 系列:为ASP.NET MVC应用程序使用高级功能
- [06] 使用 MVC 5 的 EF6 Code First 入门 系列:为ASP.NET MVC应用程序创建更复杂的数据模型
- [07] 使用 MVC 5 的 EF6 Code First 入门 系列:为ASP.NET MVC应用程序读取相关数据
- [08] 使用 MVC 5 的 EF6 Code First 入门 系列:为ASP.NET MVC应用程序更新相关数据
- [10] 使用 MVC 5 的 EF6 Code First 入门 系列:为ASP.NET MVC应用程序处理并发
- [11] 使用 MVC 5 的 EF6 Code First 入门 系列:为ASP.NET MVC应用程序实现继承
- [05] 使用 MVC 5 的 EF6 Code First 入门 系列:MVC程序中实体框架的Code First迁移和部署
- [04] 使用 MVC 5 的 EF6 Code First 入门 系列:MVC程序中实体框架的连接恢复和命令拦截
- Asp.net Mvc 使用EF6 code first 方式连接MySQL总结
- MVC中code first方式开发,数据库的生成与更新(Ef6)
- MVC中code first方式开发,数据库的生成与更新(Ef6)
- 多线程C调用python api的陷阱
- ThinkPHP3.2.3验证码
- 需要团队
- Windows API GetUserNameEx 函数使用
- 给TextView加上多彩效果:改变部分字体的大小和颜色
- [13]使用 MVC 5 的 EF6 Code First 入门 系列:补充:Deploy to Azure
- js用正则表达式来验证表单(比较齐全的资源),JS正则test()方法
- truncate与delete的区别
- 手把手教你把pomelo客户端组件libpomelo加入cocos2d-x 3.0项目(Windows、Android、IOS平台)
- Android Studio常用快捷键整理
- 【Nginx】Nginx下的Yii部署
- java nio学习(七)
- [Leetcode] 2 - Add Two Numbers
- opencv学习笔记9 直方图均衡化并绘制直方图