Spring学习 HTTP Invoker
来源:互联网 发布:软件测试的出路 编辑:程序博客网 时间:2024/06/17 05:23
RMI:使用JRMP协议(基于TCP/IP),不允许穿透防火墙,使用JAVA系列化方式,使用于任何JAVA应用之间相互调用。
Hessian:使用HTTP协议,允许穿透防火墙,使用自己的系列化方式,支持JAVA、C++、.Net等跨语言使用。
Burlap: 与Hessian相同,只是Hessian使用二进制传输,而Burlap使用XML格式传输(两个产品均属于caucho公司的开源产品)。
Spring HTTP Invoker: 使用HTTP协议,允许穿透防火墙,使用JAVA系列化方式,但仅限于Spring应用之间使用,即调用者与被调用者都必须是使用Spring框架的应用。
/* <p><b>HTTP invoker is the recommended protocol for Java-to-Java remoting.</b>* It is more powerful and more extensible than Hessian and Burlap, at the* expense of being tied to Java. Nevertheless, it is as easy to set up as* Hessian and Burlap, which is its main advantage compared to RMI.*/代码结构图如下:

客户端通过Spring的HttpInvoker,完成对远程函数的调用。涉及的类有:
客户端调用User类的服务UserService,完成对实现类UserServiceImpl的addUser(User u)方法调用。其中User类为普通Pojo对象,UserService为接口,UserServiceImpl为UserService的具体实现。代码如下:
public interface UserService {
void addUser(User u);
}
public class UserServiceImpl implements UserService {
public void addUser(User u) {
System.out.println(“add user ["+u.getUsername()+ "] ok !!!”);
}
}
客户端调用时,主方法代码为:
public static void main(String[] args) throws Exception {
ClassPathXmlApplicationContext ctx = new ClassPathXmlApplicationContext(
new String[] {“ApplicationContext.xml” });
UserService us = (UserService)ctx.getBean(“ServletProxy”);
us.addUser(new User(“Hook1″));
UserService us2 = (UserService)ctx.getBean(“UrlPathProxy”);
us2.addUser(new User(“Hook2″));
}
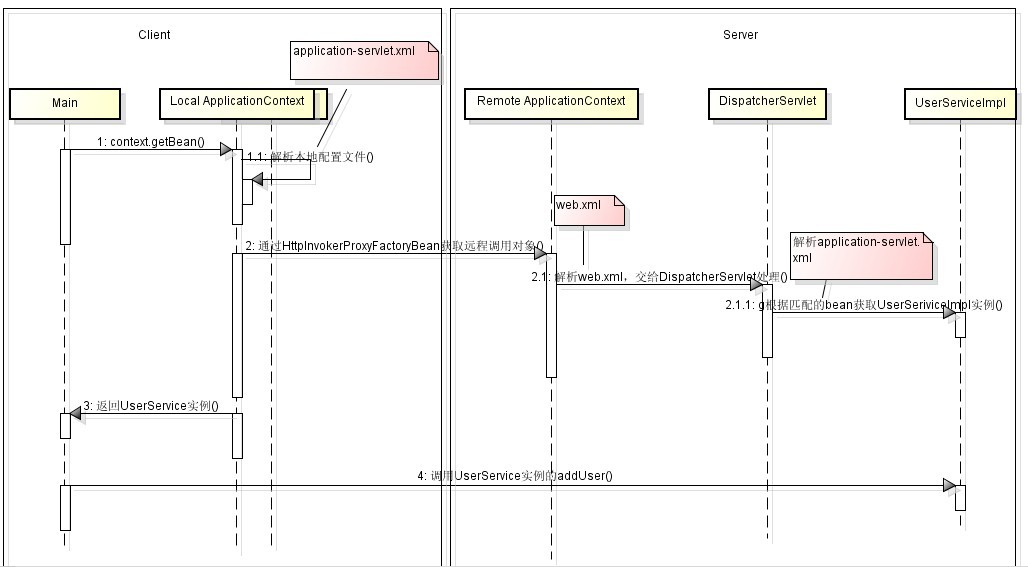
其调用流程用时序图可表示为:
图中粉红色表示基于Url映射方式的配置时程序的处理流程,红色表示基于Servlet配置时的处理流程。
当以示基于Url映射方式的配置时,远程系统处理请求的方式同SpringMVC的controller类似,所有的请求通过在web.xml中的org.springframework.web.servlet.DispatcherServlet统一处理,根据url映射,去对应的【servlet名称-servlet.xml】文件中,查询跟请求的url匹配的bean配置;而基于Servlet配置时,由org.springframework.web.context.support.HttpRequestHandlerServlet去拦截url-pattern匹配的请求,如果匹配成功,去ApplicationContext中查找name与servlet-name一致的bean,完成远程方法调用。
当使用URL映射配置时,实力配置如下(application-servlet.xml):
<bean name=”/userHttpInvokerService” class=”org.springframework.remoting.httpinvoker.HttpInvokerServiceExporter”>
<property name=”service” ref=”userService”/>
<property name=”serviceInterface” value=”com.handou.httpinvoker.service.UserService”/>
</bean>
web.xml文件配置:
<servlet>
<servlet-name>application</servlet-name>
<servlet-class>org.springframework.web.servlet.DispatcherServlet</servlet-class>
<load-on-startup>1</load-on-startup>
</servlet>
<servlet-mapping>
<servlet-name>application</servlet-name>
<url-pattern>/*</url-pattern>
</servlet-mapping>
如果使用基于Servlet的配置,web.xml文件配置如下:
<!– 基于servlet配置时使用 ,根据请求的url匹配url-pattern,如果匹配成功,去ApplicationContext
中查找name与servlet-name一致的bean–>
<servlet>
<servlet-name>userHttpInvokerService</servlet-name>
<servlet-class>org.springframework.web.context.support.HttpRequestHandlerServlet</servlet-class>
</servlet>
<servlet-mapping>
<servlet-name>userHttpInvokerService</servlet-name>
<url-pattern>/UserHttpInvokerService</url-pattern>
</servlet-mapping>
applicationContext.xml文件中配置如下:
<bean id=”userService” class=”com.handou.httpinvoker.service.UserServiceImpl” />
<!–第二种配置方式 –>
<bean name=”userHttpInvokerService”
class=”org.springframework.remoting.httpinvoker.HttpInvokerServiceExporter”>
<property name=”service” ref=”userService”/>
<property name=”serviceInterface” value=”com.handou.httpinvoker.service.UserService”/>
</bean>
两种方式,客户端配置均相同:
<bean id=”ServletProxy”
class=”org.springframework.remoting.httpinvoker.HttpInvokerProxyFactoryBean”>
<property name=”serviceUrl”>
<value>http://localhost:8080/HttpInvoke/UserHttpInvokerService</value>
</property>
<property name=”serviceInterface”>
<value>com.handou.httpinvoker.service.UserService</value>
</property>
</bean>
具体可参考源码 :点击下载
==========================================================================================================================
Spring HTTP Invoker是spring框架中的一个远程调用模型,执行基于HTTP的远程调用,也就是说,可以通过防火墙,并使用java的序列化机制在网络间传递对象。客户端可以很轻松的像调用本地对象一样调用远程服务器上的对象,要注意的一点是,服务端、客户端都是使用Spring框架。下面通过一个例子,来 讲解Spring HTTP Invoker的使用,这里使用的是 Spring2.5.6 框架。
Spring HTTP Invoker的整体流程如下 (下图显示整个调用的过程)
- 客户端
- 向服务器发送远程调用请求
远程调用信息-->封装为远程调用对象-->序列化写入到远程调用http请求中-->向服务器端发送 - 接收服务器端返回的远程调用结果
服务器端返回的远程调用结果HTTP响应——>反序列化为远程调用结果对象
- 向服务器发送远程调用请求
- 服务端
- 接收客户端发送的远程调用请求
客户端发送的远程调用HTTP请求——>反序列化为远程调用对象——>调用服务器端目标对象的目标方法处理 - 向客户端返回远程调用结果
服务器端目标对象方法的处理结果——>序列化写入远程调用结果HTTP响应中——>返回给客户端。
- 接收客户端发送的远程调用请求
Spring HTTP Invoker有两种实现方式
- 基于Url映射方式,远程系统处理请求的方式同SpringMVC的controller类似,所有的请求通过在web.xml中的 org.springframework.web.servlet.DispatcherServlet统一处理,根据url映射,去对应的 【servlet名称-servlet.xml】文件中,查询跟请求的url匹配的bean配置
- 基于Servlet方式,由org.springframework.web.context.support.HttpRequestHandlerServlet去拦截url- pattern匹配的请求,如果匹配成功,去ApplicationContext中查找name与servlet-name一致的bean,完成远程方法调用。
- 建立web项目
- 导入jar包
- spring.jar
- spring-webmvc.jar
- commons-logging-1.1.2.jar
- 在web.xml新增如下配置文件12345678910
<servlet><servlet-name>application</servlet-name><servlet-class>org.springframework.web.servlet.DispatcherServlet</servlet-class><load-on-startup>1</load-on-startup></servlet><servlet-mapping><servlet-name>application</servlet-name><url-pattern>/*</url-pattern></servlet-mapping> - 在WEB-INF下增加application-servlet.xml (注意xml文件的命名,这里的application要和servlet-name名字保持一致)配置如下1234567891011121314151617181920
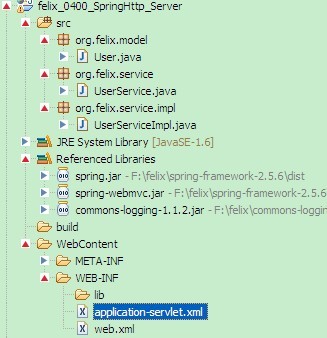
<?xmlversion="1.0"encoding="UTF-8"?><!DOCTYPEbeans PUBLIC "-//SPRING//DTD BEAN 2.0//EN""http://www.springframework.org/dtd/spring-beans-2.0.dtd"><beans><beanid="userService"class="org.felix.service.impl.UserServiceImpl"/><!-- 基于Url映射方式,这个配置,就是把userService接口,提供给远程调用 --><beanid="httpService"class="org.springframework.remoting.httpinvoker.HttpInvokerServiceExporter"><propertyname="service"ref="userService"/><propertyname="serviceInterface"value="org.felix.service.UserService"/></bean><!-- 远程服务的URL --><beanclass="org.springframework.web.servlet.handler.SimpleUrlHandlerMapping"><propertyname="mappings"><props><propkey="/test">httpService</prop></props></property></bean></beans> - 建立相关类和包结构,如下图所示
- 各类代码如下
User类,需要实现Serializable 接口UserService接口1234567891011121314151617181920212223242526packageorg.felix.model;importjava.io.Serializable;publicclassUserimplementsSerializable {/****/privatestaticfinallongserialVersionUID = 1L;privateString name;privateString password;publicString getName() {returnname;}publicvoidsetName(String name) {this.name = name;}publicString getPassword() {returnpassword;}publicvoidsetPassword(String password) {this.password = password;}}UserService接口的实现类UserServiceImpl1234567packageorg.felix.service;importorg.felix.model.User;publicinterfaceUserService {voidadd(User u);}12345678910111213packageorg.felix.service.impl;importorg.felix.model.User;importorg.felix.service.UserService;publicclassUserServiceImplimplementsUserService {@Overridepublicvoidadd(User u) {System.out.println("add user["+ u.getName() +"]");}}
- 复制服务端工程,重命名一下,工程结构如下图

- 在src目录下新建application-servlet.xml配置如下1234567891011121314
<?xmlversion="1.0"encoding="UTF-8"?><!DOCTYPEbeans PUBLIC "-//SPRING//DTD BEAN 2.0//EN""http://www.springframework.org/dtd/spring-beans-2.0.dtd"><beans><beanid="httpTestService"class="org.springframework.remoting.httpinvoker.HttpInvokerProxyFactoryBean"><propertyname="serviceUrl"><value>http://localhost:8080/felix_0400_SpringHttp_Server/test</value></property><propertyname="serviceInterface"><value>org.felix.service.UserService</value></property></bean></beans> - 新建测试类TestSpringHttp代码如下12345678910111213141516171819
importorg.felix.model.User;importorg.felix.service.UserService;importorg.springframework.context.ApplicationContext;importorg.springframework.context.support.ClassPathXmlApplicationContext;publicclassTestSpringHttp {privatestaticApplicationContext context =newClassPathXmlApplicationContext("application-servlet.xml");publicstaticUserService getUserService(){return(UserService)context.getBean("httpTestService");}publicstaticvoidmain(String[] args) {User user =newUser();user.setName("felix");user.setPassword("felix");getUserService().add(user);}} - 运行程序在控制台输出如下

参考文章
Spring中HttpInvoker远程调用使用实例
Spring HTTP Invoker例子
《Spring技术内幕》学习笔记17——Spring HTTP调用器实现远程调用
- Spring学习 HTTP Invoker
- Spring HTTP Invoker 学习小记
- spring rmi http invoker学习笔记
- Spring HTTP invoker简介
- Spring HTTP invoker简介
- Spring HTTP invoker简介
- Spring HTTP invoker简介
- Spring HTTP invoker简介
- spring http invoker 实践
- Spring Http Invoker
- Spring HTTP invoker RPC
- Spring HTTP Invoker使用
- Spring HTTP Invoker
- Spring HTTP invoker简介
- Spring HTTP Invoker
- Spring Http Invoker
- Spring HTTP Invoker
- Spring HTTP invoker 简介
- 浅析总结 Java 内部类的一些使用与梳理
- MySQL用户及数据安全专题
- SELECT OPTION 向上、下移动、增加、删除
- uva10815安迪的第一个字典
- Qt for iOS,Qt 与Objective C混合编程
- Spring学习 HTTP Invoker
- linux中断处理------顶半部与底半部
- opencv批量输入图片缩放后保存到文件夹里面
- ] 百度地图开发(二)之添加覆盖物 + 地理编码和反地理编码
- LR11安装详解
- 海外优秀资讯抢先看12:世界上最薄的硅材料将为您带来引爆眼球的更快,更小,更高效的计算机芯片
- 物联网安全的重要性
- Android NDK开发Crash错误定位
- 提高Xcode 的编译速度