Android UI Layout 之 AbsoluteLayout
来源:互联网 发布:运城软件开发 编辑:程序博客网 时间:2024/06/04 23:30
Android UI Layout 之 AbsoluteLayout
在 Android UI 中,最基本的构建单位(building block)是 android.view.View。一个 View 占据屏幕上的一个矩形区域,并负责该区域的绘画和事件处理。View 有一些子类,比如 ImageView、TextView 等可分别用来显示图像、文字…… View 还有一个特殊的子类 ViewGroup,ViewGroup 在 UI layout 中充当“容器”的角色,用以“包含”其他 View 以及 ViewGroup:

由于 ViewGroup 是一个 abstract class 无法直接实例化,所以在 layout 中真正充当“容器”角色的应该是 ViewGroup 的子类 :AbsoluteLayout、 FrameLayout、 LinearLayout、 RelativeLayout 等。在实际的 UI 编程中,使用不同的 Layout 类作为容器,对该容器中的各个子 View 的排列方式有很大影响。比如,LinearLayout 中的各个子 View 按照横向或者纵向线性排列;而 AbsoluteLayout 中各个子 View 可以指定以像素为单位的“绝对”位置。AbsoluteLayout 的这种“绝对”定位的布局方式和我们非常熟悉的 Windows 编程中的 SetWindowPos() 或 Form1.Left = 10 的布局方式是一样的,比较简单:
现在我们新建一个 Android 工程中,在其主 Activity 类中添加如下三个成员:
private AbsoluteLayout al;
private TextView tv;
private View v;
改写这个类的 onCreate 方法如下:
public void onCreate(Bundle icicle) {
super.onCreate(icicle);
// 构造一个 AbsoluteLayout,设置其背景色
al = new AbsoluteLayout(this);
al.setBackgroundColor(Color.YELLOW);
// 构造一个 TextView 并设置其 text 和 背景色
tv = new TextView(this);
tv.setText("Android is a software stack for mobile devices that includes an operating system, middleware and key applications. ");
tv.setBackgroundColor(Color.BLUE);
// 用该 View 在父 View 中的 width,height,x,y 作为参数构造一个 AbsoluteLayout.LayoutParams
AbsoluteLayout.LayoutParams tvLP = new AbsoluteLayout.LayoutParams(70, 50, 10, 20);
// 把这个 TextView 加入到 AbsoluteLayout 中,并应用上一步创建的 LayoutParams。这样 TextView 就会显示在我们指定的位置上了。
al.addView(tv, tvLP);
v = new View(this);
v.setBackgroundColor(Color.RED);
AbsoluteLayout.LayoutParams vLP = new AbsoluteLayout.LayoutParams(70, 50, 90, 70);
// 也可以先为子 View 设置 LayoutParams,然后再调用一个参数的 ViewGroup.addView(View) 来添加。效果是一样的。
v.setLayoutParams(vLP);
al.addView(v);
// 设置 al 为本 Activity 的 content
// 这样,在该 Activity 被调用时,就会显示该 AbsoluteLayout 和其子 View
this.setContentView(al);
}
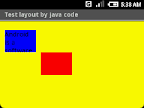
运行效果如下:
- Android UI Layout 之 AbsoluteLayout
- Android UI Layout 之 AbsoluteLayout
- Android Layout之AbsoluteLayout
- Ophone/Android 的UI 布局之AbsoluteLayout,RelativeLayout
- Ophone/Android 的UI 布局之AbsoluteLayout,RelativeLayout
- Android基本之UI Layout
- Android之LinearLayout、AbsoluteLayout
- Android UI之Android Layout XML属性
- android 开发布局之AbsoluteLayout
- Android学习三UI之Layout
- Android UI详解之Layout属性
- AndroidのUI布局之layout weight
- android 动态UI Layout 之 RelativeLayout用法
- Android UI 之 layout(一)初探layout
- UI 之 Basic Layout
- Android : UI Layout
- Android入门第二篇之LinearLayout、AbsoluteLayout
- Android入门第二篇之LinearLayout、AbsoluteLayout
- 获取机器码
- Hibernate级联保存和更新
- ActiveX组件--图形图像--MicroDraw
- [转载,并且格式化页面]Linux守护进程的编程方法
- HTTP-404:Servlet action is not available错误解决
- Android UI Layout 之 AbsoluteLayout
- 利用Oracle构建BI信息板
- 我与VC和Cximage的相识
- 实战 JDOM
- ASP.NET AJAX入门系列(2):使用ScriptManager控件
- VPN中出现“连接管理器未能调用 CMMON32.EXE”错误的解决
- 第一个对话框
- JAVA组件--商业规则--QuickRules
- 都说男人好色