Liferay6.2环境搭建及详细配置精讲
来源:互联网 发布:云转码软件 编辑:程序博客网 时间:2024/06/05 20:05
This post is for you - if you are new to Liferay Portal, but you already have enough experience with Java development using Eclipse.
If you are new to portal, then read what is portal? If you are new to Liferay portal, then readwhat is Liferay Portal? But most of time, we don't understand all theoretical fundamentals until we try something practically. So first attempt should be to setup Liferay environment. There aremultiple options available for Liferay Development, which are covered at depth in developer guide (refer those if you are a beginner java developer).
If you already have good experience with Eclipse IDE and Java development, you can start with Liferay portal development using Eclipse just by following below quick steps.
Environment - Windows 7, Liferay 6.2 CE Bundled with Tomcat, Eclipse Kepler [***NOTE - I have used mentioned environment, but similar steps should work even if you use different OS or Eclipse version]
Step 1 - Make sure you have a supported Java JRE and Eclipse release already installed on your machine
- Java 6.0 JRE or greater.
- Liferay IDE must be run in one of the following Eclipse releases: Eclipse Kepler Java EE (4.3.x), Eclipse Juno Java EE (4.2.x), Eclipse Indigo Java EE (3.7.x)
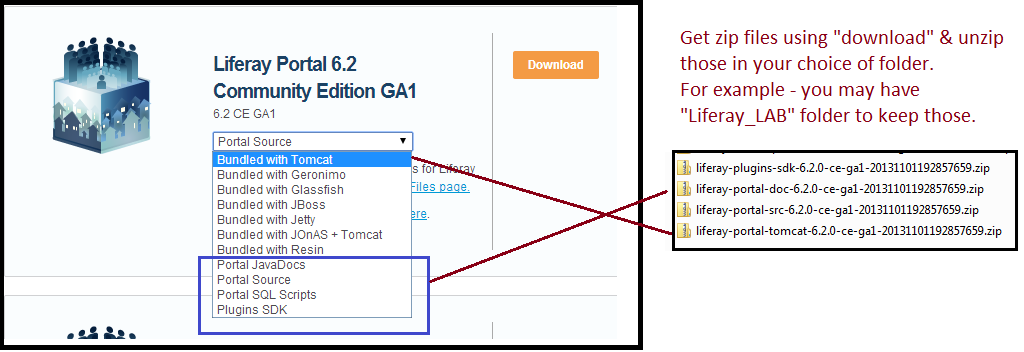
Step 2 - DownloadLiferay & unzip those in your choice of folder (e.g. you may create "Liferay_LAB" folder)
- Portal Bundled with Tomcat (or your choice of server container) as a Liferay runtime environment --- liferay-portal-tomcat-6.2.0-ce-ga1-20131101192857659.zip
- Plugins SDK (software development kit) to develop custom plugins (e.g. portlets, hooks, ext, themes, layout) and deploy on Liferay server --- liferay-plugins-sdk-6.2.0-ce-ga1-20131101192857659.zip
- Portal Documentation --- liferay-portal-doc-6.2.0-ce-ga1-20131101192857659.zip
- Portal Source Code of CE (community edition) --- liferay-portal-src-6.2.0-ce-ga1-20131101192857659.zip
Step 3 - Setup Liferay Portal
- By default it comes with embedded "HSQL" database. However I recommend to configuration it to use your choice of database such as MySQL or MSSQL (Liferay supports range of databases, but for exact supported version you need to refer "Liferay support matrix").
- Portal custom configuration and change database from default "HSQL" to other database:
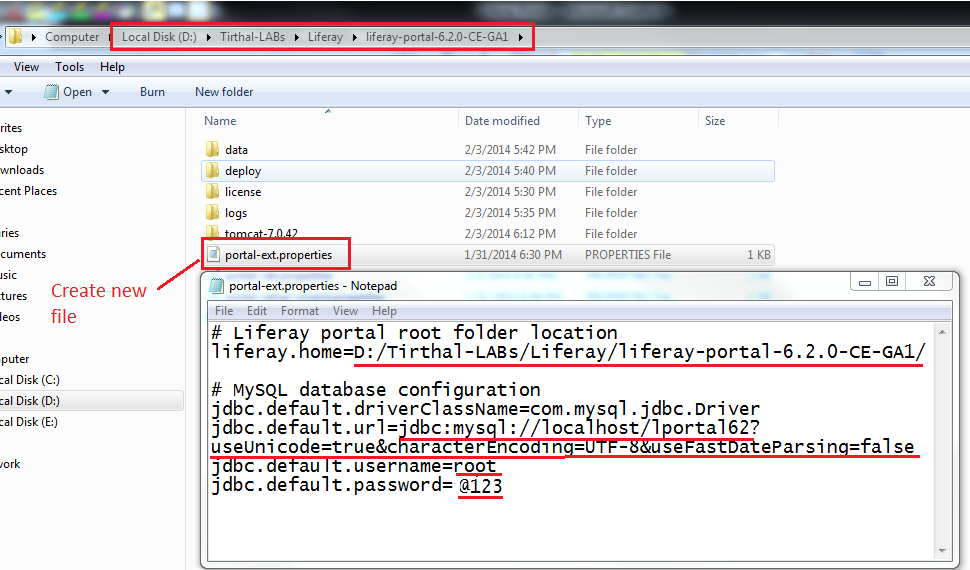
- Create new database with name "lportal62" (or any name you can give) in your selected DB.
- Create new "portal-ext.properties" file in root folder of your Liferay portal server (in the unzipped folder of "liferay-portal-tomcat-6.2.0-ce-ga1-20131101192857659.zip").
- Add below configuration in "portal-ext.properties" file (update it as per your settings). Below configuration is for MySQL, but if you select any other then accordingly mention appropriate values of "jdbc.default.driverClassName" and "jdbc.default.url".
# Liferay portal root folder location
liferay.home=D:/Tirthal-LABs/Liferay/liferay-portal-6.2.0-CE-GA1/
# MySQL database configuration
jdbc.default.driverClassName=com.mysql.jdbc.Driver
jdbc.default.url=jdbc:mysql://localhost/lportal62?useUnicode=true&characterEncoding=UTF-8&useFastDateParsing=false
jdbc.default.username=xxxxx
jdbc.default.password=xxxxx
- Start Liferay Portal - Go to bin folder in tomcat (e.g. liferay-portal-6.2.0-CE-GA1\tomcat-7.0.42\bin) - Run "startup.bat". Wait… wait… It would take few minutes to create required database tables and start the server. When you start liferay portal for the first time, you would see sequence of events as per below screens.
- Database tables are created.

- Some of out-of-box portlet applications are deployed in liferay server and at the end server started successfully.

- Automatically it would open browser with default Liferay screen (If you close by mistake, you can always open it using http://localhost:8080/ url). Now you just validate click "Finish Configuration", which would again take few minutes.

- Database tables are created.
- Now you would see "finished adding data" message.

- Then you would see this page in browser (showing file location where it saved setup wizard settings). Next you just need to click "Go to My Portal".

- Now click "Agree" button and then in next screen save "Password Reminder" answer.

- Congratulations… Finally you would get "Welcome" page of Liferay. If you wish to explore out-of-the-box (OOTB) features of Liferay 6.2, then you can refer Liferay 6.2 User Guide.

- Stop Liferay Portal - Go to bin folder in tomcat (e.g. liferay-portal-6.2.0-CE-GA1\tomcat-7.0.42\bin) - Run "shutdown.bat". In 2-3 minutes, it would stop server and close the command prompt. That's it. [***NOTE - Stop server without fail, as in next step we'll integrate it in Eclipse IDE to start/stop using Eclipse during development.]
Step 4 - Install Liferay Plugins in your Eclipse IDE (3.7 or greater) in same way you install other Eclipse plugins
- The Liferay Eclipse plugins would allow you to integrate Liferay portal server and Liferay plugins SDK with Eclipse IDE. So you can control Liferay plugins projects development and deployment using Eclipse IDE.
- Go to Help - Install New Software… - Enter the update site URL - http://sourceforge.net/projects/lportal/files/Liferay%20IDE/2.0.1%20GA2/updatesite/
- On successful Liferay plugins installation, you would see those in Eclipse IDE as per below screen. Now you can switch to Liferay perspective using Windows -> Open Perspective -> Other -> Select Liferay.

- IMPORTANT NOTE: Firstly I tried "IDE 2.0.0.GA1" in Eclipse Kepler and could install it without any error, but IDE 2.0.0.GA1 was causing problems to open default page of liferay in browser even if liferay server started successfully. Finally "IDE 2.0.1.GA2" installation worked perfectly in Eclipse Kepler. However you can always refer to Liferay IDE page for latest updates -http://www.liferay.com/downloads/liferay-projects/liferay-ide.
Step 5 - Setup Eclipse IDE for Liferay Development Environment
- Configure new Liferay Server = Windows -> Preferences -> Liferay -> Create new Liferay Server -> Select Liferay v6.2 CE Server (Tomcat7) and click Next -> Select Liferay Tomcat directory and click Next -> Select Liferay Javadoc and source code -> click Finish.

- Configure new Liferay Plugin SDK = Windows -> Preferences -> Liferay -> Installed Plugin SDK -> Add (configure unzipped Liferay plugin SDK folder o n your machine as per below screen) -> OK.

Now create a new "build.<username>.properties" (where <username> must match with OS username, for example in Windows OS you can get it by executing "echo %username%" on command prompt) file in your Liferay plugins SDK folder. For example, I created "build.tirthalp.properties" file. Then you can open default "build.xml" file and put required properties to overwrite in "build.<username>.properties" file. For example, I overwritten "app.server.parent.dir=xxxxxxxxxxx", "database.name=lportal62" and "database.types=mysql" to match values with my development setup.
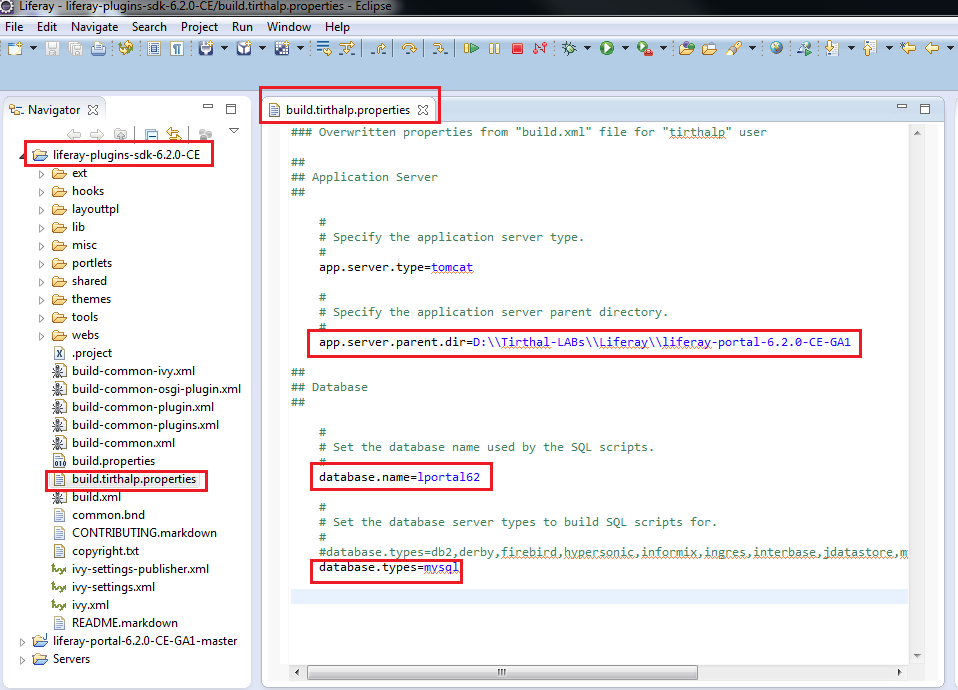
***NOTE - Liferay plugins SDK would facilitate you to create different types of Liferay plugins and deploy it directly in Liferay server using Eclipse IDE, hence ensure doing correct configuration of "build.<username>.properties" file. But at this stage, don't worry about all details of liferay plugins sdk!
- Start the Liferay server in same way you start any integrated server in Eclipse & wait for 2-5 minutes. On successful server startup, you would see "server startup in x ms" message in Console. [***NOTE: This step would create "portal-ide.properties" file automatically in root folder of Liferay portal server. E.g. D:\Tirthal-LABs\Liferay\liferay-portal-6.2.0-CE-GA1\portal-ide.properties).

- Now open "http://localhost:8080/" url in browser and in less than 1-2 minutes you should see default liferay page. Then you can sign-in using default credentials - test@liferay.com / test (email/password).
- Excellent... You completed one time setup steps for Liferay development environment and ready to develop projects for customization/extension of default features of Liferay portal. Now next step would allow you quickly achieve "Hello World" application in Liferay. Then you can refer Liferay 6.2 Developer's Guide to understand different Liferay plug-ins (such as portlets, themes, layouts, hooks and ext) development methodology.
Step 6 - Hello World portlet application - Create, deploy and test in Liferay server
- In Eclipse - Create new Liferay Plugin Project as shown below (or alternatively using File -> New -> Liferay Plugin Project).

- Enter project name as "FirstHelloWorld" and ensure to select the plugin type as "Portlet". Based on previous configurations, other options would be selected automatically such as default location, Plugins type, Liferay runtime. Now click Next.

- Just click "Finish" to create Liferay MVC portlet project.

- You would need to wait for few minutes, until it downloads required dependencies using Ivy. At the end you would see "BUILD SUCCESSFUL" message in Console and "FirstHelloWorld-portlet" project in Package Explorer / Navigator view. The project is located in "portlets" folder of your Liferay Plugins SDK project. Before you proceed to next step, again validate that you didn't miss to add "build.<username>.properties file as mentioned in step-5, because that is required to deploy this portlet in Liferay server using SDK as shown in next step.

- Select "FirstHelloWorld-portlet" and right click Menu would show "Liferay". Click SDK -> deploy.

- It would build the project and copy "FirstHelloWorld-portlet-6.2.0.1.war" file in Liferay portal server. You would see below messages in Console.

- In Liferay server log, you should see messages as below. The "1 portlet for FirstHelloWorld-portlet is available for use" message confirms that it registered and deployed successfully in server.

- Now open "http://localhost:8080/" url in the browser and sign-in using default credentials - test@liferay.com / test (email/password). Then click "+" icon to add created "My First Hello World" portlet application in page of site. Once you add it, you will get some of configuration options for that application. If you sign out, you would not get all such administration options. In short, you already get many out-of-box applications in left panel categories, which you can just add in your page same way you added "My First Hello World" application. It's really easy, so try to add and explore some of out-of-box applications.


- Liferay 6.2 Overview Video - http://www.liferay.com/video?title=video-web-event-liferay-portal-6-2-overview
- Liferay 6.2 User Guide - http://www.liferay.com/documentation/liferay-portal/6.2/user-guide
- Liferay 6.2 Administration Guide - http://www.liferay.com/documentation/liferay-portal/6.2/development

Also Refer
0 0
- Liferay6.2环境搭建及详细配置精讲
- J2EE 工具及配置环境搭建详细步骤
- JDK开发环境搭建及环境变量配置详细教程
- LAMP详细搭建及配置
- TestLink环境搭建及配置
- java环境搭建及配置
- maven环境搭建及配置
- angular4环境搭建及配置
- UiAutomator环境搭建及详细操作
- UiAutomator环境搭建及详细操作
- ORB_SLAM运行详细过程(ubuntu14.04系统和ROS Indigo环境搭建,配置及测试运行)
- 第一讲:scala环境搭建及helloworld解析
- Liferay6初始化安装配置
- liferay6.2 linux环境ext删除与重部署
- Android环境介绍及配置详细大全
- Centos搭建SVN服务器及配置文件(主要讲配置)
- liferay6.2 使用默认方式实现可配置的portlet
- struts1+spring+JPA环境搭建及配置
- (翻译)开始iOS 7中自动布局教程(二)
- Android webview 加载html 页面缩放的问题
- ios 中怎样获取 Unix时间戳
- 内核定时器的使用(好几个例子add_timer) .
- 关于Oracle的技术问答
- Liferay6.2环境搭建及详细配置精讲
- C++笔记:map键值类型,元素删除
- 最简单的Java Post请求
- 条形码/二维码之开源利器ZXing图文介绍 .
- iCloud + UIDocument
- sqlite3中的自增主键和联合主键设置
- 使用热区链接——笔记
- Android开发史上最全笔试面试题
- 公钥与私钥