Handling form submission(处理表单提交)
来源:互联网 发布:java项目需求分析 编辑:程序博客网 时间:2024/06/01 19:22
【原文地址】:https://www.playframework.com/documentation/2.2.x/ScalaForms
一、概述
表单的处理和提交是web应用中非常重要的一块。Play自带功能让处理简单表单变得更容易,并且使得处理复杂表单成为可能。
Play的表单处理方法基于数据绑定的概念。当数据来自POST请求时,Play将会查找格式化的值,并且把它们和一个表单的对象绑定。Play可以用这些绑定的表单为一个case类赋值,也可以调用自定义的验证等。
通常形式的表单是被一个Controller实例直接使用的。但是,表单定义不必精确匹配case类或者模型,因为它们纯粹是为了处理输入,而且为了一个独立的POST而单独使用一个表单也是合理的。
二、导入
为了使用表单,要在你的类中导入以下的包:
import play.api.data._import play.api.data.Forms._
三、表单基础
我们通过以下步骤处理表单:
- 定义一个表单
- 在表单中定义约束条件
- 在一个action中验证表单
- 在一个视图模板中现实表单
- 最后,在视图模板中处理结果(或者错误)
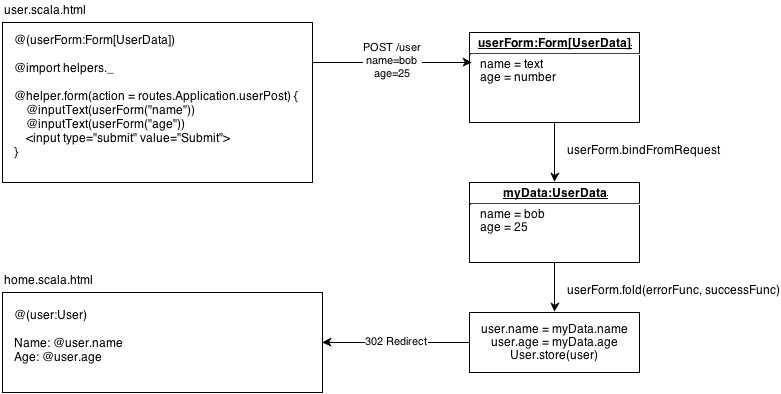
最后的结果会类似于这样:
1、定义一个表单
首先,定义一个包含你表单中需要元素的case类。这儿我们想要获得一个用户(User)的姓名和年龄,所以我们先创建一个UserData的对象:
case class UserData(name: String, age: Int)
现在我们拥有了一个case类,接下来我们要定义一个表单结构。
Form的功能就是把表单数据转化成为一个case类的一个绑定的实例,我们如下定义:
val userForm = Form( mapping( "name" -> text, "age" -> number )(UserData.apply)(UserData.unapply))
表单对象定义了mapping方法。这种方法包含了表单的名称和约束,同时也包含了两个函数:一个apply函数和一个unapply函数。因为UserData是一个case类,我们可以把它的apply和unapply方法直接插入到mapping方法中。
注意:case类至多只能map22种不同的field,根据编译限制 。如果你在表单中的field数目大于22的话,你应该使用list或者嵌套数据拆开你的表单。
一个表单当被给予一个Map时,将会创建一个带有绑定数值的UserData实例:
val anyData = Map("name" -> "bob", "age" -> "21")val userData = userForm.bind(anyData).get但是,大多数时间你会在一个带有请求数据的Action中使用表单。Form中包含bindFromRequest方法,该方法拥有一个作为隐式参数的请求。如果你定义一个隐式请求,那么bindFromRequest将会找到它。val userData = userForm.bindFromRequest.get
注意:有一种使用get的情况,就是当表单无法绑定到数据的时候,get就会抛出一个异常。我们在将在接下来的几段展示一种更安全的处理输入的方法。
你在表单mapping中使用case类不会受到限制。只要apply和unapply方法被正确地map,你就可以传递你喜欢的任何东西,比如使用Forms.tuple mapping或者模板case类的元组。但是,对一个表单明确地定义一个case类还是有很多优点:
- 方便。case类被设计成为简单的数据容器,已经提供了一些与Form功能匹配的特性。
- 强大。元组便于使用,但是不允许被传统的apply或unapply方法使用,而且只能引用包含数字的数据(_1,_2等)。
- 专门针对表单。模板case类的重用会非常方便,但通常模板会包含一些附加的域逻辑,甚至会有一些能导致紧耦合的持久性的细节。另外,如果在表单和模型之间没有一个直接的1:1mapping的话,那么一些敏感的field必须被显式忽略从而避免一次参数篡改攻击。
2、在表单中定义约束条件
text的约束条件为简单的字符串。这意味着name为空也不会报错,但这并不是我们想要的。一种保证name取得正确值的方法就是使用nonEmptyText约束条件。
val userFormConstraints2 = Form( mapping( "name" -> nonEmptyText, "age" -> number(min = 0, max = 100) )(UserData.apply)(UserData.unapply))使用这个表单,如果输入不匹配约束条件的话将会报错:
val boundForm = userFormConstraints2.bind(Map("bob" -> "", "age" -> "25"))<span style="color:#FF0000;"></span>boundForm.hasErrors must beTrue表单对象上定义的一些已有的约束条件:
text: map 为scala.String, 可选择性附加minLength和maxLength.nonEmptyText: map 为scala.String, 可选择性附加minLength和maxLength.number: map 为scala.Int, 可选择性附加min,max, 和strict.longNumber: map 为scala.Long, 可选择性附加min,max, 和strict.bigDecimal:增加精度和规模.date: map 为java.util.Date, 可选择性附加pattern和timeZone.email: map 为scala.String, 使用一个email的正则表达.boolean: map 为scala.Boolean.checked: map 为scala.Boolean.optional: map 为scala.Option.
3、定义ad-hoc约束条件
你可以通过在case类中使用validation包来定义你自己的ad-hoc条件。
val userFormConstraints = Form( mapping( "name" -> text.verifying(nonEmpty), "age" -> number.verifying(min(0), max(100)) )(UserData.apply)(UserData.unapply))
你也可以用case类自身定义ad-hoc约束条件:
def validate(name: String, age: Int) = { name match { case "bob" if age >= 18 => Some(UserData(name, age)) case "admin" => Some(UserData(name, age)) case _ => None }}val userFormConstraintsAdHoc = Form( mapping( "name" -> text, "age" -> number )(UserData.apply)(UserData.unapply) verifying("Failed form constraints!", fields => fields match { case userData => validate(userData.name, userData.age).isDefined }))你也可以选择创建你自己的验证方式。请参照普通验证部分,获取更多细节。
4、在Action中验证表单
现在我们已经有了约束条件了,我们可以在一个action中验证表单,处理错误。
我们使用fold方法来完成上述功能,该方法带有两个函数:第一个是在绑定失败的时候调用,第二个是在绑定成功的时候调用。
userForm.bindFromRequest.fold( formWithErrors => { // binding failure, you retrieve the form containing errors: BadRequest(views.html.user(formWithErrors)) }, userData => { /* binding success, you get the actual value. */ val newUser = models.User(userData.name, userData.age) val id = models.User.create(newUser) Redirect(routes.Application.home(id)) })在失败的情况下,我们提交带有BadRequest的页面,同时将错误作为页面参数传入表单。如果我们使用视图helper(下面会有讨论),那么任何绑定到一个field的错误都会在页面中紧邻该field被提交。
在成功的情况下,我们将发送一个路由到routes.Application.home的Redirect,而不是发送一个视图模板。这种模式叫做POST之后重定向,是一种非常棒的防止表单重复提交的方法。
注意:在使用flashing或者其他使用闪存区域的方法时,“POST之后重定向”是必须的,因为新的cookies只有在重定向的HTTP请求之后才可用。
5、在视图模板中显示表单
一旦你有一个表单,那么你需要让它对于模板引擎是可用的。你可以通过把表单作为视图模板的一个参数来实现。对于user.scala.html,它页面顶部的header将会看起来像这样:
@(userForm: Form[UserData])因为
user.scala.html需要被传入一个表单,你可以在最开始在提交user.scala.html的时候传入一个空的userForm:def index = Action { Ok(views.html.user(userForm))}第一件事就是要创建一个表单标签。它是一个用来创建表单标签和根据你传入的反向路由设置action和方法标签参数的简单的视图helper@helper.form(action = routes.Application.userPost()) { @helper.inputText(userForm("name")) @helper.inputText(userForm("age"))}你可以在views.html.helper包里面找到许多输入的helper。你用表单的field填充它们,它们就会显示相应的HTML输入、设置、值、约束条件和绑定失败时报的错误。
注意:你可以在模板中使用@import helper._来避免在helper之前加@helper.
有许多输入helper,但是最有用的有:
form: 提交一个form 元素.inputText:提交一个text input 元素.inputPassword:提交一个password input 元素.inputDate:提交一个date input 元素.inputFile:提交一个file input 元素.inputRadioGroup:提交一个radio input 元素.select:提交一个select 元素.textarea:提交一个textarea 元素.checkbox: 提交一个checkbox元素.input:提交一个一般的 input元素 (需要显式参数).
@helper.inputText(userForm("name"), 'id -> "name", 'size -> 30)上文提到的一般的输入helper允许你为期望得到的HTML结果编码:@helper.input(userForm("name")) { (id, name, value, args) => <input type="text" name="@name" id="@id" @toHtmlArgs(args)>}注意:除非你使用_字符开始,否则所有的额外参数都会被附加在生成的Html中。以_开始的参数是为field构造参数保留的。对于复杂的表单元素,你也可以创建你自己的传统的视图helper(在views包里面使用scala类)和field构造器。
6、在视图模板中显示错误
表单中的错误表现为Map[String,FormError],其中FormError有:
key: 应该与field相同.message: 一个消息或者消息主键.args: 消息的参数列表.
表单错误在绑定的表单实例中被如下使用:
errors:作为Seq[FormError]返回所有错误.globalErrors:返回没有任何主键作为Seq[FormError]的错误.error("name"):返回第一个作为Option[FormError]绑定到主键的错误.errors("name"):返回所有作为Seq[FormError]绑定到主键的错误.
被关联到field的错误将会通过表单helper自动提交,因此,有错误的@helper.inputText将会显示如下
<dl class="error" id="age_field"> <dt><label for="age">Age:</label></dt> <dd><input type="text" name="age" id="age" value=""></dd> <dd class="error">This field is required!</dd> <dd class="error">Another error</dd> <dd class="info">Required</dd> <dd class="info">Another constraint</dd></dl>
没有被绑定到主键的全局错误(global errors)没有一个helper,而且必须在页面上显式定义:
@if(userForm.hasGlobalErrors) { <ul> @userForm.globalErrors.foreach { error => <li>error.message</li> } </ul>}7、使用元组(tuples)Mapping
在你的field中,你可以使用元组代替case类:
val userFormTuple = Form( tuple( "name" -> text, "age" -> number ) // tuples come with built-in apply/unapply)使用元组比定义case类更加方便,尤其是对于数量较少的元组:
val anyData = Map("name" -> "bob", "age" -> "25")val (name, age) = userFormTuple.bind(anyData).get8、使用单个元素(single)Mapping
只有值比较多的时候才使用元组。如果在表单中只有一个field,使用Forms.single来map一个值,而不用额外开销一个case类或者元组:
val singleForm = Form( single( "email" -> email ))val email = singleForm.bind(Map("email", "bob@example.com")).get9、填写值
有时候你会想着用存在的值去填充一个表单,典型的情形就是编辑数据:
val filledForm = userForm.fill(UserData("Bob", 18))当你通过视图helper使用它时,元素的值将会被填充为:@helper.inputText(filledForm("name")) @* will render value="Bob" *@填充对于那些需要值的map列表的helper尤其有用,比如select和inputRadioGroup的helper。可以选择list,map和pair为这些helper赋值。10、嵌套值
一个表单mapping可以通过在已有的mapping中使用Forms.mapping来定义嵌套值:
case class AddressData(street: String, city: String)case class UserAddressData(name: String, address: AddressData)val userFormNested: Form[UserAddressData] = Form( mapping( "name" -> text, "address" -> mapping( "street" -> text, "city" -> text )(AddressData.apply)(AddressData.unapply) )(UserAddressData.apply)(UserAddressData.unapply))注意:当你通过这种方式使用嵌套值时,由浏览器发送的表单值必须被命名为类似
address.street,address.city等。@helper.inputText(userFormNested("name"))@helper.inputText(userFormNested("address.street"))@helper.inputText(userFormNested("address.city"))11、重复值
一个表单mapping可以通过使用Forms.list或者Forms.seq来定义重复值:
case class UserListData(name: String, emails: List[String])val userFormRepeated = Form( mapping( "name" -> text, "emails" -> list(email) )(UserListData.apply)(UserListData.unapply))当你这样使用重复值时,被浏览器发送的重复值必须被命名为
emails[0],emails[1],emails[2]等。现在你必须使用repeat helper生成和emails field一样多的输入:
@helper.inputText(myForm("name"))@helper.repeat(myForm("emails"), min = 1) { emailField => @helper.inputText(emailField)}min参数允许你显示一个fileld的最小数量,即使相应的表单数据为空。12、可选值
一个表单mapping也可以通过使用Forms.optional来定义可选值:
case class UserOptionalData(name: String, email: Option[String])val userFormOptional = Form( mapping( "name" -> text, "email" -> optional(email) )(UserOptionalData.apply)(UserOptionalData.unapply))
这个的mapping在输出中可以map到一个Option[A],如果没有发现表单值的话该选项为None。
13、默认值
你可以使用Form#fill通过初始值来验证表单:
val filledForm = userForm.fill(User("Bob", 18))或者你可以使用Forms.default为数字定义一个默认的mapping:
Form( mapping( "name" -> default(text, "Bob") "age" -> default(number, 18) )(User.apply)(User.unapply))
14、忽略值
如果你想让一个表单的一个field拥有一个静态值,那就使用Forms.ignored:
val userFormStatic = Form( mapping( "id" -> ignored(23L), "name" -> text, "email" -> optional(email) )(UserStaticData.apply)(UserStaticData.unapply))
四、归总
Play有一些表单示例程序在/samples/scala/forms下,其中有一些非常有用的例子讲的是怎样生成复杂的表单。作为例子,这是Contacts的controller。
得到了一个case类Contact:
case class Contact(firstname: String, lastname: String, company: Option[String], informations: Seq[ContactInformation])case class ContactInformation(label: String, email: Option[String], phones: List[String])注意到Contact包含一个
拥有ContactInformation元素的Seq和一个String的List。在这种情况下,我们可以把嵌套mapping和重复mapping(分别通过Forms.seq和Forms.list定义)结合起来。val contactForm: Form[Contact] = Form( // Defines a mapping that will handle Contact values mapping( "firstname" -> nonEmptyText, "lastname" -> nonEmptyText, "company" -> optional(text), // Defines a repeated mapping "informations" -> seq( mapping( "label" -> nonEmptyText, "email" -> optional(email), "phones" -> list( text verifying pattern("""[0-9.+]+""".r, error="A valid phone number is required") ) )(ContactInformation.apply)(ContactInformation.unapply) ) )(Contact.apply)(Contact.unapply))这段代码展示了一个已经存在的contact怎样使用被填充的数据在表单中显示:def editForm = Action { val existingContact = Contact( "Fake", "Contact", Some("Fake company"), informations = List( ContactInformation( "Personal", Some("fakecontact@gmail.com"), List("01.23.45.67.89", "98.76.54.32.10") ), ContactInformation( "Professional", Some("fakecontact@company.com"), List("01.23.45.67.89") ), ContactInformation( "Previous", Some("fakecontact@oldcompany.com"), List() ) ) ) Ok(views.html.contact.form(contactForm.fill(existingContact)))}下一篇:Protecting against Cross Site Request Forgery
- Handling form submission(处理表单提交)
- Handling duplicate form submission in Spring MVC
- Handling duplicate form submission in Spring MVC
- html form表单提交处理
- easyUI的form表单重复提交处理
- form表单put方式提交处理
- 基于annotation注解的Spring3 MVC Form Handling Example之二表单提交学习笔记
- form表单button自动提交表单处理方法
- Servlet (处理form表单)
- 两个form表单同时提交(示例)
- (14)使用Ajax 提交 Form表单
- form表单回车自动提交(禁止)
- MVC提交Form表单(方法一)
- js提交form表单(Javascript)
- 批量添加数据(Form表单提交)
- form表单的提交!!!
- form 表单提交
- Form表单提交方法
- POJ1753 Flip Game 枚舉
- 软件工程师必须掌握的知识结构
- ZOJ 3644 Kitty's Game (DP)
- RFID第6周作业
- 多级树集合分裂(SPIHT)算法的过程详解与Matlab实现
- Handling form submission(处理表单提交)
- 设计之禅 基本原则
- OneDayOneClass----UIStepper
- Android初学习 - 颜色对应的xml配置值,颜色表
- 黑马程序员—【Java基础篇】之语言基础———关键字、标识符、注释、常量和变量及运算符
- Android实现自定义带文字和图片的Button
- Android 夜间模式实现(二)
- 蓝桥杯——算法训练 十六进制转八进制
- 二叉树的遍历(一)