PyQt4中的布局管理 (入门较好2)
来源:互联网 发布:kali linux能做什么 编辑:程序博客网 时间:2024/06/03 13:20
http://www.blogjava.net/glorywine/archive/2008/07/30/217842.html
布局是GUI程序开发中非常重要的一个环节, 而布局管理就是要规划如何在窗口中放置需要的部件. PyQt4中就有两种方法来完成布局任务,一个是绝对位置(absolute positioning), 另一个就是使用布局类(layout classes).
绝对位置(absolute positioning)
这种方法就需要程序员在程序中指定每个部件的坐标位置和大小. 在这里有几个注意事项.
- 指定了坐标和大小的部件是不能够随着窗口大小的变化而变化的.
- 程序在不同的操作系统平台上也许会有所变化.
- 改变字体可能会引起布局的混乱.
- 如果需要改变当前的布局, 就需要重新编码, 这意味着非常大的工作量.
1 #!/usr/bin/python
2
3 # absolute.py
4
5 import sys
6 from PyQt4 import QtGui
7
8 class Absolute(QtGui.QWidget):
9 def __init__(self, parent=None):
10 QtGui.QWidget.__init__(self, parent)
11
12 self.setWindowTitle('Communication')
13
14 label = QtGui.QLabel('Could\'t', self)
15 label.move(15, 10)
16
17 label = QtGui.QLabel('care', self)
18 label.move(35, 40)
19
20 label = QtGui.QLabel('less', self)
21 label.move(55, 65)
22
23 label = QtGui.QLabel('And', self)
24 label.move(115, 65)
25
26 label = QtGui.QLabel('then', self)
27 label.move(135, 45)
28
29 label = QtGui.QLabel('you', self)
30 label.move(115, 25)
31
32 label = QtGui.QLabel('kissed', self)
33 label.move(145, 10)
34
35 label = QtGui.QLabel('me', self)
36 label.move(215, 10)
37
38 self.resize(250, 150)
39
40 app = QtGui.QApplication(sys.argv)
41 qb = Absolute()
42 qb.show()
43 sys.exit(app.exec_())
在这里, 就是简单的调用move()方法来指定部件的放置坐标. 坐标的顶点就在窗口的左上角, x由左向右不断增大, y由上到下不断增大.

Figure: absolute positioning
Box Layout
使用布局类进行布局管理是一件非常轻松的事情. 最基本的布局类就是QHboxLayout和VHBoxLayout. 他们将部件线性的水平或垂直排列.
这里假设我们要将两个按钮放在窗口的右下方, 要实现这样的布局, 使用一个QHBoxLayout和一个QVBoxLayout, 而其他的空间, 通过添加stretch factor来实现.
1 #!/usr/bin/python
2
3 # boxlayout.py
4
5 import sys
6 from PyQt4 import QtGui
7
8 class BoxLayout (QtGui.QWidget):
9 def __init__(self, parent=None):
10 QtGui.QWidget.__init__(self, parent)
11
12 self.setWindowTitle('boxlayout')
13
14 ok = QtGui.QPushButton('OK')
15 cancel = QtGui.QPushButton('Cancel')
16
17 hbox = QtGui.QHBoxLayout()
18 hbox.addStretch(1)
19 hbox.addWidget(ok)
20 hbox.addWidget(cancel)
21
22 vbox = QtGui.QVBoxLayout()
23 vbox.addStretch(1)
24 vbox.addLayout(hbox)
25
26 self.setLayout(vbox)
27
28 self.resize(300, 150)
29
30 app = QtGui.QApplication(sys.argv)
31 qb = BoxLayout()
32 qb.show()
33 sys.exit(app.exec_())
ok = QtGui.QPushButton( ' OK ' )
cancel = QtGui.QPushButton( ' Cancel ' )
创建两个按钮 cancel = QtGui.QPushButton( ' Cancel ' )
hbox = QtGui.QHBoxLayout()
hbox.addStretch( 1 )
hbox.addWidget(ok)
hbox.addWidget(cancel)
创建一个水平的box layout. 然后添加stretch factor和两个按钮.hbox.addStretch( 1 )
hbox.addWidget(ok)
hbox.addWidget(cancel)
vbox = QtGui.QVBoxLayout()
vbox.addStretch( 1 )
vbox.addLayout(hbox)
创建最后的布局类, 将水平的布局类放入到垂直的布局类当中. vbox.addStretch( 1 )
vbox.addLayout(hbox)
self.setLayout(vbox)
最后, 将窗口的布局设定为垂直布局. 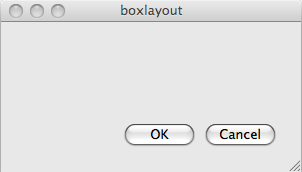
Figure: box layout
QGridLayout
最常用的布局类应当是QGridLayout, 他将窗口分成不同的行和列.
1 #!/usr/bin/python
2
3 # gridlayout.py
4
5 import sys
6 from PyQt4 import QtGui
7
8 class GridLayout(QtGui.QWidget):
9 def __init__(self, parent=None):
10 QtGui.QWidget.__init__(self, parent)
11
12 self.setWindowTitle('grid layout')
13
14 names = ['Cls', 'Bck', '', 'Close', '7', '8', '9', '/',
15 '4', '5', '6', '*', '1', '2', '3', '-',
16 '0', '.', '=', '+']
17
18 grid = QtGui.QGridLayout()
19
20 j = 0
21 pos = [
22 (0, 0), (0, 1), (0, 2), (0, 3),
23 (1, 0), (1, 1), (1, 2), (1, 3),
24 (2, 0), (2, 1), (2, 2), (2, 3),
25 (3, 0), (3, 1), (3, 2), (3, 3),
26 (4, 0), (4, 1), (4, 2), (4, 3)
27 ]
28
29 for i in names:
30 button = QtGui.QPushButton(i)
31 if j == 2:
32 grid.addWidget(QtGui.QLabel(''), 0, 2)
33 else:
34 grid.addWidget(button, pos[j][0], pos[j][1])
35 j = j + 1
36
37 self.setLayout(grid)
38
39 app = QtGui.QApplication(sys.argv)
40 qb = GridLayout()
41 qb.show()
42 sys.exit(app.exec_())
在这个例子中, 创建了很多按钮, 用来填充相应的grid. 2
3 # gridlayout.py
4
5 import sys
6 from PyQt4 import QtGui
7
8 class GridLayout(QtGui.QWidget):
9 def __init__(self, parent=None):
10 QtGui.QWidget.__init__(self, parent)
11
12 self.setWindowTitle('grid layout')
13
14 names = ['Cls', 'Bck', '', 'Close', '7', '8', '9', '/',
15 '4', '5', '6', '*', '1', '2', '3', '-',
16 '0', '.', '=', '+']
17
18 grid = QtGui.QGridLayout()
19
20 j = 0
21 pos = [
22 (0, 0), (0, 1), (0, 2), (0, 3),
23 (1, 0), (1, 1), (1, 2), (1, 3),
24 (2, 0), (2, 1), (2, 2), (2, 3),
25 (3, 0), (3, 1), (3, 2), (3, 3),
26 (4, 0), (4, 1), (4, 2), (4, 3)
27 ]
28
29 for i in names:
30 button = QtGui.QPushButton(i)
31 if j == 2:
32 grid.addWidget(QtGui.QLabel(''), 0, 2)
33 else:
34 grid.addWidget(button, pos[j][0], pos[j][1])
35 j = j + 1
36
37 self.setLayout(grid)
38
39 app = QtGui.QApplication(sys.argv)
40 qb = GridLayout()
41 qb.show()
42 sys.exit(app.exec_())
grid = QtGui.QGridLayout()
这一句就创建了grid layout. if j == 2 :
grid = addWidget(QtGui.QLabel( '' ), 0, 2 )
else :
grid = addWidget(button, pos[j][0], pos[j][i])
把部件放入grid, 调用addWidget()方法就行了, 参数就是要放入的部件以及相应的行数和列数. grid = addWidget(QtGui.QLabel( '' ), 0, 2 )
else :
grid = addWidget(button, pos[j][0], pos[j][i])
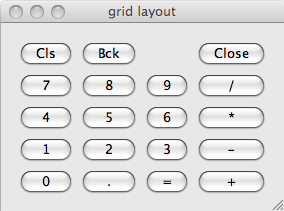
Figure: grid layout
需要说明一下, 部件也可以多行和多列. 下面的列子就演示了之一点.
1 #!/usr/bin/python
2
3 # gridlayout2.py
4
5 import sys
6 from PyQt4 import QtGui
7
8 class GridLayout2(QtGui.QWidget):
9 def __init__(self, parent=None):
10 QtGui.QWidget.__init__(self, parent)
11
12 self.setWindowTitle('grid layout2')
13
14 title = QtGui.QLabel('Title')
15 author = QtGui.QLabel('Author')
16 review = QtGui.QLabel('Review')
17
18 titleEdit = QtGui.QLineEdit()
19 authorEdit = QtGui.QLineEdit()
20 reviewEdit = QtGui.QTextEdit()
21
22 grid = QtGui.QGridLayout()
23 grid.setSpacing(10)
24
25 grid.addWidget(title, 1, 0)
26 grid.addWidget(titleEdit, 1, 1)
27
28 grid.addWidget(author, 2, 0)
29 grid.addWidget(authorEdit, 2, 1)
30
31 grid.addWidget(review, 3, 0)
32 grid.addWidget(reviewEdit, 3, 1, 5, 1)
33
34 self.setLayout(grid)
35 self.resize(350, 300)
36
37 app = QtGui.QApplication(sys.argv)
38 qb = GridLayout2()
39 qb.show()
40 sys.exit(app.exec_())
41
grid = QtGui.QGridLayout()
grid.setSpacing( 10 )
创建布局类, 并设定部件之间的距离为10个像素. grid.setSpacing( 10 )
grid.addWidget(reviewEdit, 3 , 1 , 5 , , 1 )
给布局中添加部件时, 可以指定占据的行数和占据的列数. 这个例子中, 我们让reviewEdit占据了5行. 
Figure: grid layout 2
0 0
- PyQt4中的布局管理 (入门较好2)
- PyQt4 - (4) 布局管理
- PyQt4 - (4) 布局管理
- PyQt4-入门学习(2)
- PyQt4 - (2) 第一印象 (pyqt的入门)
- PyQt4 学习笔记3之布局管理
- PyQt4入门教程(4)_布局管理
- PyQt4-入门学习(1)
- pyQt4入门
- PyQt4入门
- PyQt4 精彩实例分析* 实例12 基本布局管理
- swing 较好布局
- QML中的布局管理
- Android中的布局管理
- QMainWindow中的布局管理
- Android中的布局管理
- QMainWindow中的布局管理
- PyQt4 tutorial读书笔记(2)
- 产品经理必须知道的网站/app/公众号
- poj 2112 Optimal Milking 二分+最大流
- 标准C++中的string类的用法总结【转】
- OSI参考模型下电子邮件传输过程
- DB Manipulation
- PyQt4中的布局管理 (入门较好2)
- asp.net MVC、bootstrap、AngularJS新手学习笔记
- VC多项式运算
- (4.4.1.3)android内存管理方式
- C++实现一个类并包含构造函数,拷贝构造函数,赋值函数,析构函数
- 间质性肺炎的临床表现有哪些?
- The connection to adb is down, and a severe error has occured.问题解决
- linux 命令之sed
- 设计师与客户打交道时哪些该做和哪些不该做的事