Android Window、PhoneWindow、WindowManager、Activity学习心得 第一弹
来源:互联网 发布:淘宝网址怎么找 编辑:程序博客网 时间:2024/05/16 00:55
Android Window、PhoneWindow、WindowManager、Activity学习心得 第一弹
阅读本文,你首先需要理解
Context 上下文环境,Window 窗口的准确含义。
那么,接下来,我们首先从Activity的启动开始。(本文重点不在启动详细信息@
Android应用程序的Activity启动过程简要介绍和学习计划
)。我们需要知道Activity有显式启动和隐式启动两种,但是不管是什么启动方式。我们要知道借助于应用程序框架层的ActivityManagerService服务进程。
目录(源码目录/frameworks/base/services/java/com/android/server/am/ActivityManagerService.java)
以后我将用 Android = 源码目录 (默认为Android4.4)
在Android应用程序框架层中,ActivityManagerService是一个非常重要的接口,它不但负责启动Activity和Service,还负责管理Activity和Service。
Android应用程序框架层中的ActivityManagerService启动Activity的过程大致如下图所示:
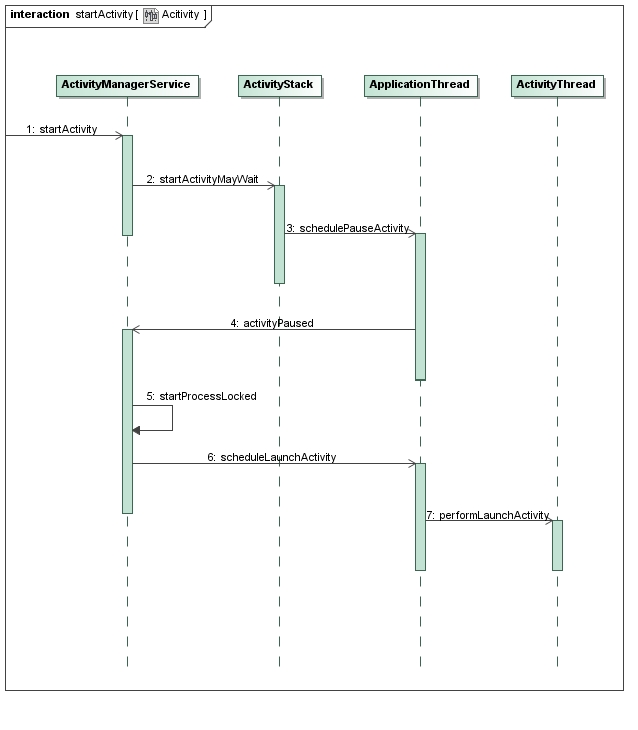
具体启动过程不再做过多赘述,我们这里只需要知道通过ActivityManagerService把这个启动Activity的操作转发给ActivityThread,ActivityThread通过ClassLoader导入相应的Activity类,然后把它启动起来。
目录(Android4.4/frameworks/base/core/java/android/app/ActivityThread.java)
那么,我们下一步进入到ActivityThread执行handleLaunchActivity
private void handleLaunchActivity(ActivityClientRecord r, Intent customIntent){.........Activity a = performLaunchActivity(r, customIntent);if (a != null) {......handleResumeActivity(r.token, false, r.isForward,!r.activity.mFinished && !r.startsNotResumed);.......}.....}而在performLaunchActivity中
public final class ActivityThread {......private final Activity performLaunchActivity(ActivityClientRecord r, Intent customIntent) {ActivityInfo aInfo = r.activityInfo;if (r.packageInfo == null) {r.packageInfo = getPackageInfo(aInfo.applicationInfo,Context.CONTEXT_INCLUDE_CODE);}ComponentName component = r.intent.getComponent();if (component == null) {component = r.intent.resolveActivity(mInitialApplication.getPackageManager());r.intent.setComponent(component);}if (r.activityInfo.targetActivity != null) {component = new ComponentName(r.activityInfo.packageName,r.activityInfo.targetActivity);}//以上 为收集Activity的Package 和 Component 信息Activity activity = null;try {java.lang.ClassLoader cl = r.packageInfo.getClassLoader();activity = mInstrumentation.newActivity(cl, component.getClassName(), r.intent);r.intent.setExtrasClassLoader(cl);if (r.state != null) {r.state.setClassLoader(cl);}} catch (Exception e) {......}//通过ClassLoade 根据收集的信息把你的Activity加载进来try {Application app = r.packageInfo.makeApplication(false, mInstrumentation);//根据AndroidManifest.xml配置文件中的Application标签的信息来创建......if (activity != null) {ContextImpl appContext = new ContextImpl();appContext.init(r.packageInfo, r.token, this);appContext.setOuterContext(activity);CharSequence title = r.activityInfo.loadLabel(appContext.getPackageManager());Configuration config = new Configuration(mConfiguration);......<span style="color:#ff6666;">activity.attach(appContext, this, getInstrumentation(), r.token,r.ident, app, r.intent, r.activityInfo, title, r.parent,r.embeddedID, r.lastNonConfigurationInstance,r.lastNonConfigurationChildInstances, config);</span>//这里正式开始我们的窗口创建if (customIntent != null) {activity.mIntent = customIntent;}r.lastNonConfigurationInstance = null;r.lastNonConfigurationChildInstances = null;activity.mStartedActivity = false;int theme = r.activityInfo.getThemeResource();if (theme != 0) {activity.setTheme(theme);}activity.mCalled = false;mInstrumentation.callActivityOnCreate(activity, r.state);......r.activity = activity;r.stopped = true;if (!r.activity.mFinished) {activity.performStart();r.stopped = false;}if (!r.activity.mFinished) {if (r.state != null) {mInstrumentation.callActivityOnRestoreInstanceState(activity, r.state);}}if (!r.activity.mFinished) {activity.mCalled = false;mInstrumentation.callActivityOnPostCreate(activity, r.state);if (!activity.mCalled) {throw new SuperNotCalledException("Activity " + r.intent.getComponent().toShortString() +" did not call through to super.onPostCreate()");}}}r.paused = true;mActivities.put(r.token, r);} catch (SuperNotCalledException e) {......} catch (Exception e) {......}return activity;}......}</span>以上关于ActivityThread 启动Activity,如果还有什么不明白的请查看
@Android应用程序启动过程源代码分析
紧接着上一步,我们跟踪到Activity的attach
目录(Android 4.4 /frameworks/base/core/java/android/app/Activity.java)
final void attach(Context context,ActivityThread aThread, Instrumentation instr, IBinder token,Application application, Intent intent, ActivityInfo info, CharSequence title,Application application, Intent intent, ActivityInfo info, CharSequence title,Configuration config) {attach(context, aThread, instr, token, 0, application,intent, info, title, parent, id,lastNonConfigurationInstances, config);}final void attach(Context context, ActivityThread aThread,Instrumentation instr, IBinder token, int ident,Application application, Intent intent, ActivityInfo info,CharSequence title, Activity parent, String id,NonConfigurationInstances lastNonConfigurationInstances,Configuration config) {.....mWindow = PolicyManager.makeNewWindow(this);mWindow.setCallback(this);......//基本信息初始化.......mWindow.setWindowManager((WindowManager)context.getSystemService(Context.WINDOW_SERVICE),mToken, mComponent.flattenToString(),(info.flags & ActivityInfo.FLAG_HARDWARE_ACCELERATED) != 0);if (mParent != null) { mWindow.setContainer(mParent.getWindow());} mWindowManager = mWindow.getWindowManager(); ......}走到这里,我们终于看到了我们的Window我们知道,在Android中,每一个Activity组件都有一个关联的Window对象,用来描述一个应用程序窗口。
每一个应用程序窗口内部又包含有一个View对象,用来描述应用程序窗口的视图。应用程序窗口视图是真正用来实现UI内容和布局的,也就是说,每一个Activity组件的UI内容和布局都是通过与其所关联的一个Window对象的内部的一个View对象来实现的
目录(Android 4.4/frameworks/base/core/java/com/android/internal/policy/PolicyManager.java)
public final class PolicyManager {private static final String POLICY_IMPL_CLASS_NAME ="com.android.internal.policy.impl.Policy";private static final IPolicy sPolicy;static {try{Class policyClass = Class.forName(POLICY_IMPL_CLASS_NAME);sPolicy = (IPolicy)policyClass.newInstance();}catch(....){.......}}public static Window makeNewWindow(Context context) {return sPolicy.makeNewWindow(context);}public static LayoutInflater makeNewLayoutInflater(Context context) {return sPolicy.makeNewLayoutInflater(context);}public static WindowManagerPolicy makeNewWindowManager() {return sPolicy.makeNewWindowManager();}}相应的Policy中
目录(Android 4.4 /frameworks/base/policy/src/com/android/internal/policy/impl/Policy.java)
public class Policy implements IPolicy {private static final String[] preload_classes = {"com.android.internal.policy.impl.PhoneLayoutInflater","com.android.internal.policy.impl.PhoneWindow",.....};static {for (String s : preload_classes) {try{Class.forName(s);}catch (ClassNotFoundException ex) {}}public Window makeNewWindow(Context context) {return new PhoneWindow(context);}public LayoutInflater makeNewLayoutInflater(Context context) {return new PhoneLayoutInflater(context);}public WindowManagerPolicy makeNewWindowManager() {return new PhoneWindowManager();}}这里 我们开始创建继承了Window的PhoneWindow
在这里,如果我们想继续往下分析,我们必须知道

一、PhoneWindow实现了Window
二、
应用程序窗口内部所包含的视图对象的实际类型为DecorView。DecorView类继承了View类,是作为容器(ViewGroup)来使用的
应用程序窗口内部所包含的视图对象的实际类型为DecorView。DecorView类继承了View类,是作为容器(ViewGroup)来使用的
0 0
- Android Window、PhoneWindow、WindowManager、Activity学习心得 第一弹
- Android Window、PhoneWindow、Activity学习心得第二弹
- Android Window PhoneWindow Activity学习心得--第三弹
- ERROR/WindowManager(***): Activity *** has leaked window com.android.internal.policy.impl.PhoneWindow$DecorView@*** that was ori
- Activity has leaked window com.android.internal.policy.impl.PhoneWindow
- android Activity.setContentView和Window PhoneWindow类学习
- Android Window PhoneWindow DecorView
- android中Activity中的WindowManager与Window
- Android中Activity中的WindowManager与Window
- android中Activity中的WindowManager与Window
- android中Activity中的WindowManager与Window
- android中Activity中的WindowManager与Window
- android中Activity中的WindowManager与Window
- 源码探索系列13---Window的PhoneWindow与WindowManager
- android Activity has leaked window com.android.internal.policy.impl.PhoneWindow$Deco...
- Android异常-Activity has leaked window com.android.internal.policy.impl.PhoneWindow... was originally
- Android快速理解Activity、View及Window&WindowManager之间关系
- Android快速理解Activity、View及Window&WindowManager之间关系
- Linux部署项目总结
- struts2学习之表单校验的两种方式
- iOS开发系列之常用自定义控件开发集—自定义下拉列表按钮控件开发
- Aerospike-Architecture系列之数据模型(Data Model)
- Spring MVC详解
- Android Window、PhoneWindow、WindowManager、Activity学习心得 第一弹
- Suricata配置文件说明1
- 对ContentProvider中getType(Uri uri)和android.intent.category.DEFAULT的理解
- http接口测试工具postman
- 输出成绩(第三章第六题0
- Response.Flush()的作用
- coreseek 配置文件csft_mysql.conf详解
- asp.net MVC4使用Entity连接mysql
- Oracle System密码忘记 密码修改、删除账号锁定lock 【转】