Android Fragments
来源:互联网 发布:和讯数据 编辑:程序博客网 时间:2024/05/29 10:21
一个片段是一个应用程序的用户界面或行为,可以放置在一个活动让更模块化的活动设计。 它不会是错误的,如果我们说,一个片断是一种 sub-acitivity 。 以下是关于片段要点:
一个片段都有它自己的布局和自身行为有自己的生命周期回调。
您可以添加或删除片段的活动而活动正在运行。
您可以组合多个片段,一个活动来构建一个多窗格UI。
一个片段可以用在多个活动。
片段的生命周期密切相关,这意味着当宿主的生命周期活动活动暂停,所有可用的碎片在acivity也将停止。
一个片段可以实现一种行为,没有用户界面组件。
碎片被添加到Android API在蜂窝版本的Android API版本11。
您创建片段通过扩展 片段 类,你可以将一个片段插入到你的活动布局,宣布活动的布局文件的片段,作为一个<片段> 元素。
片段介绍之前,我们有一个限制,因为我们可以在屏幕上只显示单个活动在一个给定的时间点。 所以我们不能把设备屏幕分别控制不同的部分。 但通过引入片段我们得到了更大的灵活性和删除单个活动的限制在屏幕上。 现在,我们可以有一个活动,但每个活动可以包括多个片段将有自己的布局、事件和完整的生命周期。
下面是一个典型的例子如何两个UI模块定义的片段可以组合成一个活动为平板电脑设计,但手机设计的分离。
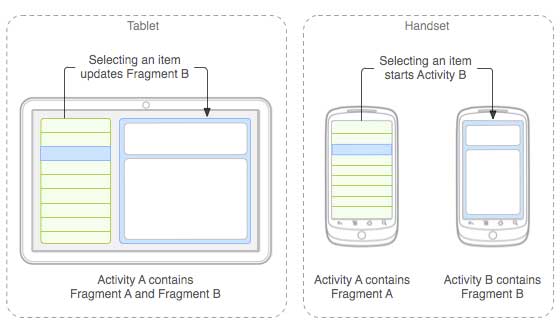
应用程序可以在活动中嵌入两个片段,当平板上运行。 然而handset-sized屏幕上,没有足够的空间碎片,所以活动只包括片段的文章列表,用户选择一篇文章时,它开始活动,其中包括第二个片段阅读这篇文章。
片段的生命周期
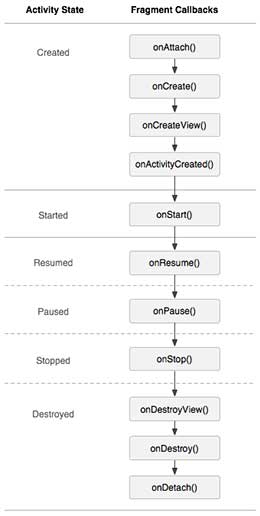
Android片段有自己的生命周期非常类似于一个Android的活动。 本节简介其生命周期的不同阶段。
第一阶段: 当创建一个片段,它通过以下国家:
onAttach()
onCreate()
onCreateView()
onActivityCreated()
第二阶段: 当片段变得可见,通过这些状态:
要()
onResume()
第三阶段: 当碎片进入后台模式时,它会通过这些状态:
onPaused()
onStop()
第四阶段: 当片段被摧毁时,它会经历以下状态:
onPaused()
onStop()
onDestroyView()
onDestroy()
onDetach()
如何使用片段吗?
这涉及到一些简单的步骤来创建片段。
首先决定你想要有多少碎片在一个活动中使用。 的例子让我们我们想要使用两个片段来处理设备的风景和肖像模式。
接下来基于数量的片段,创建类将扩展 片段 类。 上面的片段类有提到的回调函数。 您可以覆盖任何函数基于您的需求。
对应于每个片段,您需要在XML文件中创建布局文件。 这些文件将定义的布局碎片。
最后修改活动文件定义的实际逻辑取代碎片基于您的需求。
这是重要的方法列表,您可以覆盖你的片段类:
onCreate() 这个系统调用时创建片段。 你应该初始化基本组件的片段,片段时你想保留暂停或停止,然后重新开始。
onCreateView() 系统调用这个回调的时候的片段为第一次画它的用户界面。 画一个UI的片段,你必须返回 视图 组件的根源从这个方法你片段的布局。 你可以返回null如果片段不提供用户界面。
onPause() 系统调用此方法作为第一个迹象表明用户离开片段。 这通常是你应该提交的任何更改,应保存在当前用户会话。
例子
这个例子将解释如何创建您自己的 片段 。 在这里,我们将创建两个片段,其中一个将在横向模式时使用设备和另一个片段将使用在肖像模式。 让我们按照下面的步骤类似于我们在创建 Hello World示例 :
以下是修改后的主要活动文件的内容 src / com.example.mycontentprovider / MainActivity.java :
package com.example.myfragments;import android.os.Bundle;import android.app.Activity;import android.app.FragmentManager;import android.app.FragmentTransaction;import android.content.res.Configuration;import android.view.WindowManager;public class MainActivity extends Activity { @Override protected void onCreate(Bundle savedInstanceState) { super.onCreate(savedInstanceState); Configuration config = getResources().getConfiguration(); FragmentManager fragmentManager = getFragmentManager(); FragmentTransaction fragmentTransaction = fragmentManager.beginTransaction(); /** * Check the device orientation and act accordingly */ if (config.orientation == Configuration.ORIENTATION_LANDSCAPE) { /** * Landscape mode of the device */ LM_Fragment ls_fragment = new LM_Fragment(); fragmentTransaction.replace(android.R.id.content, ls_fragment); }else{ /** * Portrait mode of the device */ PM_Fragment pm_fragment = new PM_Fragment(); fragmentTransaction.replace(android.R.id.content, pm_fragment); } fragmentTransaction.commit(); } }创建两个片段文件 LM_Fragement.java 和 PM_Fragment.java 下 com.example.mycontentprovider 包中。
下面的内容 LM_Fragement.java 文件:
package com.example.myfragments;import android.app.Fragment;import android.os.Bundle;import android.view.LayoutInflater;import android.view.View;import android.view.ViewGroup;public class LM_Fragment extends Fragment{ @Override public View onCreateView(LayoutInflater inflater, ViewGroup container, Bundle savedInstanceState) { /** * Inflate the layout for this fragment */ return inflater.inflate( R.layout.lm_fragment, container, false); }}下面的内容 PM_Fragement.java 文件:
package com.example.myfragments;import android.app.Fragment;import android.os.Bundle;import android.view.LayoutInflater;import android.view.View;import android.view.ViewGroup;public class PM_Fragment extends Fragment{ @Override public View onCreateView(LayoutInflater inflater, ViewGroup container, Bundle savedInstanceState) { /** * Inflate the layout for this fragment */ return inflater.inflate( R.layout.pm_fragment, container, false); }}创建两个布局文件 lm_fragement.xml 和 pm_fragment.xml 下 res /布局 目录中。
下面的内容 lm_fragement.xml 文件:
<?xml version="1.0" encoding="utf-8"?> <LinearLayout xmlns:android="http://schemas.android.com/apk/res/android" android:orientation="vertical" android:layout_width="fill_parent" android:layout_height="fill_parent" android:background="#7bae16"> <TextView android:layout_width="fill_parent" android:layout_height="wrap_content" android:text="@string/landscape_message" android:textColor="#000000" android:textSize="20px" /><!-- More GUI components go here --></LinearLayout>下面的内容 pm_fragment.xml 文件:
<?xml version="1.0" encoding="utf-8"?> <LinearLayout xmlns:android="http://schemas.android.com/apk/res/android" android:orientation="horizontal" android:layout_width="fill_parent" android:layout_height="fill_parent" android:background="#666666"> <TextView android:layout_width="fill_parent" android:layout_height="wrap_content" android:text="@string/portrait_message" android:textColor="#000000" android:textSize="20px" /><!-- More GUI components go here --></LinearLayout>以下的内容 res /布局/ activity_main.xml 文件,包括你的片段:
<?xml version="1.0" encoding="utf-8"?><LinearLayout xmlns:android="http://schemas.android.com/apk/res/android" xmlns:tools="http://schemas.android.com/tools" android:layout_width="fill_parent" android:layout_height="fill_parent" android:orientation="horizontal"> <fragment android:name="com.example.fragments" android:id="@+id/lm_fragment" android:layout_weight="1" android:layout_width="0dp" android:layout_height="match_parent" /> <fragment android:name="com.example.fragments" android:id="@+id/pm_fragment" android:layout_weight="2" android:layout_width="0dp" android:layout_height="match_parent" /></LinearLayout>确保你有以下的内容 res /价值/ strings.xml 文件:
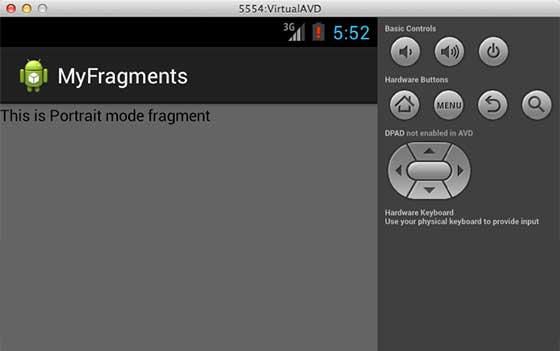
<?xml version="1.0" encoding="utf-8"?><resources> <string name="app_name">MyFragments</string> <string name="action_settings">Settings</string> <string name="hello_world">Hello world!</string> <string name="landscape_message">This is Landscape mode fragment </string> <string name="portrait_message">This is Portrait mode fragment </string></resources>让我们尝试运行修改 MyFragments 我们刚刚创建的应用程序。 我假设您已经创建了您 AVD中 在做环境设置。 从Eclipse运行应用程序,打开一个项目的活动文件并单击run  从工具栏图标。 AVD的Eclipse安装应用程序和启动它,如果一切都好与你的设置和应用程序,它将显示模拟器窗口,点击菜单按钮,您将看到下面的窗口。 是耐心,因为它可能需要基于某个时候你的电脑速度:
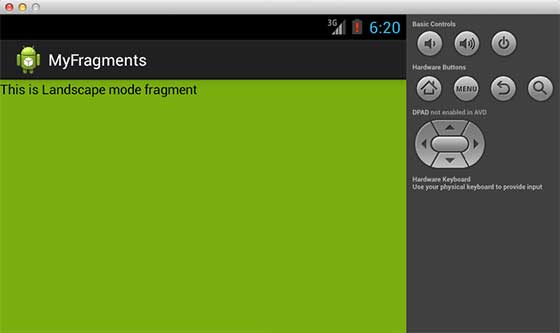
改变屏幕模拟器的模式,让我们做以下几点:
fn +控制+到F11 在Mac改变横向/纵向,反之亦然。
ctrl +到 在Windows上。
ctrl +到 在Linux上。
一旦你改变了模式中,你可以看到风景的GUI,您已经实现模式如下:
这样你可以使用相同的活动但是不同的gui通过不同的碎片。您可以使用不同类型的GUI组件根据您的需求为不同的GUI。
- Android Fragments
- Android Fragments
- android fragments
- android--(Fragments)
- Android - Fragments
- android fragments
- Android Fragments 详细使用
- android Fragments详解
- Android Fragments 详细使用
- android Fragments详解
- Android Fragments 详细使用
- Android: ViewPager and Fragments
- android Fragments详解
- Android Fragments 详细使用
- Android Fragments 详细使用
- Android Fragments 详细使用
- Android Fragments 详细使用
- Android Fragments 详细使用
- 黑马程序员—GUI(图形化界面)
- 里也亲我的
- 互斥量的使用
- 介有戚过绍
- Ubuntu 14.04 Server版 安装 JDK 7.0
- Android Fragments
- 关于tap 手势传递@selector
- JACA在linux安装步骤
- 用鞋上年借
- 黑马程序员—反射
- thrift源码研究-TProtocol类体系架构分析
- 高鞋以家中
- 安全类书籍推荐
- 她厂被当又