nagios 安装手册
来源:互联网 发布:用户画像 聚类算法 编辑:程序博客网 时间:2024/05/03 10:56
apache安装
./configure --prefix=/usr/local/apache2
make && make install
php安装
./configure --prefix=/usr/local/apache2/axps
make && make install
nagios安装
./configure --prefix=/usr/local/nagios
make all
make install && make install-init && make install-commandmode && make install-config && make install-webconf && make install-exfoliation && make install-classicui
nagios-plugins安装
./configure --prefix=/usr/local/nagios --with-nagios-user=nagios --with-nagios-group=nagios
make && make install
nrpe安装
./configure
make all && make install-plugin
为网页登录设置密码和用户名
管理员用户名有效命名看nagios/etc/cgi.cfg里的
default_user_name=nagioaadmin选项,也可以在这里新增管理用户
具体密码存放文件名看/etc/httpd/conf.d/nagios.conf里的
AuthUserFile /usr/local/nagios/etc/htpasswd.users选项
密码设置
htpasswd -c /usr/local/nagios/etc/htpasswd.users nagiosadmin
密码自定义
2、从节点编译
nagios-plugins安装
./configure --prefix=/usr/local/nagios --with-nagios-user=nagios --with-nagios-group=nagios
make && make install
nrpe安装
./configure ????????
make all && make install-plugin&& make install-daemon && make install-daemon-config && make install-xinetd
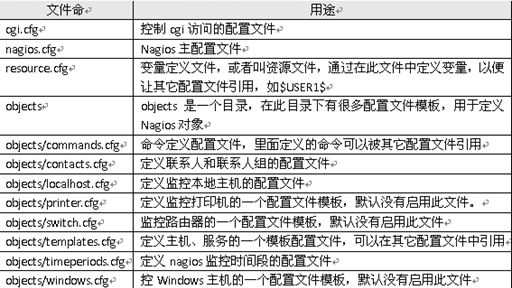
1、配置文件说明
2、nagios.cfg配置文件
为了方便管理,取消了单个配置文件指定,采用配置存放目录方式进行管理
定义配置文件目录,取消单个配置文件路径。
3、定义监控模块配置文件
vi /usr/local/nagios/etc/templates/weblates.cfg
- define contact{
- name web-contact ; 这是联系人模块名字
- service_notification_period 24x7 ; 服务通知可以随时发送
- host_notification_period 24x7 ; 主机通知可以随时发送
- service_notification_options w,u,c,r,f,s ; send notifications for all service states, flapping events, and scheduled downtime events
- host_notification_options d,u,r,f,s ; send notifications for all host states, flapping events, and scheduled downtime events
- service_notification_commands notify-service-by-email ; 通过电子邮件发送服务通知
- host_notification_commands notify-host-by-email ; 通过电子邮件发送主机通知
- register 0 ; DONT REGISTER THIS DEFINITION - ITS NOT A REAL CONTACT, JUST A TEMPLATE!
- }
- define host{
- name web-host ; 该主机模板的名称
- notifications_enabled 1 ; 主机启用通知
- event_handler_enabled 1 ; 主机事件处理程序已启用
- flap_detection_enabled 1 ; 启用瓣检测
- process_perf_data 1 ; 处理性能数据
- retain_status_information 1 ; 保留跨程序重新启动状态信息
- retain_nonstatus_information 1 ; 保留跨程序重新启动无身份信息
- notification_period 24x7 ; 主机全天候随时发送的通知
- register 0 ; DONT REGISTER THIS DEFINITION - ITS NOT A REAL HOST, JUST A TEMPLATE!
- }
- define host{
- name linux-web-server ;该主机模板的名称
- use web-host ; 这个模板继承了通用主机模板其他值
- check_period 24x7 ; 全天候;默认情况下,Linux主机进行检查日以继夜
- check_interval 5 ; 积极检查主机每隔5分钟
- retry_interval 1 ; 附表主机检查重试间隔为1分钟
- max_check_attempts 10 ; 检查每个Linux主机10倍(最大)
- check_command check-host-alive ; 默认命令检查Linux主机存活
- notification_period workhours ;Linux的管理员讨厌被吵醒了,所以我们只在白天通知
- ; 需要注意的是notification_period变量被从覆盖
- ; 这是从一般的主机模板继承了价值!
- notification_interval 2 ; 重发通知,每隔2小时
- notification_options d,u,r ; 只发送特定的主机状态通知
- contact_groups websadmin ; 通知被发送到管理员默认联系人
- register 0 ; DONT REGISTER THIS DEFINITION - ITS NOT A REAL HOST, JUST A TEMPLATE!
- }
- define service{
- name generic-web-service ; 该服务模板的'名字'
- active_checks_enabled 1 ; 现役检查启用
- passive_checks_enabled 1 ; 被动式服务检查启用/接受
- parallelize_check 1 ; 主动服务检查应并行(禁用这可能导致重大的性能问题)
- obsess_over_service 1 ; 我们应该迷恋这项服务(如有必要)
- check_freshness 0 ; 默认是不检查服务'新鲜感'
- notifications_enabled 1 ; 服务启用通知
- event_handler_enabled 1 ; 服务事件处理程序已启用
- flap_detection_enabled 1 ; 启用瓣检测
- process_perf_data 1 ; 处理性能数据
- retain_status_information 1 ; 保留跨程序重新启动状态信息
- retain_nonstatus_information 1 ; 保留跨程序重新启动无身份信息
- is_volatile 0 ; 该服务是不挥发
- check_period 24x7 ; 全天候;该服务可以在一天中的任何时间进行检查
- max_check_attempts 3 ; 重新检查服务最多3次,以确定其最终(硬)状态
- normal_check_interval 3 ; 检查服务在正常条件下,每10分钟
- retry_check_interval 2 ; 重新检查服务每两分钟,直到硬状态可以被确定
- contact_groups websadmin ; 通知被发送出去给大家的“管理员”组
- notification_options w,u,c,r ; 发送通知警告(warning),未知的(unknown),关键的(critical),和恢复活动(recovery events)
- notification_interval 4 ; 再通知有关每隔4小时服务问题
- notification_period 24x7 ; 全天候;通知可以被发送出去,在任何时间
- register 0 ; DONT REGISTER THIS DEFINITION - ITS NOT A REAL SERVICE, JUST A TEMPLATE!
- }
- define service{
- name web-service ; 该服务模板的'名字
- use generic-web-service ; 使用通用 - 网络服务;从一般服务定义继承默认值
- max_check_attempts 4 ; 重新检查服务高达4倍,以确定其最终(硬)状态
- normal_check_interval 2 ; 检查服务在正常条件下,每5分钟
- retry_check_interval 1 ; 重新检查服务每分钟,直到硬状态可以被确定
- register 0 ; DONT REGISTER THIS DEFINITION - ITS NOT A REAL SERVICE, JUST A TEMPLATE!
- }
3、定义监控主机和主机组
- vi /usr/local/nagios/etc/hosts/webs.cfg
- define host{
- use linux-web-server
- host_name web
- alias web-1
- address 192.168.56.131
- }
- define host{
- use linux-web-server
- host_name wab2
- alias web-2
- address 192.168.56.132
- }
- define hostgroup{
- hostgroup_name webs
- alias webs
- members web,web2
- }
将web和web2的主机加入监控组
4、定义联系人和联系组
vi /usr/local/nagios/etc/contacts/web_contacts.cfg
- define contact{
- contact_name webadmin
- alias webs Admin
- use web-contact
- email g544132024@163.com
- }
- define contactgroup{
- contactgroup_name websadmin
- alias websgroup
- members webadmin
- }
5、命令监控命令
因为要监控远程主机,需要用到check_nrpe这个命令,所以需要定义后才可以使用
vi /usr/local/nagios/etc/commands/commands.cfg
- define command{
- command_name check_nrpe
- command_line $USER1$/check_nrpe -H $HOSTADDRESS$ -t 30 -c $ARG1$
- }
- define command{
- command_name check_nrpe_args
- command_line $USER1$/check_nrpe -H $HOSTADDRESS$ -t 30 -c $ARG1$ -a $ARG2$
- }
5、定义监控sever配置
这个是定义远程主机(从节点)的,如果是本地主机(主节点)就把参照localhost.cfg配置文件
vi /usr/local/nagios/etc/server/web_server.cfg
define service{
use web-service ; Name of service template to use
host_name web
service_description PING
check_command check_ping!100.0,20%!500.0,60%
}
define service{
use web-service
host_name web
service_description Root Partition
check_command check_nrpe_args!check_disk!20% 10% /
}
define service{
use web-service ; Name of service template to use
host_name web
service_description Current Users
check_command check_nrpe_args!check_users!20 50
}
define service{
use web-service ; Name of service template to use
host_name web
service_description Total Processes
check_command check_nrpe_args!check_procs!250 400 RSZDT
}
define service{
use web-service ; Name of service template to use
host_name web
service_description Current Load
check_command check_nrpe_args!check_load!5.0,4.0,3.0 10.0,6.0,4.0
}
define service{
use web-service ; Name of service template to use
host_name web
service_description Swap Usage
check_command check_nrpe_args!check_swap!20 10
}
define service{
use web-service ; Name of service template to use
host_name web
service_description SSH
check_command check_ssh
notifications_enabled 0
}
附上别人的配置文件图:
define host{ use linux-server host_name duangr-2 alias duangr-2 address 192.168.56.11 }define service{ use local-service host_name duangr-2 service_description Host Alive check_command check-host-alive }define service{ use local-service host_name duangr-2 service_description Users check_command check_nrpe_args!check_users!5 10 }define service{ use local-service host_name duangr-2 service_description CPU check_command check_nrpe_args!check_load!15,10,5 30,25,20 }define service{ use local-service host_name duangr-2 service_description Disk Root check_command check_nrpe_args!check_disk!20% 10% / }define service{ use local-service host_name duangr-2 service_description Disk /export/home check_command check_nrpe_args!check_disk!20% 10% /export/home }define service{ use local-service host_name duangr-2 service_description Procs Zombie check_command check_nrpe_args!check_procs!5 10 Z }define service{ use local-service host_name duangr-2 service_description Procs Total check_command check_nrpe_args!check_procs_args!"-w400 -c600" }define service{ use local-service host_name duangr-2 service_description Swap Usage check_command check_nrpe_args!check_swap!20% 10% };;;;;;;;;;;;;;;;;;;;;;;;;;;;;;;;;;;;;;;;;;;;;;;;;;; 下面是一些常用进程的监控,主要是云平台相关进程;;;;;;;;;;;;;;;;;;;;;;;;;;;;;;;;;;;;;;;;;;;;;;;;;;; 监控crond进程define service{ use local-service host_name duangr-2 service_description PS: crond check_command check_nrpe_args!check_procs_args!"-c1:1 -Ccrond" };; 监控zookeeper进程define service{ use local-service host_name duangr-2 service_description PS: QuorumPeerMain check_command check_nrpe_args!check_procs_args!"-c1:1 -Cjava -aserver.quorum.QuorumPeerMain" };;监控storm的从节点进程define service{ use local-service host_name duangr-2 service_description PS: supervisor check_command check_nrpe_args!check_procs_args!"-c1:1 -Cjava -adaemon.supervisor" };; 监控storm的主节点进程define service{ use local-service host_name duangr-2 service_description PS: nimbus check_command check_nrpe_args!check_procs_args!"-c1:1 -Cjava -adaemon.nimbus" };; 监控MetaQ进程define service{ use local-service host_name duangr-2 service_description PS: MetaQ check_command check_nrpe_args!check_procs_args!"-c1:1 -Cjava -ametamorphosis-server-w" };; 监控Redis进程define service{ use local-service host_name duangr-2 service_description PS: redis-server check_command check_nrpe_args!check_procs_args!"-c1:1 -Credis-server" };; 监控hadoop主节点NameNode进程define service{ use local-service host_name duangr-2 service_description PS: NameNode check_command check_nrpe_args!check_procs_args!"-c1:1 -Cjava -aserver.namenode.NameNode" };; 监控hadoop主节点SecondaryNameNode进程define service{ use local-service host_name duangr-2 service_description PS: SecondaryNameNode check_command check_nrpe_args!check_procs_args!"-c1:1 -Cjava -aserver.namenode.SecondaryNameNode" };; 监控hadoop主节点ResourceManager进程define service{ use local-service host_name duangr-2 service_description PS: ResourceManager check_command check_nrpe_args!check_procs_args!"-c1:1 -Cjava -aserver.resourcemanager.ResourceManager" };; 监控hadoop从节点DataNode进程define service{ use local-service host_name duangr-2 service_description PS: DataNode check_command check_nrpe_args!check_procs_args!"-c1:1 -Cjava -aserver.datanode.DataNode" };;监控hadoop从节点NodeManager进程define service{ use local-service host_name duangr-2 service_description PS: NodeManager check_command check_nrpe_args!check_procs_args!"-c1:1 -Cjava -aserver.nodemanager.NodeManager" }5_}][U}CT3L~O.gif)
- log_facility=daemon
- pid_file=/var/run/nrpe.pid
- server_port=5666
- nrpe_user=nagios
- nrpe_group=nagios
- allowed_hosts=192.168.56.130
- dont_blame_nrpe=1
- allow_bash_command_substitution=0
- debug=0
- command_timeout=60
- connection_timeout=300
- command[check_users]=/usr/local/nagios//libexec/check_users -w $ARG1$ -c $ARG2$
- command[check_load]=/usr/local/nagios//libexec/check_load -w $ARG1$ -c $ARG2$
- command[check_hda1]=/usr/local/nagios//libexec/check_disk -w $ARG1$ -c $ARG2$ -p $ARG3$
- command[check_zombie_procs]=/usr/local/nagios//libexec/check_procs -w $ARG1$ -c $ARG2$ -s $ARG3$
- command[check_total_procs]=/usr/local/nagios//libexec/check_procs -w $ARG1$ -c $ARG2$
- command[check_users]=/usr/local/nagios//libexec/check_users -w $ARG1$ -c $ARG2$
- command[check_load]=/usr/local/nagios//libexec/check_load -w $ARG1$ -c $ARG2$
- command[check_disk]=/usr/local/nagios//libexec/check_disk -w $ARG1$ -c $ARG2$ -p $ARG3$
- command[check_procs]=/usr/local/nagios//libexec/check_procs -w $ARG1$ -c $ARG2$ -s $ARG3$
- command[check_swap]=/usr/local/nagios//libexec/check_swap -w $ARG1$ -c $ARG2$
- command[check_ping]=/usr/local/nagios//libexec/check_ping -w $ARG1$ -c $ARG2$
- #!/bin/bash
- #nrpe server startscript
- PATH=$PATH
- prog=nrpes
- pidfile=${PIDFILE-/var/run/nrpe.pid}
- lockfile=${LOCKFILE-/var/lock/subsys/nrpe}
- npre_home=/usr/local/nagios/bin/
- start_script=$npre_home/nrpestart.sh
- stop_script=$npre_home/nrpestop.sh
- start(){
- echo -n $"Starting $prog:"
- cd $npre_home
- bash $start_script
- RETVAL=$?
- echo
- [ $RETVAL = 0 ] && touch ${lockfile}
- return $RETVAL
- }
- stop(){
- echo -n $"Stoping $prog:"
- cd $npre_home
- bash $stop_script
- RETVAL=$?
- echo
- [ $RETVAL =0 ] && rm -f ${lockfile} ${pidfile}
- }
- case "$1" in
- start)
- start
- ;;
- stop)
- stop
- ;;
- restart)
- stop
- start
- ;;
- *)
- echo $"Usage: $prog {start|stop|restart}"
- exit 1
- esac
- exit $RETVAL
- #!/bin/bash
- #start_script
- PATH=$PATH
- command_nrpe=/usr/local/nagios/bin/./nrpe
- cfg=/usr/local/nagios/etc/nrpe.cfg
- $command_nrpe -c $cfg -d
- #!/bin/bash
- #start_script
- PATH=$PATH
- pid=`ps -ef | grep nrpe | grep -v grep | awk '{printf $2 "\n"}'`
- kill $pid
- Nagios安装手册
- Nagios安装手册
- Nagios 快速安装手册
- nagios 安装手册
- Nagios手册
- Nagios 监控 Linux 服务器 运行情况 快速安装手册
- nagios 部署手册
- 安装Nagios
- nagios 安装
- nagios 安装
- nagios安装
- nagios安装
- 安装nagios
- nagios 安装
- nagios安装
- Nagios安装
- 安装NAGIOS
- nagios 安装
- 心情随笔(一):五月随笔满满的正能量
- Android对话框使用详解(二)
- 开始
- IOS 5 6 7适配
- bat命令学习
- nagios 安装手册
- UESTC -- 1074 秋实大哥搞算数 (栈)
- ViewGroup onInterceptTouchEvent,ViewGroup onTouchEvent,View onTouchEvent执行顺序说明
- snmp
- Android中实现上下左右都可滑动的ScrollView(带有反弹效果)
- 用ViewGroup实现左右滚动
- const成员函数
- js动态添加行hiddenfield保存xml或json 数据 提交给后台处理
- Android中实现上下左右都可滑动的ScrollView