使用路径(3)Quartz 2D
来源:互联网 发布:小米机器人编程 编辑:程序博客网 时间:2024/06/16 12:50
借助CGContextAddArcToPoint()和CGContextAddLineToPoint()函数可以非常容易地实现添加圆角矩形路径的方法(所谓圆角矩形,就是在矩形的每个角都绘制一段90°的圆弧)。除此之外,还有CGContextMoveToPoint(CGContextRef c, CGFloat x, CGFloat y)函数用于把绘制点移动到指定位置,借助这些方法还可以绘制任意的多角星。
下面的程序代码将会开发两个自定义函数,一个用于添加圆角矩形,一个用于添加多角星。程序代码如下。
程序清单:codes/12/12.2/PathTest/FKContext.h
- #ifndef PathTest_FKContext_h
- #define PathTest_FKContext_h
- /*
- 该方法负责绘制圆角矩形。x1、y2:是圆角矩形左上角的座标;width、height:控制圆角矩行的宽、高;
- radius:控制圆角矩形的四个圆角的半径
- */
- void CGContextAddRoundRect(CGContextRef c, CGFloat x1 , CGFloat y1
- , CGFloat width , CGFloat height , CGFloat radius)
- {
- CGContextMoveToPoint (c, x1 + radius , y1); // 移动到左上角
- CGContextAddLineToPoint(c , x1 + width - radius, y1); // 添加一条连接到右上角的线段
- // 添加一段圆弧
- CGContextAddArcToPoint(c , x1 + width , y1, x1 + width, y1 + radius, radius); // 添加一条连接到右下角的线段
- CGContextAddLineToPoint(c , x1 + width, y1 + height - radius);
- // 添加一段圆弧
- CGContextAddArcToPoint(c , x1 + width, y1 + height
- , x1 + width - radius , y1 + height , radius);
- // 添加一条连接到左下角的线段
- CGContextAddLineToPoint(c , x1 + radius, y1 + height);
- // 添加一段圆弧
- CGContextAddArcToPoint(c , x1, y1 + height , x1, y1 + height - radius , radius); // 添加一条连接到左上角的线段
- CGContextAddLineToPoint(c , x1 , y1 + radius);
- // 添加一段圆弧
- CGContextAddArcToPoint(c , x1 , y1 , x1 + radius , y1 , radius);
- }
- /*
- 该方法负责绘制多角星。n:该参数通常应设为奇数,控制绘制N角星。
- dx、dy:控制N角星的中心。size:控制N角星的大小
- */
- void CGContextAddStar(CGContextRef c , NSInteger n,
- CGFloat dx , CGFloat dy , NSInteger size)
- {
- CGFloat dig = 4 * M_PI / n ;
- CGContextMoveToPoint(c , dx , dy + size); // 移动到指定点
- for(int i = 1 ; i <= n ; i++)
- {
- CGFloat x = sin(i * dig);
- CGFloat y = cos(i * dig);
- // 绘制从当前点连接到指定点的线条
- CGContextAddLineToPoint(c , x * size + dx ,y * size + dy);
- }
- }
- #endif
上面两个函数都没有执行任何绘制操作,它们都只是向当前CGContextRef中添加路径,第一个函数用于添加一个圆角矩形路径,第二个函数用于添加一个多角星路径。
上面这个函数库与项目无关,该函数库中包含的两个函数完全可以在任何项目中复用。因此,如果读者以后的项目需要绘制圆角矩形、多角星,只要将该文件复制到项目中,并导入该函数库,即可调用这两个函数添加路径。
实例:绘制任意多角星
下面创建一个应用来绘制圆角矩形和多角星。首先创建一个Single View Application,该Application包含一个应用程序委托代理类、一个视图控制器和配套的Storyboard界面设计文件。将该界面设计文件中最大的View改为使用自定义的FKPathView类。该程序的控制器类几乎无须修改,只要重写FKPathView的drawRect:方法,在该方法中调用FKContext.h中的方法来添加圆角矩形、多角星路径,然后根据需要采用不同的方式绘制这些路径即可。
下面是FKPathView类的实现代码。
程序清单:codes/12/12.2/PathTest/FKPathView.m
- #import "FKPathView.h"
- #import "FKContext.h"
- @implementation FKPathView
- - (void)drawRect:(CGRect)rect
- {
- CGContextRef ctx = UIGraphicsGetCurrentContext(); // 获取绘图CGContextRef
- CGContextBeginPath(ctx); // 开始添加路径
- CGContextAddStar(ctx, 5, 80, 150, 40); // 添加一个五角星的路径
- CGContextAddRoundRect(ctx, 10, 30, 150, 70, 14); // 添加一个圆角矩形的路径
- CGContextClosePath(ctx); // 关闭路径
- CGContextSetRGBStrokeColor(ctx, 1, 1, 0, 1); // 设置线条颜色
- CGContextSetLineWidth(ctx, 4); // 设置线宽
- CGContextStrokePath(ctx); // 绘制路径
- CGContextBeginPath(ctx); // 开始添加路径
- CGContextAddStar(ctx, 5, 240, 150, 40); // 添加一个五角星的路径
- CGContextAddRoundRect(ctx, 170, 30, 130, 70, 14); // 添加一个圆角矩形的路径
- CGContextClosePath(ctx); // 关闭路径
- CGContextSetRGBFillColor(ctx, 1, 0, 1, 1); // 设置填充颜色
- CGContextDrawPath(ctx, kCGPathFillStroke); // 采用填充并绘制路径的方式来绘制路径
- CGContextBeginPath(ctx); // 开始添加路径
- CGContextAddStar(ctx, 3, 60, 220, 40); // 添加一个三角形的路径
- CGContextClosePath(ctx); // 关闭路径
- CGContextSetRGBFillColor(ctx, 1, 0, 0, 1); // 设置填充颜色
- CGContextFillPath(ctx); // 填充路径
- CGContextBeginPath(ctx); // 开始添加路径
- CGContextAddStar(ctx, 7, 160, 220, 40); // 添加一个7角星的路径
- CGContextClosePath(ctx); // 关闭路径
- CGContextSetRGBFillColor(ctx, 0, 1, 0, 1); // 设置填充颜色
- CGContextFillPath(ctx); // 填充路径
- CGContextBeginPath(ctx); // 开始添加路径
- CGContextAddStar(ctx, 9, 260, 220, 40); // 添加一个9角星的路径
- CGContextClosePath(ctx); // 关闭路径
- CGContextSetRGBFillColor(ctx, 0, 0, 1, 1); // 设置填充颜色
- CGContextFillPath(ctx); // 填充路径
- }
- @end
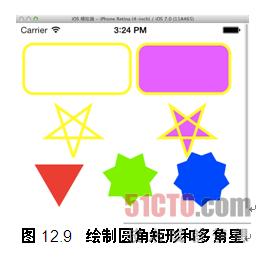
上面程序的第一行粗体字代码导入了FKContext.h文件,接下来的粗体字代码多次调用了CGContextAddRoundRect()函数和CGContextAddStar()函数来添加圆角矩形和多角星。编译、运行该程序,即可看到如图12.9所示的效果。
- 使用路径(3)Quartz 2D
- Quartz 2D 使用路径(2)
- 使用路径(1)Quartz 2D
- Quartz 2D的路径的使用
- iPhone之Quartz 2D系列--路径(3)Paths
- iPhone之Quartz 2D系列--路径(3)Paths
- iPhone之Quartz 2D系列--路径(3)Paths
- iPhone之Quartz 2D系列--路径(3)Paths
- Quartz 2D编程指南(3) - 路径(Paths)【上】
- Quartz 2D编程指南(3) - 路径(Paths)【下】
- Quartz 2D编程指南(3) - 路径(Paths)【上】
- Quartz 2D编程指南(3) - 路径(Paths)【下】
- Quartz 2D编程指南(3) - 路径(Paths)【上】
- Quartz 2D编程指南(3) - 路径(Paths)【下】
- Quartz 2D编程指南(3) - 路径(Paths)【上】
- Quartz 2D编程指南(3) - 路径(Paths)【下】
- Quartz 2D编程指南(3) - 路径(Paths)【上】
- Quartz 2D编程指南(3) - 路径(Paths)【上】
- vi大小写转换
- listview加载性能优化ViewHolder
- Markdown个人笔记
- Java基础(极客)——08、Java类方法详解
- Windows下Laravel5 路由问题 /home及其它页面无法访问 ()
- 使用路径(3)Quartz 2D
- C++之RAII惯用法
- android 判断网络时打开设置
- Xcode6 配置国际化
- Java并发编程--Thread
- c的数据处理和交互输入
- 欢迎使用CSDN-markdown编辑器
- Solr配置文件说明
- 绘制曲线 Quartz 2D