centos安装lamp,开启防火墙端口
一、配置防火墙,开启80端口、3306端口
CentOS 7.0默认使用的是firewall作为防火墙,这里改为iptables防火墙。
1、关闭firewall:
#停止firewall服务
- systemctl stop firewalld.service
- systemctl disable firewalld.service
2、安装iptables防火墙
#安装
- yum install iptables-services
- vi /etc/sysconfig/iptables
# Firewall configuration written by system-config-firewall
# Manual customization of this file is not recommended.
*filter
:INPUT ACCEPT [0:0]
:FORWARD ACCEPT [0:0]
:OUTPUT ACCEPT [0:0]
-A INPUT -m state --state ESTABLISHED,RELATED -j ACCEPT
-A INPUT -p icmp -j ACCEPT
-A INPUT -i lo -j ACCEPT
-A INPUT -m state --state NEW -m tcp -p tcp --dport 22 -j ACCEPT
-A INPUT -m state --state NEW -m tcp -p tcp --dport 80 -j ACCEPT //APACHE
-A INPUT -m state --state NEW -m tcp -p tcp --dport 3306 -j ACCEPT // MYSQL
#-A INPUT -m state --state NEW -m tcp -p tcp --dport 8080 -j ACCEPT // TOMCAT
#-A INPUT -m state --state NEW -m tcp -p tcp --dport 5222 -j ACCEPT // OPENFIRE
-A INPUT -j REJECT --reject-with icmp-host-prohibited
-A FORWARD -j REJECT --reject-with icmp-host-prohibited
COMMIT
:wq! #保存退出
#最后重启防火墙使配置生效
- systemctl restart iptables.service
- systemctl enable iptables.service
二、关闭SELINUX
#修改配置文件
#SELINUX=enforcing #注释掉
#SELINUXTYPE=targeted #注释掉
SELINUX=disabled #增加
:wq! #保存退出
#使配置立即生效
三.安装apache
可能会用到的:
systemctl start httpd.service #启动apache
systemctl stop httpd.service #停止apache
systemctl restart httpd.service #重启apache
systemctl enable httpd.service #设置apache开机启动
restart一下,然后:
输入localhost
出现之后代表已经安装上去了。

四.安装mysql
方法参考我mysql分类下的第一篇博文
http://blog.itpub.net/29773961/viewspace-1248176/
方法大致相同
在cent7中可以用:
- rpm -ivh mysql-community-release-el6-5.noarch.rpm
关于这一步骤,在目前能够找到的centos7配置教程上,大多都是安装mariadb,因为centos7默认将mariadb视作mysql。
p.s.因为mysql被oracle收购后,原作者担心mysql闭源,所以又写了一个mariadb,这个数据库可以理解为mysql的分支。
我在此处还是安装mysql
如果需要安装mariadb,只需通过yum就可。五.安装php
安装PHP组件,使PHP支持mysql
- yum install php-mysql php-gd libjpeg* php-ldap php-odbc php-pear php-xml php-xmlrpc php-mbstring php-bcmath php-mhash
- systemctl restart mysqld.service
- systemctl restart httpd.service
CentOS环境下通过YUM安装软件
>>上一步:CentOS云服务器数据盘分区和格式化
为了提升用户在云服务器上的软件安装效率,减少下载和安装软件的成本,腾讯云提供了Yum下载源。在CentOS环境下,用户可通过YUM快速安装软件。
对于Yum下载源,不需要添加软件源,可以直接安装软件包。
1. 安装步骤1. 登录操作系统为CentOS6.2的云服务器后,默认已获取root权限:
注意:严禁执行password命令,root密码默认不能被修改。
2. 在root权限下,通过命令 yum install 来安装软件,示例如下:
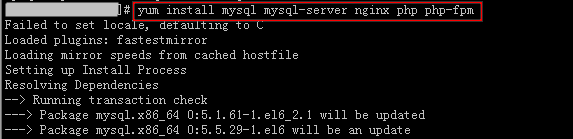
3. 系统会自动搜索相关的软件包和依赖关系,并且在界面中提示用户确认搜索到的软件包是否合适,如下图所示:
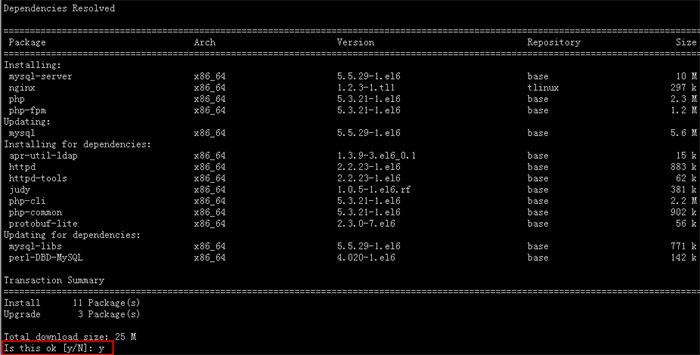
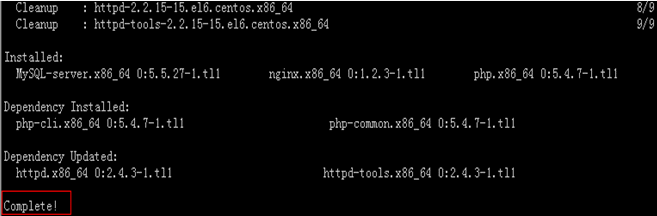
4. 输入“Y”确认后,开始安装软件,安装完成后会提示“Complete”,如下图所示:
2. 安装的软件信息查看
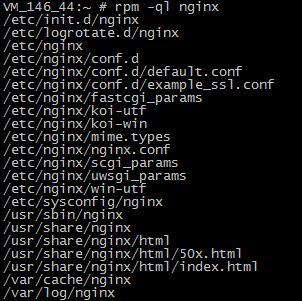
软件安装完成后,可通过命令 rpm -ql 查看软件包具体的安装目录。
以查看nginx的安装目录为例:
结果如下:
可通过命令 rpm -q 查看软件包的版本信息。
以查看nginx的版本为例:
结果如下(实际的版本可能和此版本不一致,请以实际查询到的版本为准):

CentOS6.4下VNC Server最简配置
环境:
CentOS 6.4 Final,桌面安装了除KDE的所有组件
1、安装服务
yum install tigervnc-server
名字有点怪哦,CentOS5前叫vnc-server
2、运行并设置密码
vncserver :1
输入密码,会生成相关的文件
xauth: creating new authority file /root/.Xauthority
New 'centos6-244:1 (root)' desktop is centos6-244:1
Starting applications specified in /root/.vnc/xstartup
Log file is /root/.vnc/centos6-244:1.log
3、配置用户
vim /etc/sysconfig/vncservers
最后一行加入:
VNCSERVERS="1:root" 多个用户用空格分开,并要先su - 到那个用户运行vncserver :n来设定配置文件和密码
4、实用命令
usage: vncserver [:<number>] [-name <desktop-name>] [-depth <depth>]
[-geometry <width>x<height>]
[-pixelformat rgbNNN|bgrNNN]
[-fp <font-path>]
[-fg]
<Xvnc-options>...
vncserver -kill <X-display>
vncserver -list
vncserver[:n]开服务
vncserver -list看有几个在运行
vncserver -kill :n 杀掉第几个x-display
vncpasswd 修改密码
5、服务管理
service vncserver restart
其它用法:/etc/init.d/vncserver {start|stop|restart|try-restart|status|force-reload}
chkconfig vncserver on 加入到自启动(chkconfig --level 35 vncserver on)
6、客户端连接
CentOS:使用TigerVNC Viewer 连接 ip:1
Windows:使用Real VNC Viewer 连接ip:1
输入密码即可访问
CentOS安装卸载桌面环境
·使用yum grouplist,列出已经安装和可以安装的软件组,
·yum groupinstall “X Window System”,安装桌面基础环境,桌面的基础,必须装的,
·yum groupinstall “Desktop”,安装桌面系统,
·yum groupinstall “Chinese Support”,安装中文支持,
·安装centos时,如果默认选择的是英文,需要修改/etc/sysconfig/i18n,将LANG修改为LANG="zh_CN.UTF-8,
·安装GNOME桌面环境:
·yum groupinstall "GNOME Desktop Environment" ,安装GNOME桌面环境,
· yum groupremove "GNOME Desktop Environment" ,卸载GNOME桌面环境,
·安装KDE桌面环境:
·yum groupinstall "KDE Desktop",安装KDE桌面环境,
·yum groupinstall "KDE (K Desktop Environment)",安装KDE桌面环境,
·yum groupremove "KDE (K Desktop Environment)",卸载KDE桌面环境 ,
·startx启动图形界面,
·startkde启动KDE桌面环境