iOS开发入门实例
来源:互联网 发布:淘宝店升级为企业店铺 编辑:程序博客网 时间:2024/04/29 13:38
著作权声明:本文由http://blog.csdn.net/totogo2010/原创,欢迎转载分享。请尊重作者劳动,转载时保留该声明和作者博客链接,谢谢!
iOS学习之动态添加Button和监听UIAlertView按钮
- (IBAction)addButton:(id)sender { CGRect frame = CGRectMake(90, 200, 200, 60); UIButton *someAddButton = [UIButton buttonWithType:UIButtonTypeRoundedRect]; someAddButton.backgroundColor = [UIColor clearColor]; [someAddButton setTitle:@"动态添加一个按钮!" forState:UIControlStateNormal]; someAddButton.frame = frame; [someAddButton addTarget:self action:@selector(someButtonClicked) forControlEvents:UIControlEventTouchUpInside]; [self.view addSubview:someAddButton];}-(void) someButtonClicked{ UIAlertView *alert = [[UIAlertView alloc] initWithTitle:@"提示" message:@"您点击了动态按钮!" delegate:self cancelButtonTitle:@"确定" otherButtonTitles:nil]; [alert show];}二、监听UIAlertView。
#import <UIKit/UIKit.h>@interface addbuttonViewController : UIViewController<UIAlertViewDelegate>- (IBAction)addButton:(id)sender;@end
-(void) someButtonClicked{ UIAlertView *alert = [[UIAlertView alloc] initWithTitle:@"提示" message:@"您点击了动态按钮!" delegate:self cancelButtonTitle:@"确定" otherButtonTitles:@"取消",@"第三项",nil]; [alert show];}3、在对应的.m文件中实现委托中的方法
-(void)alertView:(UIAlertView *)alertView clickedButtonAtIndex:(NSInteger)buttonIndex{ NSLog(@"buttonIndex:%d", buttonIndex);}一、NINetworkImageView是Nimbus下载图片的类,类是这么描述的:
Overview
A network-enabled image view that consumes minimal amounts of memory.
Intelligently crops and resizes images for optimal memory use and uses threads to avoid processing images on the UI thread.
使用线程以避免在UI线程上下载处理,并智能,调整优化内存的使用图像。
真的很好用,一步加载图片。
(void)actionSheet:(UIActionSheet *)actionSheet clickedButtonAtIndex:(NSInteger)buttonIndex
在开发过程中,发现有时候UIActionSheet的最后一项点击失效,点最后一项的上半区域时有效,这是在特定情况下才会发生,这个场景就是试用了UITabBar的时候才有。解决办法:
NSString *plistPath = [[NSBundle mainBundle] pathForResource:@"plistdemo" ofType:@"plist"];NSMutableDictionary *data = [[NSMutableDictionary alloc] initWithContentsOfFile:plistPath]; NSLog(@"%@", data);//直接打印数据。
写入的plist文件会生成在对应程序的沙盒目录里。
<strong>- (void)viewDidLoad{ [super viewDidLoad]; //读取plist NSString *plistPath = [[NSBundle mainBundle] pathForResource:@"plistdemo" ofType:@"plist"]; NSMutableDictionary *data = [[NSMutableDictionary alloc] initWithContentsOfFile:plistPath]; NSLog(@"%@", data); //添加一项内容 [data setObject:@"add some content" forKey:@"c_key"]; //获取应用程序沙盒的Documents目录 NSArray *paths=NSSearchPathForDirectoriesInDomains(NSDocumentDirectory,NSUserDomainMask,YES); NSString *plistPath1 = [paths objectAtIndex:0]; //得到完整的文件名 NSString *filename=[plistPath1 stringByAppendingPathComponent:@"test.plist"]; //输入写入 [data writeToFile:filename atomically:YES]; //那怎么证明我的数据写入了呢?读出来看看 NSMutableDictionary *data1 = [[NSMutableDictionary alloc] initWithContentsOfFile:filename]; NSLog(@"%@", data1); // Do any additional setup after loading the view, typically from a nib.}- (NSArray *)sectionIndexTitlesForTableView:(UITableView *)tableView { //返回省份的数组 NSMutableArray *array = [NSMutableArray arrayWithCapacity:35]; for (NSDictionary *dict in provinces) { [array addObject:[dict objectForKey:@"p_Name"]]; } return array;}1、iOS沙盒机制
iOS应用程序只能在为该改程序创建的文件系统中读取文件,不可以去其它地方访问,此区域被成为沙盒,所以所有的非代码文件都要保存在此,例如图像,图标,声音,映像,属性列表,文本文件等。
1.2、应用程序不能翻过自己的围墙去访问别的存储空间的内容
1.3、应用程序请求的数据都要通过权限检测,假如不符合条件的话,不会被放行。
通过这张图只能从表层上理解sandbox是一种安全体系,应用程序的所有操作都要通过这个体系来执行,其中核心内容是:sandbox对应用程序执行各种操作的权限限制。
2、打开模拟器沙盒目录
下面看看模拟器的沙盒文件夹在mac电脑上的什么位置。
文件都在个人用户名文件夹下的一个隐藏文件夹里,中文叫资源库,他的目录其实是Library。
3、目录结构
默认情况下,每个沙盒含有3个文件夹:Documents, Library 和 tmp。因为应用的沙盒机制,应用只能在几个目录下读写文件
Documents:苹果建议将程序中建立的或在程序中浏览到的文件数据保存在该目录下,iTunes备份和恢复的时候会包括此目录
Library:存储程序的默认设置或其它状态信息;
Library/Caches:存放缓存文件,iTunes不会备份此目录,此目录下文件不会在应用退出删除
tmp:提供一个即时创建临时文件的地方。
NSString *homeDirectory = NSHomeDirectory();
NSArray *paths = NSSearchPathForDirectoriesInDomains(NSDocumentDirectory, NSUserDomainMask, YES);NSString *path = [paths objectAtIndex:0];NSLog(@"path:%@", path);
NSArray *paths = NSSearchPathForDirectoriesInDomains(NSCachesDirectory, NSUserDomainMask, YES); NSString *path = [paths objectAtIndex:0]; NSLog(@"%@", path);
NSArray *paths = NSSearchPathForDirectoriesInDomains(NSLibraryDirectory, NSUserDomainMask, YES); NSString *path = [paths objectAtIndex:0]; NSLog(@"%@", path);
NSString *tmpDir = NSTemporaryDirectory(); NSLog(@"%@", tmpDir);
NSArray *paths = NSSearchPathForDirectoriesInDomains(NSDocumentDirectory, NSUserDomainMask, YES); NSString *docDir = [paths objectAtIndex:0]; if (!docDir) { NSLog(@"Documents 目录未找到"); } NSArray *array = [[NSArray alloc] initWithObjects:@"内容",@"content",nil]; NSString *filePath = [docDir stringByAppendingPathComponent:@"testFile.txt"]; [array writeToFile:filePath atomically:YES];NSArray *paths = NSSearchPathForDirectoriesInDomains(NSDocumentDirectory, NSUserDomainMask, YES); NSString *docDir = [paths objectAtIndex:0]; NSString *filePath = [docDir stringByAppendingPathComponent:@"testFile.txt"]; NSArray *array = [[NSArray alloc]initWithContentsOfFile:filePath]; NSLog(@"%@", array);
NSArray *paths = NSSearchPathForDirectoriesInDomains(NSDocumentDirectory, NSUserDomainMask, YES); NSString *documentsDirectory = [paths objectAtIndex:0]; NSLog(@"documentsDirectory%@",documentsDirectory); NSFileManager *fileManager = [NSFileManager defaultManager]; NSString *testDirectory = [documentsDirectory stringByAppendingPathComponent:@"test"]; // 创建目录 [fileManager createDirectoryAtPath:testDirectory withIntermediateDirectories:YES attributes:nil error:nil];

testDirectory是上面代码生成的路径哦,不要忘了。我往test文件夹里写入三个文件,test00.txt ,test22.txt,text.33.txt。内容都是写入内容,write String。
NSString *testPath = [testDirectory stringByAppendingPathComponent:@"test00.txt"]; NSString *testPath2 = [testDirectory stringByAppendingPathComponent:@"test22.txt"]; NSString *testPath3 = [testDirectory stringByAppendingPathComponent:@"test33
NSString *string = @"写入内容,write String"; [fileManager createFileAtPath:testPath contents:[string dataUsingEncoding:NSUTF8StringEncoding] attributes:nil]; [fileManager createFileAtPath:testPath2 contents:[string dataUsingEncoding:NSUTF8StringEncoding] attributes:nil]; [fileManager createFileAtPath:testPath3 contents:[string dataUsingEncoding:NSUTF8StringEncoding] attributes:nil];

NSArray *paths = NSSearchPathForDirectoriesInDomains(NSDocumentDirectory, NSUserDomainMask, YES); NSString *documentsDirectory = [paths objectAtIndex:0]; NSLog(@"documentsDirectory%@",documentsDirectory); NSFileManager *fileManage = [NSFileManager defaultManager]; NSString *myDirectory = [documentsDirectory stringByAppendingPathComponent:@"test"]; NSArray *file = [fileManage subpathsOfDirectoryAtPath: myDirectory error:nil]; NSLog(@"%@",file); NSArray *files = [fileManage subpathsAtPath: myDirectory ]; NSLog(@"%@",files);
获取上面刚才test文件夹里的文件名
打印结果
2012-06-17 23:23:19.684 IosSandbox[947:f803] fileList:(
".DS_Store",
"test00.txt",
"test22.txt",
"test33.txt"
)
2012-06-17 23:23:19.686 IosSandbox[947:f803] fileLit(
".DS_Store",
"test00.txt",
"test22.txt",
"test33.txt"
)
两个方法都可以,隐藏的文件也打印出来了。//创建文件管理器 NSFileManager *fileManager = [NSFileManager defaultManager]; NSArray *paths = NSSearchPathForDirectoriesInDomains(NSDocumentDirectory, NSUserDomainMask, YES); NSString *documentsDirectory = [paths objectAtIndex:0]; //更改到待操作的目录下 [fileManager changeCurrentDirectoryPath:[documentsDirectory stringByExpandingTildeInPath]]; //创建文件fileName文件名称,contents文件的内容,如果开始没有内容可以设置为nil,attributes文件的属性,初始为nil NSString * fileName = @"testFileNSFileManager.txt"; NSArray *array = [[NSArray alloc] initWithObjects:@"hello world",@"hello world1", @"hello world2",nil]; [fileManager createFileAtPath:fileName contents:array attributes:nil];

5、删除文件
用NSMutableData创建混合数据,然后写到文件里。并按数据的类型把数据读出来
6.1写入数据:NSString * fileName = @"testFileNSFileManager.txt"; NSArray *paths = NSSearchPathForDirectoriesInDomains(NSDocumentDirectory, NSUserDomainMask, YES); NSString *documentsDirectory = [paths objectAtIndex:0]; //获取文件路径 NSString *path = [documentsDirectory stringByAppendingPathComponent:fileName]; //待写入的数据 NSString *temp = @"nihao 世界"; int dataInt = 1234; float dataFloat = 3.14f; //创建数据缓冲 NSMutableData *writer = [[NSMutableData alloc] init]; //将字符串添加到缓冲中 [writer appendData:[temp dataUsingEncoding:NSUTF8StringEncoding]]; //将其他数据添加到缓冲中 [writer appendBytes:&dataInt length:sizeof(dataInt)]; [writer appendBytes:&dataFloat length:sizeof(dataFloat)]; //将缓冲的数据写入到文件中 [writer writeToFile:path atomically:YES];

//读取数据: int intData; float floatData = 0.0; NSString *stringData; NSData *reader = [NSData dataWithContentsOfFile:path]; stringData = [[NSString alloc] initWithData:[reader subdataWithRange:NSMakeRange(0, [temp length])] encoding:NSUTF8StringEncoding]; [reader getBytes:&intData range:NSMakeRange([temp length], sizeof(intData))]; [reader getBytes:&floatData range:NSMakeRange([temp length] + sizeof(intData), sizeof(floatData))]; NSLog(@"stringData:%@ intData:%d floatData:%f", stringData, intData, floatData);
bundle是一个目录,其中包含了程序会使用到的资源.这些资源包含了如图像,声音,编译好的代码,nib文件(用户也会把bundle称为plug-in).对应bundle,cocoa提供了类NSBundle.
我们现在用bundle获取程序里的一张图片,并显示到View上。
// 通过使用下面的方法得到程序的main bundle NSBundle *mainBundle = [NSBundle mainBundle]; NSString *imagePath = [mainBundle pathForResource:@"QQ20120616-1" ofType:@"png"]; NSLog(@"%@", imagePath); UIImage *image = [[UIImage alloc]initWithContentsOfFile:imagePath]; UIImageView *imageView = [[UIImageView alloc] initWithImage:image]; [self.view addSubview:imageView];
/Users/rongfzh/Library/Application Support/iPhone Simulator/5.1/Applications/3B8EC78A-5EEE-4C2F-B0CB-4C3F02B996D2/iOSSandbox.app/QQ20120616-1.png
我们可以看到,图片在iOSSandbox.app这个包里,
- (BOOL)application:(UIApplication *)application didFinishLaunchingWithOptions:(NSDictionary *)launchOptions{ self.window = [[UIWindow alloc] initWithFrame:[[UIScreen mainScreen] bounds]]; RootViewController *rootView = [[RootViewController alloc] init]; rootView.title = @"Root View"; self.navController = [[UINavigationController alloc] init]; [self.navController pushViewController:rootView animated:YES]; [self.window addSubview:self.navController.view]; [self.window makeKeyAndVisible]; return YES;}8、添加UIBarButtonItem
bar ButtonItem分左右UIBarButtonItem。我们把左右的都添加上去。
- (void)viewDidLoad{ [super viewDidLoad]; UIBarButtonItem *leftButton = [[UIBarButtonItem alloc] initWithBarButtonSystemItem:UIBarButtonSystemItemAction target:self action:@selector(selectLeftAction:)]; self.navigationItem.leftBarButtonItem = leftButton; UIBarButtonItem *rightButton = [[UIBarButtonItem alloc] initWithBarButtonSystemItem:UIBarButtonSystemItemAdd target:self action:@selector(selectRightAction:)]; self.navigationItem.rightBarButtonItem = rightButton;}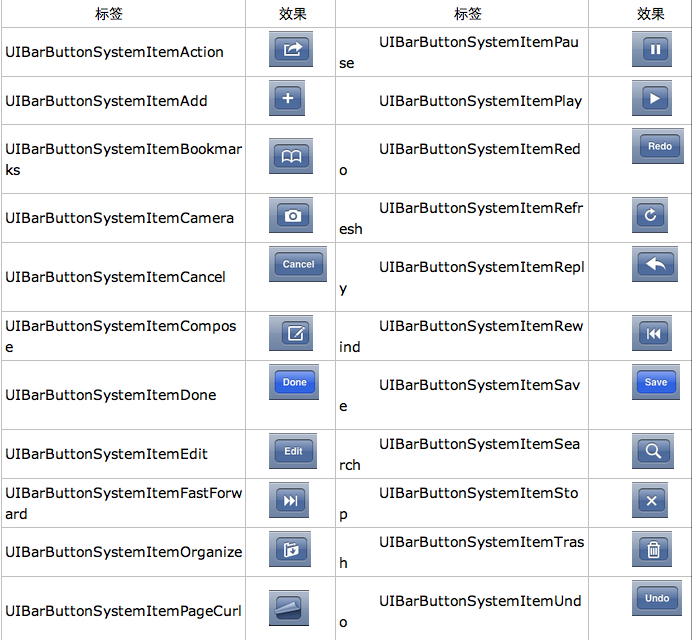
-(void)selectLeftAction:(id)sender{ UIAlertView *alter = [[UIAlertView alloc] initWithTitle:@"提示" message:@"你点击了导航栏左按钮" delegate:self cancelButtonTitle:@"确定" otherButtonTitles:nil, nil]; [alter show];}-(void)selectRightAction:(id)sender{ UIAlertView *alter = [[UIAlertView alloc] initWithTitle:@"提示" message:@"你点击了导航栏右按钮" delegate:self cancelButtonTitle:@"确定" otherButtonTitles:nil, nil]; [alter show];}- (IBAction)gotoSecondView:(id)sender { SecondViewController *secondView = [[SecondViewController alloc] init]; [self.navigationController pushViewController:secondView animated:YES]; secondView.title = @"Second View";}在nav bar这样的效果是如何实现的呢?

.png)
这就是segmentedController。
NSArray *array = [NSArray arrayWithObjects:@"鸡翅",@"排骨", nil]; UISegmentedControl *segmentedController = [[UISegmentedControl alloc] initWithItems:array]; segmentedController.segmentedControlStyle = UISegmentedControlSegmentCenter; [segmentedController addTarget:self action:@selector(segmentAction:) forControlEvents:UIControlEventValueChanged]; self.navigationItem.titleView = segmentedController;
-(void)segmentAction:(id)sender{ switch ([sender selectedSegmentIndex]) { case 0: { UIAlertView *alter = [[UIAlertView alloc] initWithTitle:@"提示" message:@"你点击了鸡翅" delegate:self cancelButtonTitle:@"确定" otherButtonTitles:nil, nil]; [alter show]; } break; case 1: { UIAlertView *alter = [[UIAlertView alloc] initWithTitle:@"提示" message:@"你点击了排骨" delegate:self cancelButtonTitle:@"确定" otherButtonTitles:nil, nil]; [alter show]; } break; default: break; }4、自定义backBarButtonItem
左上角的返回上级View的barButtonitem的名字是上级目录的Title,如果title或者适合做button的名字,怎么办呢?我们可以自己定义
UIBarButtonItem *backButton = [[UIBarButtonItem alloc] initWithTitle:@"根视图" style:UIBarButtonItemStyleDone target:nil action:nil]; self.navigationItem.backBarBuutton
6、自定义title
UINavigationController的title可以用别view替代,比如用UIButton UILable等,下面我用UIButton.
在SecondViewController.m中添加下面如下。
- (void)viewDidLoad{ [super viewDidLoad]; UIButton *button = [UIButton buttonWithType: UIButtonTypeRoundedRect]; [button setTitle: @"自定义title" forState: UIControlStateNormal]; [button sizeToFit]; self.navigationItem.titleView = button;}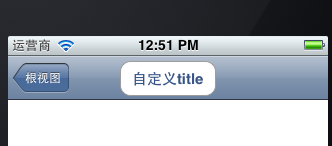
[self.navigationController setToolbarHidden:NO animated:YES];
UIBarButtonItem *one = [[UIBarButtonItem alloc] initWithBarButtonSystemItem:UIBarButtonSystemItemAdd target:nil action:nil]; UIBarButtonItem *two = [[UIBarButtonItem alloc] initWithBarButtonSystemItem:UIBarButtonSystemItemBookmarks target:nil action:nil]; UIBarButtonItem *three = [[UIBarButtonItem alloc] initWithBarButtonSystemItem:UIBarButtonSystemItemAction target:nil action:nil]; UIBarButtonItem *four = [[UIBarButtonItem alloc] initWithBarButtonSystemItem:UIBarButtonSystemItemEdit target:nil action:nil]; UIBarButtonItem *flexItem = [[UIBarButtonItem alloc] initWithBarButtonSystemItem:UIBarButtonSystemItemFlexibleSpace target:nil action:nil]; [self setToolbarItems:[NSArray arrayWithObjects:flexItem, one, flexItem, two, flexItem, three, flexItem, four, flexItem, nil]];
- (void)viewDidLoad{ [super viewDidLoad]; [self.navigationController setToolbarHidden:YES animated:YES]; UIBarButtonItem *addButton = [[UIBarButtonItem alloc] initWithBarButtonSystemItem:UIBarButtonSystemItemSearch target:self action:@selector(gotoThridView:)]; toolBar = [[UIToolbar alloc] initWithFrame:CGRectMake(0.0, self.view.frame.size.height - toolBar.frame.size.height - 44.0, self.view.frame.size.width, 44.0)]; [toolBar setBarStyle:UIBarStyleDefault]; toolBar.autoresizingMask = UIViewAutoresizingFlexibleTopMargin; [toolBar setItems:[NSArray arrayWithObject:addButton]]; [self.view addSubview:toolBar]; // Do any additional setup after loading the view from its nib.}- (IBAction)selectDate:(id)sender { NSDate *select = [datePicker date]; NSDateFormatter *dateFormatter = [[NSDateFormatter alloc] init]; [dateFormatter setDateFormat:@"yyyy-MM-dd HH:mm"]; NSString *dateAndTime = [dateFormatter stringFromDate:select]; UIAlertView *alert = [[UIAlertView alloc] initWithTitle:@"时间提示" message:dateAndTime delegate:self cancelButtonTitle:@"确定" otherButtonTitles:nil, nil]; [alert show];}[dateFormatter setDateFormat:@"yyyy-MM-dd"];
iOS学习之WebView的使用
1、使用UIWebView加载网页
2、加载WebView
- (void)viewDidLoad{ [super viewDidLoad]; webView = [[UIWebView alloc] initWithFrame:CGRectMake(0, 0, 320, 480)]; NSURLRequest *request =[NSURLRequest requestWithURL:[NSURL URLWithString:@"http://www.baidu.com"]]; [self.view addSubview: webView]; [webView loadRequest:request];}手机的网络环境是实时变化的,网络慢的时候,怎么提示用户网页正在打开呢?在网页打开出错的时候怎么提示用户呢?这时候我们就需要知道网页什么时候打开的,
3、实现协议,在ViewController.h修改如下:
#import <UIKit/UIKit.h>@interface ViewController : UIViewController<UIWebViewDelegate>{ UIWebView *webView;}@end1.- (void )webViewDidStartLoad:(UIWebView *)webView 网页开始加载的时候调用
2.- (void )webViewDidFinishLoad:(UIWebView *)webView 网页加载完成的时候调用
3.- (void)webView:(UIWebView *)webView didFailLoadWithError:(NSError *)error 网页加载错误的时候调用
2012-06-23 15:20:29.728 WebViewDemo[1001:f803] webViewDidStartLoad
2012-06-23 15:20:29.991 WebViewDemo[1001:f803] webViewDidFinishLoad
那我们试试error情况,把wifi关掉,运行打印结果:2012-06-23 15:23:58.939 WebViewDemo[1087:f803] webViewDidStartLoad
2012-06-23 15:23:59.016 WebViewDemo[1087:f803] webViewDidFinishLoad
2012-06-23 15:24:41.131 WebViewDemo[1134:f803] webViewDidStartLoad
2012-06-23 15:24:41.149 WebViewDemo[1134:f803] didFailLoadWithError:Error Domain=NSURLErrorDomain Code=-1009 "The Internet connection appears to be offline." UserInfo=0x6b41660 {NSErrorFailingURLStringKey=http://www.163.com/, NSErrorFailingURLKey=http://www.163.com/, NSLocalizedDescription=The Internet connection appears to be offline., NSUnderlyingError=0x6eae690 "The Internet connection appears to be offline."}
连接错误了,调用了didFailLoadWithError。5、加载等待界面
为了给用户更直观的界面效果,我们加上等待的loading界面试试
- (void) webViewDidStartLoad:(UIWebView *)webView{ //创建UIActivityIndicatorView背底半透明View UIView *view = [[UIView alloc] initWithFrame:CGRectMake(0, 0, 320, 480)]; [view setTag:108]; [view setBackgroundColor:[UIColor blackColor]]; [view setAlpha:0.5]; [self.view addSubview:view]; activityIndicator = [[UIActivityIndicatorView alloc] initWithFrame:CGRectMake(0.0f, 0.0f, 32.0f, 32.0f)]; [activityIndicator setCenter:view.center]; [activityIndicator setActivityIndicatorViewStyle:UIActivityIndicatorViewStyleWhite]; [view addSubview:activityIndicator]; [activityIndicator startAnimating];- (void) webViewDidFinishLoad:(UIWebView *)webView{ [activityIndicator stopAnimating]; UIView *view = (UIView*)[self.view viewWithTag:108]; [view removeFromSuperview]; NSLog(@"webViewDidFinishLoad");}- (void) webView:(UIWebView *)webView didFailLoadWithError:(NSError *)error{ [activityIndicator stopAnimating]; UIView *view = (UIView*)[self.view viewWithTag:108]; [view removeFromSuperview];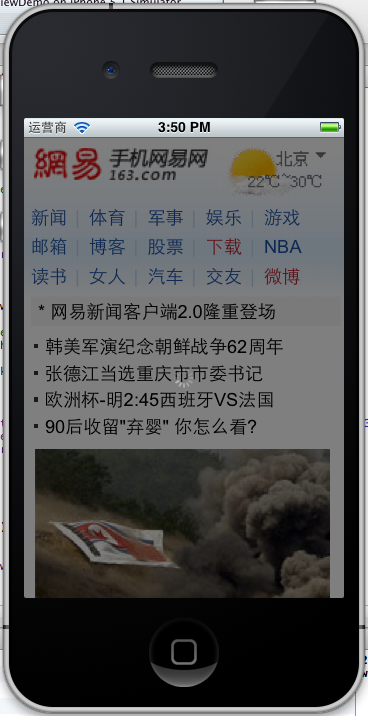
1、新建一个Single View Application ,命名为PickerViewDemo
2、拖放控件
2.1、拖放一个UIPickerView,放置在View的最下方
2.2、拖放一个Toolbar控件,放置在View的外面,让它不属于View的子控件,并把item命名为“完成”,效果如下:

3、创建映射
#import <UIKit/UIKit.h>@interface ViewController : UIViewController{ NSArray *pickerArray;}- (IBAction)selectButton:(id)sender;@property (strong, nonatomic) IBOutlet UIToolbar *doneToolbar;@property (strong, nonatomic) IBOutlet UIPickerView *selectPicker;@property (strong, nonatomic) IBOutlet UITextField *textField;@end4、实现数据源和协议
#import <UIKit/UIKit.h>@interface ViewController : UIViewController<UIPickerViewDelegate, UITextFieldDelegate,UIPickerViewDataSource>{ NSArray *pickerArray;}- (IBAction)selectButton:(id)sender;@property (strong, nonatomic) IBOutlet UIToolbar *doneToolbar;@property (strong, nonatomic) IBOutlet UIPickerView *selectPicker;@property (strong, nonatomic) IBOutlet UITextField *textField;@end-(NSInteger)numberOfComponentsInPickerView:(UIPickerView *)pickerView{ return 1;}-(NSInteger) pickerView:(UIPickerView *)pickerView numberOfRowsInComponent:(NSInteger)component{ return [pickerArray count];}-(NSString*) pickerView:(UIPickerView *)pickerView titleForRow:(NSInteger)row forComponent:(NSInteger)component{ return [pickerArray objectAtIndex:row];}-(void)textFieldDidEndEditing:(UITextField *)textField{ NSInteger row = [selectPicker selectedRowInComponent:0]; self.textField.text = [pickerArray objectAtIndex:row];}上面numberOfComponentsInPickerView返回有几个PickerView ,
textFieldDidEndEditing这个在textField结束编辑时,显示PickerView选择中的数据。
- (IBAction)selectButton:(id)sender { [textField endEditing:YES];}5、初始化
- (void)viewDidLoad{ [super viewDidLoad]; pickerArray = [NSArray arrayWithObjects:@"动物",@"植物",@"石头",@"天空", nil]; textField.inputView = selectPicker; textField.inputAccessoryView = doneToolbar; textField.delegate = self; selectPicker.delegate = self; selectPicker.dataSource = self; selectPicker.frame = CGRectMake(0, 480, 320, 216);}
1、打开上篇PickerViewDemo项目
#import <UIKit/UIKit.h>@interface ViewController : UIViewController<UIPickerViewDelegate, UITextFieldDelegate,UIPickerViewDataSource>{ NSArray *pickerArray; NSArray *subPickerArray; NSDictionary *dicPicker;}- (IBAction)selectButton:(id)sender;@property (strong, nonatomic) IBOutlet UIToolbar *doneToolbar;@property (strong, nonatomic) IBOutlet UIPickerView *selectPicker;@property (strong, nonatomic) IBOutlet UITextField *textField;@end2、初始化
- (void)viewDidLoad{ [super viewDidLoad]; pickerArray = [NSArray arrayWithObjects:@"动物",@"植物",@"石头", nil]; dicPicker = [NSDictionary dictionaryWithObjectsAndKeys: [NSArray arrayWithObjects:@"鱼",@"鸟",@"虫子", nil], @"动物", [NSArray arrayWithObjects:@"花",@"草",@"葵花", nil], @"植物", [NSArray arrayWithObjects:@"疯狂的石头",@"花岗岩",@"鹅卵石", nil], @"石头",nil]; subPickerArray = [dicPicker objectForKey:@"动物"]; textField.inputView = selectPicker; textField.inputAccessoryView = doneToolbar; textField.delegate = self; selectPicker.delegate = self; selectPicker.dataSource = self; selectPicker.frame = CGRectMake(0, 480, 320, 216);}3、Component返回两个,这样就有两个齿轮了。
-(NSInteger)numberOfComponentsInPickerView:(UIPickerView *)pickerView{ return 2;}4、使用宏
在#import "ViewController.h"下面定义两个宏,代表UIPickerView齿轮的左边的部分和右边的部分。左边的部分是0,右边的是1.
#import "ViewController.h"#define kFirstComponent 0#define kSubComponent 1
5、判断是那个齿轮,返回相应的数据的Count。
-(NSInteger) pickerView:(UIPickerView *)pickerView numberOfRowsInComponent:(NSInteger)component{ if(component == kFirstComponent){ return [pickerArray count]; }else { return [subPickerArray count]; }}6、根据component返回相应的String数据
-(NSString*) pickerView:(UIPickerView *)pickerView titleForRow:(NSInteger)row forComponent:(NSInteger)component{ if(component == kFirstComponent){ return [pickerArray objectAtIndex:row]; }else { return [subPickerArray objectAtIndex:row]; }}7、拖动左边的齿轮时,右边的数据相应的Reload更新。
-(void)pickerView:(UIPickerView *)pickerView didSelectRow:(NSInteger)row inComponent:(NSInteger)component{ if (component == kFirstComponent) { subPickerArray = [dicPicker objectForKey:[pickerArray objectAtIndex:row]]; [pickerView selectRow:0 inComponent:kSubComponent animated:YES]; [pickerView reloadComponent:kSubComponent]; }}8、相应选择的数据,并显示在TextField上。
-(void)textFieldDidEndEditing:(UITextField *)textField{ NSInteger firstViewRow = [selectPicker selectedRowInComponent:kFirstComponent]; NSInteger subViewRow = [selectPicker selectedRowInComponent:kSubComponent]; NSString * firstString = [pickerArray objectAtIndex:firstViewRow]; NSString * subString = [[dicPicker objectForKey:[pickerArray objectAtIndex:firstViewRow]] objectAtIndex:subViewRow] ; NSString *textString = [[NSString alloc ] initWithFormat:@"您选择了:%@%@%@", firstString, @" 里的 ", subString]; self.textField.text = textString;}- (IBAction)selectButton:(id)sender { [textField endEditing:YES];}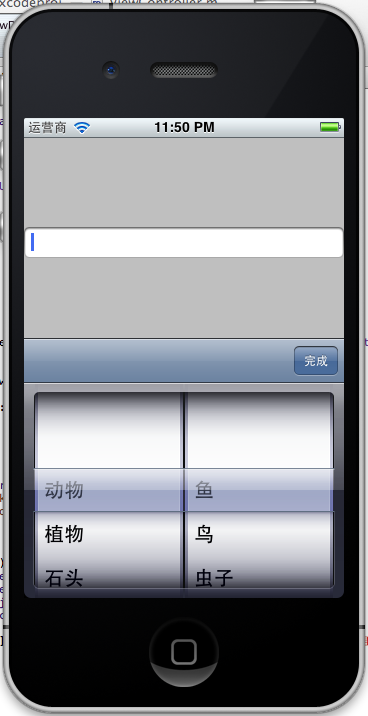
iOS开发之iOS程序偏好设置(Settings Bundle)的使用
1、添加设置项
选择Single View App模版创建。项目创建完成,在项目里选择创建新文件,选择Resource 中的Settings Bundle,创建。
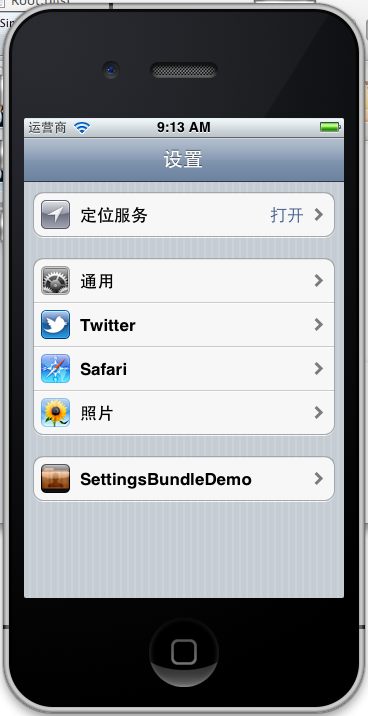
2、设置的控件
默认的生成的设置项里有这个几个控件。
分别是:Group分组,文本框,Slider,开关控件几个控件。
设置想能使用的控件如下:
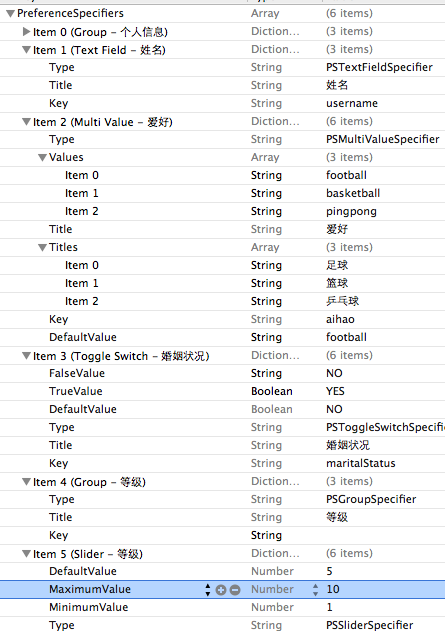
PSTextFieldSpecifier文字PSTitleValueSpecifier开关控件PSToggleSwitchSpecifierSliderPSSliderSpecifierMultivaluePSMultiValueSpecifierGroupPSGroupSpecifier子面板PSChildPaneSpecifier.3、编辑设置项的文件
我们把原有的项删掉,添加自己的设置项,添加如下:
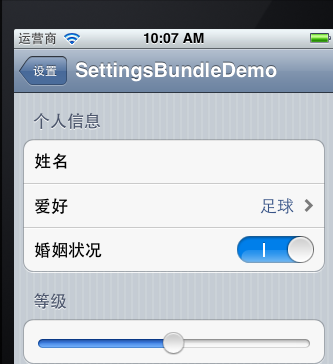
4、在程序中获取Settings 和写入Settings 添加UI
5、实现读取设置和保存代码
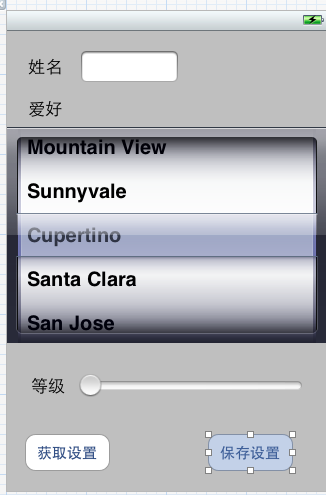
- (IBAction)getSettings:(id)sender { NSUserDefaults *defaults = [NSUserDefaults standardUserDefaults]; username.text = [defaults objectForKey:@"username"]; selectedAihao = [defaults objectForKey:@"aihao"]; NSLog(@"aihao:%@",selectedAihao); NSInteger aihaoIndex = [aihaoValues indexOfObject:selectedAihao]; [pickerView selectRow:aihaoIndex inComponent:0 animated:YES]; [level setValue:[defaults integerForKey:@"levelState"]];}- (IBAction)setSettings:(id)sender { NSUserDefaults *defaults = [NSUserDefaults standardUserDefaults]; [defaults setValue:username.text forKey:@"username"]; NSInteger aihaoIndex = [aihaoTitles indexOfObject:selectedAihao]; [defaults setValue:[aihaoValues objectAtIndex:aihaoIndex] forKey:@"aihao"]; [defaults setInteger:level.value forKey:@"levelState"]; UIAlertView *alert = [[UIAlertView alloc] initWithTitle:@"偏好设置" message:@"偏好设置已经保存!" delegate:nil cancelButtonTitle: @"完成" otherButtonTitles:nil]; [alert show];}#import <UIKit/UIKit.h>@interface ViewController : UIViewController<UIPickerViewDelegate, UIPickerViewDataSource>{ NSMutableArray *aihaoTitles; NSMutableArray *aihaoValues; NSString *selectedAihao;}@property (strong, nonatomic) IBOutlet UITextField *username;@property (strong, nonatomic) IBOutlet UIPickerView *pickerView;@property (strong, nonatomic) IBOutlet UISlider *level;- (IBAction)getSettings:(id)sender;- (IBAction)setSettings:(id)sender;- (IBAction)doneEdit:(id)sender;@end#import "ViewController.h"@interface ViewController ()@end@implementation ViewController@synthesize username;@synthesize pickerView;@synthesize level;- (void)viewDidLoad{ [super viewDidLoad]; aihaoTitles = [[NSMutableArray alloc] init]; [aihaoTitles addObject:@"足球"]; [aihaoTitles addObject:@"篮球"]; [aihaoTitles addObject:@"乒乓球"]; aihaoValues = [[NSMutableArray alloc] init]; [aihaoValues addObject:@"football"]; [aihaoValues addObject:@"basketball"]; [aihaoValues addObject:@"pingpong"]; // Do any additional setup after loading the view, typically from a nib.}- (void)viewDidUnload{ [self setUsername:nil]; [self setPickerView:nil]; [self setLevel:nil]; [super viewDidUnload]; // Release any retained subviews of the main view.}- (BOOL)shouldAutorotateToInterfaceOrientation:(UIInterfaceOrientation)interfaceOrientation{ return (interfaceOrientation != UIInterfaceOrientationPortraitUpsideDown);}-(NSInteger) numberOfComponentsInPickerView:(UIPickerView *)pickerView{ return 1;}-(NSInteger) pickerView:(UIPickerView *)pickerViewnumberOfRowsInComponent:(NSInteger)component{ return [aihaoTitles count];}-(NSString *) pickerView:(UIPickerView *)pickerView titleForRow:(NSInteger)row forComponent:(NSInteger)component{ return [aihaoTitles objectAtIndex:row];}-(void) pickerView:(UIPickerView *)pickerView didSelectRow:(NSInteger)row inComponent:(NSInteger)component{ selectedAihao = [aihaoTitles objectAtIndex:row];}- (IBAction)doneEdit:(id)sender{ }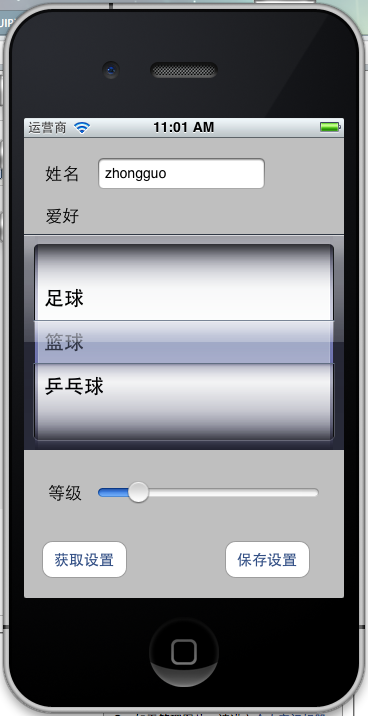

iOS学习之UITableView中Cell的操作
1、标记Cell。
-(void)tableView:(UITableView *)tableView didSelectRowAtIndexPath:(NSIndexPath *)indexPath{// NSString *rowString = [self.list objectAtIndex:[indexPath row]];// UIAlertView * alter = [[UIAlertView alloc] initWithTitle:@"选中的行信息" message:rowString delegate:self cancelButtonTitle:@"确定" otherButtonTitles:nil, nil];// [alter show]; UITableViewCell *cell = [tableView cellForRowAtIndexPath:indexPath]; if (cell.accessoryType == UITableViewCellAccessoryNone) { cell.accessoryType = UITableViewCellAccessoryCheckmark; }else { cell.accessoryType = UITableViewCellAccessoryNone; } [tableView deselectRowAtIndexPath:indexPath animated:YES];}UITableViewCellAccessoryDetailDisclosureButton
UITableViewCellAccessoryDisclosureIndicator
UITableViewCellAccessoryNone
2、删除Cell
在viewDidload里添加
[self.tableViewsetEditing:YES];
- (void)tableView:(UITableView *)tableView commitEditingStyle:(UITableViewCellEditingStyle)editingStyle forRowAtIndexPath:(NSIndexPath *)indexPath { NSUInteger row = [indexPath row]; if (editingStyle == UITableViewCellEditingStyleDelete) { [self.list removeObjectAtIndex:row]; [tableView deleteRowsAtIndexPaths:[NSArray arrayWithObject:indexPath] withRowAnimation:UITableViewRowAnimationAutomatic]; }}这个方法根据参数editingStyle是UITableViewCellEditingStyleDelete
UITableViewRowAnimationAutomatic
UITableViewRowAnimationTop
UITableViewRowAnimationBottom
UITableViewRowAnimationLeft
UITableViewRowAnimationRight
UITableViewRowAnimationMiddle
UITableViewRowAnimationFade
UITableViewRowAnimationNone
3、移动Cell
- (UITableViewCellEditingStyle)tableView:(UITableView *)tableView editingStyleForRowAtIndexPath:(NSIndexPath *)indexPath { return UITableViewCellEditingStyleInsert;} - (BOOL)tableView:(UITableView *)tableView canMoveRowAtIndexPath:(NSIndexPath *)indexPath { return YES;}- (void)tableView:(UITableView *)tableView moveRowAtIndexPath:(NSIndexPath *)sourceIndexPath toIndexPath:(NSIndexPath *)destinationIndexPath { NSUInteger fromRow = [sourceIndexPath row]; NSUInteger toRow = [destinationIndexPath row]; id object = [self.list objectAtIndex:fromRow]; [self.list removeObjectAtIndex:fromRow]; [self.list insertObject:object atIndex:toRow];}
4、插入cell:
4.1插入和删除差不多,在
- (void)tableView:(UITableView *)tableView commitEditingStyle:(UITableViewCellEditingStyle)editingStyle forRowAtIndexPath:(NSIndexPath *)indexPath添加UITableViewCellEditingStyleInsert判断- (void)tableView:(UITableView *)tableView commitEditingStyle:(UITableViewCellEditingStyle)editingStyle forRowAtIndexPath:(NSIndexPath *)indexPath { NSUInteger row = [indexPath row]; if (editingStyle == UITableViewCellEditingStyleDelete) { [self.list removeObjectAtIndex:row]; [tableView deleteRowsAtIndexPaths:[NSArray arrayWithObject:indexPath] withRowAnimation:UITableViewRowAnimationAutomatic]; }else if(editingStyle == UITableViewCellEditingStyleInsert ){ NSArray *insertIndexPaths = [NSArray arrayWithObjects:indexPath,nil]; [self.list insertObject:@"inset new Cell" atIndex:row]; [tableView insertRowsAtIndexPaths:insertIndexPaths withRowAnimation:UITableViewRowAnimationMiddle]; }}- (UITableViewCellEditingStyle)tableView:(UITableView *)tableView editingStyleForRowAtIndexPath:(NSIndexPath *)indexPath { return UITableViewCellEditingStyleInsert;}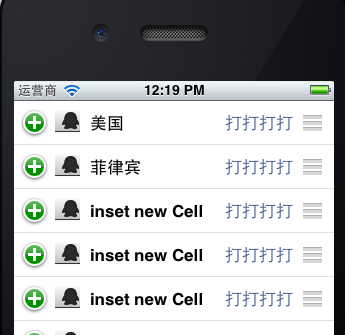
1、添加地图
#import <UIKit/UIKit.h>#import <MapKit/MapKit.h>#import <CoreLocation/CoreLocation.h>@interface ViewController : UIViewController <MKMapViewDelegate, CLLocationManagerDelegate> { MKMapView *map; CLLocationManager *locationManager;}@end- (void)viewDidLoad{ map = [[MKMapView alloc] initWithFrame:[self.view bounds]]; map.showsUserLocation = YES; map.mapType = MKMapTypeSatellite; [self.view addSubview:map]; [super viewDidLoad]; // Do any additional setup after loading the view, typically from a nib.}这里map.mapType =MKMapTypeSatellite;我用到是卫星地图,可以使用标准的地图,
map.mapType =MKMapTypeStandard;
2、定位到指定经纬度
CLLocationCoordinate2D coords = CLLocationCoordinate2DMake(39.915352,116.397105); float zoomLevel = 0.02; MKCoordinateRegion region = MKCoordinateRegionMake(coords, MKCoordinateSpanMake(zoomLevel, zoomLevel)); [map setRegion:[map regionThatFits:region] animated:YES];<span style="font-family: Tahoma; line-height: 26px; background-color: rgb(255, 255, 255);"> </span>
3、添加标注大头针
#import <Foundation/Foundation.h>#import <MapKit/MapKit.h>@interface CustomAnnotation : NSObject <MKAnnotation>{ CLLocationCoordinate2D coordinate; NSString *title; NSString *subtitle;}-(id) initWithCoordinate:(CLLocationCoordinate2D) coords;@property (nonatomic, readonly) CLLocationCoordinate2D coordinate;@property (nonatomic, retain) NSString *title;@property (nonatomic, retain) NSString *subtitle;@end#import "CustomAnnotation.h"@implementation CustomAnnotation@synthesize coordinate, title, subtitle;-(id) initWithCoordinate:(CLLocationCoordinate2D) coords{ if (self = [super init]) { coordinate = coords; } return self;}@end-(void)createAnnotationWithCoords:(CLLocationCoordinate2D) coords { CustomAnnotation *annotation = [[CustomAnnotation alloc] initWithCoordinate: coords]; annotation.title = @"标题"; annotation.subtitle = @"子标题"; [map addAnnotation:annotation];}CLLocationCoordinate2D coords = CLLocationCoordinate2DMake(39.915352,116.397105); float zoomLevel = 0.02; MKCoordinateRegion region = MKCoordinateRegionMake(coords, MKCoordinateSpanMake(zoomLevel, zoomLevel)); [map setRegion:[map regionThatFits:region] animated:YES]; [self createAnnotationWithCoords:coords];
4、定位到当前位置并获取当前经纬度
前面我们已经添加了locationManager,现在在DidViewLoad里直接调用
locationManager = [[CLLocationManager alloc] init]; locationManager.delegate = self; [locationManager startUpdatingLocation];
- (void)locationManager:(CLLocationManager *)manager didUpdateToLocation:(CLLocation *)newLocation fromLocation:(CLLocation *)oldLocation { [locationManager stopUpdatingLocation]; NSString *strLat = [NSString stringWithFormat:@"%.4f",newLocation.coordinate.latitude]; NSString *strLng = [NSString stringWithFormat:@"%.4f",newLocation.coordinate.longitude]; NSLog(@"Lat: %@ Lng: %@", strLat, strLng);}- (void)locationManager:(CLLocationManager *)manager didFailWithError:(NSError *)error { NSLog(@"locError:%@", error);}- (void)locationManager:(CLLocationManager *)manager didUpdateToLocation:(CLLocation *)newLocation fromLocation:(CLLocation *)oldLocation { [locationManager stopUpdatingLocation]; NSString *strLat = [NSString stringWithFormat:@"%.4f",newLocation.coordinate.latitude]; NSString *strLng = [NSString stringWithFormat:@"%.4f",newLocation.coordinate.longitude]; NSLog(@"Lat: %@ Lng: %@", strLat, strLng); CLLocationCoordinate2D coords = CLLocationCoordinate2DMake(newLocation.coordinate.latitude,newLocation.coordinate.longitude); float zoomLevel = 0.02; MKCoordinateRegion region = MKCoordinateRegionMake(coords,MKCoordinateSpanMake(zoomLevel, zoomLevel)); [map setRegion:[map regionThatFits:region] animated:YES];}5、会遇到的问题:
运行是发现了编译错误:
Undefined symbols for architecture i386:
"_CLLocationCoordinate2DMake", referenced from:
-[ViewController viewDidLoad] in ViewController.o
-[ViewController locationManager:didUpdateToLocation:fromLocation:] in ViewController.o
"_OBJC_CLASS_$_MKMapView", referenced from:
objc-class-ref in ViewController.o
"_OBJC_CLASS_$_CLLocationManager", referenced from:
objc-class-ref in ViewController.o
ld: symbol(s) not found for architecture i386
clang: error: linker command failed with exit code 1 (use -v to see invocation)
这是为什么呢?没有添加对应的FrameWork。iOS学习之sqlite的创建数据库,表,插入查看数据
iOS sqlite数据库操作。步骤是:
先加入sqlite开发库libsqlite3.dylib,
新建或打开数据库,
创建数据表,
插入数据,
1、新建项目sqliteDemo,添加使用sqlite的库libsqlite3.dylib
2、sqlite 的方法
sqlite3 *db, 数据库句柄,跟文件句柄FILE很类似
sqlite3_open(), 打开数据库,没有数据库时创建。
sqlite3_exec(), 执行非查询的sql语句
Sqlite3_step(), 在调用sqlite3_prepare后,使用这个函数在记录集中移动。
Sqlite3_close(), 关闭数据库文件
还有一系列的函数,用于从记录集字段中获取数据,如
sqlite3_column_text(), 取text类型的数据。
sqlite3_column_blob(),取blob类型的数据
sqlite3_column_int(), 取int类型的数据
3、获取沙盒目录,并创建或打开数据库。
viewController.h头文件添加一个成员变量,并包含头文件sqlite3.h
#import <UIKit/UIKit.h>#import <sqlite3.h>@interface ViewController : UIViewController{ sqlite3 *db;}@end#define DBNAME @"personinfo.sqlite"#define NAME @"name"#define AGE @"age"#define ADDRESS @"address"#define TABLENAME @"PERSONINFO" NSArray *paths = NSSearchPathForDirectoriesInDomains(NSDocumentDirectory, NSUserDomainMask, YES); NSString *documents = [paths objectAtIndex:0]; NSString *database_path = [documents stringByAppendingPathComponent:DBNAME]; if (sqlite3_open([database_path UTF8String], &db) != SQLITE_OK) { sqlite3_close(db); NSLog(@"数据库打开失败"); }4、创建数据表
创建一个独立的执行sql语句的方法,传入sql语句,就执行sql语句
-(void)execSql:(NSString *)sql{ char *err; if (sqlite3_exec(db, [sql UTF8String], NULL, NULL, &err) != SQLITE_OK) { sqlite3_close(db); NSLog(@"数据库操作数据失败!"); }}[self execSql:sqlCreateTable];
5、插入数据:
NSString *sql1 = [NSString stringWithFormat: @"INSERT INTO '%@' ('%@', '%@', '%@') VALUES ('%@', '%@', '%@')", TABLENAME, NAME, AGE, ADDRESS, @"张三", @"23", @"西城区"]; NSString *sql2 = [NSString stringWithFormat: @"INSERT INTO '%@' ('%@', '%@', '%@') VALUES ('%@', '%@', '%@')", TABLENAME, NAME, AGE, ADDRESS, @"老六", @"20", @"东城区"]; [self execSql:sql1]; [self execSql:sql2];6、查询数据库并打印数据
NSString *sqlQuery = @"SELECT * FROM PERSONINFO"; sqlite3_stmt * statement; if (sqlite3_prepare_v2(db, [sqlQuery UTF8String], -1, &statement, nil) == SQLITE_OK) { while (sqlite3_step(statement) == SQLITE_ROW) { char *name = (char*)sqlite3_column_text(statement, 1); NSString *nsNameStr = [[NSString alloc]initWithUTF8String:name]; int age = sqlite3_column_int(statement, 2); char *address = (char*)sqlite3_column_text(statement, 3); NSString *nsAddressStr = [[NSString alloc]initWithUTF8String:address]; NSLog(@"name:%@ age:%d address:%@",nsNameStr,age, nsAddressStr); } } sqlite3_close(db);2012-06-29 13:25:32.206 sqlitDemo[3587:f803] name:老六 age:20 address:东城区

#import <Foundation/Foundation.h>@interface HMCustomSwitch : UISlider { BOOL on; UIColor *tintColor; UIView *clippingView; UILabel *rightLabel; UILabel *leftLabel; // private member BOOL m_touchedSelf;}@property(nonatomic,getter=isOn) BOOL on;@property (nonatomic,retain) UIColor *tintColor;@property (nonatomic,retain) UIView *clippingView;@property (nonatomic,retain) UILabel *rightLabel;@property (nonatomic,retain) UILabel *leftLabel;+ (HMCustomSwitch *) switchWithLeftText: (NSString *) tag1 andRight: (NSString *) tag2;- (void)setOn:(BOOL)on animated:(BOOL)animated;#import "HMCustomSwitch.h"@implementation HMCustomSwitch@synthesize on;@synthesize tintColor, clippingView, leftLabel, rightLabel;+(HMCustomSwitch *)switchWithLeftText:(NSString *)leftText andRight:(NSString *)rightText{ HMCustomSwitch *switchView = [[HMCustomSwitch alloc] initWithFrame:CGRectZero]; switchView.leftLabel.text = leftText; switchView.rightLabel.text = rightText; return [switchView autorelease];}-(id)initWithFrame:(CGRect)rect{ if ((self=[super initWithFrame:CGRectMake(rect.origin.x,rect.origin.y,95,27)])) { // self.clipsToBounds = YES; [self awakeFromNib]; // do all setup in awakeFromNib so that control can be created manually or in a nib file } return self;}-(void)awakeFromNib{ [super awakeFromNib]; self.backgroundColor = [UIColor clearColor]; [self setThumbImage:[UIImage imageNamed:@"switchThumb.png"] forState:UIControlStateNormal]; [self setMinimumTrackImage:[UIImage imageNamed:@"switchBlueBg.png"] forState:UIControlStateNormal]; [self setMaximumTrackImage:[UIImage imageNamed:@"switchOffPlain.png"] forState:UIControlStateNormal]; self.minimumValue = 0; self.maximumValue = 1; self.continuous = NO; self.on = NO; self.value = 0.0; self.clippingView = [[UIView alloc] initWithFrame:CGRectMake(4,2,87,23)]; self.clippingView.clipsToBounds = YES; self.clippingView.userInteractionEnabled = NO; self.clippingView.backgroundColor = [UIColor clearColor]; [self addSubview:self.clippingView]; [self.clippingView release]; NSString *leftLabelText = NSLocalizedString(@"ON","Custom UISwitch ON label. If localized to empty string then I/O will be used"); if ([leftLabelText length] == 0) { leftLabelText = @"l"; // use helvetica lowercase L to be a 1. } self.leftLabel = [[UILabel alloc] init]; self.leftLabel.frame = CGRectMake(0, 0, 48, 23); self.leftLabel.text = leftLabelText; self.leftLabel.textAlignment = NSTextAlignmentCenter; self.leftLabel.font = [UIFont boldSystemFontOfSize:17]; self.leftLabel.textColor = [UIColor whiteColor]; self.leftLabel.backgroundColor = [UIColor clearColor]; // self.leftLabel.shadowColor = [UIColor redColor]; // self.leftLabel.shadowOffset = CGSizeMake(0,0); [self.clippingView addSubview:self.leftLabel]; [self.leftLabel release]; NSString *rightLabelText = NSLocalizedString(@"OFF","Custom UISwitch OFF label. If localized to empty string then I/O will be used"); if ([rightLabelText length] == 0) { rightLabelText = @"O"; // use helvetica uppercase o to be a 0. } self.rightLabel = [[UILabel alloc] init]; self.rightLabel.frame = CGRectMake(95, 0, 48, 23); self.rightLabel.text = rightLabelText; self.rightLabel.textAlignment = NSTextAlignmentCenter; self.rightLabel.font = [UIFont boldSystemFontOfSize:17]; self.rightLabel.textColor = [UIColor grayColor]; self.rightLabel.backgroundColor = [UIColor clearColor]; // self.rightLabel.shadowColor = [UIColor redColor]; // self.rightLabel.shadowOffset = CGSizeMake(0,0); [self.clippingView addSubview:self.rightLabel]; [self.rightLabel release]; }-(void)layoutSubviews{ [super layoutSubviews]; // NSLog(@"leftLabel=%@",NSStringFromCGRect(self.leftLabel.frame)); // move the labels to the front [self.clippingView removeFromSuperview]; [self addSubview:self.clippingView]; CGFloat thumbWidth = self.currentThumbImage.size.width; CGFloat switchWidth = self.bounds.size.width; CGFloat labelWidth = switchWidth - thumbWidth; CGFloat inset = self.clippingView.frame.origin.x; // NSInteger xPos = self.value * (self.bounds.size.width - thumbWidth) - (self.leftLabel.frame.size.width - thumbWidth/2); NSInteger xPos = self.value * labelWidth - labelWidth - inset; self.leftLabel.frame = CGRectMake(xPos, 0, labelWidth, 23); // xPos = self.value * (self.bounds.size.width - thumbWidth) + (self.rightLabel.frame.size.width - thumbWidth/2); xPos = switchWidth + (self.value * labelWidth - labelWidth) - inset; self.rightLabel.frame = CGRectMake(xPos, 0, labelWidth, 23); // NSLog(@"value=%f xPos=%i",self.value,xPos); // NSLog(@"thumbWidth=%f self.bounds.size.width=%f",thumbWidth,self.bounds.size.width);}- (UIImage *)image:(UIImage*)image tintedWithColor:(UIColor *)tint { if (tint != nil) { UIGraphicsBeginImageContext(image.size); //draw mask so the alpha is respected CGContextRef currentContext = UIGraphicsGetCurrentContext(); CGImageRef maskImage = [image CGImage]; CGContextClipToMask(currentContext, CGRectMake(0, 0, image.size.width, image.size.height), maskImage); CGContextDrawImage(currentContext, CGRectMake(0,0, image.size.width, image.size.height), image.CGImage); [image drawAtPoint:CGPointMake(0,0)]; [tint setFill]; UIRectFillUsingBlendMode(CGRectMake(0,0,image.size.width,image.size.height),kCGBlendModeColor); UIImage *newImage = UIGraphicsGetImageFromCurrentImageContext(); UIGraphicsEndImageContext(); return newImage; } else { return image; }}-(void)setTintColor:(UIColor*)color{ if (color != tintColor) { [tintColor release]; tintColor = [color retain]; [self setMinimumTrackImage:[self image:[UIImage imageNamed:@"switchBlueBg.png"] tintedWithColor:tintColor] forState:UIControlStateNormal]; } }- (void)setOn:(BOOL)turnOn animated:(BOOL)animated;{ on = turnOn; if (animated) { [UIView beginAnimations:nil context:nil]; [UIView setAnimationDuration:0.2]; } if (on) { self.value = 1.0; } else { self.value = 0.0; } if (animated) { [UIView commitAnimations]; }}- (void)setOn:(BOOL)turnOn{ [self setOn:turnOn animated:NO];}- (void)endTrackingWithTouch:(UITouch *)touch withEvent:(UIEvent *)event{ NSLog(@"preendTrackingWithtouch"); [super endTrackingWithTouch:touch withEvent:event]; NSLog(@"postendTrackingWithtouch"); m_touchedSelf = YES; [self setOn:on animated:YES];}- (void)touchesBegan:(NSSet*)touches withEvent:(UIEvent*)event{ [super touchesBegan:touches withEvent:event]; NSLog(@"touchesBegan"); m_touchedSelf = NO; on = !on;}- (void)touchesEnded:(NSSet*)touches withEvent:(UIEvent*)event{ [super touchesEnded:touches withEvent:event]; NSLog(@"touchesEnded"); if (!m_touchedSelf) { [self setOn:on animated:YES]; [self sendActionsForControlEvents:UIControlEventValueChanged]; }}-(void)dealloc{ [tintColor release]; [clippingView release]; [rightLabel release]; [leftLabel release]; [super dealloc];}@end- (void)loadView{ UIView *contentView = [[UIView alloc] initWithFrame:[[UIScreen mainScreen] applicationFrame]]; self.view = contentView; contentView.backgroundColor = [UIColor whiteColor]; // Standard ON/OFF HMCustomSwitch *switchView = [[HMCustomSwitch alloc] initWithFrame:CGRectZero]; switchView.center = CGPointMake(160.0f, 20.0f); switchView.on = YES; [contentView addSubview:switchView]; [switchView release]; // Custom YES/NO switchView = [HMCustomSwitch switchWithLeftText:@"YES" andRight:@"NO"]; switchView.center = CGPointMake(160.0f, 60.0f); switchView.on = YES; [contentView addSubview:switchView]; // Custom font and color switchView = [HMCustomSwitch switchWithLeftText:@"Hello " andRight:@"ABC "]; switchView.center = CGPointMake(160.0f, 100.0f); switchView.on = YES; [switchView.leftLabel setFont:[UIFont boldSystemFontOfSize:13.0f]]; [switchView.rightLabel setFont:[UIFont italicSystemFontOfSize:15.0f]]; [switchView.rightLabel setTextColor:[UIColor blueColor]]; [contentView addSubview:switchView]; // Multiple lines switchView = [HMCustomSwitch switchWithLeftText:@"Hello\nWorld" andRight:@"Bye\nWorld"]; switchView.center = CGPointMake(160.0f, 140.0f); switchView.on = YES; switchView.tintColor = [UIColor orangeColor]; switchView.leftLabel.font = [UIFont boldSystemFontOfSize:9.0f]; switchView.rightLabel.font = [UIFont boldSystemFontOfSize:9.0f]; switchView.leftLabel.numberOfLines = 2; switchView.rightLabel.numberOfLines = 2; switchView.leftLabel.lineBreakMode = NSLineBreakByWordWrapping; switchView.rightLabel.lineBreakMode = NSLineBreakByWordWrapping; [contentView addSubview:switchView]; switchView = [[HMCustomSwitch alloc] init]; switchView.center = CGPointMake(160.0f, 180.0f); switchView.on = YES; switchView.tintColor = [UIColor purpleColor]; [contentView addSubview:switchView]; [switchView release]; switchView = [HMCustomSwitch switchWithLeftText:@"l" andRight:@"O"]; switchView.center = CGPointMake(160.0f, 220.0f);// customSwitch.tintColor = [UIColor colorWithRed:125.f/255.f green:157.f/255.f blue:93.f/255.f alpha:1.0];// customSwitch.tintColor = [UIColor colorWithRed:125.f/255.f green:157.f/255.f blue:93.f/255.f alpha:1.0]; [contentView addSubview:switchView]; // Standard ON/OFF switchView = [[HMCustomSwitch alloc] init]; switchView.center = CGPointMake(160.0f, 260.0f); switchView.tintColor = [UIColor colorWithRed:125.f/255.f green:157.f/255.f blue:93.f/255.f alpha:1.0]; [switchView addTarget:self action:@selector(switchFlipped:) forControlEvents:UIControlEventValueChanged]; [contentView addSubview:switchView]; [switchView release]; UIToolbar *toolbar = [[UIToolbar alloc] initWithFrame:CGRectMake(0, 420, 320, 40)]; toolbar.tintColor = [UIColor colorWithRed:125.f/255.f green:157.f/255.f blue:93.f/255.f alpha:1.0]; [contentView addSubview:toolbar]; [contentView release];}-(void)switchFlipped:(HMCustomSwitch*)switchView{ NSLog(@"switchFlipped=%f on:%@",switchView.value, (switchView.on?@"Y":@"N")); }- iOS开发入门实例
- Flex开发入门实例
- Portlet开发入门实例
- JPA开发入门实例
- Struts2开发入门实例
- iOS 开发实例
- iOS项目开发实例
- iOS入门实例文章目录
- iOS入门实例文章目录
- IOS入门实例(组件大全)
- iOS入门实例文章目录
- ios 开发入门资料
- IOS开发入门
- 【iOS开发】---- ARC 入门
- ios 入门开发三
- 第一章 ios开发入门
- iOS开发~OPenCV入门
- iOS应用开发入门
- HMM最大匹配分词算法(Python)
- 二分图最大匹配的König定理及其证明
- Hibernate merge、update与saveOrUpdate方法的区别
- Linux 的多线程编程的高效开发经验
- Java中如何读写cookie
- iOS开发入门实例
- 利用Fiddler模拟恶劣网络环境
- 西安网站建设公司做个网站要多少钱?
- 栈区,堆区,全局区,文字常量区,程序代码区 详解
- 关于NetBean 中出现的Tomcat 服务器无法启动的问题
- [置顶] 并查集详解 (转)
- hibernate generator class="" id详解
- 读取文件之<绝对路径>与<相对路径>
- VS2010+VisualDDK开发驱动需要注意的问题