plist文件的读写
来源:互联网 发布:御彩轩黄金版计划软件 编辑:程序博客网 时间:2024/05/17 02:12
Plist文件通常用于储存用户设置,也可以用于存储捆绑的信息
我们创建一个项目来学习plist文件的读写。
1、创建项目Plistdemo
项目创建之后可以找到项目对应的plist文件,打开如下图所示:
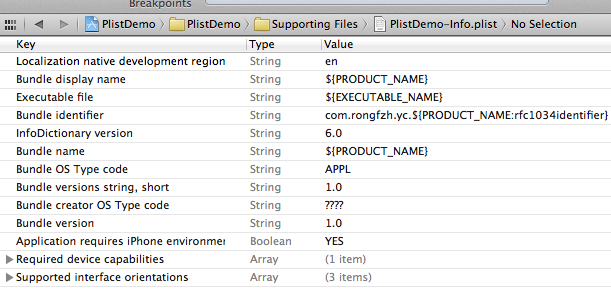
在编辑器中显示类似与表格的形式,可以在plist上右键,用源码方式打开,就能看到plist文件的xml格式了。
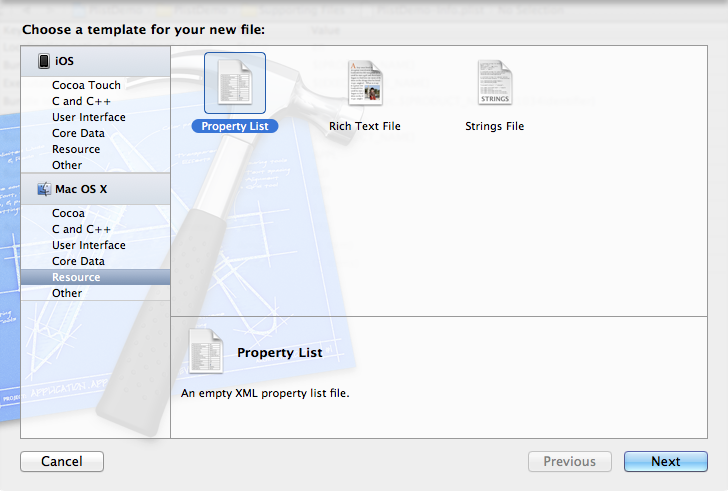
2、创建plist文件。
按command +N快捷键创建,或者File —> New —> New File,选择Mac OS X下的Property List
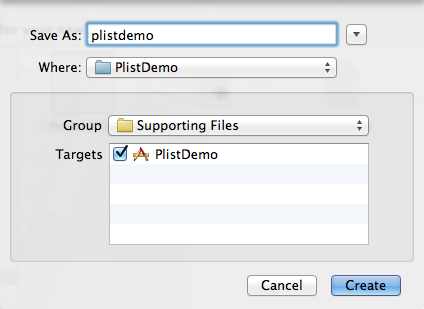
创建plist文件名为plistdemo。
打开plistdemo文件,在空白出右键,右键选择Add row 添加数据,添加成功一条数据后,在这条数据上右键看到 value Type选择Dictionary。点加号添加这个Dictionary下的数据
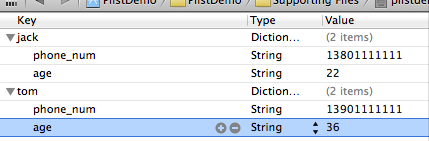
添加完key之后在后面添加Value的值,添加手机号和年龄
创建完成之后用source code查看到plist文件是这样的:
- <?xml version="1.0" encoding="UTF-8"?>
- <!DOCTYPE plist PUBLIC "-//Apple//DTD PLIST 1.0//EN" "http://www.apple.com/DTDs/PropertyList-1.0.dtd">
- <plist version="1.0">
- <dict>
- <key>jack</key>
- <dict>
- <key>phone_num</key>
- <string>13801111111</string>
- <key>age</key>
- <string>22</string>
- </dict>
- <key>tom</key>
- <dict>
- <key>phone_num</key>
- <string>13901111111</string>
- <key>age</key>
- <string>36</string>
- </dict>
- </dict>
- </plist>
3、读取plist文件的数据
- - (void)viewDidLoad
- {
- [super viewDidLoad];
- //读取plist
- NSString *plistPath = [[NSBundle mainBundle] pathForResource:@"plistdemo" ofType:@"plist"];
- NSMutableDictionary *data = [[NSMutableDictionary alloc] initWithContentsOfFile:plistPath];
- NSLog(@"%@", data);//直接打印数据。
- }
- PlistDemo[6822:f803] {
- jack = {
- age = 22;
- "phone_num" = 13801111111;
- };
- tom = {
- age = 36;
- "phone_num" = 13901111111;
- };
- }
这样就把数据读取出来了。
4、创建和写入plist文件
在开发过程中,有时候需要把程序的一些配置保存下来,或者游戏数据等等。 这时候需要写入Plist数据。
写入的plist文件会生成在对应程序的沙盒目录里。
接着上面读取plist数据的代码,加入了写入数据的代码,
- <strong>- (void)viewDidLoad
- {
- [super viewDidLoad];
- //读取plist
- NSString *plistPath = [[NSBundle mainBundle] pathForResource:@"plistdemo" ofType:@"plist"];
- NSMutableDictionary *data = [[NSMutableDictionary alloc] initWithContentsOfFile:plistPath];
- NSLog(@"%@", data);
- //添加一项内容
- [data setObject:@"add some content" forKey:@"c_key"];
- //获取应用程序沙盒的Documents目录
- NSArray *paths=NSSearchPathForDirectoriesInDomains(NSDocumentDirectory,NSUserDomainMask,YES);
- NSString *plistPath1 = [paths objectAtIndex:0];
- //得到完整的文件名
- NSString *filename=[plistPath1 stringByAppendingPathComponent:@"test.plist"];
- //输入写入
- [data writeToFile:filename atomically:YES];
- //那怎么证明我的数据写入了呢?读出来看看
- NSMutableDictionary *data1 = [[NSMutableDictionary alloc] initWithContentsOfFile:filename];
- NSLog(@"%@", data1);
- // Do any additional setup after loading the view, typically from a nib.
- }
- </strong>
在获取到自己手工创建的plistdemo.plist数据后,在这些数据后面加了一项内容,证明输入写入了。
怎么证明添加的内容写入了呢?下面是打印结果:
plist文件读写实例
在cocos2d-x中,对于plist文件,既可以读取,也可以进行写入的操作;下面先来看一个plist文件:


1 <?xml version="1.0" encoding="UTF-8"?> 2 <!DOCTYPE plist PUBLIC "-//Apple//DTD PLIST 1.0//EN" "http://www.apple.com/DTDs/PropertyList-1.0.dtd"/> 3 4 <plist version="1.0"> 5 <dict> 6 <key>string element key</key> 7 <string>string element value</string> 8 <key>array</key> 9 <array>10 <dict>11 <key>string in dictInArray key 0</key>12 <string>string in dictInArray value 0</string>13 <key>string in dictInArray key 1</key>14 <string>string in dictInArray value 1</string>15 </dict>16 <string>string in array</string>17 <array>18 <string>string 0 in arrayInArray</string>19 <string>string 1 in arrayInArray</string>20 </array>21 </array>22 <key>dictInDict, Hello World</key>23 <dict>24 <key>string in dictInDict key</key>25 <string>string in dictInDict value</string>26 <key>bool</key>27 <true/>28 <key>integer</key>29 <integer>1024</integer>30 <key>float</key>31 <real>1024.1024170</real>32 <key>double</key>33 <real>1024.1230000000000000</real>34 </dict>35 </dict>36 </plist>
先不看上面的plist文件到底有些什么内容;实际上它是由下一段代码生成的。
1 auto root = Dictionary::create(); 2 auto string = String::create("string element value"); 3 root->setObject(string, "string element key"); // 添加一个键值对 4 5 auto array = Array::create(); // 创建一个array 6 7 auto dictInArray = Dictionary::create(); 8 dictInArray->setObject(String::create("string in dictInArray value 0"), "string in dictInArray key 0"); 9 dictInArray->setObject(String::create("string in dictInArray value 1"), "string in dictInArray key 1");10 array->addObject(dictInArray); // 往数组中添加一个键值对11 12 array->addObject(String::create("string in array")); // 往数组中添加一个字符串13 14 auto arrayInArray = Array::create();15 arrayInArray->addObject(String::create("string 0 in arrayInArray"));16 arrayInArray->addObject(String::create("string 1 in arrayInArray"));17 array->addObject(arrayInArray); // 往数组中添加一个数组18 19 root->setObject(array, "array");20 21 auto dictInDict = Dictionary::create();22 dictInDict->setObject(String::create("string in dictInDict value"), "string in dictInDict key");23 24 //add boolean to the plist25 auto booleanObject = Bool::create(true);26 dictInDict->setObject(booleanObject, "bool");27 28 //add interger to the plist29 auto intObject = Integer::create(1024);30 dictInDict->setObject(intObject, "integer");31 32 //add float to the plist33 auto floatObject = Float::create(1024.1024f);34 dictInDict->setObject(floatObject, "float");35 36 //add double to the plist37 auto doubleObject = Double::create(1024.123);38 dictInDict->setObject(doubleObject, "double");39 40 root->setObject(dictInDict, "dictInDict, Hello World");41 // end with /42 std::string writablePath = FileUtils::getInstance()->getWritablePath();43 std::string fullPath = writablePath + "text.plist";44 if(root->writeToFile(fullPath.c_str()))45 log("see the plist file at %s", fullPath.c_str());46 else47 log("write plist file failed");48 49 // 读取上面创建的内容50 auto loadDict = __Dictionary::createWithContentsOfFile(fullPath.c_str());51 auto loadDictInDict = (__Dictionary*)loadDict->objectForKey("dictInDict, Hello World");52 auto boolValue = (__String*)loadDictInDict->objectForKey("bool");53 CCLOG("%s",boolValue->getCString());54 auto floatValue = (__String*)loadDictInDict->objectForKey("float");55 CCLOG("%s",floatValue->getCString());56 auto intValue = (__String*)loadDictInDict->objectForKey("integer");57 CCLOG("%s",intValue->getCString());58 auto doubleValue = (__String*)loadDictInDict->objectForKey("double");59 CCLOG("%s",doubleValue->getCString());
因此可以看出,对符合一定格式的plist文件,可以通过Dictionary进行操作。cocos2dx 3.0 的Dictionary,可以实现对Array,Dictionary,Integer,String,Bool等基础数据类型进行读写。
下面再来看另一种读取方式: 假定plist文件如下;
1 <plist version="1.0">2 <dict>3 <key>name</key>4 <string>Ls</string>5 <key>isgirl</key>6 <false/>7 </dict>8 </plist>
读取方式二,这种方法是借助VectorMap来进行读的:
1 FileUtils * fu = FileUtils::getInstance();2 ValueMap vm = fu->getValueMapFromFile("Info.plist");3 log("%s", vm["name"].asString().c_str()); // 读取string -->Ls4 bool bl = vm["isgirl"].asBool(); // 读取bool -->05 log("%d", bl);
如果文件节点也是一个ValueMap,则可以通过xm["xx"].asValueMap()将节点转换为ValueMap;如果根节点为数组也可能直接通过ValueVector.getValueVectorFromFile("xx")读取数据;
- plist文件的读写
- plist文件的读写
- plist文件的读写
- plist文件的读写
- plist文件的读写
- plist文件的读写
- plist文件的读写
- plist文件的读写
- plist文件的读写
- Plist文件的读写
- 读写.plist文件的例子
- ios plist文件的读写
- 关于Plist文件的读写
- .plist文件的读写操作
- Plist文件的读写操作
- plist 文件的读写操作
- iOS-plist文件的读写
- iOS plist文件的读写
- 机器学习实战之决策树(1)---ID3算法与信息熵,基尼不纯度
- 出现leaked ServiceConnection 的解决办法
- Android学习之绘图入门
- BT协议学习笔记1--阅读概览
- ecshop第三方登陆之微信登录
- plist文件的读写
- 《机器学习实战》读书笔记:第一章 机器学习基础
- 缓慢变化维抽取方案
- ExpandableListView长按监听实现
- 【selenium学习笔记】webdriver对页面元素的操作
- 有关sd卡
- Swift Compiler Error Arithmetic operation '** ' (on type '**') results in an overflow (溢出运算符'&+')
- ArrayAdapter详解:ArrayAdapter(Context context, int textViewResourceId, T[] objects)
- Centos 6.4 minimal最小化安装完成后,光盘安装setup工具