android Tabhost部件(二)
来源:互联网 发布:淘宝店铺数据异常 编辑:程序博客网 时间:2024/05/22 05:33
第一弹
底部菜单栏很重要,我看了一下很多应用软件都是用了底部菜单栏做。我这里使用了tabhost做了一种通用的(就是可以像微信那样显示未读消息数量的,虽然之前也做过但是layout下的xml写的太臃肿,这里去掉了很多不必要的层,个人看起来还是不错的,所以贴出来方便以后使用)。
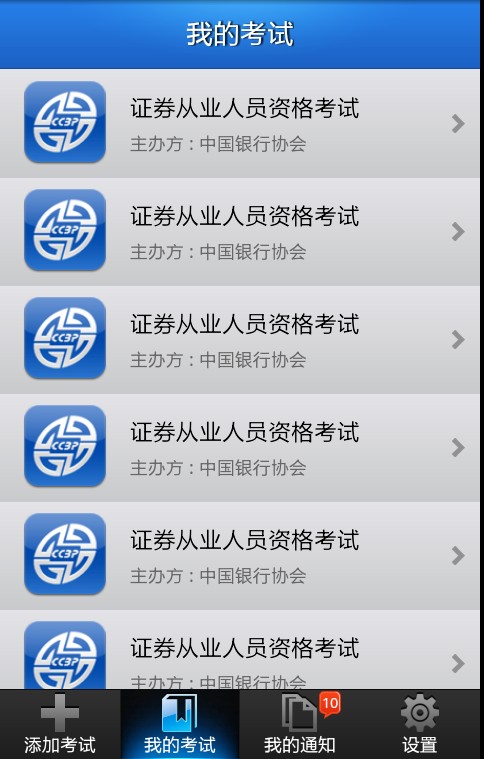
先看一下做出来之后的效果:
以后使用的时候就可以换成自己项目的图片和字体了,主框架不用变哈哈,
首先是要布局layout下xml文件 main.xml:
- <?xml version="1.0" encoding="UTF-8"?>
- <TabHost xmlns:android="http://schemas.android.com/apk/res/android"
- android:id="@android:id/tabhost"
- android:layout_width="fill_parent"
- android:layout_height="fill_parent" >
- <LinearLayout
- android:layout_width="fill_parent"
- android:layout_height="fill_parent"
- android:background="@color/bg_gray"
- android:orientation="vertical" >
- <FrameLayout
- android:id="@android:id/tabcontent"
- android:layout_width="fill_parent"
- android:layout_height="0.0dip"
- android:layout_weight="1.0" />
- <TabWidget
- android:id="@android:id/tabs"
- android:layout_width="fill_parent"
- android:layout_height="wrap_content"
- android:layout_weight="0.0"
- android:visibility="gone" />
- <FrameLayout
- android:layout_width="fill_parent"
- android:layout_height="wrap_content" >
- <RadioGroup
- android:id="@+id/main_tab_group"
- android:layout_width="fill_parent"
- android:layout_height="wrap_content"
- android:layout_gravity="bottom"
- android:background="@drawable/bottom1"
- android:gravity="bottom"
- android:orientation="horizontal"
- >
- <RadioButton
- android:id="@+id/main_tab_addExam"
- style="@style/MMTabButton"
- android:layout_weight="1.0"
- android:drawableTop="@drawable/bg_checkbox_icon_menu_0"
- android:text="添加考试" />
- <RadioButton
- android:id="@+id/main_tab_myExam"
- style="@style/MMTabButton"
- android:layout_weight="1.0"
- android:checked="true"
- android:drawableTop="@drawable/bg_checkbox_icon_menu_1"
- android:text="我的考试" />
- <RadioButton
- android:id="@+id/main_tab_message"
- style="@style/MMTabButton"
- android:layout_weight="1.0"
- android:drawableTop="@drawable/bg_checkbox_icon_menu_2"
- android:text="我的通知" />
- <RadioButton
- android:id="@+id/main_tab_settings"
- style="@style/MMTabButton"
- android:layout_weight="1.0"
- android:drawableTop="@drawable/bg_checkbox_icon_menu_3"
- android:text="设置" />
- </RadioGroup>
- <TextView
- android:id="@+id/main_tab_new_message"
- android:layout_width="wrap_content"
- android:layout_height="wrap_content"
- android:layout_gravity="center_horizontal|top"
- android:layout_marginLeft="60dip"
- android:layout_marginTop="1dip"
- android:background="@drawable/tips"
- android:gravity="center"
- android:text="1"
- android:textColor="#ffffff"
- android:textSize="10sp"
- android:visibility="gone" />
- </FrameLayout>
- </LinearLayout>
- </TabHost>
在RadioGroup的外面加了一个FrameLayout,主要是为了使用TextView显示消息数量,这里是居中靠左60dip,可能你会问直接写死能支持多分辨率吗,这个我在320*480的手机上试过没问题的,因为dip是与设备无关的支持多分辨率,至于1280*800平板电脑这样的分辨率我就不能保证了,哈哈!
接下来是样式布局:
- <style name="MMTabButton">
- <item name="android:textSize">12.0dip</item>
- <item name="android:gravity">center_horizontal</item>
- <item name="android:background">@drawable/bg_checkbox_menus</item>
- <item name="android:layout_width">fill_parent</item>
- <item name="android:layout_height">wrap_content</item>
- <item name="android:button">@null</item>
- <item name="android:textColor">@color/white</item>
- <item name="android:layout_weight">1.0</item>
- <item name="android:paddingBottom">2.0dip</item>
- <item name="android:paddingTop">2.0dip</item>
- </style>
在drawable下bg_checkbox_menus.xml
- <?xml version="1.0" encoding="utf-8"?>
- <selector xmlns:android="http://schemas.android.com/apk/res/android">
- <item
- android:state_checked="false"
- android:drawable="@drawable/mm_trans" />
- <item
- android:state_checked="true"
- android:drawable="@drawable/home_btn_bg" />
- </selector>
其他的那四个都合这个一样点击后图片换成亮色的,所以就不一一贴出来了。
最后看MainActivity这个类:
- package cn.com.karl.test;
- import android.app.TabActivity;
- import android.content.Intent;
- import android.os.Bundle;
- import android.view.View;
- import android.view.Window;
- import android.widget.RadioGroup;
- import android.widget.RadioGroup.OnCheckedChangeListener;
- import android.widget.TabHost;
- import android.widget.TextView;
- public class MainActivity extends TabActivity {
- /** Called when the activity is first created. */
- private TabHost tabHost;
- private TextView main_tab_new_message;
- @Override
- public void onCreate(Bundle savedInstanceState) {
- super.onCreate(savedInstanceState);
- this.requestWindowFeature(Window.FEATURE_NO_TITLE);
- setContentView(R.layout.main);
- main_tab_new_message=(TextView) findViewById(R.id.main_tab_new_message);
- main_tab_new_message.setVisibility(View.VISIBLE);
- main_tab_new_message.setText("10");
- tabHost=this.getTabHost();
- TabHost.TabSpec spec;
- Intent intent;
- intent=new Intent().setClass(this, AddExamActivity.class);
- spec=tabHost.newTabSpec("添加考试").setIndicator("添加考试").setContent(intent);
- tabHost.addTab(spec);
- intent=new Intent().setClass(this,MyExamActivity.class);
- spec=tabHost.newTabSpec("我的考试").setIndicator("我的考试").setContent(intent);
- tabHost.addTab(spec);
- intent=new Intent().setClass(this, MyMessageActivity.class);
- spec=tabHost.newTabSpec("我的通知").setIndicator("我的通知").setContent(intent);
- tabHost.addTab(spec);
- intent=new Intent().setClass(this, SettingActivity.class);
- spec=tabHost.newTabSpec("设置").setIndicator("设置").setContent(intent);
- tabHost.addTab(spec);
- tabHost.setCurrentTab(1);
- RadioGroup radioGroup=(RadioGroup) this.findViewById(R.id.main_tab_group);
- radioGroup.setOnCheckedChangeListener(new OnCheckedChangeListener() {
- @Override
- public void onCheckedChanged(RadioGroup group, int checkedId) {
- // TODO Auto-generated method stub
- switch (checkedId) {
- case R.id.main_tab_addExam://添加考试
- tabHost.setCurrentTabByTag("添加考试");
- break;
- case R.id.main_tab_myExam://我的考试
- tabHost.setCurrentTabByTag("我的考试");
- break;
- case R.id.main_tab_message://我的通知
- tabHost.setCurrentTabByTag("我的通知");
- break;
- case R.id.main_tab_settings://设置
- tabHost.setCurrentTabByTag("设置");
- break;
- default:
- //tabHost.setCurrentTabByTag("我的考试");
- break;
- }
- }
- });
- }
- }
这样就完成了,主要还是使用了tabhost完成,tabhost有缓存机制这四个界面都会缓存到内存中,这样即有利也有弊,有利是因为切换的时候不用在重新加载了,有弊是因为缓存四个界面会耗费内存较多一些。如果只想缓存一个界面以后下一篇我会使用ActivityGroup实现顶部滑动栏,就像网易新闻的顶部滑动栏我相信也是只缓存了一个界面,切换的时候是从数据库加载的,所以第二次滑动加载会比较快。
最后奉上下载地址,如果有需要的希望大家自己去下载吧,有些代码存在本地时间长了我也会弄丢。[rar文件] android底部菜单栏demo
转载于:http://blog.csdn.net/yuzhiboyi/article/details/7782276
第二弹
文
一、效果图

红色部分是本文要实现的目标。
二、实现
maintabs.xml

<TabHost android:id="@android:id/tabhost" android:layout_width="fill_parent" android:layout_height="fill_parent"
xmlns:android="http://schemas.android.com/apk/res/android">
<LinearLayout android:orientation="vertical" android:layout_width="fill_parent" android:layout_height="fill_parent">
<FrameLayout android:id="@android:id/tabcontent" android:layout_width="fill_parent" android:layout_height="0.0dip" android:layout_weight="1.0" />
<TabWidget android:id="@android:id/tabs" android:visibility="gone" android:layout_width="fill_parent" android:layout_height="wrap_content" android:layout_weight="0.0" />
<RadioGroup android:gravity="center_vertical" android:layout_gravity="bottom" android:orientation="horizontal" android:id="@id/main_radio" android:background="@drawable/maintab_toolbar_bg" android:layout_width="fill_parent" android:layout_height="wrap_content">
<RadioButton android:text="@string/main_home" android:checked="true" android:id="@+id/radio_button0" android:layout_marginTop="2.0dip" android:drawableTop="@drawable/icon_1_n" style="@style/main_tab_bottom" />
<RadioButton android:id="@+id/radio_button1" android:layout_marginTop="2.0dip" android:text="@string/main_news" android:drawableTop="@drawable/icon_2_n" style="@style/main_tab_bottom" />
<RadioButton android:id="@+id/radio_button2" android:layout_marginTop="2.0dip" android:text="@string/main_my_info" android:drawableTop="@drawable/icon_3_n" style="@style/main_tab_bottom" />
<RadioButton android:id="@+id/radio_button3" android:layout_marginTop="2.0dip" android:text="@string/menu_search" android:drawableTop="@drawable/icon_4_n" style="@style/main_tab_bottom" />
<RadioButton android:id="@+id/radio_button4" android:layout_marginTop="2.0dip" android:text="@string/more" android:drawableTop="@drawable/icon_5_n" style="@style/main_tab_bottom" />
</RadioGroup>
</LinearLayout>
</TabHost>
styles.xml
<item name="android:textSize">@dimen/bottom_tab_font_size</item>
<item name="android:textColor">#ffffffff</item>
<item name="android:ellipsize">marquee</item>
<item name="android:gravity">center_horizontal</item>
<item name="android:background">@drawable/home_btn_bg</item>
<item name="android:paddingTop">@dimen/bottom_tab_padding_up</item>
<item name="android:layout_width">fill_parent</item>
<item name="android:layout_height">wrap_content</item>
<item name="android:button">@null</item>
<item name="android:singleLine">true</item>
<item name="android:drawablePadding">@dimen/bottom_tab_padding_drawable</item>
<item name="android:layout_weight">1.0</item>
</style>
home_btn_bg.xml
xmlns:android="http://schemas.android.com/apk/res/android">
<item android:state_focused="true" android:state_enabled="true" android:state_pressed="false" android:drawable="@drawable/home_btn_bg_s" />
<item android:state_enabled="true" android:state_pressed="true" android:drawable="@drawable/home_btn_bg_s" />
<item android:state_enabled="true" android:state_checked="true" android:drawable="@drawable/home_btn_bg_d" />
<item android:drawable="@drawable/transparent" />
</selector>
代码说明:
1. 需要注意的是他这里把TabWidget的Visibility设置成了gone!也就是默认难看的风格不见了:![]() ,取而代之的是5个带风格的单选按钮.
,取而代之的是5个带风格的单选按钮.
2. 注意为单选按钮设置的style,其中最重要的是为其background设置了home_btn_bg.xml,也就是自定义了选中效果。
Java文件
OnCheckedChangeListener {
private TabHost mHost;
private Intent mMBlogIntent;
private Intent mMoreIntent;
private Intent mInfoIntent;
private Intent mSearchIntent;
private Intent mUserInfoIntent;
@Override
protected void onCreate(Bundle savedInstanceState) {
super.onCreate(savedInstanceState);
requestWindowFeature(Window.FEATURE_NO_TITLE);
setContentView(R.layout.maintabs);
// ~~~~~~~~~~~~ 初始化
this.mMBlogIntent = new Intent(this, HomeListActivity.class);
this.mSearchIntent = new Intent(this, SearchSquareActivity.class);
this.mInfoIntent = new Intent(this, MessageGroup.class);
this.mUserInfoIntent = new Intent(this, MyInfoActivity.class);
this.mMoreIntent = new Intent(this, MoreItemsActivity.class);
initRadios();
setupIntent();
}
/**
* 初始化底部按钮
*/
private void initRadios() {
((RadioButton) findViewById(R.id.radio_button0)).setOnCheckedChangeListener(this);
((RadioButton) findViewById(R.id.radio_button1)).setOnCheckedChangeListener(this);
((RadioButton) findViewById(R.id.radio_button2)).setOnCheckedChangeListener(this);
((RadioButton) findViewById(R.id.radio_button3)).setOnCheckedChangeListener(this);
((RadioButton) findViewById(R.id.radio_button4)).setOnCheckedChangeListener(this);
}
/**
* 切换模块
*/
@Override
public void onCheckedChanged(CompoundButton buttonView, boolean isChecked) {
if (isChecked) {
switch (buttonView.getId()) {
case R.id.radio_button0:
this.mHost.setCurrentTabByTag("mblog_tab");
break;
case R.id.radio_button1:
this.mHost.setCurrentTabByTag("message_tab");
break;
case R.id.radio_button2:
this.mHost.setCurrentTabByTag("userinfo_tab");
break;
case R.id.radio_button3:
this.mHost.setCurrentTabByTag("search_tab");
break;
case R.id.radio_button4:
this.mHost.setCurrentTabByTag("more_tab");
break;
}
}
}
private void setupIntent() {
this.mHost = getTabHost();
TabHost localTabHost = this.mHost;
localTabHost.addTab(buildTabSpec("mblog_tab", R.string.main_home,
R.drawable.icon_1_n, this.mMBlogIntent));
localTabHost.addTab(buildTabSpec("message_tab", R.string.main_news,
R.drawable.icon_2_n, this.mInfoIntent));
localTabHost.addTab(buildTabSpec("userinfo_tab", R.string.main_my_info,
R.drawable.icon_3_n, this.mUserInfoIntent));
localTabHost.addTab(buildTabSpec("search_tab", R.string.menu_search,
R.drawable.icon_4_n, this.mSearchIntent));
localTabHost.addTab(buildTabSpec("more_tab", R.string.more,
R.drawable.icon_5_n, this.mMoreIntent));
}
private TabHost.TabSpec buildTabSpec(String tag, int resLabel, int resIcon,
final Intent content) {
return this.mHost
.newTabSpec(tag)
.setIndicator(getString(resLabel),
getResources().getDrawable(resIcon))
.setContent(content);
}
代码说明
1. 由于TabWidget被隐藏,所以相关的事件也会无效,这里取巧用RadioGroup与RadioButton的特性来处理切换,然后监听事件调用setCurrentTabByTag来切换Activity。
2. 注意即使TabWidget被隐藏,也要为其设置indicator,否则会保持。
三、总结
在这之前如果要做这种效果我恐怕第一时间就会想到用ActivityGroup来做,主要是因为TabHost的TabWidget非常难看,用起来也不方便。其实从源码可以看出,TabActivity也是继承自ActivityGroup,这里结合了单选按钮和TabHost,各取其长
- android Tabhost部件(二)
- android Tabhost部件
- android Tabhost部件(详细)
- android Tabhost部件
- Android Tabhost部件
- android Tabhost部件(一)
- Android中TabHost部件使用
- android Tabhost部件(四)--其他类似TabHost实现
- android TabHost使用(二)
- Android TabHost 二
- android Tabhost部件(三)--使用自定义view和fragement实现类似TabHost样式
- Android Widget 小部件(二) 使用configure
- Android Widget 小部件(二) 使用configure
- Android Widget桌面小部件二
- 二期Android项目 - TabHost界面
- 浅谈Android的TabHost(二)
- Android tabhost
- Android:TabHost
- Nginx反向代理和负载均衡部署指南
- 如何使用intellij搭建spark开发环境(下)
- 总结了Struts1与Struts2的12点区别
- KMP & hdu 1711 Number Sequence
- GRE写作必备句型
- android Tabhost部件(二)
- 2012年5月SAT香港真题解析
- 开发为王!顶级编程人员推荐软件
- 給Mac添加wget功能
- 程序员必读的六本书
- [转载] 张子阳 --- C# 中的委托和事件
- 每天一个linux命令(16):which命令
- 网络代理服务Agent,服务端.client 连接server 进行通信
- 旅行充电器原理分析