Android中AsyncTask的简单用法
来源:互联网 发布:程序员的硬技能 编辑:程序博客网 时间:2024/06/01 11:29
在开发Android移动客户端的时候往往要使用多线程来进行操作,我们通常会将耗时的操作放在单独的线程执行,避免其占用主线程而给用户带来不好的用户体验。但是在子线程中无法去操作主线程(UI 线程),在子线程中操作UI线程会出现错误。因此android提供了一个类Handler来在子线程中来更新UI线程,用发消息的机制更新UI界面,呈现给用户。这样就解决了子线程更新UI的问题。但是费时的任务操作总会启动一些匿名的子线程,太多的子线程给系统带来巨大的负担,随之带来一些性能问题。因此android提供了一个工具类AsyncTask,顾名思义异步执行任务。这个AsyncTask生来就是处理一些后台的比较耗时的任务,给用户带来良好用户体验的,从编程的语法上显得优雅了许多,不再需要子线程和Handler就可以完成异步操作并且刷新用户界面。
先大概认识下Android.os.AsyncTask类:
* android的类AsyncTask对线程间通讯进行了包装,提供了简易的编程方式来使后台线程和UI线程进行通讯:后台线程执行异步任务,并把操作结果通知UI线程。
* AsyncTask是抽象类.AsyncTask定义了三种泛型类型 Params,Progress和Result。
* Params 启动任务执行的输入参数,比如HTTP请求的URL。
* Progress 后台任务执行的百分比。
* Result 后台执行任务最终返回的结果,比如String,Integer等。
* AsyncTask的执行分为四个步骤,每一步都对应一个回调方法,开发者需要实现这些方法。
* 1) 继承AsyncTask
* 2) 实现AsyncTask中定义的下面一个或几个方法
* onPreExecute(), 该方法将在执行实际的后台操作前被UI 线程调用。可以在该方法中做一些准备工作,如在界面上显示一个进度条,或者一些控件的实例化,这个方法可以不用实现。
* doInBackground(Params...), 将在onPreExecute 方法执行后马上执行,该方法运行在后台线程中。这里将主要负责执行那些很耗时的后台处理工作。可以调用 publishProgress方法来更新实时的任务进度。该方法是抽象方法,子类必须实现。
* onProgressUpdate(Progress...),在publishProgress方法被调用后,UI 线程将调用这个方法从而在界面上展示任务的进展情况,例如通过一个进度条进行展示。
* onPostExecute(Result), 在doInBackground 执行完成后,onPostExecute 方法将被UI 线程调用,后台的计算结果将通过该方法传递到UI 线程,并且在界面上展示给用户.
* onCancelled(),在用户取消线程操作的时候调用。在主线程中调用onCancelled()的时候调用。
为了正确的使用AsyncTask类,以下是几条必须遵守的准则:
1) Task的实例必须在UI 线程中创建
2) execute方法必须在UI 线程中调用
3) 不要手动的调用onPreExecute(), onPostExecute(Result),doInBackground(Params...), onProgressUpdate(Progress...)这几个方法,需要在UI线程中实例化这个task来调用。
4) 该task只能被执行一次,否则多次调用时将会出现异常
doInBackground方法和onPostExecute的参数必须对应,这两个参数在AsyncTask声明的泛型参数列表中指定,第一个为doInBackground接受的参数,第二个为显示进度的参数,第第三个为doInBackground返回和onPostExecute传入的参数。
下面通过一个Demo来说明如何使用Android.os.AsyncTask类,通过进度条来显示进行的进度,然后用TextView来显示进度值。程序结构图如下:
[1] \layout\main.xml 布局文件源码如下:
[html] view plaincopyprint?<?xml version="1.0" encoding="utf-8"?> <LinearLayout xmlns:android="http://schemas.android.com/apk/res/android" android:orientation="vertical" android:layout_width="fill_parent" android:layout_height="fill_parent" > <TextView android:layout_width="fill_parent" android:layout_height="wrap_content" android:text="Hello , Welcome to Andy's Blog!"/> <Button android:id="@+id/download" android:layout_width="fill_parent" android:layout_height="wrap_content" android:text="Download"/> <TextView android:id="@+id/tv" android:layout_width="fill_parent" android:layout_height="wrap_content" android:text="当前进度显示"/> <ProgressBar android:id="@+id/pb" android:layout_width="fill_parent" android:layout_height="wrap_content" style="?android:attr/progressBarStyleHorizontal"/> </LinearLayout> <?xml version="1.0" encoding="utf-8"?>
<LinearLayout xmlns:android="http://schemas.android.com/apk/res/android"
android:orientation="vertical"
android:layout_width="fill_parent"
android:layout_height="fill_parent"
>
<TextView
android:layout_width="fill_parent"
android:layout_height="wrap_content"
android:text="Hello , Welcome to Andy's Blog!"/>
<Button
android:id="@+id/download"
android:layout_width="fill_parent"
android:layout_height="wrap_content"
android:text="Download"/>
<TextView
android:id="@+id/tv"
android:layout_width="fill_parent"
android:layout_height="wrap_content"
android:text="当前进度显示"/>
<ProgressBar
android:id="@+id/pb"
android:layout_width="fill_parent"
android:layout_height="wrap_content"
style="?android:attr/progressBarStyleHorizontal"/>
</LinearLayout>
[2] /src中的MainActivity.java源码如下:
[html] view plaincopyprint?package com.andyidea.demo; import android.app.Activity; import android.os.AsyncTask; import android.os.Bundle; import android.view.View; import android.widget.Button; import android.widget.ProgressBar; import android.widget.TextView; public class MainActivity extends Activity { Button download; ProgressBar pb; TextView tv; /** Called when the activity is first created. */ @Override public void onCreate(Bundle savedInstanceState) { super.onCreate(savedInstanceState); setContentView(R.layout.main); pb=(ProgressBar)findViewById(R.id.pb); tv=(TextView)findViewById(R.id.tv); download = (Button)findViewById(R.id.download); download.setOnClickListener(new View.OnClickListener() { @Override public void onClick(View v) { DownloadTask dTask = new DownloadTask(); dTask.execute(100); } }); } class DownloadTask extends AsyncTask<Integer, Integer, String>{ //后面尖括号内分别是参数(例子里是线程休息时间),进度(publishProgress用到),返回值 类型 @Override protected void onPreExecute() { //第一个执行方法 super.onPreExecute(); } @Override protected String doInBackground(Integer... params) { //第二个执行方法,onPreExecute()执行完后执行 for(int i=0;i<=100;i++){ pb.setProgress(i); publishProgress(i); try { Thread.sleep(params[0]); } catch (InterruptedException e) { e.printStackTrace(); } } return "执行完毕"; } @Override protected void onProgressUpdate(Integer... progress) { //这个函数在doInBackground调用publishProgress时触发,虽然调用时只有一个参数 //但是这里取到的是一个数组,所以要用progesss[0]来取值 //第n个参数就用progress[n]来取值 tv.setText(progress[0]+"%"); super.onProgressUpdate(progress); } @Override protected void onPostExecute(String result) { //doInBackground返回时触发,换句话说,就是doInBackground执行完后触发 //这里的result就是上面doInBackground执行后的返回值,所以这里是"执行完毕" setTitle(result); super.onPostExecute(result); } } } package com.andyidea.demo;
import android.app.Activity;
import android.os.AsyncTask;
import android.os.Bundle;
import android.view.View;
import android.widget.Button;
import android.widget.ProgressBar;
import android.widget.TextView;
public class MainActivity extends Activity {
Button download;
ProgressBar pb;
TextView tv;
/** Called when the activity is first created. */
@Override
public void onCreate(Bundle savedInstanceState) {
super.onCreate(savedInstanceState);
setContentView(R.layout.main);
pb=(ProgressBar)findViewById(R.id.pb);
tv=(TextView)findViewById(R.id.tv);
download = (Button)findViewById(R.id.download);
download.setOnClickListener(new View.OnClickListener() {
@Override
public void onClick(View v) {
DownloadTask dTask = new DownloadTask();
dTask.execute(100);
}
});
}
class DownloadTask extends AsyncTask<Integer, Integer, String>{
//后面尖括号内分别是参数(例子里是线程休息时间),进度(publishProgress用到),返回值 类型
@Override
protected void onPreExecute() {
//第一个执行方法
super.onPreExecute();
}
@Override
protected String doInBackground(Integer... params) {
//第二个执行方法,onPreExecute()执行完后执行
for(int i=0;i<=100;i++){
pb.setProgress(i);
publishProgress(i);
try {
Thread.sleep(params[0]);
} catch (InterruptedException e) {
e.printStackTrace();
}
}
return "执行完毕";
}
@Override
protected void onProgressUpdate(Integer... progress) {
//这个函数在doInBackground调用publishProgress时触发,虽然调用时只有一个参数
//但是这里取到的是一个数组,所以要用progesss[0]来取值
//第n个参数就用progress[n]来取值
tv.setText(progress[0]+"%");
super.onProgressUpdate(progress);
}
@Override
protected void onPostExecute(String result) {
//doInBackground返回时触发,换句话说,就是doInBackground执行完后触发
//这里的result就是上面doInBackground执行后的返回值,所以这里是"执行完毕"
setTitle(result);
super.onPostExecute(result);
}
}
}
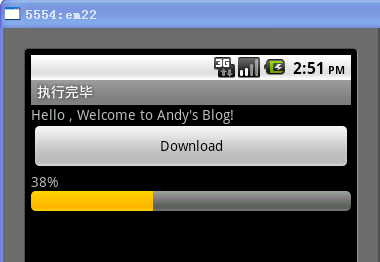
[3] 下面看下程序的运行结果截图:
- Android中AsyncTask的简单用法
- Android中AsyncTask的简单用法
- Android中AsyncTask的简单用法
- Android中AsyncTask的简单用法
- Android中AsyncTask的简单用法
- Android中AsyncTask的简单用法
- Android中AsyncTask的简单用法
- Android中AsyncTask的简单用法
- Android中AsyncTask的简单用法
- Android中AsyncTask的简单用法
- Android中AsyncTask的简单用法
- Android中AsyncTask的简单用法 .
- Android中AsyncTask的简单用法
- Android中AsyncTask的简单用法
- Android中AsyncTask的简单用法
- Android中AsyncTask的简单用法
- Android中AsyncTask的简单用法
- Android中AsyncTask的简单用法
- 迟来的Robocup2015总结及15国赛简单预测
- SQLServer索引的四个高级特性
- HDU 5411 CRB and Puzzle
- Oracle自增序列
- 2015年8月20日17:15:53
- Android中AsyncTask的简单用法
- Android中几种关闭Activity或app的方法
- 收藏下 Unicode范围
- Linux命令more
- SAP调用webservice 参数为空
- UVA 529 Addition Chains
- 如何给MP4视频加字幕
- UNIX Tutorial Three
- DOM(二)-13-(示例-全选商品列表)