安装包的制作
来源:互联网 发布:聚宝盆软件怎么样 编辑:程序博客网 时间:2024/04/30 11:19
VS中做安装包:
project:
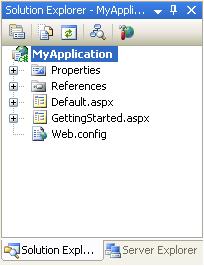
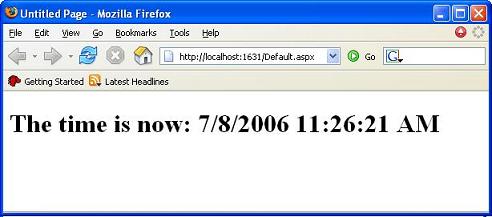
We’ll add a label to the Default.aspx page and a Page_Load event handler in the code-behind to output the current timestamp on each request. When I press F5 to build and run the application, the project will compile and run as I’d expect (and by default use the built-in VS Web Server):
2) Add a VS 2005 Web Setup Project to the Solution
Now that we have a simple ASP.NET application built, we’ll want to add a VS 2005 Web Setup Project to the solution. Choose the File->Add->New Project menu item to add one into your solution:
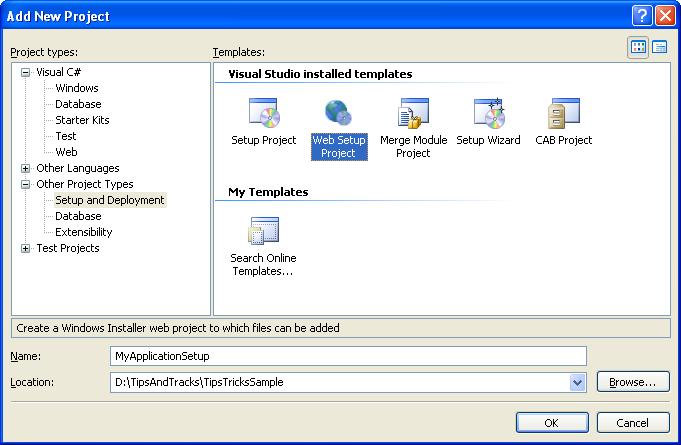
Note that the “Web Setup Project” type shows up under the “Other Project Types->Setup and Deployment” node in the New Project dialog above. Name it whatever you want and hit ok. It will then show up in your solution explorer as a separate project.
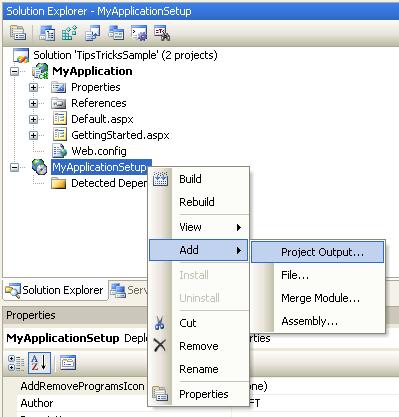
Our next step will be to configure the web setup project to take the compiled assemblies (/bin directory contents) + content markup (.aspx, .config, etc files) from our Web Application Project and use them as inputs within our setup project. To-do this, right-click on the web setup project node in the solution explorer and choose the “Add->Project Output” context menu item:
A dialog will then appear allowing us to select which project in the solution, and which of its project contents, we want to add to the setup package:
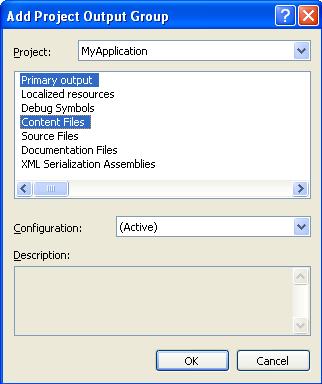
For ASP.NET Web Application Projects it is really important that we select both the “Primary Output” (which are the compiled assemblies for the /bin directory) as well as the “Content Files” (which are the .aspx markup files) within this dialog.
By default, the web setup project will copy both of these items into the root of the target Web Application Folder that the setup project will create. You can see that it is configured this way by opening up the “File System” view within the web setup project (right click on the web setup project root and choose View->File System):
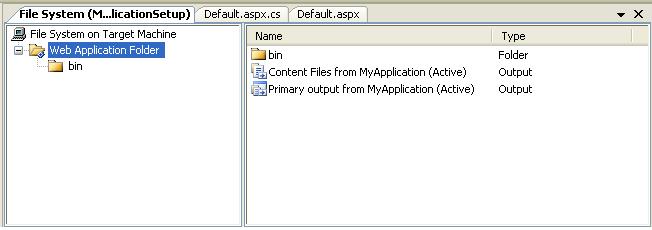
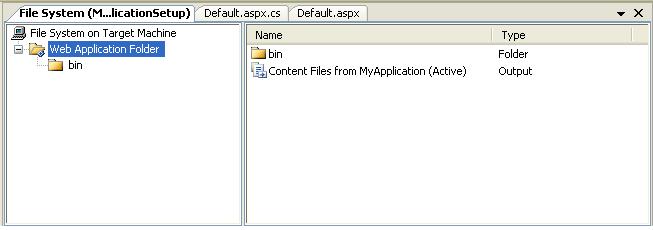
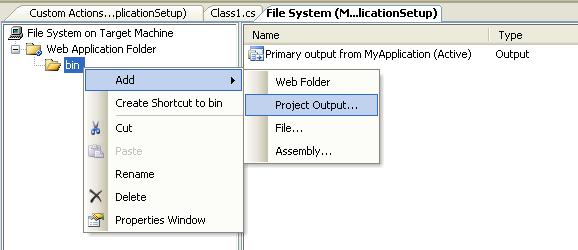
This actually isn’t what we want to have happen though – since we really want the assemblies (indicated by the Primary Output node) to be copied into the application’s /bin directory instead (otherwise ASP.NET won’t be able to find them at runtime). To fix this, drag/drop the “Primary Output from MyApplication” node into the /bin directory. Once this is done you should be able to click on the “Web Application Folder” node on the left-hand side and see this:
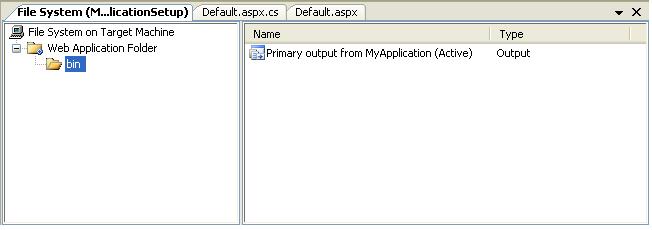
And then click on the “bin” folder sub-node and see this:
We now have a basic web setup project created and configured for our ASP.NET Web Application. Next step is to build and run it.
3) Build and Run the VS 2005 Web Setup Project to the Solution
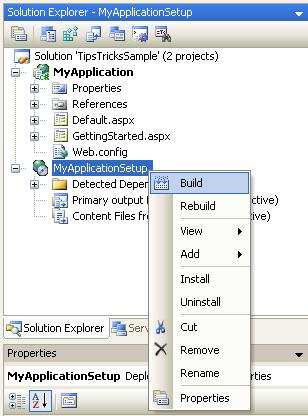
To build the web-setup project we can right-click on the web setup project node within the solution explorer and choose the “Build” option:
If you open the output window within VS (View->Output menu item), you will see the results of this build operation:
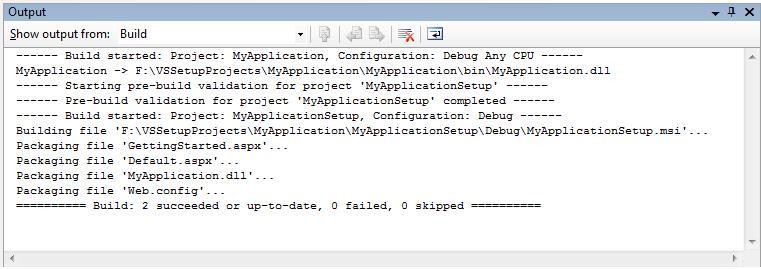
Our “MyApplicationSetup” project created a new MyApplicationSetup.msi Windows installer file and compressed and packaged the contents of our ASP.NET Web Application (note: in the web setup project properties dialog you can choose whether the compression algorithm used is optimized for size or speed).
Very Important: Because setup projects take awhile to build, they are by default marked not to build as part of the solution. What this means is that you need to right-click on them and explicitly do a build in order for them to be recompiled. Be careful to-do this when you make and test changes - otherwise you'll be running the previously compiled version and not the one with your latest code!
To test it, we can right-click on the web setup project within the solution explorer and choose the “Install” option to install it (or alternatively launch it outside of VS by running it):
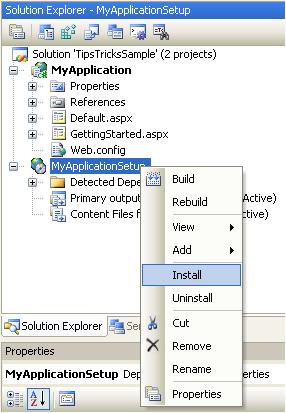
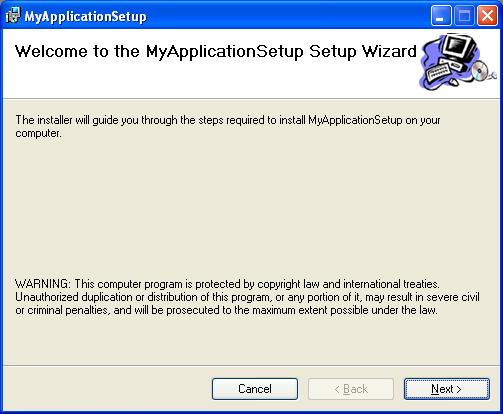
This will launch a standard Windows installer and walk the user through installing the application on IIS:
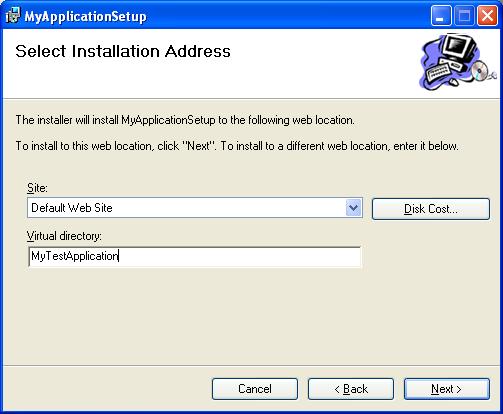
VS 2005’s web setup projects allow you to pick which site to install the application on if multiple sites are configured on IIS (this wasn’t supported with the VS 2003 version). You can optionally specify an application virtual-directory path to use (for example: http://www.myserver.com/myapppath), or you can leave this value blank to install it as the root application on the site (for example: http://www.myserver.com/).
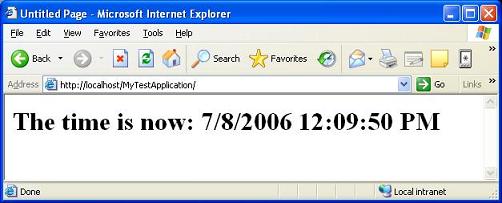
Once the installer completes, the application will have been copied to disk and registered with IIS. We can now run the application using the HTTP path we provided during installation like so:
Once installed the application will also show up in the standard “Add or Remove Programs” utility within the Windows Control Panel:
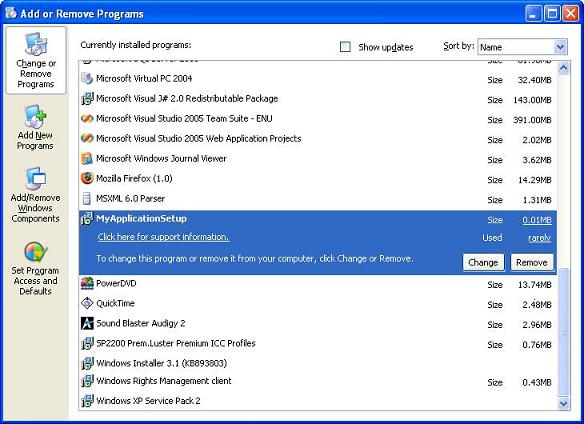
You can remove the application either by running uninstall from the control panel utility, or (at development time) by right-clicking on the web setup project node within the VS Solution Explorer and selecting the “Uninstall” menu item. This will cause all installed files to be removed from disk.
4) Update the Wizard UI of the Web Setup Project
By default the Windows installer created by a web setup project has some default instruction strings and banner images for the setup:
You can change this and customize the screens by right-clicking on the web setup project node in the VS solution explorer and selecting the "View->User Interface" context menu item):
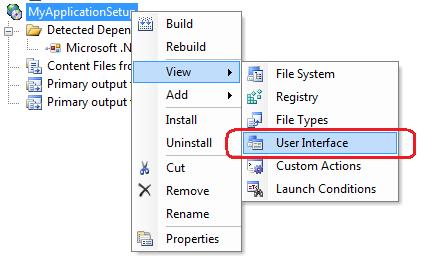
This will then bring up a screen that shows the list of screens to be displayed during setup:
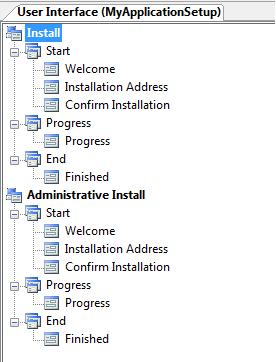
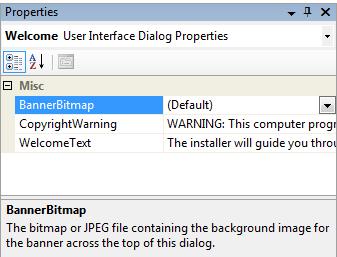
Unfortunately there isn't a forms-designer that you can use to override the screens above. However, you can select a screen, and then go to the property grid to customize its text and change the graphics used within the screen:
You can also create new screens and add them into the setup wizard. Later in this tutorial we'll use this feature to create a custom screen to collect database connection-string information and use it to automate configuring our web.config file to point at the appropriate database.
5) Adding Custom Actions to the VS 2005 Web Setup Project
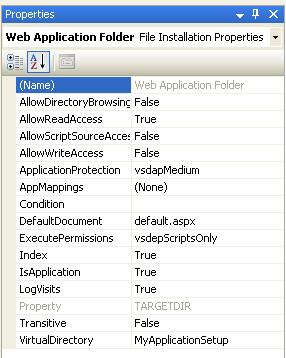
Web Setup Projects contain built-in support for configuring and performing common setup actions. These include editors for adding/changing registry entries (choose View->Register to configure), changing file-type associations (View->File Types), and for validating prerequisite components are already installed (it automatically checks that the .NET Framework 2.0 redist is installed). Setup Projects also allow you to configure a number of common IIS settings declaratively (click on the “Web Application Folder” in the File System view and then look at the property grid to see these):
But for non-trivial setups you are likely to want to be able to execute your own custom code during setup to customize things. The good news is that web setup projects support this with something called “Custom Actions” – which is code you write that can execute during both install and uninstall operations.
To add a custom action you first want to add a new class library project to your solution (File->Add->New Project->Class Library).
You then want to add assembly references in this newly created Class Library to the System.Configuration.Install.dll, System.Configuration.dll, System.Diagnostics.dll, and System.Web.dll assemblies. You’ll then want to create a new class for your custom action and have it derive from the “System.Configuration.Install.Installer” base class like so:
using System.Configuration.Install;
using System.ComponentModel;
namespace MyCustomAction
{
[RunInstaller(true)]
public class ScottSetupAction : Installer
{
public override void Install(System.Collections.IDictionary stateSaver)
{
base.Install(stateSaver);
// Todo: Write Your Custom Install Logic Here
}
}
}
Notice the custom “RunInstaller(true)” attribute that must be set on the class name. This is important and required (and easy to forget!). You’ll need to add a using statement to the System.ComponentModel namespace to avoid fully qualifying this.
Next we’ll need to make sure this Custom Action assembly gets added to our web setup project. To-do this, right-click on the Web Setup Project root node in the solution explorer and select the View->File System menu item to bring up the file-system editor. Right-click on the “bin” sub-folder and choose “Add->Project Output” like we did earlier to get the custom action assembly added to the web setup project:
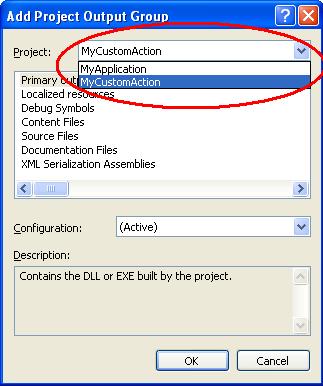
In this case we’ll want to select the Custom Action Class Library project instead of our web application one. Pick it from the project drop-down at the top of the dialog and then select the “Primary Output” option as the piece we want to add to the web-setup project (this will cause the Custom Action assembly to get added):
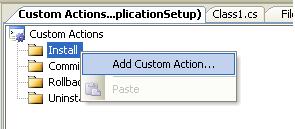
Lastly, we’ll configure the web-setup project to call our custom action assembly during the install phase of setup. To do this we’ll right-click on the web setup project root node in the solution explorer and choose the “View->Custom Actions” menu item. This will then bring up the Custom Actions Editor. Right-click on the “Install” node and choose “Add Custom Action”:
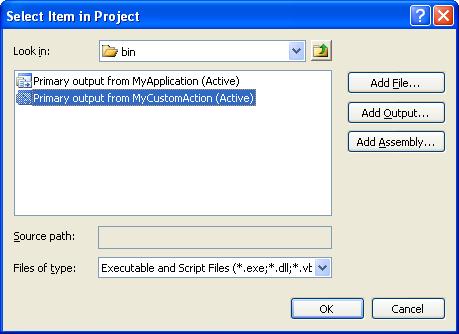
Drill into the Web Application Folder and Bin directory and choose the output from our Custom Action we imported:
The Setup Project will then automatically detect the custom action because of the “RunInstaller” attribute:
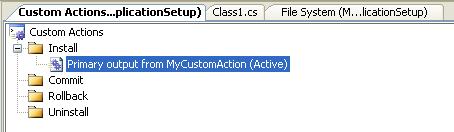
Our custom action class and Install method will now run anytime we run the installation setup program.
6) Useful Custom Action Example: ASP.NET Script Mapping Checker
The previous section showed how to create and configure an empty custom action class and install method. Let’s now do something useful with it. Specifically, let’s add code to verify that the right version of ASP.NET is correctly mapped for the application we are creating.
Because ASP.NET V1.1 and V2.0 can run side-by-side with each other on the same machine, it is possible to have different parts of a web server configured to run using different versions of ASP.NET. By default, the versions inherit hierarchically – meaning if the root application on a site is configured to still run using ASP.NET V1.1, a newly created application underneath the site root will by default run using V1.1 as well. What we’ll do in the steps below is write some code to ensure that our new application always runs using ASP.NET 2.0.
To begin with, we’ll select our custom action within the Custom Action explorer (just like in the previous screenshot above - using the View->Custom Action context menu item). We’ll then go to the property grid and specify a few parameters to pass to our custom action to use:
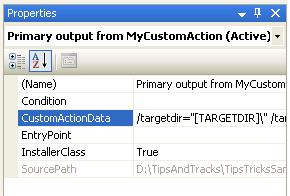
Specifically, we’ll pass in the target directory that the application is being installed in, the IIS site map path, and the IIS virtual directory name that the user specified in the setup wizard. This string of values looks like this:
/targetdir="[TARGETDIR]/" /targetvdir="[TARGETVDIR]" /targetsite="[TARGETSITE]"
We’ll then update our custom action to access these values and do something with them like so:
using System.Configuration;
using System.Configuration.Install;
using System.ComponentModel;
using System.Diagnostics;
using System.IO;
namespace MyCustomAction
{
[RunInstaller(true)]
public class ScottSetupAction : Installer
{
public override void Install(System.Collections.IDictionary stateSaver)
{
base.Install(stateSaver);
// Retrieve configuration settings
string targetSite = Context.Parameters["targetsite"];
string targetVDir = Context.Parameters["targetvdir"];
string targetDirectory = Context.Parameters["targetdir"];
if (targetSite == null)
throw new InstallException("IIS Site Name Not Specified!");
if (targetSite.StartsWith("/LM/"))
targetSite = targetSite.Substring(4);
RegisterScriptMaps(targetSite, targetVDir);
}
void RegisterScriptMaps(string targetSite, string targetVDir)
{
// Calculate Windows path
string sysRoot = System.Environment.GetEnvironmentVariable("SystemRoot");
// Launch aspnet_regiis.exe utility to configure mappings
ProcessStartInfo info = new ProcessStartInfo();
info.FileName = Path.Combine(sysRoot, @"Microsoft.NET/Framework/v2.0.50727/aspnet_regiis.exe");
info.Arguments = string.Format("-s {0}/ROOT/{1}", targetSite, targetVDir);
info.CreateNoWindow = true;
info.UseShellExecute = false;
Process.Start(info);
}
}
}
The above code launches the aspnet_regiis.exe utility that ships with ASP.NET within the /Windows/Microsoft.net/framework/v2.0.5.0727/ directory, and passes in the path location information for the site that the web setup installer previously created, along with the “-s” flag – which indicates that the IIS script-maps for that application should be updated to specifically use the ASP.NET 2.0 version, and not inherit the version number from any parent applications.
A special thanks to John for figuring this out in his blog post here.
Note: If you are using IIS6 or IIS7, you'll probably want to also add some logic into the custom action to ensure that the application pool that the application is being hosted in is also mapped to use ASP.NET 2.0. Either that or you'll want to tell the admin to manually check the application pool settings after the setup is complete.
7) Useful Custom Action Example: Configuring Database Connection String
For our next custom action example, let’s add some UI to the setup that allows a user to configure the connection string details of a database the application should use.
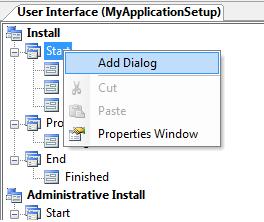
Right click on the web setup project and open up the user interface screens again:
Right click on the "Install" node on the user interface screens page and chose to add a new dialog to the install wizard:
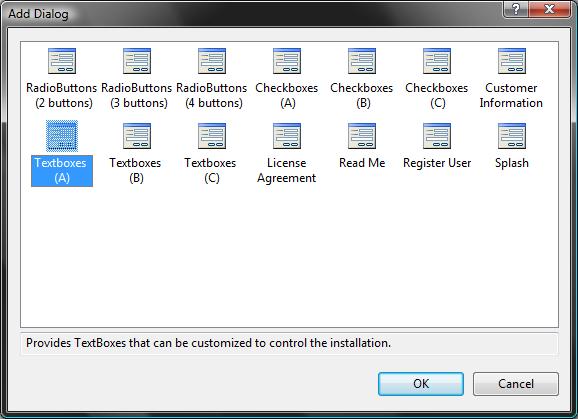
Chose one of the TextBox screens to use for gathering connection string details from the user:
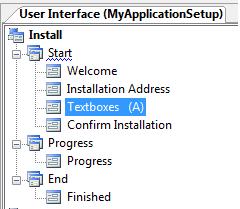
Right-click on the TextBox screen node and move it up to be earlier in the wizard (right after we pick the IIS site and application name to use):
Then click on the TextBox screen and access its property window. Via the property window you can change the text displayed on the screen, as well as control how many textboxes are visible:
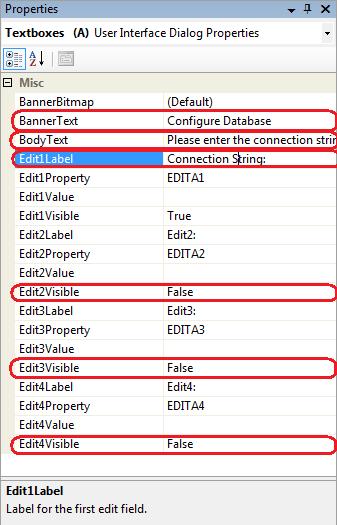
Note in the above property window how I've set the Edit2, Edit3 and Edit4 text boxes to not be visible. Now when we build and run the setup package we'll see this dialog in our wizard steps:

Now that we have UI to capture the connection-string value entered by a user in the wizard, we want to make sure it is passed to our custom action class. You can do this by right-clicking on the web setup project node and by then choosing the "View->Custom Actions" context menu and then opening the property page window of our custom action:
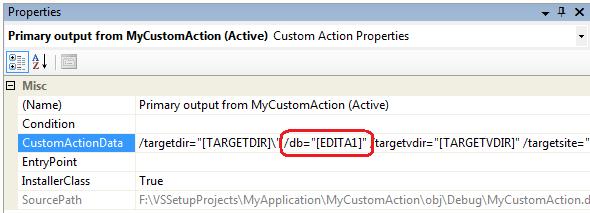
We'll want to update the CustomActionData property value and pass in the connection-string of the database to use (we'll pass in the value from the EDITA1 textbox in the user interface screen):
/targetdir="[TARGETDIR]/" /db="[EDITA1]" /targetvdir="[TARGETVDIR]" /targetsite="[TARGETSITE]"
We can then update our custom action class to retrieve and use this connectionstring value to update the web.config file of the new application to contain the value the user installing the application entered. Below is a method that opens the web.config file for our new application and programmatically updates it with the user entered connection string:
{
// Retrieve "Friendly Site Name" from IIS for TargetSite
DirectoryEntry entry = new DirectoryEntry("IIS://LocalHost/" + targetSite);
string friendlySiteName = entry.Properties["ServerComment"].Value.ToString();
// Open Application's Web.Config
Configuration config = WebConfigurationManager.OpenWebConfiguration("/" + targetVDir, friendlySiteName);
// Add new connection string setting for web.config
ConnectionStringSettings appDatabase = new ConnectionStringSettings();
appDatabase.Name = DATABASE_CONNECTION_KEY;
appDatabase.ConnectionString = connectionString;
config.ConnectionStrings.ConnectionStrings.Clear();
config.ConnectionStrings.ConnectionStrings.Add(appDatabase);
// Persist web.config settings
config.Save();
}
And now after we run the setup program our newly installed ASP.NET application's web.config file will have been updated to point to the right database.
To learn more about how the ASP.NET configuration APIs can be used to make changes to web.config files, please check out the management API section in the ASP.NET 2.0 Quickstart tutorials. Chris Crowe also has some useful samples that demonstrate how to use the System.DirectoryServices APIs to query IIS settings (I needed them to figure out how to lookup the "friendly name" of the site from IIS to open up the web.config file).
You might also want to check out this MSDN documentation sample that demonstrates how to programmatically create a new database (complete with schema and data) with a custom action. You could combine the approach in the MSDN article with the configuration one I used above to completely automate database deployment as part of your setup.
Summary
Hopefully the above tutorial helps demonstrate how to get started with using the built-in web setup project support within Visual Studio. Click here to download a complete version of the sample I built above.
Web setup projects aren't perfect for all scenarios, and I'd primarily recommend them only for cases where you want a packaged GUI setup program (for example: to give to an external customer or to make available as a download on a web-site). If you are instead working on maintaining/managing a site that you have direct access to, I'd probably instead recommend using the "Publish Application" feature available with VS 2005 Web Application Projects (for simple updates), or recommend authoring a PowerShell script to automate updates to the remote server. For an example of a really advanced Powershell script that www.pageflakes.com uses to update their site, check out Omar's article here.
One downside with the VS 2005 Web Setup Project support is that you can only build web setup projects from within the IDE - which means you can't completely automate the creation of .MSIs as part of an automated MSBuild process. If this is a showstopper for you, you should consider looking at the WIX setup framework - which does support this scenario.
You can find a good set of WIX Tutorials here. If someone wants to publish a blog post that demonstrates how to perform the scenarios I outlined in the blog post above using WIX, let me know and I will definitely link to it (and send you a few .NET books to say thanks!).
Hope this helps,
Scott
P.S. Please check out my ASP.NET Tips, Tricks and Tutorials page for more cool ASP.NET samples and tips/tricks.
Trackback: http://tb.blog.csdn.net/TrackBack.aspx?PostId=1658324
windows驱动的安装包制作:
这是一个MP3 Player在win98下的驱动程序安装包的例子,开发工具是InstallShield6.2。
其功能是实现Driver的自动安装,原始文件是StMp3Rec.inf,StUms.inf,StMp3Rec.sys,
StUms.sys,StUmsPdr.pdr。供大家参考,以便快速掌握InstallShield开发98驱动安装程序的方法。
创建驱动程序包的步骤
一、用向导生成一个工程。
二、创建Files Groups
1、Inf Files
包含文件:StMp3Rec.inf, StUms.inf, 安装目录:
2、Sys Files
包含文件:StMp3Rec.sys, StUms.sys, 安装目录:
3、Pdr Files
包含文件:StUms.pdr, 安装目录:
4、App Files
包含文件:无
三、创建Componets
1. Inf Files 2、Sys Files 3、Pdr Files 4、App Files 并指定它们和Files Groups的组件一一对应。
四、创建卸载菜单
新建Uninstall快捷方式,Target:
Install Conditions: App Files
五、写InstallScrip代码
////////////////////////////////////////////////////////////////////////////////
//
// File Name: Setup.rul
//
// Description: InstallShield script
//
// Comments: This script was generated based on the selections you made in
// the Project Wizard. Refer to the help topic entitled "Modify
// the script that the Project Wizard generates" for information
// on possible next steps.
//
////////////////////////////////////////////////////////////////////////////////
// Include header files
#include "ifx.h"
////////////////////// string defines ////////////////////////////
//////////////////// installation declarations ///////////////////
// ----- DLL function prototypes -----
// your DLL function prototypes
// ---- script function prototypes -----
// your script function prototypes
// your global variables
//////////////////////////////////////////////////////////////////////////////
//
// FUNCTION: OnBegin
//
// EVENT: Begin event is always sent as the first event during installation.
//
//////////////////////////////////////////////////////////////////////////////
function OnBegin()
begin
if (!(SYSINFO.WIN9X.bWin98)) then
MessageBox("The installation only for Windows 98.",INFORMATION);
abort;
endif;
//delete device infomation
RegDBSetDefaultRoot(HKEY_LOCAL_MACHINE);
RegDBDeleteKey("Enum//USB//VID_066F&PID_8000");
end;
//////////////////////////////////////////////////////////////////////////////
//
// FUNCTION: OnFirstUIBefore
//
// EVENT: FirstUIBefore event is sent when installation is run for the first
// time on given machine. In the handler installation usually displays
// UI allowing end user to specify installation parameters. After this
// function returns, ComponentTransferData is called to perform file
// transfer.
//
///////////////////////////////////////////////////////////////////////////////
function OnFirstUIBefore()
number nResult,nSetupType;
string szTitle, szMsg;
LIST listStartCopy;
begin
// TO DO: if you want to enable background, window title, and caption bar title
// SetTitle( @TITLE_MAIN, 24, WHITE );
// SetTitle( @TITLE_CAPTIONBAR, 0, BACKGROUNDCAPTION );
// Enable( FULLWINDOWMODE );
// Enable( BACKGROUND );
// SetColor(BACKGROUND,RGB (0, 128, 128));
TARGETDIR = PROGRAMFILES ^@COMPANY_NAME ^@PRODUCT_NAME;
Dlg_Start:
// beginning of dialogs label
Dlg_SdWelcome:
szTitle = "";
szMsg = "";
nResult = SdWelcome( szTitle, szMsg );
if (nResult = BACK) goto Dlg_Start;
// setup default status
SetStatusWindow(0, "");
Enable(STATUSEX);
StatusUpdate(ON, 100);
return 0;
end;
///////////////////////////////////////////////////////////////////////////////
//
// FUNCTION: OnFirstUIAfter
//
// EVENT: FirstUIAfter event is sent after file transfer, when installation
// is run for the first time on given machine. In this event handler
// installation usually displays UI that will inform end user that
// installation has been completed successfully.
//
///////////////////////////////////////////////////////////////////////////////
function OnFirstUIAfter()
STRING szTitle, szMsg1, szMsg2;
NUMBER nReserved;
begin
Disable(STATUSEX);
ShowObjWizardPages(NEXT);
szMsg1 = SdLoadString(IFX_SDFINISH_MSG1);
nReserved = 0;
SdFinishReboot(szTitle, szMsg1, SYS_BOOTMACHINE,szMsg2,nReserved);
end;
///////////////////////////////////////////////////////////////////////////////
//
// FUNCTION: OnMoving
//
// EVENT: Moving event is sent when file transfer is started as a result of
// ComponentTransferData call, before any file transfer operations
// are performed.
//
///////////////////////////////////////////////////////////////////////////////
function OnMoving()
string szAppPath;
begin
// Set LOGO Compliance Application Path
// TO DO : if your application .exe is in a subfolder of TARGETDIR then add subfolder
szAppPath = TARGETDIR;
RegDBSetItem(REGDB_APPPATH, szAppPath);
RegDBSetItem(REGDB_APPPATH_DEFAULT, szAppPath ^ @PRODUCT_KEY);
end;
///////////////////////////////////////////////////////////////////////////////
//
// FUNCTION: OnMaintUIAfter
//
// EVENT: MaintUIAfter event is sent after file transfer, when end user runs
// installation that has already been installed on the machine. Usually
// this happens through Add/Remove Programs applet.
// In the handler installation usually displays UI that will inform
// end user that maintenance/uninstallation has been completed successfully.
//
///////////////////////////////////////////////////////////////////////////////
function OnMaintUIAfter()
STRING szTitle, szMsg1, szMsg2, szOption1, szOption2;
NUMBER bOpt1, bOpt2;
begin
Disable(STATUSEX);
ShowObjWizardPages(NEXT);
//Delete device information
RegDBSetDefaultRoot(HKEY_LOCAL_MACHINE);
RegDBDeleteKey("Enum//USB//VID_066F&PID_8000");
bOpt1 = FALSE;
bOpt2 = FALSE;
szMsg1 = SdLoadString(IFX_SDFINISH_MAINT_MSG1);
szTitle = SdLoadString(IFX_SDFINISH_MAINT_TITLE);
SdFinishEx(szTitle, szMsg1, szMsg2, szOption1, szOption2, bOpt1, bOpt2);
end;
// --- include script file section ---
xuquanyong 2004-07-14 12:52 请问用这种方法可以实现驱动的自动安装吗?
我的驱动只有一个.inf 和一个.sys文件。试了一下,为什么不能实现驱动的自动安装呢?
可以在控制面板的添加/删除程序中看到这个驱动项目。
但在设备管理器中为什么看不到这个驱动程序呢?
54cndr 2004-07-15 21:18 可以实现,你注意一下inf,sys文件安装的目录,再试试看.
inf:
sys:
KungFu 2004-07-16 15:55 我也正在研究
多谢了
有问题来找你请教 :)
54cndr 2004-07-20 08:25 To xuquanyong:
如果你是Win2000,WinXP那么还要增加以下处理,内容是以前的一张贴子,在此引用。
首先说一下我的资源何我的目标:
我有两个文件,scap.sys和scap.inf,我的环境是InstallShield Developer 8 ,我希望最终可以制作出一个安装包,执行后可以自己实现驱动的安装。安装的平台为Windows 2000 或windows XP
下面是我找到的资料列出来:
1)这是InstallShield的官方网站上的一遍文档:
HOWTO: Launching an .inf File Via InstallScript 文档ID: Q102851
如何通过安装脚本来实现.inf的安装
为可以实现安装.inf文件,可以在安装脚本中通过调用LaunchAppAndWait函数启动一个命令行方式实现:
Windows 9x
Rundll.exe setupx.dll,InstallHinfSection DefaultInstall 132 %1
Windows NT/2000
Rundll32.exe setupapi.dll,InstallHinfSection DefaultInstall 132 %1
where %1 is the .inf filename.
下面给出例子:
Windows 9x
szProgram = "rundll.exe";
szCmdLine = "setupx.dll,InstallHinfSection DefaultInstall 132 " + SUPPORTDIR + "test.inf";
LaunchAppAndWait(szProgram, szCmdLine, WAIT);
Windows NT / 2000
szProgram = "rundll32.exe";
szCmdLine = "setupapi.dll,InstallHinfSection DefaultInstall 132 + SUPPORTDIR + "test.inf";
LaunchAppAndWait(szProgram, szCmdLine, WAIT);
文档内容我只保留需要的,如果需要详细的资料请根据文档ID到InstallShield上阅读。
2)还是一个例子,是InstallShield里一个老外问的
Q:How can i call an INF file during installation through installshield.
I need to do this inorder to install some PDF printers.
A:
Windows 9x
szProgram = "rundll.exe";
szCmdLine = "setupx.dll,InstallHinfSection DefaultInstall 132 " + SUPPORTDIR + "test.inf";
LaunchAppAndWait(szProgram, szCmdLine, WAIT);
Windows NT / 2000
szProgram = "rundll32.exe";
szCmdLine = "setupapi.dll,InstallHinfSection DefaultInstall 132 " + SUPPORTDIR + "test.inf";
LaunchAppAndWait(szProgram, szCmdLine, WAIT);
SUPPORTDIR is were your inf will be located.
3)网上的大虾都说在安装程序之外写一个执行安装功能的小程序,可以在DDKsrcsetup……找得到,我去看了,同时我也在MSDN上找到了一个文章,就是介绍这个小程序的的
http://support.microsoft.com/default.aspx?scid=http://support.microsoft..com:80/support/kb/articles/q311/2/72.asp&NoWebContent=1
有兴趣自己去看看,我就不罗嗦啦,我把这个程序Devcon下载了下来。
现在我手上有的资料可以使我有两种安装方式,一个是通过InstallShield在安装过程中通过脚本来调用Devcon来实现安装;还有一个是通过在脚本中调用rundll32来实现安装。
顺遍提一下,关于INF文件安装需要调用的函数说明,具体说明请参看Microsoft的MSDN
http://msdn.microsoft.com/library/default.asp?url=/library/en-us/setupapi/setup/installing_from_an_inf_file.asp
KungFu 2004-07-20 14:47 好像不OK;
szProgram = "rundll32.exe";
szCmdLine = "setupapi.dll,InstallHinfSection DefaultInstall 132 + SUPPORTDIR + "test.inf";
LaunchAppAndWait(szProgram, szCmdLine, WAIT);
只用这几句代码就可以了吗???
用rundll32调用的时候没有任何错误提示,就是看不到设备,还要做其他的吗?
[编辑 - 7/21/04 by KungFu]
54cndr 2004-07-28 09:42 To KungFu:
1.SUPPORTDIR是指inf及sys等所有Driver文件所在的路径.你要先把所有Driver文件copy到硬盘,例如你的文件在C://YourDriver,则SUPPORTDIR在程序中要替换为 "C:////YourDriver////".
2.如果你的设备是USB设备,则在安装Driver后,要把设备连接到电脑后才会在设备管理器看到设备名称.
[编辑 - 7/28/04 by 54cndr]
[编辑 - 7/28/04 by 54cndr]
beckzp 2004-08-02 10:54 我用这个方法加载我的passthru.sys,为什么敲入以后,系统没有报错,但实际上并没有加载上?有人还有我这种情况吗
dcj2004 2004-08-06 19:03 你好,各位高手您们好。
我对InstallShield一点都不懂。
但是我现在急需搞会“制作驱动自动安装程序”。
我在一家工厂工作。工厂做很多PCI卡。但是从网上下载的驱动大多都是必须得手动安装驱动。如今老板下达指令得我在一个月内把所有的PCI卡驱动(包括Sound Card,Modem Card, Network Adapter, RS232 PCMCIA Cardbus, LAN Cardbus and so on).苦于自己对这个一点都不懂。眼看着时间一天一天过去。请各位大虾指点迷津。小的一定铭记。下辈子一定做牛做马侍候您们!!!
请给我一些介意吧。请发至我的邮箱:dengchaojun2003@sohu.com
wormworm 2004-08-10 09:14 谢谢两位高手。
sunzb 2004-08-11 12:58 我以前做过PCI电视卡,USB电视盒,还有串口特殊运用的驱动安装程序。有原码。
54cndr 2004-08-13 08:31 To: dcj2004
你可以在google里搜索"InstallShield简明使用教程",就可以找一本电子书,它是InstallShield入门的好书.
wound 2004-08-14 15:29 TO sunzb
我现在也在做PCMCIA串口的安装,可以将你原来做的例子给我参考下吗,谢谢了!
mail:wound1979@163.com/ding_jie@mtift.com
dcj2004 2004-08-17 16:02 To sunzb:
你能把网卡的安装工程样本给我参考一下吗?
Sundsea 2004-08-17 19:09 [quote]To: dcj2004
你可以在google里搜索"InstallShield简明使用教程",就可以找一本电子书,它是InstallShield入门的好书. [/quote]
renwood 2004-08-23 11:08 谁能把完整的安装脚本贴出来啊?
我的一执行就报安装失败,用的是:
szProgram = "rundll32.exe";
driverDir = "D://CDMASource//driver";
szCmdLine = "setupapi.dll,InstallHinfSection DefaultInstall 132" + driverDir + "modem.inf";
LaunchAppAndWait(szProgram, szCmdLine, WAIT);
还有supportdir在哪设哦?请高手指点.
zsh_7769 2004-10-09 10:24 to sunzb:
你能把以前做过PCI电视卡,USB电视盒,还有串口特殊运用的驱动安装程序发给我学习一下吗?谢谢!
zsh_7769@163.com
playar 2004-10-14 11:59 说了这么多,我直接问一句吧:)
是不是对有inf文件的驱动程序,将文件拷入相应目录后
只需要运行rundll32就可以安装?
多些啦!
limh909 2004-10-25 14:43 我要好好研究一下。谢谢了!
blackperl 2004-11-09 20:31 szProgram = "rundll32.exe";
szCmdLine = "setupapi.dll,InstallHinfSection DefaultInstall 132 " + SUPPORTDIR + "test.inf";
LaunchAppAndWait(szProgram, szCmdLine, WAIT);
我用上面的方法利用InstallShield X 做Passthru的自安装程序,我把需要的文件passthru.dll,passthru.sys,netsf.inf,netsf_m.inf都关联到了目录SUPPORTDIR目录下,然后调用了上代码,可LaunchAppAndWait(szProgram, szCmdLine, WAIT);返回值小于零,没有安装成功。请问我的方法那里有问题啊?
到底这种方法能不能成功啊?有谁成功了吗?
blackperl 2004-11-13 23:12 这种方法好像根本不OK啊,有成功了吗?
54cndr 2004-12-02 15:45 blackperl:
如果使用Rundll32.exe不行,你可以试试验调用Devcon来实现安装.
54cndr 2004-12-09 11:26 关于rundll32.exe安装方法
szProgram = "rundll32.exe";
szCmdLine = "setupapi.dll,InstallHinfSection DefaultInstall 132" + SUPPORTDIR + "netsf.inf";
其中DefaultInstll是指INF文件中的安装节,必须替换为自己INF中的INSTALL节名,例如节名是USBCamera.Dev,则代码要要改为:
szCmdLine = "setupapi.dll,InstallHinfSection USBCamera.Dev
132" + SUPPORTDIR + "netsf.inf";
此方法在2K、XP中经测试有效。
- 安装包的制作
- 升级安装包的制作
- deb安装包的制作
- deb安装包的制作
- 制作一体化的安装包
- C# vs2005 制作安装包的过程
- VS 2008中安装包的制作
- 制作iPhone PXL安装包的方法
- 制作iPhone PXL安装包的方法
- linux下run安装包的制作
- VS2005中安装包的制作
- 如何制作Windows Service的安装包
- vs自定义安装包的制作
- NSIS制作自己的安装包
- 制作iPhone PXL安装包的方法
- 制作iPhone PXL安装包的方法
- Android程序安装包APK的制作
- android 程序安装包APK的制作
- vi编辑器参数
- C语言运算符的优先级表
- 一个简单的php LDAP认证脚本
- 乱砍设计模式之六 -- OBSERVER 及 ITERATOR 模式
- Linux下的shell编程入门(2)
- 安装包的制作
- Linux下的shell编程入门(三)
- Shell编程入门教学文档Shell编程入门教学文档
- google笔试题目
- 原来我找到了“极品”!
- C#中foreach循环
- Shell编程入门:Linux解释器原理详细介绍
- 乱砍设计模式之七 -- VISITOR模式
- 新手入门 Linux系统下各文件目录的含义