使用MyBatis-Generator自动生成代码
来源:互联网 发布:lol日服有mac版吗 编辑:程序博客网 时间:2024/05/05 07:46
MyBatis-Generator是一个MyBatis相关代码的自动生成工具,使用MyBatis-Generator可以自动生成Dao层代码、Model层代码、Mapping SQL映射文件。
二、MyBatis-Generator配置
(1)检查是否安装MyBatis-Generator插件
1.1 MyEclipse下检查是否安装
点击【Help】菜单,选择【Install from Site...】,如下图所示:

在打开的窗口中点击【What is already installed?】,如下图所示:
 在【Plug-ins】选项卡中如果有MyBatis-Generator说明已安装,否则说明未安装。
1.2 Eclipse下检查是否安装
点击【Help】菜单,选择【Install New Software...】,如下图所示:

在新打开的窗口中点击【What is already installed?】,如下图所示: 在新打开的窗口中,选择【Plug-ins】选项卡,可以在中间文本框中输入“MyBatis”,将插件过滤显示。下图显示我们已经在Eclipse中安装了MyBatis-Generator插件。
(2)安装MyBatis-Generator插件
2.1 离线安装MyBatis-Generator插件
1、下载MyBatis-Generator
下载地址:http://pan.baidu.com/s/1bndANcN
2、安装MyBatis-Generator插件
将下载的文件解压,将“features”、“plugins”拷贝到MyEclipse或Eclipse的安装目录的相应目录中即可。
2.2 MyEclipse在线安装MyBatis-Generator插件
打开eclipse,点击【Help】菜单,选择【Install From Site...】
选择 "Available Software" 标签,点击 "Add Site" 按钮
输入以下信息:
Location:http://mybatis.googlecode.com/svn/sub-projects/generator/trunk/eclipse/UpdateSite/
点击ok,自动进入 "mybatis generator Feature"
点击【install】按钮进行安装mybatis generator 插件安装完成。
2.3 利用Maven安装Mybatis-Generator插件
在pom.xml中配置如下:
<build> <plugins> <plugin> <groupId>org.mybatis.generator</groupId> <artifactId>mybatis-generator-maven-plugin</artifactId> <version>1.3.1</version> <configuration></configuration> </plugin> </plugins></build>然后执行mvn eclipse:eclipse,这时在maven中会加入此插件。
(3)构建数据库环境
创建数据库表的SQL脚本如下:
/*Navicat MySQL Data TransferSource Server : mysqldbSource Server Version : 50600Source Host : localhost:3306Source Database : ibatisdatabaseTarget Server Type : MYSQLTarget Server Version : 50600File Encoding : 65001Date: 2014-07-11 15:48:30*/SET FOREIGN_KEY_CHECKS=0;-- ------------------------------ Table structure for `score`-- ----------------------------DROP TABLE IF EXISTS `score`;CREATE TABLE `score` ( `ID` int(11) NOT NULL AUTO_INCREMENT, `PID` int(11) NOT NULL, `Score` int(11) NOT NULL, `Grade` int(11) DEFAULT NULL, `Subject` varchar(255) DEFAULT NULL, PRIMARY KEY (`ID`)) ENGINE=InnoDB AUTO_INCREMENT=162 DEFAULT CHARSET=utf8;-- ------------------------------ Records of score-- ----------------------------INSERT INTO `score` VALUES ('82', '0', '50', '0', '测试0');INSERT INTO `score` VALUES ('83', '1', '51', '1', '测试1');INSERT INTO `score` VALUES ('84', '2', '52', '2', '测试2');INSERT INTO `score` VALUES ('85', '3', '53', '3', '测试3');INSERT INTO `score` VALUES ('86', '4', '54', '4', '测试4');INSERT INTO `score` VALUES ('87', '5', '55', '5', '测试5');INSERT INTO `score` VALUES ('102', '0', '50', '0', '测试0');INSERT INTO `score` VALUES ('103', '1', '51', '1', '测试1');INSERT INTO `score` VALUES ('104', '2', '52', '2', '测试2');INSERT INTO `score` VALUES ('105', '3', '53', '3', '测试3');INSERT INTO `score` VALUES ('106', '4', '54', '4', '测试4');INSERT INTO `score` VALUES ('107', '5', '55', '5', '测试5');INSERT INTO `score` VALUES ('122', '0', '50', '0', '测试0');INSERT INTO `score` VALUES ('123', '1', '51', '1', '测试1');INSERT INTO `score` VALUES ('124', '2', '52', '2', '测试2');INSERT INTO `score` VALUES ('125', '3', '53', '3', '测试3');INSERT INTO `score` VALUES ('126', '4', '54', '4', '测试4');INSERT INTO `score` VALUES ('127', '5', '55', '5', '测试5');INSERT INTO `score` VALUES ('142', '0', '50', '0', '测试0');INSERT INTO `score` VALUES ('143', '1', '51', '1', '测试1');INSERT INTO `score` VALUES ('144', '2', '52', '2', '测试2');INSERT INTO `score` VALUES ('145', '3', '53', '3', '测试3');INSERT INTO `score` VALUES ('146', '4', '54', '4', '测试4');INSERT INTO `score` VALUES ('147', '5', '55', '5', '测试5');(4)配置自动生成代码所需的xml文件
本例中以generatorConfig.xml为例:
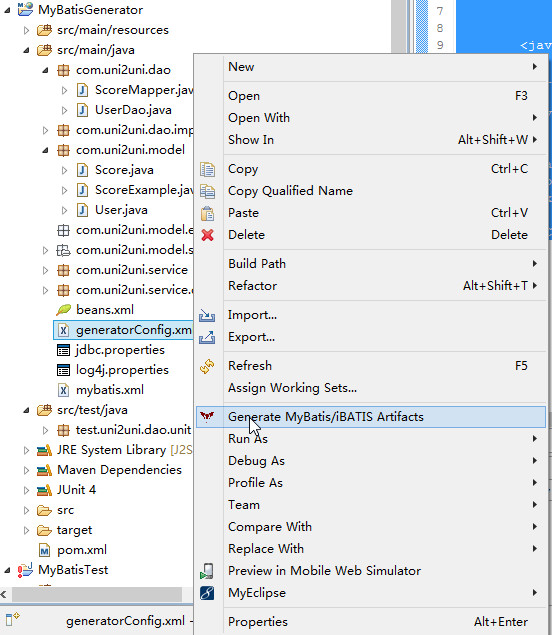
<?xml version="1.0" encoding="UTF-8" ?><!DOCTYPE generatorConfiguration PUBLIC "-//mybatis.org//DTD MyBatis Generator Configuration 1.0//EN" "http://mybatis.org/dtd/mybatis-generator-config_1_0.dtd" ><generatorConfiguration> <classPathEntry location="C:\Users\Administrator\Desktop\MybatisTest\lib\mysql-connector-java-5.1.24-bin.jar" /> <context id="aisSnsTables" targetRuntime="MyBatis3"> <jdbcConnection driverClass="com.mysql.jdbc.Driver" connectionURL="jdbc:mysql://localhost:3306/ibatisdatabase" userId="root" password="root" /> <javaModelGenerator targetPackage="com.uni2uni.model" targetProject="MyBatisGenerator/src/main/java" /> <sqlMapGenerator targetPackage="com.uni2uni.model.sqlmapper" targetProject="MyBatisGenerator/src/main/java" /> <javaClientGenerator targetPackage="com.uni2uni.dao" targetProject="MyBatisGenerator/src/main/java" type="XMLMAPPER"> <property name="enableSubPackages" value="true" /> </javaClientGenerator> <table schema="ibatisdatabase" tableName="Score" domainObjectName="Score" /> </context></generatorConfiguration>我们在generatorConfig.xml文件上【右键】,选择【Generate MyBatis/iBATIS Artifacts】。
就会在相应的目录的包下生成相应的文件。如下图所示:
本例中以Scope表为例,生成的文件有:
com.uni2uni.model\Score.java:实体类
com.uni2uni.model\ScoreExample.java:用于构造复杂的筛选条件。
com.uni2uni.dao\ScoreMapper.java:数据访问接口
com.uni2uni.model.sqlmapper\ScoreMapper.xml:实体sql映射文件
(5)测试生成结果
接下来我们以单元测试为例来进行测试,ScoreUnit.java的代码如下所示:
package test.uni2uni.dao.unit;import java.util.List;import java.io.IOException;import org.junit.Test;import org.junit.runner.RunWith;import org.mybatis.spring.SqlSessionTemplate;import org.springframework.beans.factory.annotation.Autowired;import org.springframework.test.context.ContextConfiguration;import org.springframework.test.context.junit4.SpringJUnit4ClassRunner;import com.uni2uni.dao.ScoreMapper;import com.uni2uni.model.Score;import com.uni2uni.model.ScoreExample;import com.uni2uni.model.ScoreExample.Criteria;@RunWith(SpringJUnit4ClassRunner.class)@ContextConfiguration(locations={"classpath:beans.xml"})public class ScoreUnit { @Autowired private SqlSessionTemplate session; @Test public void addTest() throws IOException{ ScoreMapper mapper = session.getMapper(ScoreMapper.class); Score model= new Score(); model.setPid(6); model.setScore(59); model.setGrade(1); model.setSubject("test"); mapper.insert(model); } @Test public void updateTest() { ScoreMapper mapper = session.getMapper(ScoreMapper.class); Score model= new Score(); model.setId(148); model.setPid(67); model.setScore(58); model.setGrade(2); model.setSubject("test222"); mapper.updateByPrimaryKey(model); } @Test public void deleteTest() { ScoreMapper mapper = session.getMapper(ScoreMapper.class); mapper.deleteByPrimaryKey(148); } @Test public void selectTest() { ScoreMapper mapper = session.getMapper(ScoreMapper.class); int count = mapper.countByExample(null); System.out.println("当前表中的数量是:"+count+"条"); ScoreExample scoreExample = new ScoreExample(); Criteria criteria = scoreExample.createCriteria(); criteria.andIdEqualTo(147); List<Score> scopes= mapper.selectByExample(scoreExample); if(scopes!=null){ System.out.println(scopes.size()); } }}三、Demo下载
下载地址:http://pan.baidu.com/s/1qWFe0Ug
四、知识扩展
(1)Criteria介绍
在单元测试类中的selectTest用到了Criteria,它是最基本、最底层的Where条件,用于字段级的筛选,filed用于指代字段名字,列举如下:
只有一个条件,不需要其他参考值
feild IS NOLL
feild IS NOT NULL
与一个参考值进行算数运算
feild > value
feild >= value
feild = value
feild <> value
feild <= value
feild < value
与一个参考值进行模糊查询,参值中的%,?只能在构造查询条件时手动指定
feild LIKE value
feild NOT LIKE value
介于两个参考值之间
feild BETWEEN value AND secondValue
在或不在一个参考值集合中,item来自于value集合
feild IN (item,item,item,...)
feild NOT IN (item,item,item,...)
(2)如何不生成Example类
我们上面介绍过,xxxExample类用于构造复杂的筛选条件。如果我们不想生成改Example类,可以进行如下配置:
<table schema="ibatisdatabase" tableName="Score" domainObjectName="Score" enableCountByExample="false" enableDeleteByExample="false" enableSelectByExample="false" enableUpdateByExample="false" />enableCountByExample、enableDeleteByExample、enableSelectByExample、enableUpdateByExample属性用于配置是否生成相应的Example类。
(3)generatorConfig.xml文件重命名注意事项
generatorConfig.xml文件为默认文件名,如果更改的话,需要在pom.xml中增加如下配置:
<properties><mybatis.generator.configurationFile>generatorConfig.xml</mybatis.generator.configurationFile></properties>- 使用MyBatis-generator 自动生成MyBatis代码
- MyBatis使用Generator自动生成代码
- MyBatis使用Generator自动生成代码
- 使用MyBatis generator自动生成代码
- 使用mybatis generator自动生成代码步骤
- MyBatis使用Generator自动生成代码
- 使用MyBatis-Generator自动生成代码
- 使用Mybatis Generator自动生成代码
- 使用MyBatis Generator 自动生成代码
- 使用Mybatis Generator自动生成代码
- 使用Mybatis-Generator自动生成代码
- 使用Mybatis-Generator自动生成代码
- maven使用mybatis-generator自动生成代码
- eclipse使用mybatis generator自动生成代码
- Generator-Mybatis自动生成代码
- MyBatis Generator自动生成代码
- mybatis-generator自动生成代码
- mybatis自动生成代码generator
- Lua 语言的常见的相关base 变量和base函数
- 分享一个链接
- 机器学习中的数学(1)-回归(regression)、梯度下降(gradient descent)
- HIVE的安装
- 用shell写俄罗斯方块(一)
- 使用MyBatis-Generator自动生成代码
- storm安装
- struct 结构体类型的大小计算
- Puppet部署:安装puppet server、client
- 史上最严格的实名制是否能解决电信骚扰诈骗
- 问题五20150907Mysql版本不一致错误
- Cocoa Touch事件处理流程--响应者链
- iBeacons Tutorial with iOS and Swift
- thrift for java的使用