Extended Vertical Label Control in C# .NET
来源:互联网 发布:编程命名规范 编辑:程序博客网 时间:2024/05/16 05:20
http://www.codeproject.com/Articles/19774/Extended-Vertical-Label-Control-in-C-NET
Introduction
This article describes how to create a custom vertical label user control in C# .NET. The user control provides text draw from top or from bottom. This article is a derivation of Raman Tayal's Vertical Label Control in VB.NET. I just translated his work to C# and added the functionality of drawing text starting from bottom to top. Also, an updated version now supports transparent backgrounds.
Background
On one of my projects, I needed a label control that can display text vertically. I encountered Raman Tayal's Vertical Label Control in VB.NET and translated it to C#. But, I needed additional functionality of drawing text starting from the top, so I just added the functionality. This control has been useful to me, and I hope others would find it useful too.
Using the Code
The code provided is a class that creates a DLL that can be added as an item in the Toolbox of the Windows Forms designer. The class uses the following namespaces:
using System;using System.ComponentModel;using System.Drawing;Code
The part of the code that really does the job is the override for the OnPaint event.
protected override void OnPaint(System.Windows.Forms.PaintEventArgs e){ float vlblControlWidth; float vlblControlHeight; float vlblTransformX; float vlblTransformY; Color controlBackColor = BackColor; Pen labelBorderPen; SolidBrush labelBackColorBrush; if (_transparentBG) { labelBorderPen = new Pen(Color.Empty, 0); labelBackColorBrush = new SolidBrush(Color.Empty); } else { labelBorderPen = new Pen(controlBackColor, 0); labelBackColorBrush = new SolidBrush(controlBackColor); } SolidBrush labelForeColorBrush = new SolidBrush(base.ForeColor); base.OnPaint(e); vlblControlWidth = this.Size.Width; vlblControlHeight = this.Size.Height; e.Graphics.DrawRectangle(labelBorderPen, 0, 0, vlblControlWidth, vlblControlHeight); e.Graphics.FillRectangle(labelBackColorBrush, 0, 0, vlblControlWidth, vlblControlHeight); e.Graphics.TextRenderingHint = this._renderMode; e.Graphics.SmoothingMode = System.Drawing.Drawing2D.SmoothingMode.HighQuality; if (this.TextDrawMode == DrawMode.BottomUp) { vlblTransformX = 0; vlblTransformY = vlblControlHeight; e.Graphics.TranslateTransform(vlblTransformX, vlblTransformY); e.Graphics.RotateTransform(270); e.Graphics.DrawString(labelText, Font, labelForeColorBrush, 0, 0); } else { vlblTransformX = vlblControlWidth; vlblTransformY = vlblControlHeight; e.Graphics.TranslateTransform(vlblControlWidth, 0); e.Graphics.RotateTransform(90); e.Graphics.DrawString(labelText, Font, labelForeColorBrush, 0, 0, StringFormat.GenericTypographic); } }As you can see, I have an if condition in if (this.TextDrawMode == DrawMode.BottomUp). This tells us where the control decides whether to draw the text from bottom up or from top to bottom depending on the value of the property TextDrawMode.
When the value of TextDrawMode is BottomUp, you will notice that TranslateTransform accepts values zero for the X component of the translation and the height of the control as value for Y of the translation. This tells GDI to start drawing from the bottom left of the rectangle occupied by the control.
When the value of TextDrawMode is TopBottom, you will see that TranslateTransform accepts the control's width as the X component of the translation and zero as the Y component of the translation. This tells GDI to start drawing from top right of the rectangle occupied by the control.
The TextDrawMode property is an additional property that can be set during design time and also during runtime.
In this update, please notice that I am checking for the value of the _transparentBG variable which gets its value from a public boolean property TransparentBackground. If this is set to true, notice that the Brushcolor is set to Color.Empty; otherwise, it uses the control's assigned Color.
Also, I made the modifications on the constructor of the VerticalLabel control to include the following line:
SetStyle(System.Windows.Forms.ControlStyles.Opaque, true);And finally, to enable transparency, the following override was added:
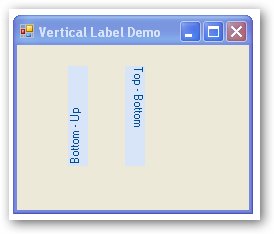
protected override CreateParams CreateParams{ get { CreateParams cp = base.CreateParams; cp.ExStyle |= 0x20; // Turn on WS_EX_TRANSPARENT return cp; }}On the screenshot that I have provided, the horizontally-aligned text uses a WinForms Label control. The three vertical labels were displayed in different orientation (Bottom-Up | Top-Bottom) and also with different transparency (BackgroundTransparent = true|false) settings.
Points of Interest
Since this is my first time writing a program using GDI+, I tried to do it using trial and error, but it was frustrating at first, until I found a nice article on how to use Graphics.RotateTransform.
History
- July 27, 2007: Initial version.
- September 27: Updated with support for transparent background.
License
This article, along with any associated source code and files, is licensed under The Code Project Open License (CPOL)
- Extended Vertical Label Control in C# .NET
- Extended web browser control for .NET 1.0/1.1
- About DataGridView control in C#
- ListView Control in C#.Net
- Listening for the link event in a Flex Label control
- Simplified and Extended Data Binding Syntax in ASP.NET 2.0
- Vertical Text Centering in an Edit Control(CEdit 单行 垂直居中)
- Chart Control for .net 设置饼图label显示格式
- Label vs Literal in ASP.NET
- Passing Domain Credentials in C# to a WebBrowser Control in .Net WinForms Applications(winform中传递域认)
- c# find control in windows form
- ViewState in .net Client Control xss
- Static in C# .NET
- Disabling Copy/Paste in a Textbox control in C#
- Simplified and Extended Data Binding Syntax in ASP.NET 2.0(part1)
- Simplified and Extended Data Binding Syntax in ASP.NET 2.0 -- Cont'd
- ASP.net C# Label 英文被隔断问题
- Generic Chart Control in C# 一个通用的图表控件
- 《我与大数据的365天》 ——(3) 【写代码观察数据变化】
- 二维数组排序
- Javaweb的基础
- 第六课纹理映射:
- android:open failed: EISDIR (Is a directory)
- Extended Vertical Label Control in C# .NET
- 第七课 光照和键盘控制
- QT QTableWidget 用法总结
- 【大数据处理架构】SparkR
- 关于如何使用thinkphp自带的分页功能
- BestCoder Round #55 解题报告
- linux下安装和配置mongodb
- 类中的const成员函数
- Visual Studio 2008 简体中文正式版下载及序列号(无使用期限限制,正式版)