黑马程序员-java基础(九)-网络编程
来源:互联网 发布:达内培训 校软件编程 编辑:程序博客网 时间:2024/06/14 01:19
网络编程
1 网络编程概述
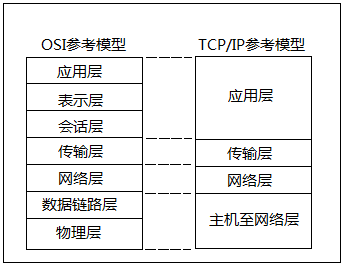
1、网络参考模型

P.S.2、网络通讯
1、每个网卡的MAC地址都是全球唯一的。
2、路由器实现将数据包发送到指定的地点。
3、应用软件之间通信的过程就是层与层之间封包、解封包的过程。
4、OSI参考模型虽然设计精细,但过于麻烦,效率不高,因此才产生了简化版的TCP/IP参考模型。
a、 IP地址(InetAddress): 网络中设备的标识。
P.S.
本地回环地址:127.0.0.1 主机名:localhost
import java.net.InetAddress;public class Test{ public static void main(String[] args)throws Exception { InetAddress i=InetAddress.getByName("www.baidu.com");//在给定主机名的情况下确定主机的 IP 地址 System.out.println("HostAddress:"+i.getHostAddress()); System.out.println("HostName:"+i.getHostName()); InetAddress ia=InetAddress.getLocalHost(); System.out.println("MyHostAddress:"+ia.getHostAddress()); //据系统上配置的名称服务返回其IP地址所组成的数据(主要针对主机地址不唯一,有服务器群) InetAddress[] I=InetAddress.getAllByName("www.baidu.com"); System.out.println(I[0].getHostAddress()); System.out.println(I[1].getHostAddress()); } }
b、端口
用于标识进程(应用程序)的逻辑地址,不同进程的标识。
有效端口:0~65535,其中0~1024系统使用或保留端口
3、传输协议
P.S.
1、当一台计算机A向另一台计算机B发送QQ信息时,首先路由器通过数据包中的IP地址定位该信息发送到哪一台机器。然后计算机B接收到数据包后,通过此数据包中的端口号定位到发送给本机的QQ应用程序。
2、所谓防火墙,其功能就是将发送到某程序端口的数据屏蔽掉以及将从该程序端口发出的数据也屏蔽掉。
p.s.
域名解析:
在浏览器中输入百度的域名,DNS解析域名成IP,然后计算机再通过获取到的IP访问新浪服务器。域名解析,最先走是本地的hosts(C:\WINDOWS\system32\drivers\etc\hosts)文件,解析失败了,才去访问DNS服务器解析、获取IP地址。(因此可以自定义要访问的域名)
因此: 通过hosts文件可以屏蔽游戏网站内容弹出,例如:在hosts文件中添加,127.0.0.1www.9377.com。

UDP:
应用于:QQ、FeiQ聊天、在线视频用的都是UDP传输协议。
应用于:文件下载,FTP,File Transfer Protocol(文件传输协议)
2 Socket
Socket就是为网络服务提供的一种机制。通信的两端都有Socket。
网络通信其实就是Socket间的通信。
数据在两个Socket间通过IO传输。
3 UDP传输
DatagramSocket:用来发送和接收数据报包的套接字)
DatagramPacket:此类表示数据报包,每条报文仅根据该包中包含的信息从一台机器路由到另一台机器。
【】UDP发送
/*需求:通过UDP传输,将一段文字数据发送出去思路:1、建立udpSocket服务2、提供数据,并将其封装成数据报包3、通过socket服务的功能发送数据包4、关闭资源*/import java.net.*;class UdpSend{public static void main(String[] args) throws Exception{//Tep1:建立udp的Socket服务DatagramSocket ds=new DatagramSocket();//此类表示用来发送和接收数据报包的套接字//Tep2:提供数据,并将其封装成数据报包byte[] buf="UDP SEND".getBytes();//DatagramPacket(byte[] buf, int length, InetAddress address, int port)DatagramPacket dp=new DatagramPacket(buf,buf.length,InetAddress.getByName("192.168.1.100"),10000);//Tep3:通过socket服务的功能发送数据包ds.send(dp);ds.close();}}【】UDP接收/* * 需求:定义一个UDP接受端,用来接收数据并打印在控制台上 * 思路: * 1、建立UDP的socket服务,指定端口为10000 * 2、创建一个数据报包用来存储接受到的数据 * 3、用socket服务的recive方法来获取数据包并存储在创建好的数据报包中 * 4、通过数据包对象的方法来获取数据,并将其打印在控制台 * 5、关闭资源 * */import java.net.*;class UdpRecive {public static void main(String[] args) throws Exception{//Tep1:建立UDP的socket服务,指定端口为10000(发送端指定为10000)DatagramSocket ds=new DatagramSocket(10000);byte[] buf=new byte[1024];//Tep2:创建一个数据报包用来存储接受到的数据DatagramPacket dp=new DatagramPacket(buf,buf.length);//Tep3:用socket服务的recive方法来获取数据包并存储在创建好的数据报包中ds.receive(dp);String add=dp.getAddress().getHostAddress();//获取发送端的地址//tep4:通过数据包对象的方法getData来获取数据,并将其打印在控制台System.out.println(add+":"+new String(dp.getData(),0,dp.getLength()));//将字节数组封装成字符串//Tep5:关闭资源ds.close();}}运行结果:【聊天模式】

/* * 需求:通过UDP传输,读取键盘文字录入的文字数据发送出去,发送886就推出 思路:1、建立udpSocket服务2、建立字节输入Io流读取键盘的录入数据,转换成字符流用缓冲区功能存储数据3、提供数据,并将其封装成数据报包4、通过socket服务的功能发送数据包5、关闭资源 * */import java.net.*;import java.io.*;class UdpSendTo{public static void main(String[] args) throws Exception{System.out.println("发送端已启动。。。");BufferedReader br=new BufferedReader(new InputStreamReader(System.in));//建立udp的Socket服务DatagramSocket ds=new DatagramSocket(8888);//此类表示用来发送和接收数据报包的套接字String line;while((line=br.readLine())!=null){byte[] buf=line.getBytes();DatagramPacket dp=new DatagramPacket(buf,buf.length,InetAddress.getByName("192.168.1.100"),10000);ds.send(dp);if("886".equals(line))break;}ds.close();}}/* * 需求:定义一个UDP接受端,用来接收数据并打印在控制台上 * 思路: * 1、建立UDP的socket服务,指定端口为10000 * 2、创建一个数据报包用来存储接受到的数据 * 3、用socket服务的recive方法来获取数据包并存储在创建好的数据报包中 * 4、通过数据包对象的方法来获取数据,并将其打印在控制台 * 5、关闭资源 * */import java.net.*;class UdpRecive {public static void main(String[] args) throws Exception{System.out.println("接收端已启动。。。");DatagramSocket ds=new DatagramSocket(10000);byte[] buf=new byte[1024];while(true){DatagramPacket dp=new DatagramPacket(buf,buf.length);ds.receive(dp);String add=dp.getAddress().getHostAddress();System.out.println(add+":"+dp.getPort()+":"+new String(dp.getData(),0,dp.getLength()));//将字节数组封装成字符串if("886".equals(new String(dp.getData(),0,dp.getLength())))break;}ds.close();}}运行结果:【群聊】

/* * 需求:群聊 思路:采用多线程,同时接收和发送 */import java.net.*;import java.io.*;class UdpSendAll implements Runnable{private DatagramSocket sds;UdpSendAll(DatagramSocket sds){this.sds=sds;}public void run(){try {BufferedReader br=new BufferedReader(new InputStreamReader(System.in));String line;while((line=br.readLine())!=null){byte[] buf=line.getBytes();DatagramPacket dp=new DatagramPacket(buf,buf.length,InetAddress.getByName("192.168.1.100"),10015);sds.send(dp);if("886".equals(line))break;}sds.close();} catch (Exception e) {throw new RuntimeException("发送失败");}}}class UdpReciveAll implements Runnable{private DatagramSocket rds;UdpReciveAll(DatagramSocket rds){this.rds=rds;}public void run(){try {byte[] buf=new byte[1024];while(true){DatagramPacket dp=new DatagramPacket(buf,buf.length);rds.receive(dp);String add=dp.getAddress().getHostAddress();System.out.println(add+":"+dp.getPort()+":"+new String(dp.getData(),0,dp.getLength()));//将字节数组封装成字符串}} catch (Exception e) {throw new RuntimeException("接收端异常");}}} public class Chat{ public static void main(String[] args)throws Exception { DatagramSocket sds=new DatagramSocket(); DatagramSocket rds=new DatagramSocket(10015); new Thread(new UdpSendAll(sds)).start(); new Thread(new UdpReciveAll(rds)).start(); }} 
4 TCP传输
TCP传输:
客户端:对应对象-Socket
服务端:对应对象-ServerSocket
客户端(Client)首先与服务端(Server)建立连接,形成通道(其实就是IO流),然后,数据就可以在通道之间进行传输,并且单个Server端可以同时与多个Client端建立连接。

1、TCP客户端
1、建立客户端的socket服务,并指定一个主机及端口,去尝试连接,如果连接失败会出现异常
2、连接成功则通过Socket对象提供的输入、输出流对象(通过getInputStream()、getOutputStream()获取)
3.通过输出流、输入流发送、获取数据
4、关闭客户端socket服务
2、TCP服务端
1、建立服务端的Socket服务,并监听一个端口
2、获取该端口连接过来的客户端对象(通过ServeSocket对象的accept()方法获取-阻塞方法,没有连接过来就会等)
3、使用对应的客户端对象,与客户端进行数据传输
4、访问结束,就关闭该服务端
/*TCP客户端和服务端交互 */import java.net.*;import java.io.*;//客户端class Client {public static void main(String[] args)throws Exception{//建立客户端socket服务,并指定要连接的主机及端口 Socket s=new Socket("192.168.1.100",10008);//获取socket的输出流OutputStream os=s.getOutputStream();//通过输出流,输出数据os.write("服务端,你好".getBytes());//获取Socket服务的输入流InputStream is=s.getInputStream();//读取服务端发送的数据(read阻塞式方法)byte[] buf=new byte[1024];int len=is.read(buf);System.out.println(new String(buf,0,len));//关闭客户端s.close();}}//服务端class Server{public static void main(String[] args)throws Exception {//建立服务端Socket服务,并监听一个端口 ServerSocket ss=new ServerSocket(10008); //获取该端口的客户端对象 Socket s=ss.accept(); String ip=s.getInetAddress().getHostAddress(); System.out.println(ip+"建立连接"); //通过客户端对象获取io流 InputStream is=s.getInputStream(); //通过获取流来读取数据 byte[] buf=new byte[1024]; int len=is.read(buf); System.out.println(new String(buf,0,len)); //向客户端反馈数据 OutputStream os=s.getOutputStream(); os.write("收到,大家好才是真的好".getBytes()); //关闭客户端 s.close(); //关闭服务端 ss.close(); }}运行结果:
p.s.

【例】建立一个文本转换服务器TCP面向连接,在建立socket对象时就应该指定主机端口,形成通路。
/*建立一个TCP转将键盘输入的文本转换成大写的服务端 */import java.net.*;import java.io.*;//客户端class Client {public static void main(String[] args)throws Exception{//建立客户端socket服务,并指定要连接的主机及端口 Socket s=new Socket("192.168.1.100",10009);//将键盘录入的字节流转换成字符流并使用缓冲区BufferedReader brin=new BufferedReader(new InputStreamReader(System.in));//将客户端发送的字节流转换成字符流并使用缓冲区BufferedWriter bwout=new BufferedWriter(new OutputStreamWriter(s.getOutputStream()));//将客户端接收的字节流转换成字符流并使用缓冲区BufferedReader brout=new BufferedReader(new InputStreamReader(s.getInputStream()));String line=null;while((line=brin.readLine())!=null){//添加数据到缓冲去bwout.write(line);//因为发送的数据是不包括“\r\n”换行符的,如果不加,服务端的readline方法就读不到结束标记bwout.newLine();//刷新缓冲区,也就是发送数据bwout.flush();if("over".equals(line))break;System.out.println("Server:"+brout.readLine());}s.close();}}//服务端 class Server{public static void main(String[] args)throws Exception { //建立服务端Socket服务,并绑定端口ServerSocket ss=new ServerSocket(10009); //获取客户端对象Socket s=ss.accept(); //获取客户端IPString ip=s.getInetAddress().getHostAddress(); System.out.println(ip+"建立连接"); //将服务端接受的字节流数据转换成字符流并使用缓冲区 BufferedReader brin=new BufferedReader(new InputStreamReader(s.getInputStream())); //将服务端发送的字节流数据转换成字符流并使用缓冲区 BufferedWriter bwout=new BufferedWriter(new OutputStreamWriter(s.getOutputStream())); String line=null; while((line=brin.readLine())!=null){ if("over".equals(line))break;//将数据写入到缓冲区中 bwout.write(line.toUpperCase()); //添加换行标记,防止客户端readline()方法阻塞 bwout.newLine(); //刷新缓冲区 bwout.flush(); } //关闭客户端 s.close(); //关闭服务端 ss.close(); }}
/*将客户端的文件传输给服务端 */import java.net.*;import java.io.*;//客户端public class UploadServer{ public static void main(String[] args) throws IOException { ServerSocket ss = new ServerSocket(10005); Socket s = ss.accept(); System.out.println(s.getInetAddress().getHostAddress() + "......connected"); BufferedReader bufIn = new BufferedReader(new InputStreamReader(s.getInputStream())); BufferedWriter bufw = new BufferedWriter(new FileWriter("d:\\demo\\server.txt")); String line = null;while((line = bufIn.readLine()) != null){ //if("over".equals(line)) // break; bufw.write(line); bufw.newLine(); } PrintWriter out = new PrintWriter(s.getOutputStream(),true); out.println("上传成功"); bufw.close(); s.close(); ss.close(); }}//服务端 public class UploadClient{ public static void main(String[] args) throws UnknownHostException,IOException { Socket s = new Socket("192.168.1.100",10005); BufferedReader bufr = new BufferedReader(new FileReader("d:\\demo\\client.txt")); PrintWriter out = new PrintWriter(s.getOutputStream(),true); String line = null; while((line = bufr.readLine()) != null){ out.println(line); } //添加结束标记告诉服务端结束。否则服务端的readline会等待 s.shutdownOutput(); //不要写over,上传的文本中可能也存在“over” //out.println("over"); BufferedReader bufIn = new BufferedReader(new InputStreamReader(s.getInputStream())); String str = bufIn.readLine(); System.out.println(str); bufr.close(); s.close(); }}【例子】并发上传图片,实现多个客户端同时向服务端上传图片
import java.net.*;import java.io.*;//服务端class UploadServer{ public static void main(String[] args) throws IOException { ServerSocket ss = new ServerSocket(10009); while(true)//多线程,实现并发上传{ Socket s = ss.accept(); new Thread(new UP(s)).start(); } }}class UP implements Runnable{private Socket s;UP(Socket s){//将客户端对象作为参数传入this.s=s;}public void run(){try {int count=1;String ip=s.getInetAddress().getHostAddress();System.out.println(ip+ "......connected");File file=new File(ip+"("+count+")"+".jpg");while(file.exists())//防止重名覆盖file=new File(ip+"("+(count++)+")"+".jpg");FileOutputStream fos=new FileOutputStream(file);InputStream is=s.getInputStream();byte[] buf=new byte[1024];int len;while((len=is.read(buf))!=-1){fos.write(buf,0,len);//将接收到的数据写入对应文件中}OutputStream os=s.getOutputStream(); os.write("上传成功".getBytes());//向客户端反馈上传成功} catch (Exception e) {throw new RuntimeException("上传异常");} }}//客户端class UploadClient{ public static void main(String[] args) throws UnknownHostException,IOException { Socket s = new Socket("192.168.1.100",10009); FileInputStream fis=new FileInputStream("f:\\c\\1.jpg"); OutputStream os=s.getOutputStream(); byte[] buf=new byte[1024]; int len=0; while((len=fis.read(buf))!=-1){ os.write(buf, 0, len); } s.shutdownOutput(); InputStream in=s.getInputStream(); len=in.read(buf); System.out.println(new String(buf,0,len)); }}运行结果:
5 客户端、服务端原理
1、用浏览器访问自定义服务端
import java.net.*;import java.io.*;public class Test{ public static void main(String[] args) throws IOException { ServerSocket ss = new ServerSocket(9080); Socket s = ss.accept(); System.out.println(s.getInetAddress().getHostAddress() + "......connected"); InputStream in = s.getInputStream(); byte[] buf = new byte[1024]; int len = in.read(buf); System.out.println(new String(buf,0,len)); //给客户端一个反馈信息。 PrintWriter out = new PrintWriter(s.getOutputStream(),true); out.println("欢迎光临"); s.close(); ss.close(); }}浏览器运行结果:
服务端打印的数据:

P.S.
上述浏览器访问服务端发送的数据为HTTP协议,是一个客户端和服务端请求和应答的标准,客户端按照HTTP的标准发送数据到服务端,服务端按照HTTP的标准解析收到的数据。
根据上述浏览器向服务端发送的数据,可以自定义一个浏览器,访问Tomcat服务端中的一个网页
import java.net.*;import java.io.*;public class MyIE{ public static void main(String[] args) throws IOException { Socket s = new Socket("192.168.1.100",8080); //模拟浏览器,向tomcat服务端发送符合协议的请求消息。 PrintWriter out = new PrintWriter(s.getOutputStream(),true); out.println("GET /Myweb/web.html HTTP/1.1"); out.println("Accept: */*"); out.println("Host: 192.168.1.100:8080"); out.println("Connection: close"); out.println(); out.println(); InputStream in = s.getInputStream();//读取服务端返回的内容 byte[] buf = new byte[1024]; int len = in.read(buf); String str = new String(buf,0,len); System.out.println(str); s.close(); }}运行结果:

6 URL
上述举例可以看出,域名解析、切割太过繁琐,而java封装了类URL处理
URI:统一资源标示符。URL:统一资源定位符,也就是说根据URL能够定位到网络上的某个资源,它是指向互联网“资源”的指针。
每个URL都是URI,但不一定每个URI都是URL。这是因为URI还包括一个子类,即统一资源名称(URN),它命名资源但不指定如何定位资源。
import java.net.*;import java.io.*;public class URLTest { public static void main(String[] args) throws MalformedURLException,IOException { String str_url = "http://192.168.1.100:8080/Myweb/web.html?name=lisi"; //创建URL对象URL url = new URL(str_url);System.out.println("getProtocol:" + url.getProtocol());//获取协议名称 System.out.println("getHost:" + url.getHost());//获取主机名 System.out.println("getPort:" + url.getPort());//获取端口号 System.out.println("getFile:" + url.getFile());//获取文件名 System.out.println("getPath:" + url.getPath());//获取路径部分 System.out.println("getQuery:" + url.getQuery());//获取查询部分//openConnection() 返回一个 URLConnection 对象。URLConnection 类应用程序和 URL 之间的通信链接 URLConnection urlc=url.openConnection();// 返回从此打开的连接读取的输入流InputStream in = urlc.getInputStream(); byte[] buf = new byte[1024]; int len = in.read(buf); String text = new String(buf,0,len); System.out.println(text); in.close(); }}运行结果:
P.S.
显然,URLConnection对象还把响应头给解析了
p.s.
一般输入网址,是不带端口号的,此时可进行获取,通过获取网址返回的port,若port为-1,则分配一个默认的80端口,如
int port = getPort();if(port == -1)port = 80;
/*自定义浏览器*/import java.io.*;import java.awt.*;import java.awt.event.*;import java.net.*;class MyIEGUI{//定义所需组件引用private Frame f;private Button but,bok;private TextField tf;private TextArea ta;//构造函数MyIEGUI(){init();}//窗体基本设置于功能实现public void init(){//组件实例化f=new Frame("MyIE");but=new Button("转到");tf=new TextField(50);ta=new TextArea(25,60);//基本设置f.setBounds(300,150,500,500);f.setLayout(new FlowLayout());//添加组件f.add(tf);f.add(but);f.add(ta);//窗体事件myEvent();//窗体显示f.setVisible(true);}//注册事件public void myEvent(){//窗体关闭功能f.addWindowListener(new WindowAdapter(){public void windowClosing(WindowEvent e){System.exit(0);}});//“跳转”按钮事件but.addActionListener(new ActionListener(){public void actionPerformed(ActionEvent e){showFile();//显示网页内容在文本区中}});//文本框键盘事件tf.addKeyListener(new KeyAdapter(){public void keyPressed(KeyEvent e){//如果键盘按下Enter键,就将网页内容显示在文本区中if(e.getKeyCode()==KeyEvent.VK_ENTER)showFile();}});}//显示网页内容private void showFile(){ta.setText("");String path=tf.getText();//获取输入的路径try{//封装地址对象URL url =new URL(path);//连接网页服务器URLConnection conn=url.openConnection();//读取流,用于读取服务器返回数据InputStream in=conn.getInputStream();byte[] buf=new byte[1024*1024];//读取数据int len=in.read(buf);//将数据显示在文本区中ta.append(new String(buf,0,len));}catch (Exception e){throw new RuntimeException("连接"+path+"网站失败");}}public static void main(String[] args) {//运行窗体new MyIEGUI();}}运行结果:
- 黑马程序员-java基础(九)-网络编程
- Java基础---网络编程 (黑马程序员)
- 黑马程序员-----java基础(网络编程)
- 黑马程序员-----java基础十九(java之网络编程)
- 黑马程序员-java基础 网络编程
- 黑马程序员---java基础之网络编程
- 黑马程序员 Java基础 ---> 网络编程
- 黑马程序员:Java基础总结----网络编程
- 黑马程序员 java基础回顾---网络编程
- <<黑马程序员>>java基础之网络编程
- 黑马程序员Java基础__网络编程
- 黑马程序员-Java基础-网络编程
- 黑马程序员--java基础--网络编程
- 黑马程序员--Java基础--11网络编程
- 黑马程序员--Java基础总结---网络编程
- 黑马程序员-java基础-网络编程
- 黑马程序员 Java基础 网络编程
- 黑马程序员---java基础之网络编程
- 深入解读缓存(二)——一致性Hash算法
- cocos2d-js跨域访问问题,cocos2d-js请求网络数据
- Python实战csdn博客刷积分bug
- poj3764 The xor-longest Path 字典树与异或
- shell脚本的函数使用
- 黑马程序员-java基础(九)-网络编程
- ueditor 在线附件和在线图片路径错误BUG补丁
- 查找当前目录和子目录下包含指定字符串的文件
- vim的set autoindent和set paste不能同时出现
- Oracle练习心得
- 网络套接字基础2-API接口
- 该套装ID包含无效字符
- 在分类中如何处理训练集中不平衡问题
- 给自己来碗鸡汤


