动画特效十七:粘性动画
来源:互联网 发布:淘宝登录名可以修改吗 编辑:程序博客网 时间:2024/05/21 12:46
注:本文内容是学习自 KittenYang 的《A GUIDE TO IOS ANIMATION》一书,如果大家感兴趣的话,可以购买本书阅读。但就个人而言,觉得作者的确思维清晰,但语言表达上面忽略了很多细节方面的说明,代码书写方面有许多需要优化及更正的地方。
粘性动画效果图如下:
其实这里的动画效果实现起来还是比较复杂的。我只进行分析,并讲解粘性小球的部分。
思路分析
1. 我们可以自定义一个View来操作这个整体的效果。
2. 这个View上面有两层
2.1 后面的灰色的背景与红色的进度条,关于在动画执行过程中,绘制具体的线条,我已经在 CALayer的needsDisplayForKey方法使用说明 进行了详细的说明。
2.2 上面滚动的正方形或者滚动的小球(这一节主要讲解怎么实现上面滚动的小球)。
局部分析小球的形变效果,效果图如下(就是上图拖拽过程中小球的拉伸效果):
代码分析
1. 主控制器代码如下:
- (void)viewDidLoad { [super viewDidLoad]; [self.slider addTarget:self action:@selector(sliderChanged:) forControlEvents:UIControlEventValueChanged]; CGRect frame = CGRectMake((self.view.frame.size.width - kRoundWidth) * 0.5, (self.view.frame.size.height - kRoundWidth) * 0.5, kRoundWidth, kRoundWidth); self.roundView = [[LFRoundView alloc] initWithFrame:frame]; self.roundView.backgroundColor = [UIColor yellowColor]; [self.view addSubview:self.roundView]; // first load self.roundView.roundLayer.progress = self.slider.value;}- (void)sliderChanged:(UISlider *)slider { self.roundView.roundLayer.progress = slider.value;}代码中的roundView就是黄色背景的View,是小球运动的载体。
2. LFRoundView的代码如下:
@class LFRoundLayer;@interface LFRoundView : UIView@property (nonatomic, strong) LFRoundLayer *roundLayer;@end@implementation LFRoundView// LFRoundView只是LFRoundLayer的载体- (instancetype)initWithFrame:(CGRect)frame { if (self = [super initWithFrame:frame]) { self.roundLayer = [LFRoundLayer layer]; self.roundLayer.frame = CGRectMake(0, 0, frame.size.width, frame.size.height); self.roundLayer.contentsScale = [UIScreen mainScreen].scale; [self.layer addSublayer:self.roundLayer]; } return self;}@end在roundView的Layer上面添加了roundLayer的图层,这个图层就是用来绘制上面变动的小球。
3. LFRoundLayer代码分析:
由于在主控制器中拖拽UISlider会一直促发小球的变形效果,所以LFRoundLayer应该定义一个progress属性用来接受主控制器中传递过来的信息,并根据这个信息实时绘制变动的小球。
LFRoundLayer的 .h文件定义如下:
@interface LFRoundLayer : CALayer@property (nonatomic, assign) CGFloat progress;@end
然后在 .m文件中重写progress属性,用来实时监听属性值的变化,绘制变动的小球。
- (void)setProgress:(CGFloat)progress { _progress = progress; // 1. Prepare Positioning Square // 1-1) squareX 的计算 CGFloat squareX = (self.frame.size.width - kOutsideWidth) * progress; CGFloat squareY = self.position.y - kOutsideWidth * 0.5; CGFloat squareW = kOutsideWidth; CGFloat squareH = kOutsideWidth; self.SquareRect = CGRectMake(squareX, squareY, squareW, squareH); [self setNeedsDisplay];}需要说明的有以下几点:
1. kOutsideWidth是自定义的一个宏,它是正圆的外接正方形的边长。
#define kOutsideWidth 90
2. SquareRect 是外接正方形的frame, 虽然小球在运动过程中一直在发生变化,但是那个正方形一直保持不变,只是squareX一直在发生变化, SquareRect这个frame主要是用来定位计算,方便的计算出小球的相关位置信息,下面会做详细的介绍。
3. 调用了[self setNeedsDisplay]方法,所以在重写progress的过程中,会一直促发屏幕的重绘工作,即调用下面这个方法
- (void)drawInContext:(CGContextRef)ctx;
最后,我们在 drawInContext: 这个方法中完成小球的绘制工作。
- (void)drawInContext:(CGContextRef)ctx { // 2. Prepare A,B,C,D CGFloat movedDistance = kOutsideWidth / 6 * fabs(self.progress - 0.5); self.direction = self.progress >= 0.5 ? MovedDirectionRight : MovedDirectionLeft; CGFloat squareX = self.SquareRect.origin.x; CGFloat squareY = self.SquareRect.origin.y; CGFloat squareW = self.SquareRect.size.width; CGPoint pointA = CGPointMake(squareX + kOutsideWidth * 0.5, squareY + movedDistance); CGPoint pointB = CGPointMake(self.direction == MovedDirectionRight ? (squareX + squareW) : (squareX + squareW + 2 * movedDistance), self.position.y); CGPoint pointC = CGPointMake(squareX + kOutsideWidth * 0.5, self.position.y + kOutsideWidth * 0.5 - movedDistance); CGPoint pointD = CGPointMake(self.direction == MovedDirectionRight ? (squareX - 2 * movedDistance) : squareX, self.position.y); // 3. Prepare C1~C8 CGPoint pointC1 = CGPointMake(pointA.x + kOffset, pointA.y); CGPoint pointC2 = CGPointMake(pointB.x, pointB.y - kOffset); CGPoint pointC3 = CGPointMake(pointB.x, pointB.y + kOffset); CGPoint pointC4 = CGPointMake(pointC.x + kOffset, pointC.y); CGPoint pointC5 = CGPointMake(pointC.x - kOffset, pointC.y); CGPoint pointC6 = CGPointMake(pointD.x, pointD.y + kOffset); CGPoint pointC7 = CGPointMake(pointD.x, pointD.y - kOffset); CGPoint pointC8 = CGPointMake(pointA.x - kOffset, pointA.y); NSArray *points = @[ [NSValue valueWithCGPoint:pointA], [NSValue valueWithCGPoint:pointB], [NSValue valueWithCGPoint:pointC], [NSValue valueWithCGPoint:pointD], [NSValue valueWithCGPoint:pointC1], [NSValue valueWithCGPoint:pointC2], [NSValue valueWithCGPoint:pointC3], [NSValue valueWithCGPoint:pointC4], [NSValue valueWithCGPoint:pointC5], [NSValue valueWithCGPoint:pointC6], [NSValue valueWithCGPoint:pointC7], [NSValue valueWithCGPoint:pointC8] ]; // highlighted assistant points [self assistantPointWithArray:points inContext:ctx]; // 1. Draw Positioning Square UIBezierPath *squareBezierPath = [UIBezierPath bezierPathWithRect:self.SquareRect]; CGContextAddPath(ctx, squareBezierPath.CGPath); CGContextSetStrokeColorWithColor(ctx, [UIColor blackColor].CGColor); CGContextSetLineWidth(ctx, 1); // how to use CGContextSetLineDash, refer to http://blog.csdn.net/zhangao0086/article/details/7234859 CGFloat squareDash[2] = {5, 5}; CGContextSetLineDash(ctx, 0, squareDash, 2); CGContextStrokePath(ctx); // 2. Draw Assistant Lines UIBezierPath *assistantBezierPath = [UIBezierPath bezierPath]; [assistantBezierPath moveToPoint:pointA]; [assistantBezierPath addLineToPoint:pointC1]; [assistantBezierPath addLineToPoint:pointC2]; [assistantBezierPath addLineToPoint:pointB]; [assistantBezierPath addLineToPoint:pointC3]; [assistantBezierPath addLineToPoint:pointC4]; [assistantBezierPath addLineToPoint:pointC]; [assistantBezierPath addLineToPoint:pointC5]; [assistantBezierPath addLineToPoint:pointC6]; [assistantBezierPath addLineToPoint:pointD]; [assistantBezierPath addLineToPoint:pointC7]; [assistantBezierPath addLineToPoint:pointC8]; [assistantBezierPath closePath]; CGContextAddPath(ctx, assistantBezierPath.CGPath); CGFloat lineDash[2] = {2, 2}; CGContextSetLineDash(ctx, 0, lineDash, 2); CGContextSetStrokeColorWithColor(ctx, [UIColor blackColor].CGColor); CGContextStrokePath(ctx); // 3. Draw Entity UIBezierPath *ovalBezierPath = [UIBezierPath bezierPath]; [ovalBezierPath moveToPoint:pointA]; [ovalBezierPath addCurveToPoint:pointB controlPoint1:pointC1 controlPoint2:pointC2]; [ovalBezierPath addCurveToPoint:pointC controlPoint1:pointC3 controlPoint2:pointC4]; [ovalBezierPath addCurveToPoint:pointD controlPoint1:pointC5 controlPoint2:pointC6]; [ovalBezierPath addCurveToPoint:pointA controlPoint1:pointC7 controlPoint2:pointC8]; [ovalBezierPath closePath]; CGContextAddPath(ctx, ovalBezierPath.CGPath); CGContextSetStrokeColorWithColor(ctx, [UIColor blackColor].CGColor); CGContextSetFillColorWithColor(ctx, [UIColor redColor].CGColor); CGContextSetLineDash(ctx, 0, NULL, 0); CGContextDrawPath(ctx, kCGPathFillStroke);}- (void)assistantPointWithArray:(NSArray *)points inContext:(CGContextRef)ctx { CGFloat rectWidth = 4; CGContextSetFillColorWithColor(ctx, [UIColor greenColor].CGColor); for (NSValue *pointValue in points) { CGPoint point = pointValue.CGPointValue; CGContextFillRect(ctx, CGRectMake(point.x - rectWidth * 0.5, point.y - rectWidth * 0.5, rectWidth, rectWidth)); }}由于代码量有点多,我会详细的说明相关代码:
1. movedDistance这个值的分析如下图

2. 为了标记小球是在向左移动还是在向右移动,定义一个枚举来标示:
typedef enum { MovedDirectionLeft, MovedDirectionRight}MovedDirection;3. 后面的一系列代码就是来绘制相关点(A,B,C,D, C1~C8)
先看下面这张关于各个点位置分布介绍图:
仔细观察Demo中gif小球的运动,在运动过程中,线段AC1的长度始终是保持不变的,变化的只是B点和D点的位置。所以,在小球运动过程中,我们可以选择特殊的位置来计算AC1的大小,而这个特殊位置就是self.progress为0.5的时候,即小球处于圆形的时刻。
我们设置A点作为起始点,B点作为终止点,C1和C2作为定位点,然后利用贝塞尔曲线进行计算。关于详细的计算过程,见上图的分析。
4. 在计算得到所有点的坐标信息后,就可以绘制出小球及相关辅助线等信息了。
扩充,关于贝塞尔曲线的知识
Bézier curve(贝塞尔曲线)是应用于二维图形应用程序的数学曲线。 曲线定义:起始点、终止点(也称锚点)、控制点。通过调整控制点,贝塞尔曲线的形状会发生变化。 1962年,法国数学家Pierre Bézier第一个研究了这种矢量绘制曲线的方法,并给出了详细的计算公式,因此按照这样的公式绘制出来的曲线就用他的姓氏来命名,称为贝塞尔曲线。
以下公式中:B(t)为t时间下 点的坐标;
P0为起点,Pn为终点,Pi为控制点
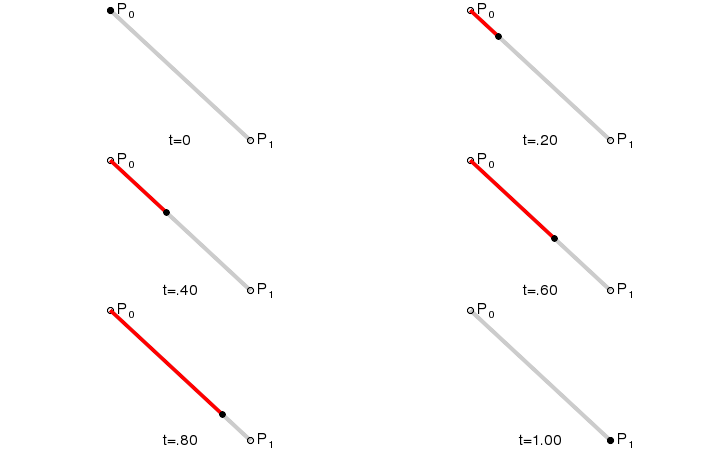
一阶贝塞尔曲线(线段):


意义:由 P0 至 P1 的连续点, 描述的一条线段
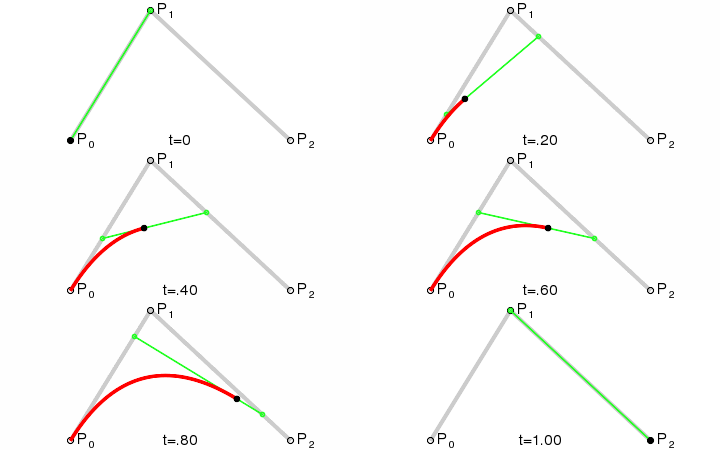
二阶贝塞尔曲线(抛物线):


原理:由 P0 至 P1 的连续点 Q0,描述一条线段。
由 P1 至 P2 的连续点 Q1,描述一条线段。
由 Q0 至 Q1 的连续点 B(t),描述一条二次贝塞尔曲线。
经验:P1-P0为曲线在P0处的切线。
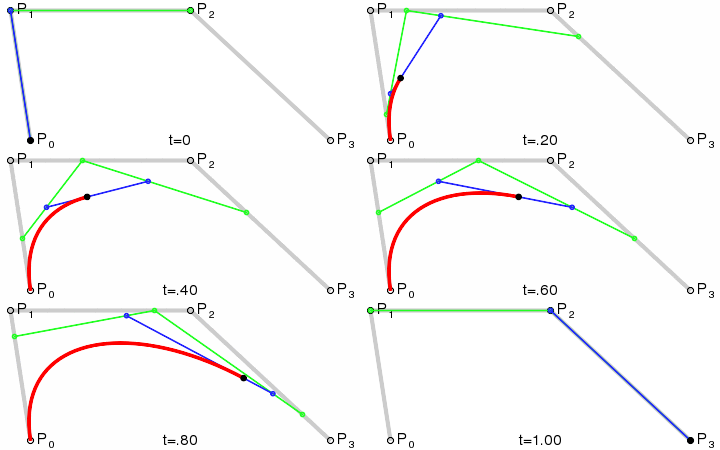
三阶贝塞尔曲线:


- 动画特效十七:粘性动画
- 动画特效十八:粘性动画2
- iOS粘性拖拽红点动画研究
- 粘性动画以及果冻效果
- 带有粘性动画的PageControl
- 动画特效三:搜索动画
- 动画特效五:灌水动画
- 动画特效七:碰撞动画
- 动画特效八:渐变动画
- 动画特效之动画组
- 动画特效之转场动画
- 粘性动画以及果冻效果的实现
- 属性动画(PropertyAnimation)好玩的粘性控件
- iOS核心动画 一一 QQ粘性效果
- jQuery 中的动画特效
- 动画特效框架
- jQuery制作动画特效
- activity 点击动画特效
- opencv实现图像细化效果
- iOS 从allCount个元素中取出myCount个元素的所有排列组合
- oracle11g 查看空表及数据库导出报“ EXP-00003: 未找到段 (0,0)
- [LeetCode]Wildcard Matching
- 第32讲 实践项目——输出小星星 1
- 动画特效十七:粘性动画
- Codeforces Round #327 (Div. 2) (B. Rebranding 字符串的操作)
- Window7中卸载Ubuntu系统
- sicily 1218. 纪念邮票
- C++基本知识(二)——vector与迭代器和数组与指针
- 文本文件读写
- hdoj 2151 Worm 【动态规划】
- 我的博客开始
- 矩阵的tr


