订制属于你自己的PreferenceActivity
来源:互联网 发布:c语言可视化游戏 编辑:程序博客网 时间:2024/04/28 18:04
当我们想给我们的应用给一个设置页面的时候,我第一反应就想到了PreferenceActivity,但我们小组的头说系统默认的PreferenceActivity不符合客户的需求,我不甘心,就开始自己在网上寻找资料,订制一个想要的PreferenceActivity页面。
功夫不负有心人,经过了2天的奋斗终于出了成果,也很感谢网上那些分享成果的哥们,他们让我受益良多。
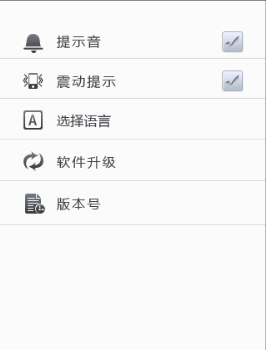
下面是我自己订制的PreferenceActivity的效果:
外面整个是一个PreferenceScreen,里面包裹了5个Preference,前两个是继承了CheckBoxPreference,第三个是继承了ListPreference,最后两个是继承了普通的Preference,不过为它们专门添加了点击事件。
背景是白色的,代码如下:
this.getListView().setBackgroundResource(R.drawable.preference_background);
因为PreferenceActivity其实是继承了ListActivity的,而它加载的整个View也是基于ListActivity中那个ListView的,所以直接设置就可以了,不过好像使用setBackgroundColor()这个方法没有效果,我也没搞明白,有大神帮忙解答一下。
我在下面是我在res/xml目录中资源文件的代码:
<?xmlversion="1.0"encoding="utf-8"?><!-- Copyright (C) 2008 ZXing authors Licensed under the Apache License, Version 2.0 (the "License"); you may not use this file except in compliance with the License. You may obtain a copy of the License at http://www.apache.org/licenses/LICENSE-2.0 Unless required by applicable law or agreed to in writing, software distributed under the License is distributed on an "AS IS" BASIS, WITHOUT WARRANTIES OR CONDITIONS OF ANY KIND, either express or implied. See the License for the specific language governing permissions and limitations under the License. --><PreferenceScreenxmlns:android="http://schemas.android.com/apk/res/android"></PreferenceScreen>private void initPreferenceScreen() { addPreferencesFromResource(R.xml.preferences); mPreferenceScreen = getPreferenceScreen(); mPreferenceScreen.setOrderingAsAdded(true); this.getListView().setBackgroundResource( R.drawable.preference_background); }什么?你还不懂或者担心每次启动APP的时候都会重新初始化,无法记录用户以前进行过的操作?
别担心,PreferenceActivity在每次退出后都会自动记录下当前页面的设置,下次启动时会自动加载。
下面开始说最关键的Preference.
由于时间问题,我就说说第一幅图的第四个Preference,我们要实现的功能是:点击它之后,到云端去检查版本更新。
首先,贴上楼主写的代码,继承了Preference,实现了点击事件和图片设置。
public class ImagePreference extendsPreference { privateImageView iv_perference_icon; privateint _id; privateOnClickListener mOnClickListener; publicImagePreference(Context context,intid) { super(context); this._id = id; setLayoutResource(R.layout.preference_list_item_layout); } @Override protectedvoid onBindView(View view) { super.onBindView(view); iv_perference_icon = (ImageView) view.findViewById(R.id.iv_perference_icon); iv_perference_icon.setImageResource(_id); view.setClickable(true); view.setOnClickListener(newOnClickListener() { @Override publicvoid onClick(View view) { if(mOnClickListener!=null) mOnClickListener.onClick(view); elsereturn; } }); } publicvoid setOnClickListener(OnClickListener mOnClickListener){ this.mOnClickListener = mOnClickListener; } }setLayoutResource(R.layout.preference_list_item_layout)
来制定该控件的布局文件,下面贴出楼主写的布局文件:
<?xmlversion="1.0"encoding="UTF-8"?><LinearLayoutxmlns:android="http://schemas.android.com/apk/res/android" android:layout_width="fill_parent" android:layout_height="wrap_content" android:background="@color/preference_background" android:gravity="center_vertical" android:minHeight="?android:listPreferredItemHeight" android:paddingRight="?android:scrollbarSize"> <RelativeLayout android:layout_width="wrap_content" android:layout_height="wrap_content" android:layout_marginBottom="1.0dip" android:layout_marginLeft="16.0dip" android:layout_marginRight="6.0dip" android:layout_marginTop="1.0dip" android:layout_weight="1.0"> <ImageView android:id="@+id/iv_perference_icon" android:layout_width="wrap_content" android:layout_height="wrap_content" android:layout_centerVertical="true" android:src="@drawable/ic_launcher"/> <TextView android:id="<a href="http://my.oschina.net/asia"target="_blank"rel="nofollow">@android</a> :id/title" android:layout_width="wrap_content" android:layout_height="wrap_content" android:layout_toRightOf="@id/iv_perference_icon" android:paddingLeft="15dp" android:ellipsize="marquee" android:layout_centerVertical="true" android:fadingEdge="horizontal" android:singleLine="true" android:textColor="@color/preference_title" android:textSize="18.0sp" /> <TextView android:id="<a href="http://my.oschina.net/asia"target="_blank"rel="nofollow">@android</a> :id/summary" android:layout_width="wrap_content" android:layout_height="wrap_content" android:layout_alignLeft="<ahref="http://my.oschina.net/asia"target="_blank"rel="nofollow">@android</a> :id/title" android:layout_below="<ahref="http://my.oschina.net/asia"target="_blank"rel="nofollow">@android</a> :id/title" android:paddingLeft="15dp" android:paddingTop="5dp" android:maxLines="4" android:textColor="@color/preference_summary" android:textSize="14.0sp" /> </RelativeLayout> <LinearLayout android:id="<a href="http://my.oschina.net/asia"target="_blank"rel="nofollow">@android</a> :id/widget_frame" android:layout_width="wrap_content" android:layout_height="fill_parent" android:gravity="center_vertical" android:orientation="vertical" /></LinearLayout>private void initImagePreference() { pre_update =new ImagePreference(this, R.drawable.preference_versionupdate); pre_update.setKey(Intents.KEY_UPDATE); pre_update.setTitle(R.string.preferences_update_title); pre_update.setOrder(4); pre_update.setOnClickListener(newOnClickListener() { @Override publicvoid onClick(View v) { // TODO Auto-generated method stub //You can do something here when somebady click this view. Toast.makeText(MoreActivity.this,"版本升级", 1).show(); } }); }privatevoid addAllPreference() { mPreferenceScreen.addPreference(pre_update);}
可能有人会问我,你怎么把PreferenceCategory隐藏掉的?
嗯,很简单,有两个方法:
1.为你写的PreferenceCategory添加自定义布局,懂了吧!这个可以是代码设置,也支持XML文件设置。
2.在使用代码动态添加Preference时,不添加PreferenceCategory就完事了,系统不会报错的。
好了,就写到这里吧,重点基本上都写到了。楼主现在在上班,被上级发现了是要扣工资的。
还有有什么不懂的可以和楼主站内交流,楼主有空就会回的。
欢迎转载啊,不过不要忽视作者的辛苦,请加上作者的链接http://my.oschina.net/freestyletime/blog/71544。
- 订制属于你自己的PreferenceActivity
- 订制属于你的Fiddler
- 打造属于你自己的BaseAdapter
- 用PHPdig打造属于你自己的Google
- Android->Toast 建立属于你自己的Toast
- 添加属于你自己的QQ UI
- 定制属于你自己的阴影效果
- Android定制属于你自己的导航栏
- Android定制属于你自己的导航栏
- Android定制属于你自己的导航栏
- Android定制属于你自己的导航栏
- 创建一个属于你自己的JavaScript库
- 打造属于你自己的Mac 机器人助手
- 定制属于你自己的阴影效果
- Android定制属于你自己的导航栏
- 构建一个属于你自己的镜像
- Android 建立属于你自己的Toast
- 如何创建属于你自己的域名邮箱
- 动态加载Animator和AnimatorController
- 文件解压缩
- hlist_head / hlist_node 设计浅析
- android图片处理方法(不断收集中)
- Android系统获取手机型号和系统版本号,以及其他配置信息
- 订制属于你自己的PreferenceActivity
- Android studio过滤Logcat中的信息解决方案。
- 逻辑电路 - 非门Inverter
- [Elasticsearch] 集群的工作原理 - 第一部分
- Mysql导出表结构及表数据 mysqldump用法
- 综合应用集成项目总结与心得
- java中instanceof用法
- 文件上传
- 关于IOS网络实时监听中reachability文件的问题


