Qt环境下利用OpenGL显示三维模型
来源:互联网 发布:java开源审批流源代码 编辑:程序博客网 时间:2024/06/07 00:46
这么详细的解释最适合我这种小白了,看来要去图书馆借C++ GUI Qt 4编程看看了。
Qt环境下利用OpenGL显示三维模型
最近在做一个利用Qt开发的小程序,其中一项功能是读取三维点云数据格式(如PLY、OBJ)数据,并利用OpenGL显示在程序窗口中。由于博主对OpenGL不太了解,只好参考相关的范例一步一步地进行开发。本文就是针对最基础的在Qt中使用OpenGL的相关知识进行一番梳理。
编程环境是Qt 5.3.2(MSVC 2010,32bit)with opengl。
以下代码部分参考了C++ GUI Qt 4编程(第二版)中第20章的范例,BTW,个人认为这本书对初学Qt的童鞋很有帮助。
首先是项目的建立,这里新建了一个Qt Widget Application,名叫Widget。并从QWidget基类继承,没有创建.ui文件。
创建了空的项目后,根据书中的实例添加了代码。另外在.pro文件中QT += opengl。
widget.h文件如下所示:
#ifndef WIDGET_H#define WIDGET_H#include <QGLWidget>class Widget : public QGLWidget{ Q_OBJECTpublic: Widget(QWidget *parent = 0); ~Widget();protected: void initializeGL(); void resizeGL(int width, int height); void paintGL(); void mousePressEvent(QMouseEvent *event); void mouseMoveEvent(QMouseEvent *event); void mouseDoubleClickEvent(QMouseEvent *event);private: void draw(); int faceAtPosition(const QPoint &pos); GLfloat rotationX; GLfloat rotationY; GLfloat rotationZ; QColor faceColors[4]; QPoint lastPos;};#endif // WIDGET_Hwidget.cpp如下:
#include "widget.h"#include <QMouseEvent>#include <QColorDialog>#include <GLU.h>Widget::Widget(QWidget *parent) : QGLWidget(parent){ setFormat(QGLFormat(QGL::DoubleBuffer | QGL::DepthBuffer)); rotationX = -21.0; rotationY = -57.0; rotationZ = -0.0; faceColors[0] = Qt::red; faceColors[1] = Qt::green; faceColors[2] = Qt::blue; faceColors[3] = Qt::yellow;}Widget::~Widget(){}void Widget::initializeGL(){ qglClearColor(Qt::black); glShadeModel(GL_FLAT); glEnable(GL_DEPTH_TEST); glEnable(GL_CULL_FACE);}void Widget::resizeGL(int width, int height){ glViewport(0,0,width,height); glMatrixMode(GL_PROJECTION); glLoadIdentity(); GLfloat x = GLfloat(width) / height; glFrustum(-x,+x,-1.0,+1.0,4.0,15.0); glMatrixMode(GL_MODELVIEW);}void Widget::paintGL(){ glClear(GL_COLOR_BUFFER_BIT | GL_DEPTH_BUFFER_BIT); draw();}void Widget::draw(){ static const GLfloat P1[3] = {0.0, -1.0, +2.0}; static const GLfloat P2[3] = {+1.73205081, -1.0, -1.0}; static const GLfloat P3[3] = {-1.73205081, -1.0, -1.0}; static const GLfloat P4[3] = {0.0, 2.0, 0.0}; static const GLfloat *const coords[4][3] = { {P1, P2, P3}, {P1, P3, P4}, {P1, P4, P2}, {P2, P4, P3} }; glMatrixMode(GL_MODELVIEW); glLoadIdentity(); glTranslatef(0.0, 0.0, -10.0); glRotatef(rotationX, 1.0, 0.0, 0.0); glRotatef(rotationY, 0.0, 1.0, 0.0); glRotatef(rotationZ, 0.0, 0.0, 1.0); for(int i = 0; i < 4; ++i) { glLoadName(i); glBegin(GL_TRIANGLES); qglColor(faceColors[i]); for(int j = 0; j <3; ++j) { glVertex3f(coords[i][j][0], coords[i][j][1], coords[i][j][2]); } glEnd(); }}void Widget::mousePressEvent(QMouseEvent *event){ lastPos = event->pos();}void Widget::mouseMoveEvent(QMouseEvent *event){ GLfloat dx = GLfloat(event->x() - lastPos.x()) / width(); GLfloat dy = GLfloat(event->y() - lastPos.y()) / height(); if(event->buttons() & Qt::LeftButton){ rotationX -= 180 * dy; rotationY -= 180 * dx; updateGL(); } else if(event->buttons() & Qt::RightButton){ rotationX -= 180 * dy; rotationZ -= 180 * dx; updateGL(); } lastPos = event->pos();}void Widget::mouseDoubleClickEvent(QMouseEvent *event){ int face = faceAtPosition(event->pos()); if(face != -1){ QColor color = QColorDialog::getColor(faceColors[face], this); if(color.isValid()){ faceColors[face] = color; updateGL(); } }}int Widget::faceAtPosition(const QPoint &pos){ const int MaxSize = 512; GLuint buffer[MaxSize]; GLint viewport[4]; makeCurrent(); glGetIntegerv(GL_VIEWPORT, viewport); glSelectBuffer(MaxSize, buffer); glRenderMode(GL_SELECT); glInitNames(); glPushName(0); glMatrixMode(GL_PROJECTION); glPushMatrix(); glLoadIdentity(); gluPickMatrix(GLdouble(pos.x()), GLdouble(viewport[3] - pos.y()), 5.0, 5.0, viewport); GLfloat x = GLfloat(width()) / height(); glFrustum(-x, x, -1.0, 1.0, 4.0, 15.0); draw(); glMatrixMode(GL_PROJECTION); glPopMatrix(); if(!glRenderMode(GL_RENDER)) return -1; return buffer[3];}#include "widget.h"#include <QApplication>int main(int argc, char *argv[]){ QApplication a(argc, argv); Widget w; w.resize(300,300); w.show(); return a.exec();}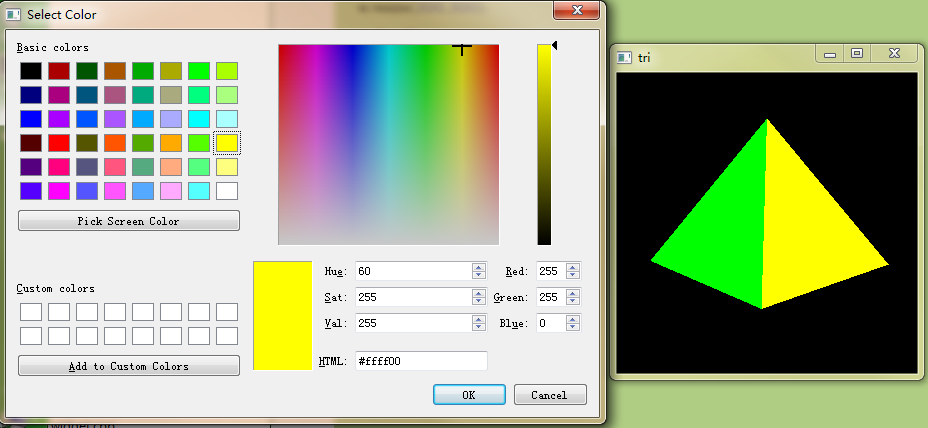
程序分析:
一、窗口坐标系,分析认为图示窗口水平向右为X轴正向,窗口竖直向下为Y轴正向,指向窗口内部为Z轴正向,从draw()函数中P1~P4点的坐标可知,另外在面的描述中每个三角形三个角点的顺序都是顺时针(面向该面),没记错的话这样才能表示面的外表面。
static const GLfloat P1[3] = {0.0, -1.0, +2.0}; static const GLfloat P2[3] = {+1.73205081, -1.0, -1.0}; static const GLfloat P3[3] = {-1.73205081, -1.0, -1.0}; static const GLfloat P4[3] = {0.0, 2, 0.0}; static const GLfloat *const coords[4][3] = {{P1, P2, P3}, {P1, P3, P4}, {P1, P4, P2}, {P2, P4, P3}};二、为加载这个四面体,程序中采用了如下函数:
for(int i = 0; i < 4; ++i) { glLoadName(i); glBegin(GL_TRIANGLES); qglColor(faceColors[i]); for(int j = 0; j <3; ++j) { glVertex3f(coords[i][j][0], coords[i][j][1], coords[i][j][2]); } glEnd(); }glVertex3f的函数原型是:void glVertex3f(GLfloat x,GLfloat y,GLfloat z);这里x,y,z分别对应coords[i][j][0], coords[i][j][1], coords[i][j][2],例如i=0,j=0时就是P1点坐标(coords[0][0][0], coords[0][0][1], coords[0][0][2]),然后j++,取到P2,再j++,取到P3,从而构成一个面,面的颜色采用faceColor[0]。之后i++,j又从0开始递增,继续取到P1,P3,P4……以此类推。由此可见,coords中点的排序是有规律的。
三、改变面的颜色。这一功能主要是通过int Widget::faceAtPosition(const QPoint &pos)函数实现的。在鼠标双击后,将鼠标指针所在位置传递给该函数,在声明了一些变量后,函数执行了如下语句:
glGetIntegerv(GL_VIEWPORT, viewport);然后是:
glSelectBuffer(MaxSize, buffer);glSelectBuffer的作用是为选择模式值建立一个缓冲区,MaxSize为缓冲区大小,buffer返回选择数据。
glRenderMode(GL_SELECT);glInitNames();//初始化名称堆栈glPushName(0);//将名称0推入栈顶glMatrixMode(GL_PROJECTION);//将之后的矩阵操作应用到投影矩阵堆栈glPushMatrix();glLoadIdentity();gluPickMatrix(GLdouble(pos.x()), GLdouble(viewport[3] - pos.y()), 5.0, 5.0, viewport);其中x表示选择区域在窗口中的x坐标,在这里就是pos.x(),而需要注意的是选择区域y坐标为viewport[3] - pos.y(),height和width表示选择区域长宽,这里取5像素,实际验证表明,即使鼠标指针不在三角面上,但5X5像素的选择区域与面有交集,则也能选中该面。
GLfloat x = GLfloat(width()) / height();//求窗口横纵比glFrustum(-x, x, -1.0, 1.0, 4.0, 15.0);- Qt环境下利用OpenGL显示三维模型
- Qt环境下利用OpenGL显示三维模型
- python+opengl显示三维模型小程序
- VC2005下利用OpenGL实现三维绘图
- OpenGL导入三维模型
- Qt OpenGL三维绘图
- 使用OpenGL和OpenCV分别显示三维模型和图像
- qt环境下学习OpenGL
- qt环境下使用OpenGL
- OpenGL显示三维汉字
- OpenGL三维坐标显示
- Qt下学习OpenGL之OBJ模型
- Qt下学习OpenGL之OBJ模型
- OpenGL 三维模型的导入
- IOS显示三维模型
- 利用OpenGL实现三维绘图
- 利用OpenGL实现三维绘图
- 利用颜色表进行图像预处理1:OpenGl显示三维颜色表
- 基于java中泛型的总结分析
- 作为新手接触安卓遇到的问题~~还没完成~~~
- jquery $.proxy使用
- 活动生命周期
- LightOJ 1021 Painful Base(状压DP)
- Qt环境下利用OpenGL显示三维模型
- Xcode 中 NSAssert() 的用法
- SQLite忽略大小写。
- Dubbo与Zookeeper、SpringMVC整合和使用(负载均衡、容错)
- 猫猫学iOS之去除服务器返回数据中的html标签,去除指定字符串,替换字符串
- UUID详解
- [python&php 网络编程]格式化IPv4地址
- 如何看懂ORACLE执行计划
- 第一章 Web MVC简介