OWA或Messenger样式的信息提示窗口(下)使用该控件
来源:互联网 发布:淘宝主图尺寸 编辑:程序博客网 时间:2024/05/22 10:32
在前面两篇(OWA或Messenger样式的信息提示窗口——编写ASP.NET AJAX Extender控件(上):客户端Behavior和OWA或Messenger样式的信息提示窗口——编写ASP.NET AJAX Extender控件(中):封装成服务器端控件)中,我们创建了自己的ASP.NET AJAX Extender控件,这一篇将介绍如何在实际项目中使用该控件。
关于该控件的详细功能、实际运行时的界面效果以及详细属性列表,请参考我的ASP.NET AJAX控件——PopupNotificationExtender:实现OWA或Messenger样式的信息提示窗口这篇文章。不过代码下载和示例程序请看本文接下来的介绍,上文中的内容已经过时。
预先需求
本控件基于ASP.NET AJAX开发,且继承于ASP.NET AJAX Control Toolkit中的AlwaysVisibleControlExtender。所以若要在程序中使用该控件,则必须配置好ASP.NET AJAX并添加好ASP.NET AJAX Control Toolkit程序集的引用(请参考《拥抱变化——从Atlas到ASP.NET AJAX(1):下载安装总览》)。
添加PopupNotificationExtender的引用
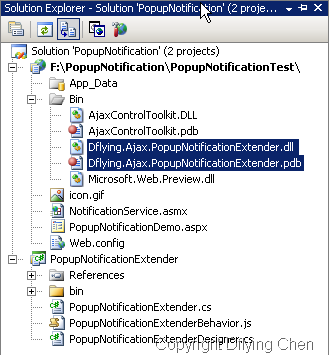
然后将控件的DLL(Dflying.Ajax.PopupNotificationExtender.zip)解压缩至Web站点的bin目录下,添加好对该DLL的引用。
注册控件前缀
在需要使用的页面头部添上如下注册代码:
<%@ Register Assembly="Dflying.Ajax.PopupNotificationExtender" Namespace="Dflying.Ajax"
TagPrefix="dflying" %>
添加ScriptManager
当然,页面中还需要一个ScriptManager控件:
<asp:ScriptManager ID="ScriptManager1" runat="server" />
编写将要弹出的提示窗口
然后定义一个Panel,用来表示提示窗口,当然其中布局样式朋友们可以随心所欲地改变:
<asp:Panel ID="thePanel" CssClass="panel" runat="server">
<div style="border: 1px solid black; height: 98px;">
<div style="padding: 3px; background-color: Silver;">
<strong>New Messages:</strong>
</div>
<img src="icon.gif" style="float: left; display: block; margin: 3px;" />
<div id="result" style="padding: 3px; margin-left: 40px;" />
</div>
</asp:Panel>
注意:该Panel中还包含了一个id为result的HTML <div>标签。注意这个<div>,等会服务器端返回的消息将填充到该<div>中。
该Panel应用的CSS Class为panel,定义如下:(注意不可以定义border、margin、padding三个属性,如果需要,可以在内部标签<div>中使用)
.panel
{font-size: 80%;
background-color: white;
width: 200px;
height: 100px;
overflow: hidden;
}
添加PopupNotificationExtender控件
然后是PopupNotificationExtender控件的代码:
<dflying:PopupNotificationExtender ID="pne" TargetControlID="thePanel" runat="server"
VerticalSide="Bottom" HorizontalSide="Right" HorizontalOffset="20" VerticalOffset="20"
ServicePath="NotificationService.asmx" ServiceMethod="GetNotification" QueryServiceInterval="6000"
ResultLabelID="result" />
其中:
- HorizontalSide和VerticalSide指定提示窗口将在页面的右下角弹出。
- HorizontalOffset和VerticalOffset指定了弹出窗口离浏览边框的距离。
- ServicePath和ServiceMethod指定了服务器端查询新消息用的Web Service以及其中定义的Web Method。
- QueryServiceInterval指定了每隔6000毫秒(6秒钟)查询一次服务器,这里仅仅用来演示,通常我们不应该这样频繁地进行查询。
- ResultLabelID指定了用来显示服务器端的新消息的客户端HTML元素的id,这里就是上面我们定义的id为result的<div>。
编写服务器端Web Service
再看看服务器端Web Service的代码:
using System;using System.Web;using System.Web.Services;using System.Web.Services.Protocols;[WebService(Namespace = "http://tempuri.org/")][WebServiceBinding(ConformsTo = WsiProfiles.BasicProfile1_1)]
[System.Web.Script.Services.ScriptService()]
public class NotificationService : System.Web.Services.WebService {
private static int m_count = 0;
[WebMethod]
public string GetNotification()
{ if (checkNewMessage()) { // return the HTML message content.return string.Format("<a href=/"#/">You've received a new message #{0}.</a>", m_count++);
}
else { // if there's no new meesage, just return an empty string.return string.Empty;
}
}
private bool checkNewMessage()
{ // TODO: whatever you want to check if there's a message.return true;
}
}
很简单不多说了,GetNotification()方法没有任何传入参数,在该方法中,我们可以随便用什么方法看看是否有新的消息需要传递给客户端。如果有的话,那么返回代表该消息的HTML字符串,如果没有,则返回空字符串即可。之后客户端如果收到的是一个非空字符串,则将弹出窗口显示出来,如果受到空字符串,那么不会显示任何东西。
程序运行界面就和本文开始的两幅图像一样,你也可以下载完整的源文件(代码+示例程序,PopupNotification.zip)亲自体验一下。
运行时的程序界面
请参考我的ASP.NET AJAX控件——PopupNotificationExtender:实现OWA或Messenger样式的信息提示窗口这篇文章。
代码下载
完整的源文件+示例程序:PopupNotification.zip
PopupNotificationExtender编译好的程序集:Dflying.Ajax.PopupNotificationExtender.zip。
随便再说两句
实际上,这个Extender所做的事情就是在服务期端封装了ASP.NET AJAX客户端的行为(Behavior)组件,整个控件开发过程中的大头部分仍然是那个JavaScript文件。之所以要这样封装,是为了方便熟悉ASP.NET服务器端开发模型的程序员使用,并提高组件的可重用性。
查看页面的源文件,可以看到在源文件的末尾部分有如下几行(为清晰起见,代码经过格式化):
<script type="text/javascript"><!--
Sys.Application.initialize();
Sys.Application.add_init(
function() {$create(Dflying.Ajax.PopupNotificationBehavior,
{ "HorizontalOffset":20, "HorizontalSide":2, "QueryServiceInterval":6000,"ResultLabelID":"result",
"ServiceMethod":"GetNotification",
"ServicePath":"NotificationService.asmx",
"VerticalOffset":20, "VerticalSide":2,"id":"pne"
},
null, null, $get("thePanel"));
}
);
// --></script>
这也正是ASP.NET AJAX客户端的行为的声明方法。
ASP.NET AJAX的客户端部分设计极为巧妙,非常值得我们去仔细研究。
备注:本文引用自http://www.cnblogs.com/dflying/archive/2007/03/07/667448.html
- OWA或Messenger样式的信息提示窗口(下)使用该控件
- OWA或Messenger样式的信息提示窗口(中)服务器端控件
- OWA或Messenger样式的信息提示窗口(上)客户端
- 我的ASP.NET AJAX控件——PopupNotificationExtender:实现OWA或Messenger样式的信息提示窗口
- 我的ASP.NET AJAX控件——PopupNotificationExtender:实现OWA或Messenger样式的信息提示窗口
- 我的ASP.NET AJAX控件——PopupNotificationExtender:实现OWA或Messenger样式的信息提示窗口
- OWA或Messenger样式的信息提示窗口——编写ASP.NET AJAX Extender控件(中):封装成服务器端控件
- 样式 提示错误或其他信息
- 使用ajax控件时的提示信息
- ubuntu 下修改zend stuido 提示信息的样式
- ASP.NET 仿MSN Messenger Alert的弹出窗口控件
- ASP.NET 仿MSN Messenger Alert的弹出窗口控件
- 【转】使用ASP.NET或HTML时,浏览器(如IE7)提示“此网站使用脚本窗口向您索取信息”解决办法
- 使用jq弹出提示窗口信息
- 使用CLASS属性或CSSCLASS属性来定义文本或控件显示的样式表
- 登陆域时提示:指定域的名称或安全标识SID与该域的信任信息不一致
- 'cmd'下提示"该命令不是内部或外部命令"
- ASP.NET AJAX控件实现信息提示窗口
- ASP.NET 2.0中直接将Access数据库导入到Excel文件中
- 一次编辑 GridView 的所有行
- 自动填充固定行数的 GridView
- GridView 实现服务器端和客户端全选的两种方法
- ASP.NET 2.0 遍历配置文件的数据库连接字符串
- OWA或Messenger样式的信息提示窗口(下)使用该控件
- 在ASP.NET 2.0中直接得到本页面生成的HTML代码
- 创建表头固定,表体可滚动的GridView
- Visual Studio 2005 Web Deployment Projects版本不同引发的问题
- ASP.NET 2.0中GridView无限层复杂表头的实现
- 解决打开CHM格式文件出现“网页不能浏览”错误的方法
- ASP.NET 2.0中合并 GridView 的表头单元格
- 网络编程--WININET 选择自 byxdaz 的 Blog
- ASP.NET 2.0中TextBox服务器控件的ReadOnly和Disabled属性